Advertisement
Quick Links
Build Instructions
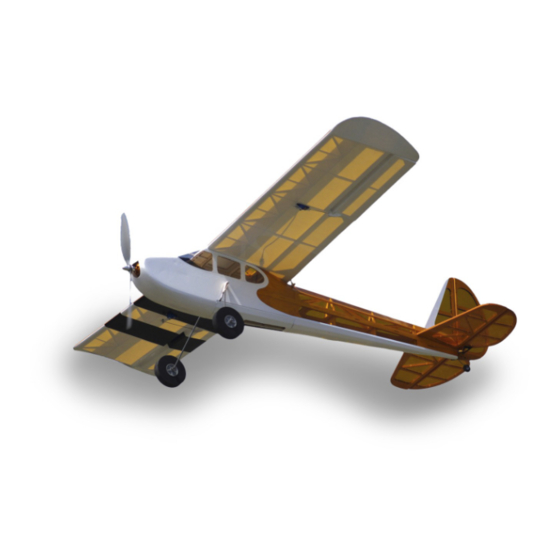
FullHouse 500
Electric Aileron Trainer Kit
Wing Span: 50 inches | Wing Area: 455 square inches | Average Flying Weight: 26 ounces
Build Instructions - Version 1.0 (revised 04.15.2014)
FullHouse™ 500 Build Instructions. © 2012 Stevens AeroModel. All rights reserved.!
Page 1
Advertisement

Related Manuals for Stevens AeroModel Build It! FullHouse 500


Summary of Contents for Stevens AeroModel Build It! FullHouse 500
- Page 1 Electric Aileron Trainer Kit Wing Span: 50 inches | Wing Area: 455 square inches | Average Flying Weight: 26 ounces Build Instructions - Version 1.0 (revised 04.15.2014) FullHouse™ 500 Build Instructions. © 2012 Stevens AeroModel. All rights reserved.! Page 1...
-
Page 2: Warranty
Build Instructions WARRANTY Stevens AeroModel guarantees this kit to be free from defects in both material and workmanship at the date of purchase. This warranty does not cover any component parts damaged by use or modification. In no case shall Stevens AeroModel’s liability exceed the original cost of the purchased kit. Further, Stevens AeroModel reserves the right to change or modify this warranty without notice. - Page 3 4 - 3/8 in. 4-40 Pan Head Screws 3007 4 - White Nylon Washers 3018 4 - Du-Bro RC 849 Micro E/Z Links 4017 4 - Neo. Magnets 1/16 x 3/16 in. diameter 4014 FullHouse™ 500 Build Instructions. © 2012 Stevens AeroModel. All rights reserved.! Page 3...
- Page 4 AeroLITE is 1/3 the weight of the typical model airplane covering film and will represent a weight savings of 2 oz. when applied to this model. ☐ 2 - Rolls (2M) AeroLITE or AeroFILM ☐ 1 - Roll (1M) AeroTRIM FullHouse™ 500 Build Instructions. © 2012 Stevens AeroModel. All rights reserved.! Page 4...
- Page 5 Build Instructions Sheet Wood Inventory (Wing 1 of 2) FullHouse™ 500 Build Instructions. © 2012 Stevens AeroModel. All rights reserved.! Page 5...
- Page 6 Build Instructions Sheet Wood Inventory (Wing 2 of 2) FullHouse™ 500 Build Instructions. © 2012 Stevens AeroModel. All rights reserved.! Page 6...
- Page 7 Build Instructions Sheet Wood Inventory (Fuselage 1 of 3) FullHouse™ 500 Build Instructions. © 2012 Stevens AeroModel. All rights reserved.! Page 7...
- Page 8 Build Instructions Sheet Wood Inventory (Fuselage 2 of 3) FullHouse™ 500 Build Instructions. © 2012 Stevens AeroModel. All rights reserved.! Page 8...
- Page 9 Build Instructions Sheet Wood Inventory (Fuselage 3 of 3) FullHouse™ 500 Build Instructions. © 2012 Stevens AeroModel. All rights reserved.! Page 9...
- Page 10 Build Instructions Builders Notes FullHouse™ 500 Build Instructions. © 2012 Stevens AeroModel. All rights reserved.! Page 10...
- Page 11 Build Instructions General Assembly Instructions Thank you, for purchasing this Stevens AeroModel FullHouse™ 500. This product has been developed and manufactured using state of the art CAD/CAM systems and features a unique interlocking construction process that, when compared to traditional methods found in other model aircraft kits, save countless hours of measuring, cutting, sanding, and fitting.
- Page 12 F11 to formers F3, F4, F5, and the central crutch side rail F2. Do not bond the fuselage side F11 to formers F6 and F7 at this time. FullHouse™ 500 Build Instructions. © 2012 Stevens AeroModel. All rights reserved.! Page 12...
- Page 13 Build Instructions Step 5 Step 1 Step 2 Step 6 Step 3 Step 7 F11a F11c F11b Repeat for F12 Do Not Glue Step 4 Step 8 FullHouse™ 500 Build Instructions. © 2012 Stevens AeroModel. All rights reserved.! Page 13...
- Page 14 Only use F21 as a jig to assist in squaring your formers, after bonding the diagonal braces, immediately remove F21 and set part aside until it’s once again called for in step 21 of this manual. FullHouse™ 500 Build Instructions. © 2012 Stevens AeroModel. All rights reserved.! Page 14...
- Page 15 F6 F7 Step 9 Step 13 Step 10 Step 14 F15a F15b Step 11 Step 15 F16b F16a F14/15/16a DO NOT BOND F14/15/16b Step 12 Step 16 FullHouse™ 500 Build Instructions. © 2012 Stevens AeroModel. All rights reserved.! Page 15...
- Page 16 Wick a little thin CA around the edges to bond the doubler to the fuselage crutch and former F3. Repeat this process to install doubler F24 against the inside of the opposite fuselage side. FullHouse™ 500 Build Instructions. © 2012 Stevens AeroModel. All rights reserved.! Page 16...
- Page 17 Build Instructions This Gap OK! Step 17 Step 20 Step 17 Step 21 Step 18 Step 22 Scrap Step 23 Step 19 FullHouse™ 500 Build Instructions. © 2012 Stevens AeroModel. All rights reserved.! Page 17...
- Page 18 Otherwise we suggest using a slow set aliphatic wood glue (carpenters glue) or white glue to bond these parts together giving adequate time to align parts and remove the dowel. FullHouse™ 500 Build Instructions. © 2012 Stevens AeroModel. All rights reserved.! Page 18...
- Page 19 3/16 sq. stringer F29a F29b F29c Step 25 Step 29 3/16 in. dowel Do not bond this dowel 3/16 sq. stringer within assembly! Step 26 Step 30 FullHouse™ 500 Build Instructions. © 2012 Stevens AeroModel. All rights reserved.! Page 19...
- Page 20 Fit former F34 first to the slots in the central crutch immediately below former F7, then to □ the tabs in the end of F33. Tack glue F34 to the central crutch and F33. FullHouse™ 500 Build Instructions. © 2012 Stevens AeroModel. All rights reserved.! Page 20...
- Page 21 Build Instructions LEFT Step 31 Step 35 3/16 sq. stringer Step 32 Step 36 Sand / Taper Invert Fuselage Step 33 Step 37 Step 38 Step 34 FullHouse™ 500 Build Instructions. © 2012 Stevens AeroModel. All rights reserved.! Page 21...
- Page 22 □ Repeat the procedure in step 45 to install the other hatch doubler F45 to the inside face of the opposite fuselage side. FullHouse™ 500 Build Instructions. © 2012 Stevens AeroModel. All rights reserved.! Page 22...
-
Page 23: Bottom View
Build Instructions Step 39 Step 43 Bottom View Step 40 Step 43 Cont. Step 41 Step 44 Step 45 Step 42 FullHouse™ 500 Build Instructions. © 2012 Stevens AeroModel. All rights reserved.! Page 23... - Page 24 Allow the aft end of the stringers to lie against the keel, but DO NOT BOND them to the keel at this time. They will be bonded in a later step. FullHouse™ 500 Build Instructions. © 2012 Stevens AeroModel. All rights reserved.! Page 24...
- Page 25 Step 46 Step 50 2-1/8 in. Rear Gear Block Step 47 Step 50 Cont. Fuselage Stringer Step 48 Step 51 Do Not Bond! Step 49 Step 51 Cont. FullHouse™ 500 Build Instructions. © 2012 Stevens AeroModel. All rights reserved.! Page 25...
- Page 26 Locate the ply parts F49a and F49b. Fit the tabs of F49a into the slots in F49b, thus □ □ creating the rear Hatch Catch. Bond with medium CA. FullHouse™ 500 Build Instructions. © 2012 Stevens AeroModel. All rights reserved.! Page 26...
- Page 27 Step 52 Cont. Step 55 Fuselage Stringers Repeat for F50a F50b Step 53 Step 56 Fuselage Stringers Repeat for F50 Terminate forward of Step 53 Cont. Step 56 Cont. FullHouse™ 500 Build Instructions. © 2012 Stevens AeroModel. All rights reserved.! Page 27...
- Page 28 Build up a thin fillet of medium CA glue along the edges of the motor mount and doublers - front and back. FullHouse™ 500 Build Instructions. © 2012 Stevens AeroModel. All rights reserved.! Page 28...
- Page 29 Build Instructions Bottom View Neo-Magnet Step 57 Step 60 Bottom View Step 61 Step 58 Bottom View Step 59 Step 62 Bottom View Step 59 Cont. Step 63 FullHouse™ 500 Build Instructions. © 2012 Stevens AeroModel. All rights reserved.! Page 29...
- Page 30 (about 3/4 inch forward of the cockpit). FullHouse™ 500 Build Instructions. © 2012 Stevens AeroModel. All rights reserved.! Page 30...
- Page 31 Build Instructions Step 68 Step 64 Step 65 Step 68 Cont. Step 69 Step 66 Step 67 Step 70 F58a Sharp F58b Round F58c FullHouse™ 500 Build Instructions. © 2012 Stevens AeroModel. All rights reserved.! Page 31...
- Page 32 H5, as indicated by the arrow. □ Fit and tack glue 1/16 in. ply magnet mount plate H7 square to to the aft end of the keel H5. FullHouse™ 500 Build Instructions. © 2012 Stevens AeroModel. All rights reserved.! Page 32...
- Page 33 Build Instructions Step 71 Step 74 Front CROSS HOUSING Step 75 Step 71 Cont. Step 72 Step 76 Front Step 77 Step 73 FullHouse™ 500 Build Instructions. © 2012 Stevens AeroModel. All rights reserved.! Page 33...
- Page 34 H5. The straight edge should rest over former H3, with the concave edge pointing aft. Bond with thin CA. FullHouse™ 500 Build Instructions. © 2012 Stevens AeroModel. All rights reserved.! Page 34...
- Page 35 Build Instructions Step 78 Step 81 Cont. Neo-Magnet Neo-Magnet Step 79 Step 82 Hatch Stringers Step 80 Step 83 Step 84 Step 81 FullHouse™ 500 Build Instructions. © 2012 Stevens AeroModel. All rights reserved.! Page 35...
-
Page 36: Tail Surfaces
“Front View” of the diagram provided on the “Detail Sheet 1 of 2”, and make the third 45 degree bend “C”. □ □ Working from the same position, make the next 45 degree bend “D” over the diagram. FullHouse™ 500 Build Instructions. © 2012 Stevens AeroModel. All rights reserved.! Page 36... - Page 37 Build Instructions Step 85 Step 89 Step 90 Step 86 Step 91 Step 87 Step 92 Step 88 FullHouse™ 500 Build Instructions. © 2012 Stevens AeroModel. All rights reserved.! Page 37...
- Page 38 100. Follow the procedure in “Step 99” as above, using two each of the parts E1, E2, E3, E4, E5, □ and E6 to build both a right and left Elevator halve over the plan provided on “Detail Sheet 2 of 2”. FullHouse™ 500 Build Instructions. © 2012 Stevens AeroModel. All rights reserved.! Page 38...
- Page 39 Step 98 LEFT Step 94 Step 99 Horn used for alignment DO NOT BOND! LEFT Step 95 Make a Right and Left Step 96 Step 100 LEFT FullHouse™ 500 Build Instructions. © 2012 Stevens AeroModel. All rights reserved.! Page 39...
- Page 40 107. Dry fit rib W4 to the next full depth slots in spars W1 and W2 out from rib W3. 108. Dry fit rib W5 to the next full depth slots in spars W1 and W2 out from rib W4. □ □ FullHouse™ 500 Build Instructions. © 2012 Stevens AeroModel. All rights reserved.! Page 40...
- Page 41 Build Instructions Step 101 Step 105 Step 102 Step 106 W1c on the BACK of spar W1. Step 103 Step 107 Step 104 Step 108 Back of Spar FullHouse™ 500 Build Instructions. © 2012 Stevens AeroModel. All rights reserved.! Page 41...
- Page 42 □ □ and W5. 116. Fit and tack glue the sub-rib W13 to the front spar and leading edge web, between ribs W5 □ □ and W6. FullHouse™ 500 Build Instructions. © 2012 Stevens AeroModel. All rights reserved.! Page 42...
- Page 43 Build Instructions Step 113 Step 109 Step 110 Step 114 Step 111 Step 115 Step 112 Step 116 FullHouse™ 500 Build Instructions. © 2012 Stevens AeroModel. All rights reserved.! Page 43...
- Page 44 124. Continue holding the center section flat. Fit and bond the center section leading edge on □ top of the center section leading edge web W26, the front of ribs W3, and between the leading edge parts W15. FullHouse™ 500 Build Instructions. © 2012 Stevens AeroModel. All rights reserved.! Page 44...
- Page 45 Build Instructions DO NOT BOND HERE Step 117 Step 121 Step 118 Step 122 Step 119 Step 123 Step 120 Step 124 FullHouse™ 500 Build Instructions. © 2012 Stevens AeroModel. All rights reserved.! Page 45...
- Page 46 Remove W34 and coat one side with thick CA then re-fit to the trailing edge, spanning the center section and trailing edge parts W8. FullHouse™ 500 Build Instructions. © 2012 Stevens AeroModel. All rights reserved.! Page 46...
- Page 47 Right (R) W28b(R) W28(L) W28c(R) Left (L) Step 125 Step 129 Step 126 LEFT W28(L) Step 130 Step 127 W28(L) Step 131 LEFT Step 128 Step 132 FullHouse™ 500 Build Instructions. © 2012 Stevens AeroModel. All rights reserved.! Page 47...
- Page 48 A1. Tack glue with Medium CA. □ □ 140. Dry fit rib A3 to the center slot in A1 matching the general orientation of the previously installed part A2. FullHouse™ 500 Build Instructions. © 2012 Stevens AeroModel. All rights reserved.! Page 48...
- Page 49 Build Instructions Bottom View Step 133 Step 137 Bottom View Step 134 Step 138 Left Aileron Step 139 Bottom View Step 135 W28(L) Step 136 Step 140 FullHouse™ 500 Build Instructions. © 2012 Stevens AeroModel. All rights reserved.! Page 49...
-
Page 50: Final Assembly
□ AeroModel AeroFILM or AeroLITE. 148. After covering the hatch, open the cooling vents in the bottom with a sharp hobby knife or □ warm soldering iron. FullHouse™ 500 Build Instructions. © 2012 Stevens AeroModel. All rights reserved.! Page 50... - Page 51 Build Instructions Step 145 Step 141 Step 142 Step 146 Step 143 Step 147 Step 144 Vents Step 148 FullHouse™ 500 Build Instructions. © 2012 Stevens AeroModel. All rights reserved.! Page 51...
- Page 52 Note: Absolutely do not allow CA glue to come into contact with the motor windings or it could short and ruin your motor. FullHouse™ 500 Build Instructions. © 2012 Stevens AeroModel. All rights reserved.! Page 52...
- Page 53 Step 154 Open Hole 2 in. Dowel Step 150 30A ESC BL450 Motor (2217-9) Step 151 Step 155 Step 156 Two Each Step 152 3-3/4 in. Dowel FullHouse™ 500 Build Instructions. © 2012 Stevens AeroModel. All rights reserved.! Page 53...
- Page 54 Slide the pushrods through until the bent ends are even with the rear of the fuselage. Trim off the excess wire about an inch beyond the servo arms, and snug down the screws on the E/Z Connectors. FullHouse™ 500 Build Instructions. © 2012 Stevens AeroModel. All rights reserved.! Page 54...
-
Page 55: Bottom View
Step 161 Step 158 Step 162 3/16 in. Drill 1/16 in. 1/32 Wire Pushrod Step 159 Step 163 Step 160 Bottom View Mini E/Z Connector DUB845 Step 164 FullHouse™ 500 Build Instructions. © 2012 Stevens AeroModel. All rights reserved.! Page 55... - Page 56 172. With a warm soldering iron, open the holes over the Rudder for mounting the Rudder □ □ Control Horn. Mount the Rudder Control Horn to the RIGHT side of the Rudder. FullHouse™ 500 Build Instructions. © 2012 Stevens AeroModel. All rights reserved.! Page 56...
- Page 57 3 in. Lite Wheels Step 166 Step 170 DAV5530 Wheel Collar DUB139 Wheel Collar DUB139 Step 171 OPEN #32 Rubber Band Step 167 Acetate Windscreen Step 172 RIGHT Step 168 FullHouse™ 500 Build Instructions. © 2012 Stevens AeroModel. All rights reserved.! Page 57...
- Page 58 CA around the base of the horn. 180. Open the covering over the servo pockets with a sharp hobby knife or warm soldering iron. □ FullHouse™ 500 Build Instructions. © 2012 Stevens AeroModel. All rights reserved.! Page 58...
- Page 59 Step 178 Tape Hinge LEFT Control Horn Step 175 Bottom View Washer Step 179 3/4 in. Tail Wheel Step 176 Square Aileron Servo Pocket Step 180 Bottom View FullHouse™ 500 Build Instructions. © 2012 Stevens AeroModel. All rights reserved.! Page 59...
- Page 60 188. Feed the “Y” connector lead down through the fuselage into the radio compartment, and □ mount the wing on the model using four (4) of the supplied XL rubber bands [HBZ127]. FullHouse™ 500 Build Instructions. © 2012 Stevens AeroModel. All rights reserved.! Page 60...
- Page 61 Step 185 Step 182 Step 186 Drill 1/16 in. Bottom View Step 183 Step 187 Bottom View Leading Edge Step 184 Step 188 Wing Tip Trailing Edge Aileron FullHouse™ 500 Build Instructions. © 2012 Stevens AeroModel. All rights reserved.! Page 61...
- Page 62 We hope you enjoyed building your FullHouse™ 500. Proceed to the Setup and Pre-Flight sections of this manual to prepare your FullHouse™ 500 for it’s first flight. FullHouse™ 500 Build Instructions. © 2012 Stevens AeroModel. All rights reserved.! Page 62...
- Page 63 Build Instructions Bottom View Step 189 Step 190 FullHouse™ 500 Build Instructions. © 2012 Stevens AeroModel. All rights reserved.! Page 63...
- Page 64 ☐ Inspect battery for full charge. Never begin a flight with a partially charged battery. ☐ Clear prop! Before applying power to the model, clear and keep clear of the prop arc. FullHouse™ 500 Build Instructions. © 2012 Stevens AeroModel. All rights reserved.! Page 64...
- Page 65 The most common mistake is to try and fly with a warped or twisted wing. Make certain that your wing is straight before you fly. FullHouse™ 500 Build Instructions. © 2012 Stevens AeroModel. All rights reserved.! Page 65...
Need help?
Do you have a question about the Build It! FullHouse 500 and is the answer not in the manual?
Questions and answers