
Related Manuals for Stevens AeroModel Build It! PuddleBug UM


Summary of Contents for Stevens AeroModel Build It! PuddleBug UM
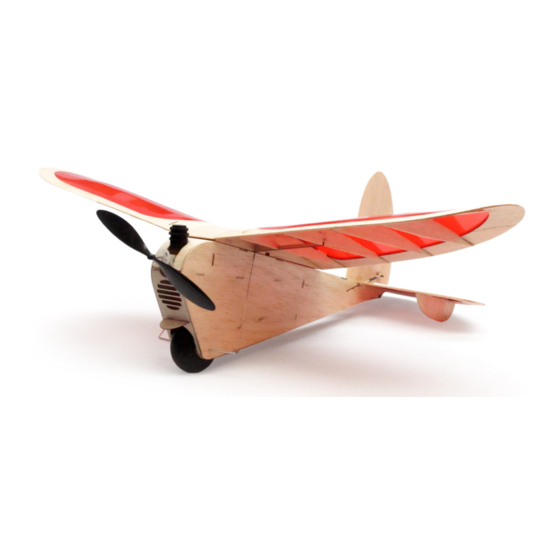
- Page 1 PuddleBug Ultra Micro RC for Spektrum / ParkZone 2.4 systems Wing Span: 17 3/4 inches | Wing Area: 71 square inches | Average Flying Weight: 1.2 ounces Build Instructions - Version 1.12 (revised 04.23.2018) ...
- Page 2 Build Instructions WARRANTY Stevens AeroModel guarantees this kit to be free from defects in both material and workmanship at the date of purchase. This warranty does not cover any component parts damaged by use or modification. In no case shall Stevens AeroModel’s liability exceed the original cost of the purchased kit. Further, Stevens AeroModel reserves the right to change or modify this warranty without notice.
- Page 3 ☐ 1 Shrink tubing, 1/16 in. diameter x 1 1/2 in. length [5012] ☐ 1 Aluminum tubing, 1/16 in. diameter x 3 in. length [*] ☐ 1 Trexler Balloon Wheel, size #02 PuddleBug UM - Build Instructions © 2010 Stevens AeroModel, all rights reserved. Page 3...
- Page 4 Many of the suggested items listed below are available at your local hobby shop. For your convenience, Stevens AeroModel stocks all the power system components and most of the building supplies required to complete this kit. If you have difficulties sourcing any of these items locally, please visit our website, stevensaero.com to purchase the items necessary to complete your model.
- Page 5 Build Instructions Sheet Wood Inventory (1 of 1) PuddleBug UM - Build Instructions © 2010 Stevens AeroModel, all rights reserved. Page 5...
- Page 6 Build Instructions Builder’s Notes PuddleBug UM - Build Instructions © 2010 Stevens AeroModel, all rights reserved. Page 6...
- Page 7 Please check our website for updates to these instructions before starting the build. To obtain downloads and updates for this model aircraft kit, please visit the product page at stevensaero.com PuddleBug UM - Build Instructions © 2010 Stevens AeroModel, all rights reserved. Page 7...
-
Page 8: Wing Assembly
Begin at the trailing edge, align the notches within the W1 center section sheeting with the tabs on ribs R1, wrap the sheeting forward to the leading edge, over the ribs and glue. PuddleBug UM - Build Instructions © 2010 Stevens AeroModel, all rights reserved. Page 8... - Page 9 Bottom View Step 1 Cont. Step 5 Bottom View Step 2 Step 6 Bottom View Step 3 Step 6 Cont. leading edge leading edge Bottom View PuddleBug UM - Build Instructions © 2010 Stevens AeroModel, all rights reserved. Page 9...
-
Page 10: Fuselage Assembly
Key the radio tray former F4 to the right fuselage side using the tabs on F4 to locate the tray within the notched locations on the right fuselage side. PuddleBug UM - Build Instructions © 2010 Stevens AeroModel, all rights reserved. Page 10... - Page 11 Bottom View Bottom View Step 9 Cont. Step 3 Bottom View Step 9 Cont. Step 4 Top View Assembled Wing Step 1 Step 5 Bottom View PuddleBug UM - Build Instructions © 2010 Stevens AeroModel, all rights reserved. Page 11...
- Page 12 Tip: Increase the durability of the strut fitting area. Harden the balsa wood slot that you just cut using thin CA glue. Bond the plywood motor mounting plate F12 on top of F3 and between parts F6. PuddleBug UM - Build Instructions © 2010 Stevens AeroModel, all rights reserved. Page 12...
- Page 13 Build Instructions Step 6 Step 9 Step 7 Step 10 Bottom View Step 7 Cont. Step 11 Step 12 Step 8 PuddleBug UM - Build Instructions © 2010 Stevens AeroModel, all rights reserved. Page 13...
-
Page 14: Final Assembly
Glue the gearbox in place using medium CA glue, white glue, or silicone adhesive (the last two adhesive options allow quicker removal should you need to service a tired motor). PuddleBug UM - Build Instructions © 2010 Stevens AeroModel, all rights reserved. Page 14... - Page 15 Build Instructions Step 13 Steps 19 and 20 Step 14 Step 21 F8 (x2) Bottom View Bottom View Step 15 Step 22 Step 17 Step 22 Cont. PuddleBug UM - Build Instructions © 2010 Stevens AeroModel, all rights reserved. Page 15...
- Page 16 R1 – locate the battery fore and aft to achieve proper model balance. That’s it, the model is complete – proceed to the ‘Model Setup’ and ‘Preflight’ sections. PuddleBug UM - Build Instructions © 2010 Stevens AeroModel, all rights reserved. Page 16...
- Page 17 Step 29 Trexler #2 axle Steps 23-25 Cont. Step 31 Bottom View Step 26 Step 31 Cont. strut do not glue! Step 27 Step 32 Complete! PuddleBug UM - Build Instructions © 2010 Stevens AeroModel, all rights reserved. Page 17...
-
Page 18: Model Setup
Check Wing Attachment Points - Always make sure you inspect for damage and wear. Make sure that the wing and wing struts, if applicable, are properly attached. PuddleBug UM - Build Instructions © 2010 Stevens AeroModel, all rights reserved. Page 18... - Page 19 Congratulations! Once you’ve completed your first flights, you will have noticed that the Stevens AeroModel PuddleBug is a very stable model airplane. When built straight, and trimmed for level flight, it should readily return to “wings level” from any attitude. When flying, we never miss an opportunity to allow an onlooker to get a little “stick-time”.
Need help?
Do you have a question about the Build It! PuddleBug UM and is the answer not in the manual?
Questions and answers