
Related Manuals for Stevens AeroModel RC-050


Summary of Contents for Stevens AeroModel RC-050
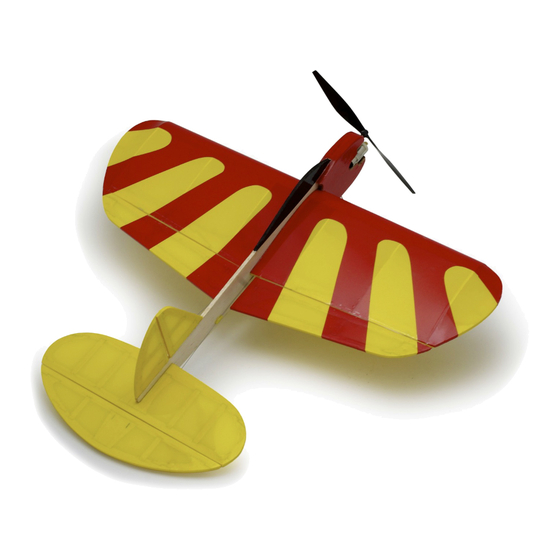
- Page 1 Build Instructions September 8, 2011! RingRat (RC-050) Wing Span: 13.5 inches | Wing Area: 57 inches | Average Flying Weight: 1.3 ounces Version 1.0 (c) 2011 Stevens AeroModel all rights reserved.! Page 1...
- Page 2 September 8, 2011! WARRANTY Stevens AeroModel guarantees this kit to be free from defects in both material and workmanship at the date of purchase. This warranty does not cover any component parts damaged by use or modification. In no case shall Stevens AeroModel’s liability exceed the original cost of the purchased kit. Further, Stevens AeroModel reserves the right to change or modify this warranty without notice.
-
Page 3: Kit Contents
☐ Sanding block with 400 and 600 grit paper ☐ Heat Gun and Covering Iron ☐ Small Needle Nose Pliers ☐ 1/2 in. wide clear tape [DUB916] ☐ Hook and Loop (Velcro) Set [PKZ1039] ☐ Servo Tape [DUB634] (c) 2011 Stevens AeroModel all rights reserved.! Page 3... - Page 4 September 8, 2011! General Assembly Instructions Thank you, for purchasing this Stevens RingRat (RC-050)™, a micro R/C version of our famous RingRat line of Control Line models. This product has been developed and manufactured using state of the art CAD/CAM systems and features a unique interlocking construction process that, when compared to traditional methods found in other model aircraft kits, save countless hours of measuring, cutting, sanding, and fitting.
- Page 5 Build Instructions September 8, 2011! Builders Notes Buy more high quality kits from Stevens AeroModel! (c) 2011 Stevens AeroModel all rights reserved.! Page 5...
- Page 6 Check alignment of F6 over F4. Bond F6 to F4 with thick CA. ☐ Lightly sand the fuselage assembly, lightly radius the cowl “cheeks”, and set aside until the Final Assembly. (c) 2011 Stevens AeroModel all rights reserved.! Page 6...
- Page 7 Build Instructions September 8, 2011! Step 1 Step 4 Step 1 Continued Step 5 Step 2 Step 6 Step 3 Step 7 (c) 2011 Stevens AeroModel all rights reserved.! Page 7...
- Page 8 15. Turn the wing back over and fit rib W7 to W6 and the slots in the spar and ☐ trailing edge to the RIGHT of the center rib W1. (c) 2011 Stevens AeroModel all rights reserved.! Page 8...
-
Page 9: Table Of Contents
Build Instructions September 8, 2011! Step 8 Step 12 Step 9 Step 13 Bottom View Step 10 Step 14 Step 11 Step 15 (c) 2011 Stevens AeroModel all rights reserved.! Page 9... - Page 10 W13 will end flush with the edge of the trailing edge W3. The front of W13 will just reach the front spar, but will not lie over it. Tack glue W13, check the alignment, then final bond with thin CA. (c) 2011 Stevens AeroModel all rights reserved.! Page 10...
-
Page 11: Step
Build Instructions September 8, 2011! W12a W12b Step 16 Step 20 Step 17 Step 21 Step 18 Step 21 Continued Step 19 Step 22 (c) 2011 Stevens AeroModel all rights reserved.! Page 11... -
Page 12: Step
Check the fit of the wing in the fuselage to ensure that the leading edge is rounded correctly. DO NOT BOND WING WITHIN FUSELAGE AT THIS TIME. Set the wing aside until the Final Assembly. (c) 2011 Stevens AeroModel all rights reserved.! Page 12... -
Page 13: Step
Build Instructions September 8, 2011! Step 22 Continued Step 25 Step 22 Continued Step 26 Step 23 Step 27 Step 24 Step 28 (c) 2011 Stevens AeroModel all rights reserved.! Page 13... -
Page 14: Step
(the dreaded “two left ailerons” situation.). Final Assembly 36. Cover the model in a lightweight, durable material. We suggest Stevens ☐ AeroModel AeroLITE. Think up a snazzy scheme, take your time, and make your plane beautiful. (c) 2011 Stevens AeroModel all rights reserved.! Page 14... -
Page 15: Step
Build Instructions September 8, 2011! Step 29 Step 33 45 degrees Step 30 Step 34 45 degrees Step 31 Step 35 Step 32 Step 36 (c) 2011 Stevens AeroModel all rights reserved.! Page 15... -
Page 16: Step
44. Remove the pins from the mounting tabs of the motor [PKZ3624] and sand ☐ the tabs smooth. (c) 2011 Stevens AeroModel all rights reserved.! Page 16... -
Page 17: Step
Build Instructions September 8, 2011! Step 37 Step 41 Step 38 Step 42 Step 39 Step 43 Step 40 Step 44 (c) 2011 Stevens AeroModel all rights reserved.! Page 17... -
Page 18: Step
CA. 52. Mount the vertical stabilizer on TOP of the fuselage, aligning the trailing ☐ edge of the rudder with the end of the fuselage. Bond with medium CA. (c) 2011 Stevens AeroModel all rights reserved.! Page 18... -
Page 19: Step
Build Instructions September 8, 2011! Step 45 Step 49 Step 46 Step 50 Step 47 Step 51 Step 48 Step 52 square (c) 2011 Stevens AeroModel all rights reserved.! Page 19... - Page 20 ☐ ☐ diagram of the receiver on the detail sheet to identify the elevator servo. 59. Cut two 1/4 in. pieces from the yellow nylon tube supplied in you kit. ☐ (c) 2011 Stevens AeroModel all rights reserved.! Page 20...
-
Page 21: Step
September 8, 2011! Step 52 Continued Step 56 Bottom View Bottom View LEFT RIGHT RIGHT Step 53 Step 57 Bottom View Step 54 Step 58 Top View LEFT Step 55 Step 59 (c) 2011 Stevens AeroModel all rights reserved.! Page 21... -
Page 22: Step
Wheels 66. Refer to the “Landing Gear Detail” on the detail sheet. Using small needle ☐ nose pliers, bend the landing gear from the 0.025 wire supplied in your kit. (c) 2011 Stevens AeroModel all rights reserved.! Page 22... -
Page 23: Step
Build Instructions September 8, 2011! Step 60 Step 63 Bottom View Step 61 Step 64 Top View LEFT Step 62 Step 65 Step 62 Continued Step 66 (c) 2011 Stevens AeroModel all rights reserved.! Page 23... -
Page 24: Step
Ta-Da!! Your RingRat (RC-050)™ is complete! If it’s too windy to test fly your model, annoy the family by taxiing it around the house. Chase the cat! He’ll love it, I swear! When the weather calms down, proceed to the Setup and Pre-Flight sections to prepare for your first flights. -
Page 25: Step
Build Instructions September 8, 2011! Step 67 Step 70 Step 67 Continued Step 71 Aileron Ports Motor Conn. Step 68 Step 72 Step 69 Velcro Step 73 (c) 2011 Stevens AeroModel all rights reserved.! Page 25... - Page 26 Elevator Travel Low Rate +/- 15 degrees 30% expo ☐ Check Weather - The RingRat (RC-050)’s High Rate +/- 20 degrees 50% expo first flight should be outdoors and in zero wind conditions.
- Page 27 (Depending on speed control responsiveness, the RingRat (RC-050) typically cruises at just If your first flight was a bit more exciting than over 1/2 throttle). you’d have liked and are having problems with erratic flight performance;...
Need help?
Do you have a question about the RC-050 and is the answer not in the manual?
Questions and answers