
Summary of Contents for Q3 ENERGIE QX3 Series
- Page 1 Installation and operating instructions QX³4000 QX³5000 QX³6000 QX³7000 QX³8000 QX³10000 QX³13000 QX³15000 QX³18000 ...
-
Page 2: Table Of Contents
4.14.1 Connecting via Ethernet ........................... 57 4.14.2 Connecting via field bus ........................... 58 4.15 USB-connection ................................60 4.16 Commissioning.................................. 60 4.17 Switch on the inverter ..............................61 _____________________________________________________________________________________________ Q3 ENERGIE Installation and operating instructions QX³ series 2/109 Version 1.0, Stand 27.04.2015... - Page 3 Status- and Fault Messages ..............................97 Maintenance ....................................100 Switch off inverter................................100 Shutting down and dismantling the inverter ......................101 Replacing an inverter ..............................102 Appendix ..................................... 103 _____________________________________________________________________________________________ Q3 ENERGIE Installation and operating instructions QX³ series 3/109 Version 1.0, Stand 27.04.2015...
- Page 4 These installation and operating instructions should provide exact, complete and comprehensive information. This information corresponds to the device version at the time of printing. Q3 ENERGIE takes no responsibility for direct, indirect or incidental damage to persons or material caused by wrong interpretation of or unintended errors in these installation instructions.
-
Page 5: General Notes
These installation instructions should be kept in a safe place for later use. These instructions are intended for the installer and operator of the photovoltaic inverter! _____________________________________________________________________________________________ Q3 ENERGIE Installation and operating instructions QX³ series 5/109 Version 1.0, Stand 27.04.2015... -
Page 6: Conventions Used In This Manual
You will find the latest version of the description in the http://www.q3-energie.de download area at Signalwords in compliance with ANSI Z535 / ISO 3864-2 _____________________________________________________________________________________________ Q3 ENERGIE Installation and operating instructions QX³ series 6/109 Version 1.0, Stand 27.04.2015... - Page 7 Never dispose of these components in the normal waste. Protect against the effects of weather Fragile! This way up! “Information sign” Symbole as per: ISO 3864-2 _____________________________________________________________________________________________ Q3 ENERGIE Installation and operating instructions QX³ series 7/109 Version 1.0, Stand 27.04.2015...
-
Page 8: Area Of Validity
The following documents are delivered together with the PV inverter; all others can be downloaded from our website at http://www.q3- energie.de Documentation: Document Contents Installation and Operating Instructions Setup, installation and operation _____________________________________________________________________________________________ Q3 ENERGIE Installation and operating instructions QX³ series 8/109 Version 1.0, Stand 27.04.2015... -
Page 9: Safety
International, national and any regional rules and regulations for electrical engineering must be observed under all circumstances. Relevant knowledge of electrical engineering is assumed. _____________________________________________________________________________________________ Q3 ENERGIE Installation and operating instructions QX³ series 9/109 Version 1.0, Stand 27.04.2015... -
Page 10: Intended Use
Only this intended use is permissible. Unauthorised modifications and changes, the use of spare parts and replacement parts that have not been approved by Q3 ENERGIE or any other kind of use is not permitted. Warranty claims and the operating licence become immediately null and void in such cases. -
Page 11: General Safety Instructions
Do not remain permanently in the immediate proximity of the inverter. People with implants or pace makers should consult their doctor before working on electrical systems. elektrischen Anlagen vornehmen, ihren Arzt konsultieren. _____________________________________________________________________________________________ Q3 ENERGIE Installation and operating instructions QX³ series 11/109 Version 1.0, Stand 27.04.2015... -
Page 12: Lightning Protection
Earthing the PV generator Pay attention to the local regulations for earthing the PV modules and the PV substructure. Q3 ENERGIE recommends combined connection and earthing of the substructure and other conductive areas, in order to achieve the highest possible protection for the system and for persons. -
Page 13: Country Code
Withdrawal of the operating licence! If you operate the inverter with the wrong country code, the power supply company can withdraw your operating licence. Q3 ENERGIE bears no liability for damage arising from an incorrectly set country code. Transport and Storage... -
Page 14: Outbreak Of Fire
Dangerous voltages are present within the inverter even when fuses have blown! For this reason, if fire should break out, do not use water to extinguish the fire. Use sand, carbon dioxide or powder extinguishers. _____________________________________________________________________________________________ Q3 ENERGIE Installation and operating instructions QX³ series 14/109 Version 1.0, Stand 27.04.2015... -
Page 15: Maintenance, Service And Faults
Q3 ENERGIE GmbH & Co. KG Innovapark 20 87600 Kaufbeuren Deutschland Q3 ENERGIE Service Telefon: +49 (0)8341/9080 335 Telefax: +49 (0)3121/1370 654 E-Mail: service@q3-energie.de Internet: www.q3-energie.de _____________________________________________________________________________________________ Q3 ENERGIE Installation and operating instructions QX³ series 15/109 Version 1.0, Stand 27.04.2015... -
Page 16: Product Description
USB (with QX³4000-8000 only for service) Direct connection to a ripple control receiver possible Connection for an irradiation and Temperature sensor Potential-free contact _____________________________________________________________________________________________ Q3 ENERGIE Installation and operating instructions QX³ series 16/109 Version 1.0, Stand 27.04.2015... -
Page 17: Design
Sealing caps for covering PV inputs that are not used 3 x for QX³13000-18000 2 x for QX³8000-10000 Sensor-/Remote: 1x signal plug Phoenix Contact SACC-MS-5SC SH SCO Installations and operating instructions _____________________________________________________________________________________________ Q3 ENERGIE Installation and operating instructions QX³ series 17/109 Version 1.0, Stand 27.04.2015... -
Page 18: Unit Identification
The device can be configured elegantly and quickly using the integrated Ethernet interface. This makes an already integrated and efficient system management possible. _____________________________________________________________________________________________ Q3 ENERGIE Installation and operating instructions QX³ series 18/109 Version 1.0, Stand 27.04.2015... -
Page 19: Block Circuit Diagram
Function elements: DESCRIPTION DESCRIPTION PV input plug PV circuit breaker Power output circuit breaker PV overvoltage protection Mains overvoltage protection Boost converter Power output plug Inverter _____________________________________________________________________________________________ Q3 ENERGIE Installation and operating instructions QX³ series 19/109 Version 1.0, Stand 27.04.2015... -
Page 20: Pv Module Cable Wiring
DC cables. If this is not the case, it is absolutely necessary to use an external string breaker in compliance with the PV module data sheet. _____________________________________________________________________________________________ Q3 ENERGIE Installation and operating instructions QX³ series 20/109 Version 1.0, Stand 27.04.2015... -
Page 21: Installation
NOTE All ventilation openings must be “free” to achieve adequate cooling. NOTE Q3 ENERGIE takes no responsibility for consequential damage caused by manipulations on the inverter system. NOTE Use only original Q3 ENERGIE spare parts! _____________________________________________________________________________________________ Q3 ENERGIE Installation and operating instructions QX³... -
Page 22: Installation Site And Minimum Clearances
Avoid installation sites where the inverter is exposed to reactive gasses, such as sulphur or ammonia for example, becausethese can cOFFe material damage on the inverter, in particular in combination with humidity. _____________________________________________________________________________________________ Q3 ENERGIE Installation and operating instructions QX³ series 22/109 Version 1.0, Stand 27.04.2015... -
Page 23: Unpacking The Inverter
4.3 Installing the inverter Approved alignment of inverter: Minimum clearance of individual inverters: _____________________________________________________________________________________________ Q3 ENERGIE Installation and operating instructions QX³ series 23/109 Version 1.0, Stand 27.04.2015... - Page 24 Installation and operating instructions QX³ series 4.3.1 QX³4000-8000 Minimum clearance, inverter group: Wall mounting bracket: _____________________________________________________________________________________________ Q3 ENERGIE Installation and operating instructions QX³ series 24/109 Version 1.0, Stand 27.04.2015...
- Page 25 Fix the inverter with screws (A) from above to prevent it from being inadvertently lifted out. 4. Mounting the inverter 5. Securing the wall bracket CAUTION Check that the inverter is securely mounted! _____________________________________________________________________________________________ Q3 ENERGIE Installation and operating instructions QX³ series 25/109 Version 1.0, Stand 27.04.2015...
- Page 26 Installation and operating instructions QX³ series 4.3.2 QX³10000-18000 Minimum clearance, inverter group: Wall mounting bracket: Wall mounting bracket: _____________________________________________________________________________________________ Q3 ENERGIE Installation and operating instructions QX³ series 26/109 Version 1.0, Stand 27.04.2015...
- Page 27 Insert the ventilation grids on the left and on the right. 4. Mounting the inverter 5. Securing the wall bracket 6. Attaching the ventilation grille CAUTION Check that the inverter is securely mounted! _____________________________________________________________________________________________ Q3 ENERGIE Installation and operating instructions QX³ series 27/109 Version 1.0, Stand 27.04.2015...
-
Page 28: Electrical Connection
All unused plug connections must be closed up with dummy plugs! CAUTION The technical connection requirements (TAB) of your power supply company must be observed! _____________________________________________________________________________________________ Q3 ENERGIE Installation and operating instructions QX³ series 28/109 Version 1.0, Stand 27.04.2015... -
Page 29: Connection Range
Cable lead through for AC connection Earthing point DC plug-in connectors (SUNCLIX) for connecting the PV + strings DC plug-in connectors (SUNCLIX) for connecting the PV - strings Ventilation grille _____________________________________________________________________________________________ Q3 ENERGIE Installation and operating instructions QX³ series 29/109 Version 1.0, Stand 27.04.2015... -
Page 30: Internal Connection Area For Accessories And Network
Connection for relay contacts Communication, sensor and remote connection Please note the connection of the cable shields for the sensor and remote connection and for the communication interfaces. _____________________________________________________________________________________________ Q3 ENERGIE Installation and operating instructions QX³ series 30/109 Version 1.0, Stand 27.04.2015... -
Page 31: Qx³10000-18000
6 x DC plug-in connectors (SUNCLIX) for connecting the PV + strings 6 x DC plug-in connectors (SUNCLIX) for connecting the PV - strings Ventilation inlet / ventilation grid _____________________________________________________________________________________________ Q3 ENERGIE Installation and operating instructions QX³ series 31/109 Version 1.0, Stand 27.04.2015... -
Page 32: Earthing
Use a Schnorr® - safety washer type S-6 between the cable lug and M6x14 screw Example view: QX³10000-18000 NOTE: The exact position for your device can be found in the chapter entitled "Connection area" _____________________________________________________________________________________________ Q3 ENERGIE Installation and operating instructions QX³ series 32/109 Version 1.0, Stand 27.04.2015... -
Page 33: Fi/Rcd Protection
No unprotected consumers may be connected between the inverter and the protective fuse. Consumers must always be protected separately. _____________________________________________________________________________________________ Q3 ENERGIE Installation and operating instructions QX³ series 33/109 Version 1.0, Stand 27.04.2015... - Page 34 5x 6 mm² 35 m QX³15000 5x 10 mm² 58 m 5x 4 mm² 20 m QX³18000 5x 6 mm² 31 m 5x 10 mm² 51 m _____________________________________________________________________________________________ Q3 ENERGIE Installation and operating instructions QX³ series 34/109 Version 1.0, Stand 27.04.2015...
- Page 35 10.1 between the PV inverter and the feed meter! Cable preparation: The following example refers to colour coding of the cores for installation, protective and low-voltage cables in compliance with HD 308 S2. _____________________________________________________________________________________________ Q3 ENERGIE Installation and operating instructions QX³ series 35/109 Version 1.0, Stand 27.04.2015...
- Page 36 Ensure the PE core is 5mm longer than the L and N cores! AC mains connection QX³4000-8000: Meaning A B C D E NOTE Q3 ENERGIE e recommends the use of flexible cable for installation. _____________________________________________________________________________________________ Q3 ENERGIE Installation and operating instructions QX³ series 36/109 Version 1.0, Stand 27.04.2015...
- Page 37 Connect the AC grid cable and / AC power plug as shown (observe and verify the rotating field). Connect the AC power plug to the inverter and screw in place. Check that all cables are firmly attached. _____________________________________________________________________________________________ Q3 ENERGIE Installation and operating instructions QX³ series 37/109 Version 1.0, Stand 27.04.2015...
-
Page 38: Assembling The Dc Plug-In Connector
Protect the plug-in connectors against humidity and soiling! Any unused string inputs must be sealed with the protective caps incl. in the scope of the delivery! _____________________________________________________________________________________________ Q3 ENERGIE Installation and operating instructions QX³ series 38/109 Version 1.0, Stand 27.04.2015... - Page 39 Rubber seal Cable gland Preparing the PV cable: Action Strip the cable back 15 mm. Take care while doing this not to cut off any single wires. _____________________________________________________________________________________________ Q3 ENERGIE Installation and operating instructions QX³ series 39/109 Version 1.0, Stand 27.04.2015...
- Page 40 Release the DC plug-in connector by prying open the clip mechanism on the side with a screwdriver. Pull the DC plug-in connector apart. Release the clamping spring by prising open the clamp. Remove the PV cable. _____________________________________________________________________________________________ Q3 ENERGIE Installation and operating instructions QX³ series 40/109 Version 1.0, Stand 27.04.2015...
- Page 41 The parallel strings must have the same alignment and roof inclination. The connection cables must be equipped with the required DC plug-in connectors (Phoenix Contact SUNCLIX) (included in the scope of delivery). _____________________________________________________________________________________________ Q3 ENERGIE Installation and operating instructions QX³ series 41/109 Version 1.0, Stand 27.04.2015...
- Page 42 "Technical Data" chapter may be connected to each input. DANGER from fire if total short circuit current ISC > ISCmax! Fire caused by overcurrents in the event of a fault _____________________________________________________________________________________________ Q3 ENERGIE Installation and operating instructions QX³ series 42/109 Version 1.0, Stand 27.04.2015...
- Page 43 In addition the fuse protection in the generator terminal box must limit the maximum possible return current in a defective string to a value lower than the defined return current resistance of the PV module. _____________________________________________________________________________________________ Q3 ENERGIE Installation and operating instructions QX³ series 43/109 Version 1.0, Stand 27.04.2015...
- Page 44 20A/12A 1000V QX³10000 1000V QX³13000 1000V QX³15000 1000V QX³18000 1000V Pay attention to short-circuit currents in the modules (parallel circuit of several strings) Minimum operating Temperaturee _____________________________________________________________________________________________ Q3 ENERGIE Installation and operating instructions QX³ series 44/109 Version 1.0, Stand 27.04.2015...
- Page 45 It is imperative that strings with different configurations are connected to separate inputs. Seal off unused connections with the dummy plugs provided. _____________________________________________________________________________________________ Q3 ENERGIE Installation and operating instructions QX³ series 45/109 Version 1.0, Stand 27.04.2015...
-
Page 46: Assembling The Sensor Plug/Remote Plug
Push the screw-down nut [6] onto the cable Push cores through the housing (5,4,3) and connect Screw the plug body [1] to the housing [3], 0.8Nm Tighten the screw-down nut [6], 3Nm _____________________________________________________________________________________________ Q3 ENERGIE Installation and operating instructions QX³ series 46/109 Version 1.0, Stand 27.04.2015... -
Page 47: Qx³4000-8000
Reserved Reserved Temperature sensor (external), optional Radiation sensor (external), optional Interface input S0, as per EN62053-31 Not used Reserved Reserved Field bus Communication+ Field bus Communication- _____________________________________________________________________________________________ Q3 ENERGIE Installation and operating instructions QX³ series 47/109 Version 1.0, Stand 27.04.2015... -
Page 48: Sensor Connection (Sensor)
4.11.2 QX³10000-18000 Schematic drawing: Pin configuration: The cable connection is a 1:1 connection, all 5 pins must be through-connected (pin1 to pin1, pin2 to pin2, …). _____________________________________________________________________________________________ Q3 ENERGIE Installation and operating instructions QX³ series 48/109 Version 1.0, Stand 27.04.2015... - Page 49 Connect the connections as per the designation in the tables above. Please pay attention to shield connection as described in chapter 5.1.2.1 Internal connection area for accessories and network. _____________________________________________________________________________________________ Q3 ENERGIE Installation and operating instructions QX³ series 49/109 Version 1.0, Stand 27.04.2015...
-
Page 50: S0-Interface
Connect the shield with a 5-core shielded cable. Connect the GND. Connect the signal line S0 of the energy meter to the plug via the 5-core cable. _____________________________________________________________________________________________ Q3 ENERGIE Installation and operating instructions QX³ series 50/109 Version 1.0, Stand 27.04.2015... - Page 51 Connect the connections as per the designation in the tables above. Please pay attention to shield connection as described in chapter 5.1.2.1 Internal connection area for accessories and network. _____________________________________________________________________________________________ Q3 ENERGIE Installation and operating instructions QX³ series 51/109 Version 1.0, Stand 27.04.2015...
-
Page 52: Ripple Control Receiver For Active Power Control (Remote)
CAUTION In a group of inverters transmission of the ripple control signal only takes place via the RS485 interface or the Ethernet interface of the inverters. _____________________________________________________________________________________________ Q3 ENERGIE Installation and operating instructions QX³ series 52/109 Version 1.0, Stand 27.04.2015... -
Page 53: Qx³10000-18000
Ripple control receiver connection: Action Connect the ripple control receiver. Connect the signals of the ripple control receiver to the signal plug as per the schematic drawing. _____________________________________________________________________________________________ Q3 ENERGIE Installation and operating instructions QX³ series 53/109 Version 1.0, Stand 27.04.2015... -
Page 54: Qx³4000-8000
Connect the connections as per the designation in the tables above. Please pay attention to shield connection as described in chapter 5.1.2.1 Internal connection area for accessories and network. _____________________________________________________________________________________________ Q3 ENERGIE Installation and operating instructions QX³ series 54/109 Version 1.0, Stand 27.04.2015... -
Page 55: Signal/Control Contact (Relay)
Without a plastic sleeve: 0.2 to 1.5 mm², with plastic sleeve: 0.2 to 0.75 mm² Cable diameters: 4…8mm Signal contact connection: Action Connect the signal line of the relay control signal to the plug connector via the cable. _____________________________________________________________________________________________ Q3 ENERGIE Installation and operating instructions QX³ series 55/109 Version 1.0, Stand 27.04.2015... -
Page 56: Qx³4000-8000
Connect the connections as per the designation in the tables above. Please pay attention to shield connection as described in chapter 5.1.2.1 Internal connection area for accessories and network. _____________________________________________________________________________________________ Q3 ENERGIE Installation and operating instructions QX³ series 56/109 Version 1.0, Stand 27.04.2015... -
Page 57: Interconnecting An Inverter Group
The "LAN active" setting must be made for all inverters in an inverter group connected via Ethernet. Please note that all inverters must be in the same subnet. _____________________________________________________________________________________________ Q3 ENERGIE Installation and operating instructions QX³ series 57/109 Version 1.0, Stand 27.04.2015... -
Page 58: Connecting Via Field Bus
Ethernet with the setting “LAN active”. Bus termination is then automatically activated for socket 2. In this configuration the Ethernet interface can be used for communication with a PC. _____________________________________________________________________________________________ Q3 ENERGIE Installation and operating instructions QX³ series 58/109 Version 1.0, Stand 27.04.2015... - Page 59 For technical reasons (bus termination) the LAN interface (Ethernet) must be activated at the first and last inverter in the inverter group. In this configuration the Ethernet interface can be used for communication with a PC. _____________________________________________________________________________________________ Q3 ENERGIE Installation and operating instructions QX³ series 59/109 Version 1.0, Stand 27.04.2015...
-
Page 60: Usb-Connection
All connections and plug-in connections are firmly locked in place. Any DC inputs not in use have been sealed with the corresponding seal plugs. _____________________________________________________________________________________________ Q3 ENERGIE Installation and operating instructions QX³ series 60/109 Version 1.0, Stand 27.04.2015... -
Page 61: Switch On The Inverter
The IP address “192.168.1.100” is assumed for the inverter in the rest of these Operating and Installation Instructions. This could deviate from the IP address assigned by the DHCP. _____________________________________________________________________________________________ Q3 ENERGIE Installation and operating instructions QX³ series 61/109 Version 1.0, Stand 27.04.2015... -
Page 62: Installation Assistant
ENEL for locations in Italy with difficult grid conditions.vorherrschen. Please contact your power supply company for information concerning other countries that have more than one setting. _____________________________________________________________________________________________ Q3 ENERGIE Installation and operating instructions QX³ series 62/109 Version 1.0, Stand 27.04.2015... - Page 63 30. Please take care here that you do not operate two devices in your inverter group with the same field bus address. Saving the configuration Save the configuration and switch to the start screen of the photovoltaic inverter. _____________________________________________________________________________________________ Q3 ENERGIE Installation and operating instructions QX³ series 63/109 Version 1.0, Stand 27.04.2015...
-
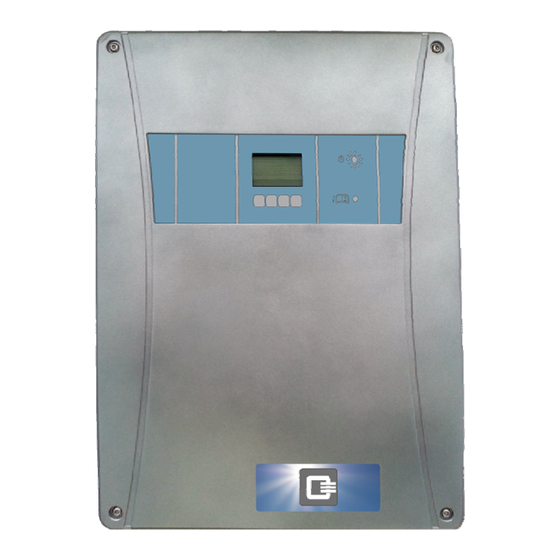
Page 64: Operation And Monitoring Using The Display
Control elements: Control elements: Action LC display Control keys “Feed-in mode” LED "Fault" LED (see chapter 8 Status and fault handling) 5.1 Determining the operating state _____________________________________________________________________________________________ Q3 ENERGIE Installation and operating instructions QX³ series 64/109 Version 1.0, Stand 27.04.2015... -
Page 65: Menu Display
Electric feed-in energy today / E(today) and Total feed-in energy / E(total): In the event of an urgent fault an exclamation mark appears in the display: _____________________________________________________________________________________________ Q3 ENERGIE Installation and operating instructions QX³ series 65/109 Version 1.0, Stand 27.04.2015... - Page 66 First connect the AC supply by switching the external circuit breakers to the “ON” position. Next turn the DC disconnecter switch to the “ON” position. If the fault appears again on the display, please contact the Q3 ENERGIE Service Department, you will find the contact data in Chapter 11 Contact.
- Page 67 Installation and operating instructions QX³ series The following pages show the menu structure of the inverter display. Main menu: Measured values, yields and information _____________________________________________________________________________________________ Q3 ENERGIE Installation and operating instructions QX³ series 67/109 Version 1.0, Stand 27.04.2015...
- Page 68 Installation and operating instructions QX³ series Main menu: Group devices, configuration and USB stick _____________________________________________________________________________________________ Q3 ENERGIE Installation and operating instructions QX³ series 68/109 Version 1.0, Stand 27.04.2015...
- Page 69 Leuchtdauer Werteingabe: min: 0s max: 300s step: 1s Datum / Uhrzeit Datumseingabe Datum Zeiteingabe Uhrzeit Zeitzoneneingabe Zeitzone Auswahlmenü: aktiv *inaktiv Sommer-/ Auswahlmenü: Sommerzeit Winterzeit Winterzeit *automatisch _____________________________________________________________________________________________ Q3 ENERGIE Installation and operating instructions QX³ series 69/109 Version 1.0, Stand 27.04.2015...
- Page 70 Installation and operating instructions QX³ series Configuration: LAN, RS485, S0 interface, passwords, service _____________________________________________________________________________________________ Q3 ENERGIE Installation and operating instructions QX³ series 70/109 Version 1.0, Stand 27.04.2015...
-
Page 71: Configuration
In addition to the values already mentioned you can also select or deselect an automatic summer/winter time adjustment or an NTP server. _____________________________________________________________________________________________ Q3 ENERGIE Installation and operating instructions QX³ series 71/109 Version 1.0, Stand 27.04.2015... -
Page 72: Lan
LAN interface (Ethernet) so you can integrate your inverter into your network. The Q3 ENERGIE Photovoltaic inverter offers the convenient option of obtaining an IPv4 address, net mask and a DNS server via an DHCP server in the network. -
Page 73: Display Settings, Operating Values And Measured Values
Displays the outdoor temperature Radiation * Displays the measured radiation You can navigate through the measured values using the arrow keys. * Requires a temperature/radiation sensor (optional) _____________________________________________________________________________________________ Q3 ENERGIE Installation and operating instructions QX³ series 73/109 Version 1.0, Stand 27.04.2015... -
Page 74: Yields
All warnings and fault messages are displayed. 1.2.3 Fault All fault messages are displayed. Only critical faults that can impair the functioning of the 1.2.4 Critical fault device are displayed. _____________________________________________________________________________________________ Q3 ENERGIE Installation and operating instructions QX³ series 74/109 Version 1.0, Stand 27.04.2015... -
Page 75: Group Devices
Function 3.1.1 Revenues Displays the revenues of the inverter 3.1.2 Energy Displays the energy of the inverter 3.1.3 Total Displays the total yield of the inverter _____________________________________________________________________________________________ Q3 ENERGIE Installation and operating instructions QX³ series 75/109 Version 1.0, Stand 27.04.2015... -
Page 76: Backing Up Data, System Recovery And Inverter Update
Starts the firmware update from the USB stick The USB interface is only available for internal service purposes for your installer as far as inverters QX³4000-8000 are concerned. _____________________________________________________________________________________________ Q3 ENERGIE Installation and operating instructions QX³ series 76/109 Version 1.0, Stand 27.04.2015... -
Page 77: Operation And Monitoring Via The Web Interface
If you wish to access all the submenus in these instructions as an installer, please contact the Q3 ENERGIE Service Department and request an “installer” password. To do this use the user name: "install" and the password that you have received from the Q3 Service Department. -
Page 78: Overview
Energy fed in since installation CO2 saving Amount of CO2 saved since installation Your yield to date with the inverter Yield Feed-in hours Yield time since installation _____________________________________________________________________________________________ Q3 ENERGIE Installation and operating instructions QX³ series 78/109 Version 1.0, Stand 27.04.2015... - Page 79 [h]. You can see the yield time of the inverter in this diagram. In the window “Performance data“ you can see a display of the current AC power [W] and the current temperature of the inverter. _____________________________________________________________________________________________ Q3 ENERGIE Installation and operating instructions QX³ series 79/109 Version 1.0, Stand 27.04.2015...
-
Page 80: Dc Input
The current current of MPP-Tracker 1 The current current of MPP-Tracker 2 DC Current MPP Tracker 2 DC Current MPP Tracker 3 The current current of MPP-Tracker 3 _____________________________________________________________________________________________ Q3 ENERGIE Installation and operating instructions QX³ series 80/109 Version 1.0, Stand 27.04.2015... -
Page 81: Ac Output
AC Current L1 The current current of line 1 AC Current L2 The current current of line 2 AC Current L3 The current current of line 3 _____________________________________________________________________________________________ Q3 ENERGIE Installation and operating instructions QX³ series 81/109 Version 1.0, Stand 27.04.2015... -
Page 82: Progression
You can see the last 500 events in this window. You can set the number of events displayed in defined steps of between 10 and 100. _____________________________________________________________________________________________ Q3 ENERGIE Installation and operating instructions QX³ series 82/109 Version 1.0, Stand 27.04.2015... -
Page 83: Settings
To carry out the summer/winter time changeover manually, please deactivate the automatic changeover and regulate the summer/winter time via the control box "Summer time active". _____________________________________________________________________________________________ Q3 ENERGIE Installation and operating instructions QX³ series 83/109 Version 1.0, Stand 27.04.2015... -
Page 84: Location
You can use this offset to correct the meter reading if an inverter Yield meter calibration offset is replaced (see Chapter 9.3 Replacing an inverter). Country Select the country of your location from the list. _____________________________________________________________________________________________ Q3 ENERGIE Installation and operating instructions QX³ series 84/109 Version 1.0, Stand 27.04.2015... -
Page 85: Mpp-Tracker
Installation and operating instructions QX³ series 6.2.4 MPP-Tracker _____________________________________________________________________________________________ Q3 ENERGIE Installation and operating instructions QX³ series 85/109 Version 1.0, Stand 27.04.2015... - Page 86 PV system for a very short time. Yield per month as a Enter the expected yield per month as a percentage. This value is percentage also used for projecting the yield. _____________________________________________________________________________________________ Q3 ENERGIE Installation and operating instructions QX³ series 86/109 Version 1.0, Stand 27.04.2015...
-
Page 87: Network
“Repeat password” and acknowledge your entries by clicking on “Change password”. Once you have done this your new password will be active and you must login again in the web interface. _____________________________________________________________________________________________ Q3 ENERGIE Installation and operating instructions QX³ series 87/109 Version 1.0, Stand 27.04.2015... -
Page 88: Fieldbus
S0 input for optimising your own energy consumption. See chapter 7.2.10 Own consumption If there is a temperature and radiation sensor connected, the current temperature and radiation strength are displayed below the selection box. _____________________________________________________________________________________________ Q3 ENERGIE Installation and operating instructions QX³ series 88/109 Version 1.0, Stand 27.04.2015... -
Page 89: Self Consumption
In this defined time the relay will be switched on (closed) if the previously defined conditions have not been fulfilled (e.g. in the event of insufficient radiation). _____________________________________________________________________________________________ Q3 ENERGIE Installation and operating instructions QX³ series 89/109 Version 1.0, Stand 27.04.2015... -
Page 90: Firmware Update
Never disconnect your inverter from the supply voltage or switch off it off for the whole duration of the updating process. This process can take several minutes. _____________________________________________________________________________________________ Q3 ENERGIE Installation and operating instructions QX³ series 90/109 Version 1.0, Stand 27.04.2015... -
Page 91: Logging Off Admin
You can only access this area with the installer password. 6.3.1 Installation – panel configuration Configure the MPP tracker for you system. More information can be found in chapter 5.6 Connecting the PV (DC) generator _____________________________________________________________________________________________ Q3 ENERGIE Installation and operating instructions QX³ series 91/109 Version 1.0, Stand 27.04.2015... -
Page 92: Installation - Power Supply Company Settings
Installation and operating instructions QX³ series 6.3.2 Installation – power supply company settings _____________________________________________________________________________________________ Q3 ENERGIE Installation and operating instructions QX³ series 92/109 Version 1.0, Stand 27.04.2015... - Page 93 Set these in the correction table. cos(phi) settings Set the value for the moving average voltage. You can obtain this Moving average voltage from your grid operator. _____________________________________________________________________________________________ Q3 ENERGIE Installation and operating instructions QX³ series 93/109 Version 1.0, Stand 27.04.2015...
-
Page 94: Installation - System Replication
To save these settings, select menu item "Download system image" and save the file on your computer. These settings are transferred to the inverter using the "Upload system image" function. _____________________________________________________________________________________________ Q3 ENERGIE Installation and operating instructions QX³ series 94/109 Version 1.0, Stand 27.04.2015... -
Page 95: Power Reduktion
All other inverters connected to inverter 1 via the field bus (RS485) are set to “No power reduction). In this configuration the power of the complete group is limited to 70% of the rated power of the installed generator. _____________________________________________________________________________________________ Q3 ENERGIE Installation and operating instructions QX³ series 95/109 Version 1.0, Stand 27.04.2015... - Page 96 (LAN) to monitor the system using external monitoring devices that have been approved by Q3 ENERGIE. The effective power and the power factor of the inverter can also be reduced or set using the interface. These functions that are used via the external devices must be compliant with the country-specific standards for generation systems on the low-voltage network (e.g.
-
Page 97: Status- And Fault Messages
A fan signals a fault If applicable clean fan carefully by blowing it out, do not use any solvents. If the problem persists: Contact the Service Department _____________________________________________________________________________________________ Q3 ENERGIE Installation and operating instructions QX³ series 97/109 Version 1.0, Stand 27.04.2015... - Page 98 PV input voltage too high The DC input voltage of the PV Immediately disconnect the _____________________________________________________________________________________________ Q3 ENERGIE Installation and operating instructions QX³ series 98/109 Version 1.0, Stand 27.04.2015...
- Page 99 (DC disconnecter switch in position off). Contact the installer. Leave the DC disconnecter switch in the “off” position until the fault is rectified. _____________________________________________________________________________________________ Q3 ENERGIE Installation and operating instructions QX³ series 99/109 Version 1.0, Stand 27.04.2015...
-
Page 100: Maintenance
Wait until the LEDs and the display have gone off. The inverter is now switched off. It is imperative not to forget the DC string cabling is still live. _____________________________________________________________________________________________ Q3 ENERGIE Installation and operating instructions QX³ series 100/109 Version 1.0, Stand 27.04.2015... -
Page 101: Shutting Down And Dismantling The Inverter
You can now dismount the inverter by lifting it up and off the wall bracket. Take note that the device is very heavy. Several persons should dismount the device depending on how heavy it is. _____________________________________________________________________________________________ Q3 ENERGIE Installation and operating instructions QX³ series 101/109 Version 1.0, Stand 27.04.2015... -
Page 102: Replacing An Inverter
Switch the AC grid connection (2) on again. Switch the DC disconnecter switch (1) on the underside of the device to “ON”. Check all the settings of your inverter. _____________________________________________________________________________________________ Q3 ENERGIE Installation and operating instructions QX³ series 102/109 Version 1.0, Stand 27.04.2015... -
Page 103: Appendix
Installation and operating instructions QX³ series 9 Appendix Technical data Temperature behaviour (power reduction) 9.1.1 QX³4000 9.1.2 QX³5000 _____________________________________________________________________________________________ Q3 ENERGIE Installation and operating instructions QX³ series 103/109 Version 1.0, Stand 27.04.2015... -
Page 104: Qx³6000
Installation and operating instructions QX³ series 9.1.3 QX³6000 9.1.4 QX³7000 _____________________________________________________________________________________________ Q3 ENERGIE Installation and operating instructions QX³ series 104/109 Version 1.0, Stand 27.04.2015... -
Page 105: Qx³8000
Installation and operating instructions QX³ series 9.1.5 QX³8000 9.1.6 QX³10000 _____________________________________________________________________________________________ Q3 ENERGIE Installation and operating instructions QX³ series 105/109 Version 1.0, Stand 27.04.2015... -
Page 106: Qx³13000
Installation and operating instructions QX³ series 9.1.7 QX³13000 9.1.8 QX³15000 _____________________________________________________________________________________________ Q3 ENERGIE Installation and operating instructions QX³ series 106/109 Version 1.0, Stand 27.04.2015... -
Page 107: Qx³18000
The list of certificates is growing continuously, the latest list of certificates can be found on our website www.q3-energie.de. Environmental compatibility Q3 ENERGIE is particularly concerned with the environmental compatibility of its complete product range. Top priority is given to environmental compatibility even as early as the development phase. -
Page 108: Warranty And Service Information
Always use original spare parts. Order data for inverters, accessories and spare parts can be found in the respective chapters. Contact Please contact the Q3 ENERGIE Helpdesk Team if you have any technical problems with our products. We require the following information to be able to provide specific assistance:... - Page 109 (Initial) address assignment of a DHCP server to a client „Residual Current protective Device“ Networking Time Protocol, protocol for setting the system time via the internet automatically _____________________________________________________________________________________________ Q3 ENERGIE Installation and operating instructions QX³ series 109/109 Version 1.0, Stand 27.04.2015...
Need help?
Do you have a question about the QX3 Series and is the answer not in the manual?
Questions and answers