
Related Manuals for Cypress HTCP-255DN


Summary of Contents for Cypress HTCP-255DN
- Page 1 HTCP-255DN CP-255DN PC/HD to 1080p DVI Scaler Box Operation Manual Operation Manual...
- Page 2 SAFETY PRECAUTIONS Please read all instructions before attempting to unpack, install or operate this equipment and before connecting the power supply. Please keep the following in mind as you unpack and install this equipment: • Always follow basic safety precautions to reduce the risk of fi re, electrical shock and injury to persons.
-
Page 3: Table Of Contents
CONTENTS 1. Introduction ..........1 2. Features ..........1 3. Package Contents ........ 1 4. Operation Controls and Functions ..2 4.1 Front Panel ........2 4.2 Rear Panel .........3 4.3. Remote Control and functions ..4 5. Installation ..........5 6. OSD Operation ........8 6.1 Video (or PC) ........8 6.2 Color ..........10 6.3 Output ..........10... -
Page 4: Introduction
1. INTRODUCTION This DVI Scaler is designed to convert PC, SD, HD and DVI to digital DVI at a variety of HDTV and PC resolutions. It handles input and output signal at 165MHZ ultra high bandwidth. It also has many great features to enhance video performance and is ideal for use in professional large screen presentation. -
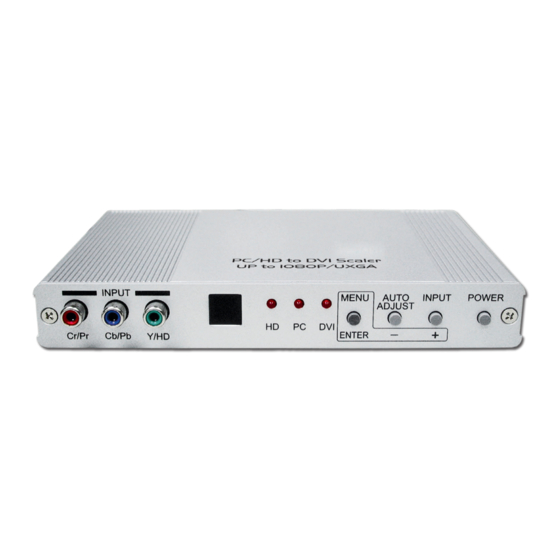
Page 5: Operation Controls And Functions
4. OPERATION CONTROLS AND FUNCTIONS 4.1 Front Panel INPUT MENU AUTO INPUT POWER ADJUST ENTER Cr/Pr Cb/Pb Y/HD Component Input: Connects this input connector to the Component output connector of your source equipment using the enclosed 3RCA to 3RCA cable. The device accepts both interlaced component input (480i, 576i) and deinterlaced progressive input (480p, 576p...1080p). -
Page 6: Rear Panel
adjust setting value of your selected parameter. Power: Press the button to turn ON or turn OFF (standby) the power of the unit. 4.2 Rear Panel DC 5V DVI OUT PC OUT DVI IN PC IN Power jack: Connect to the 5V 2.6A DC power adaptor. DVI output: Scaled digital DVI output. -
Page 7: Remote Control And Functions
4.3. Remote Control and functions Power: Press the button once to power ON the device. Press again to enter standby mode. Input: Press the button repeatedly to toggle through various input sources as follows. HD input: Press the button to select component input. -
Page 8: Installation
5. INSTALLATION Input Connection INPUT MENU AUTO INPUT POWER ADJUST ENTER Cr/Pr Cb/Pb Y/HD Component in Component out DVD or Set Top Box DVI OUT PC OUT DVI IN PC IN DC 5V PC-In HDMI to DVI HDMI connector adaptor HDMI Cable Cable... - Page 9 The device accepts component, PC and DVI inputs. The formats supported by these inputs are as follows: • When connecting to a PC source use a 15-pin D-sub cable to connect the output of a PC to the D-Sub input connector of the device.
- Page 10 Output Connection DC 5V DVI OUT PC OUT DVI IN PC IN DVI Cable Cable LCD TV HDMI to DVI connector RGBHV adaptor HDMI TV HDMI TV LCD or Monitor The device can output a variety of PC, SD and HD resolutions in both digital and analog format simultaneously.
-
Page 11: Osd Operation
6. OSD OPERATION After power on the unit, press the "menu" button will bring up the main menu as follows: Main Menu Video (or PC) Video(PC) Color Output Info Contrast User H.Position Source Color Brightness Normal SVGA V.Position Input Output Warm Time out Output... - Page 12 Note (PC): Available only when PC is selected as input. To adjust picture quality, Use "+,-" to move the highlight bar to your desired adjust item, press the Menu/Enter to confi rm your selection. At this point, the selected parameter will turn red, you can then use +,- to increase or decrease the value of the parameter.
-
Page 13: Color
6.2 Color User: Select to adjust to your favorite color temperature setting. Normal: Normal color tone setting where white is pure white. Warm: Warm color tone makes white reddish. Value of Normal Setting Cool: Cool color tone makes white bluish. 6.3 Output The device can output a wide variety of PC and HD resolutions. -
Page 14: Specifi Cations
7. SPECIFICATIONS HDMI Compliant Input format (Up to 165MHz) Resolution INPUT Component D-SUB DVI/HDMI 480i/576i 480p/576p 720p@(60/50) 1080i@(60/50) 1080p@(60/50) VGA@(60/72/75/85) SVGA@(56/60/72/75/85) XGA@(60/70/75/85) SXGA@(60/75/85) UXGA@60 WXGA@60(1280X800) WSXGA@60(1680X1050) WUXGA@60(1920X1200) * 480i 30x2 / 576i 25x2 Output format (Up to 165MHz) Resolution OUTPUT D-SUB DVI/HDMI 480i/576i... - Page 15 Input Connectors YCbCr/YPbPr x 1 via 3 RCA jack PC RGB x 1 via 15 pin D-sub DVI x 1 Output Connectors DVI x 1 PC 15 pin D-sub x 1 Dimension 180(W)x124(D)x25(H)mm/Jacks Excluded 180(W)x132(D)x25(H)mm/Including Jacks Weigh 452g Power Supply 5V 2.6A (US/EU standards, CE/FCC/UL certifi...
Need help?
Do you have a question about the HTCP-255DN and is the answer not in the manual?
Questions and answers