
Related Manuals for Keba D3-DA 3 Series


Summary of Contents for Keba D3-DA 3 Series
- Page 1 D3DA 3xx/x Axis module Project engineering manual V 1.00 Translation of the original manual...
- Page 2 Document: V 1.00 / Article No.: 1008665 Filename: da3xx_pjen.pdf Pages: 112 © KEBA Specifications are subject to change due to further technical developments. Details presented may be subject to correction. All rights reserved. Gewerbepark Urfahr, 4041 Linz, Austria, Phone: +43 732 70900, Fax: +43 732 730910, KEBA AG Headquarters: keba@keba.com For information about our subsidiaries please look at www.keba.com.
- Page 3 D3DA 3xx/x Record of Revision Record of Revision Version Date Changes in Chapter Description changed by 1.00 102014 newly created ekt, ekr Project engineering manual V1.00 © KEBA...
- Page 4 D3DA 3xx/x Project engineering manual V1.00 © KEBA...
-
Page 5: Table Of Contents
EtherCAT declaration..................Safety notes ........................ Representation....................General safety instructions ................Safety instructions for personal safety ............. Safety instructions for device maintenance ............. ESD Information....................System overview ......................Type plate ......................Displays and operating elements ................Status LEDs of the axis..................Mounting and installation instructions ..............EMC requirements ................... 5.1.1 Requirements to the connectors ............Space requirements..................Air conditioning and ventilation ................ Installation of the devices for wall mounting ............ 5.4.1 Dimensions and mounting clearances ..........Installation of the devices for cold plate ............5.5.1 Dimensions and mounting clearances ..........Project engineering manual V1.00 © KEBA... - Page 6 Specification of the terminals ............. Motor connection ..................... 6.8.1 Connection diagram motor connections ..........6.8.2 Monitoring output motor holding brake ..........6.8.3 Specification of motor connections ............ 6.8.4 Switching in the motor cable .............. Specification of EtherCAT interface ..............6.10 Encoder connections ..................6.10.1 Matching motor/encoder cables............6.10.2 Connection for highresolution encoder ..........6.11 Connection diagram..................6.12 Operation on special systems................6.13 DIPSwitch (SADR)..................Configuration ......................Safety functions ......................STO (Safe Torque OFF) .................. Project engineering manual V1.00 © KEBA...
- Page 7 Periodical functional test .................. 11 Disposal ........................11.1 Disposal of the module ..................11.2 Disposal of the battery ..................12 Technical Data ......................12.1 D3DA 3x0/x01xx, D3DA 3x0/x03xx............. 12.1.1 Current data D3DA 3x0/x01xx ............12.1.2 Current data D3DA 3x0/x03xx ............12.2 D3DA 3x0/x06xx, D3DA 3x0/x12xx............. 12.2.1 Current data D3DA 3x0/x06xx ............12.2.2 Current data D3DA 3x0/x12xx ............12.3 D3DA 310/x24xx, D3DA 320/x16xx ............12.3.1 Current data D3DA 310/x24xx ............12.3.2 Current data D3DA 320/x16xx ............12.4 General safety specifications ................Project engineering manual V1.00 © KEBA...
- Page 8 15 Appendix ........................103 15.1 Accessories...................... 103 15.2 Connection technology ..................103 15.2.1 Connection cable XW P0xxxx ............104 15.2.2 Connection cable XW H0xxxx ............104 15.2.3 Signal cable XW E10xxx ..............105 15.2.4 Signal cable XW R10xxx ..............106 15.2.5 Signal cable XW 020 ................. 107 15.3 Selection of mains filter..................108 Glossary ........................109 Index ..........................111 Project engineering manual V1.00 © KEBA...
-
Page 9: Introduction
Target group Prerequisite knowledge and abilities Basic technical training (technical college, engineer training or corresponding professional experience). Knowledge about: ● Principles of functional safety ● Relevant standards and safety regulations for the machine/ system, particularly knowledge about validation according to EN ISO 13849, Safety engineer for "Func tional Safety" ● Special risk potential of the machine/system and the pro duction process ● Specific protective measures to avert machinespecific hazards (based on hazard and risk analysis) ● Functioning and application limits of the safety components (including safety PLC) ● Indepth knowledge of national accident prevention regula tions. Basic technical training (technical college, engineer training or corresponding professional experience). Knowledge about: ● Current valid safety regulations, Project engineer ● Fundamental validation concepts according to EN ISO 13849, ● Method of operation of a PLC, ● the application. Project engineering manual V1.00 © KEBA... -
Page 10: Intend Use
● Programming of a safe PLC. Basic technical training (technical college, engineer training or corresponding professional experience). Knowledge about: ● Current valid safety regulations, ● Fundamental validation concepts according to EN ISO Startup operator 13849, ● Method of operation of the machine or system, ● Fundamental functions of the application, system analysis and troubleshooting, ● Setting options on the operating devices. Basic technical training (technical college, engineer training or corresponding professional experience). Knowledge about: ● Method of operation of a PLC, ● current valid safety regulations, Service technician ● Fundamental validation concepts according to EN ISO 13849, ● Method of operation of the machine or system, ● Diagnostic options, ● Systematic fault analysis and remedial action. Intend use The D3DA 3xx/x is intended for installation in stationary electrical systems or machines and was developed for controlling of drives. Project engineering manual V1.00 © KEBA... -
Page 11: Notes On This Document
D3DA 3xx/x Introduction The D3DA 3xx/x may only be used for the types of use described in the technical descriptions and in compliance with described technical general conditions. The D3DA 3xx/x may only be used in conjunction with recom mended/ approved thirdparty equipment/installations. The D3DA 3xx/x has been developed, manufactured, tested and docu mented in accordance with the appropriate directives and standards. There fore, the products do not pose any danger to the health of persons or a risk of damage to other property or equipment under normal circumstances, pro vided that the instructions and safety precautions are properly observed. The intended use also includes the attention of the notes and informations described in this document. The D3DA 3xx/x provides safety functions. For more information see "Safety functions". For safety relevant control tasks in combination with axis module D3DA 3xx/ x it is recommended to use the control module D3DU 3xx/x in the variant D3DU 3x5/x. Caution Also take care of the information in the safety manual "Functional safety" provided by KEBA. Requirements for a correct operation with functional safety: ● Correct projecting of the system ● Correct and complete installation of all components in compliance with the specified conditions ● Correct and complete wiring of all components ● Verification and validation of all safety functions ● Compliance of requirements of Machinery Directive and if necessary lo cal laws for a complete maschine Information The compilance of EMC directives can only be assumed under attention of chapter CE Certification as well as the information of connection and wiring, also the cable and additional components are used (specfied in chapter 15 Appendix) and a the dimension of the mains filter is done. Notes on this document This manual is an integral part of the product. It is to be retained over the en... -
Page 12: Content Of This Document
Mounting and installation instructions ● Description of interfaces including EMC directives ● Diagnostics functions ● Maintenance instructions ● Technical data 1.4.2 Not contained in this document ● Programming instruction ● Application diagnosis ● Firmware description ● General functional safety information ● Examples for safety applications Documentation for further reading Depending on the using system solution the following documents are to be observed: Doc.No. Name Target group ● Project engineer ● Electrician System manual ● Programmer ● Startup operator ● Service technician Project engineering manual V1.00 © KEBA... -
Page 13: Ethercat Declaration
D3DA 3xx/x Introduction Doc.No. Name Target group ● Safety engineer for "functional safety" ● Project engineer DE: 1008535 ● Electrician KEBA Functional safety safety manual ● Programmer EN: 1008536 ● Startup operator ● Service technician ● Programmer Onlinehelp DriveManager ● Startup operator ● Service technician Information This project engineering manual exclusively describes the D3DA 3xx/x. You can find informations about further components in the respective project engineering manual. EtherCAT declaration EtherCAT® is registered trademark and patented technology, licensed by Beckhoff Automation GmbH, Germany . Project engineering manual V1.00 © KEBA... -
Page 14: Safety Notes
Safety notes D3DA 3xx/x Safety notes Representation At various points in this manual you will see notes and precautionary warn ings regarding possible hazards. The symbols used have the following meaning: DANGER! indicates an imminently hazardous situation which will result in death or se rious bodily injury if the corresponding precautions are not taken. WARNING! indicates a potentially hazardous situation which can result in death or seri ous bodily injury if the corresponding precautions are not taken. CAUTION! means that if the corresponding safety measures are not taken, a potentially hazardous situation can occur that may result in property injury or slight bodily injury. Caution CAUTION used without the safety alert symbol indicates a potentially haz ardous situation which, if not avoided, may result in damage to property. This symbol reminds you of the possible consequences of touching electro statically sensitive components. Information Useful practical tips and information on the use of equipment are identified by the “Information” symbol. They do not contain any information that warns about potentially dangerous or harmful functions. Project engineering manual V1.00 © KEBA... -
Page 15: General Safety Instructions
D3DA 3xx/x Safety notes General safety instructions DANGER! Safety and operating instructions for drive converters (acc. to: Low voltage directive 2006/95/EC). ● During operation, drive power converters can, in accordance with their degree of protection, have life, bare, possibly even moving or rotating parts, as well as hot surfaces. ● Inadvertently removing the necessary covering, inappropriate use, incor rect installation or operation causes the risk of severe personal injuries, material damage or even fatal injuries. ● Further information can be found in the product documentation. Com missioning is not permitted if the product documentation is missing. In this case you should immediately ask for a new product documentation. ● Commissioning is only permitted if you understand the language of the product documentation. Otherwise commissioning must be performed by a specialist who understands the language. ● All work concerning transportation, installation and commissioning as well as repair and maintenance must only be carried out by qualified ex pert personnel. Project engineering manual V1.00 © KEBA... - Page 16 ● Use in areas where there is a risk of explosion or fire ● Use in the mining sector ● Use in outdoor areas ● Use in wet rooms or rooms with the risk of splashing water ● Use in environments with heavily polluted air ● Use in environments with harmful solutions, steams or radiations ● Use in nonstationary applications ● Use with a directly connected DC motor ● Other products are to be used for these applications! ● The module is defined as "open type equipment" (UL 508) or as "open equipment" (EN 611312) and must therefore be installed in a control cabinet. ● The D3DA 3xx/x contains safetyrelevant functions (e.g. STO). For safetyrelevant control tasks and personnel security a control of KEBA in the variant D3DU 3x5/x with correspondent safety related peripheral de vices must be used. Details can be found in the safety manual "Func tional safety". ● At the developement of the D3DA 3xx/x the standard EN ISO 138491 or other standards for description of the functional safety was not consid ered. Caution Improper use of the assembly or the control system leads to irreparable damage! ● Turn off the power supply before inserting or removing the module. Otherwise, the module can be destroyed or undefined signal states can lead to damage of the control system. ● If there are further power supply units in the system, they must also be turnedoff, to ensure that no electrical voltages are present at the inputs...
- Page 17 D3DA 3xx/x Safety notes Information Due to product monitoring obligation we ask you to report promptley to KEBA any possible potentially dangerous incidents, which are related to KEBA safety technology. Furthermore, it is asked to send all safe products that have failed due to a defect for purposes of analysis to KEBA, even if they are considered as ir repairable. KEBA shall assume no liability or warranty for consequential losses, which may arise of: ● Disregard of directives and standards ● Illegal changes ● Improper use ● Disregard of instructions in this document Project engineering manual V1.00 © KEBA...
-
Page 18: Safety Instructions For Personal Safety
D3DA 3xx/x Safety instructions for personal safety WARNING! Danger of personal injury due to electric shock! ● Cutoff module from power supply during installation and service. If the D3DA 3xx/x is supplied by a D3DP 3xx/x whose both supply terminals (Line IN and Line IN Aux) must be separated from power (e.g. via switching a joint main switch mechanism). ● If the D3DA 3xx/x is supplied by a D3DP 3xx/x you have to wait up to 3 minutes after switchingoff until no more dangerous residual voltage is at the intermediate circuit. Only after verification of absence of voltage the supply rails may be opened and the remaining covers can be opened. ● Protective low voltage circuits must always be installed safely insulated separated from circuits with dangerous voltage. CAUTION! Protection against magnetic and/or electromagnetic fields during in stallation and operation! Persons fitted with heart pacemakers, metallic implants and hearing aids etc. must not be allowed access to the following areas: ● Areas where drive systems are installed, repaired and operated. ● Areas where motors are installed, repaired and operated. Motors with permanent magnets pose a particular hazard. If it is necessary to access such areas, suitability to do so must be deter mined beforehand by a doctor. Safety instructions for device maintenance WARNING! ● If this device is damaged, the device must be taken out of commission and repaired or replaced by trained specialized personnel. ● The device must only be opened by trained specialized personnel. They must only carry out maintenance work that is explicitly permitted by KEBA (see Chapter "Maintenance"). Project engineering manual V1.00 © KEBA... -
Page 19: Esd Information
D3DA 3xx/x Safety notes ESD Information Electronic component are generally put at risk by electrostatic discharges (Electro Static Discharge). An electrostatic charge can occur during any ac tivity involving movement. ESD can occur with any touch. Most discharges are so low that they are not noticeable. However, they can nevertheless put unprotected electronic components at risk or even destroy them. Therefore, any handling with open electronics is only permissible with the application of effective ESD protection. When handling open electronics, please follow the following ESD measures: ● Only touch open electronics if this is absolutely necessary. ● Wear a conductive ESD wristband. ● Use conductive mats. ● Establish a conductive connection between device/system, mat, wrist band, and grounding connection. ● Cotton work clothes are preferred over synthetic fiber materials. ● Keep work area free of highly isolating materials (e.g. Styrofoam, plas tics, nylon, ...). ● Use ESD protection even for defective modules. Generally avoid, for modules which are mounted in an enclosure, direct con tact with any accessible electronic components, such as nonequipped ter minals. Project engineering manual V1.00 © KEBA... -
Page 20: System Overview
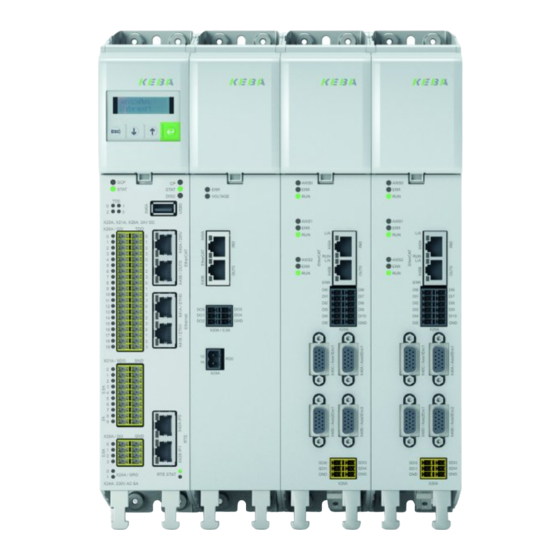
System overview D3DA 3xx/x System overview Illustration 31: System overview ... HMI (Operating) ... D3DU 3xx/x control module ... D3DP 3xx/x supply module ... D3DA 3xx/x axis module size 1 ... D3DA 3xx/x axis module size 2 Assignment number of axes, nominal current and size Axis module Size 1 Size 2 with ... Rated current I Rated current I nenn, eff nenn, eff prepa ration: 1axis 1,5 A 3 A 6 A 12 A 16 A 24 A Project engineering manual V1.00 © KEBA... -
Page 21: Type Plate
3 x 3 A 3 x 6 A Order information axis modulel The article designation informs you about the corresponding variant of the axis module delivered to you. The significance of the individual characters of the order designation is given in the following order code. Example D3DA 01 0 Product D3DA Series Axis single axis double axis triple axis Supply Cooling cooling element cold plate Continous current 1,5 A 32 A Encoder interface None multi encoder interface Hiperface DSL Safety function None STO + SBC Type plate The type plate is located on the left bottom side on the module. Project engineering manual V1.00 © KEBA... - Page 22 System overview D3DA 3xx/x Illustration 32: Type plate ... Manufactor ... Product group ... Material name ... Technical data ... Material number/Revision number ... Multiple rated equipment. See in struction manual ... QR code ... Serial number barcode ... NRTL marking ... Serial number plain text ... CE marking of conformity ... Date of production (month/year) ... Note for electronic scrap regulation ... Manufactur's address Project engineering manual V1.00 © KEBA...
-
Page 23: Displays And Operating Elements
D3DA 3xx/x Displays and operating elements Displays and operating elements Status LEDs of the axis Depending on the design of the axis module (singleaxis module, double axis module, tripleaxis module) up to 3 times 3 LEDs are provided as status indicators. The LEDs are on the front of the device and are assigned to axis 1 to axis 3 from top to bottom. The significance of the LEDs is the same for each axis and is as follows: Illustration 43: Status LEDs Axis 1(2,3) ... Indication of which axis is ... Error indication using flash accessed via the display on ing code the control module assembly ... Ready / power stage active Project engineering manual V1.00 © KEBA... -
Page 24: Mounting And Installation Instructions
Mounting and installation instructions During the installation it is imperative to avoid ● Drill chippings, screws or foreign bodies dropping into the device ● Moisture entering the device WARNING! Dangerous voltage may be applied to the device, even if the device does not emit any visual or audible signals/indications! Caution Installation must only be carried out by qualified electricians who have un dergone instruction in the necessary accident prevention measures. Caution Electric drives are dangerous: ● Electrical voltages 230 / 400 / 480 V AC or 325 / 565 / 678 V DC ● Dangerously high voltages ≥ 50 V (capacitor charge) may still be present 3 minutes after the power is cut. So check that electrical power is not present! ● Pay attention to warning sign on the device (see front of device). Information For installing the supply module within a system, also note the project man uals of the control module and the axis module. Control cabinet ● The devices are solely intended for installation in a stationary cabinet. The cabinet must as a minimum provide IP44 protection. According to EN ISO 138492 the cabinet must have degree of protection IP54 or higher on using the safety functions in the axis module or a D3DU 3x5/ Environment ● The axis modules must not be installed in areas where they are exposed to continuous vibration. (See 12.6 Ambient conditions). Pollution ● Max. pollution severity 2 to EN 606641. (See 12.6 Ambient conditions). Project engineering manual V1.00 © KEBA... - Page 25 D3DA 3xx/x Mounting and installation instructions Mounting and alignment ● The devices can be mounted directly beside each other without any spacing. They are fastened to the mounting plate using two/four screw joints. The control and supply of power to the D3DA 3xx/x axis modules and the D3DU 3xx/x controller is undertaken with the aid of the DC link and 24 VDC busbars and is possible with the same cooling concept, without additional compensation measures in relation to the device depth. ● The devices must be mounted in the stipulated order one against the other. A different order is not allowed, as otherwise there will be prob lems with the busbars and the thermal interaction between the devices. Illustration 54: Alignment sequence ... D3DU 3xx/x control module ... D3DP 3xx/x supply module ... D3DA 3xx/x axis module ... Further D3DA 3xx/x axis module Project engineering manual V1.00 © KEBA...
-
Page 26: Emc Requirements
Caution Protection against hot surfaces in operation. Temperatures up to 85 °C can occur on the rear of the device. Please maintain an adequate distance from neighbouring assemblies, particularly above the heat sink. CAUTION! Protection against hot surfaces in operation. Provide adequate protection against touching the heat sink. EMC requirements The essential EMC measures are already implemented in the design of the devices in the form of optimised housing shielding, printed circuit board lay out, filter measures and selection of suitable connectors with shield plate. In addition to the internal measures, the following installation measures are to be noted: ● To obtain the best result for effective EMC installation you should use a well conductive mounting plate, which is wellearthed due to safety rea sons. ● By mounting plates which are varnished, remove the coating from the contact area! The devices themselves have a chromated zinc frame. ● Use shielded cables: In 15 Appendix are all cables listet, which are avail able at KEBA. It is recommended to use this cables, because all EMC tests were executed with this cables and so they are tested accordingly. ● EtherCAT connection between control module, supply module and axis modules: The supply package of axis and supply modules also contains EtherCAT connection cables, which enable connection to the left com munication partner. The order designations for longer RTEthernetcables are listed in the appendix. ● Additional shield contact for RTEthernet: See 5.1.1 Requirements to the connectors 5.1.1 Requirements to the connectors The following connections are available in the system: ● RTEthernet (RJ45) connectors Project engineering manual V1.00 © KEBA... - Page 27 D3DA 3xx/x Mounting and installation instructions ● Encoder connector ● Connectors for motor ● Connector brake resistor ● Supply connectors ● Equipotential bounding lines RTEthernet (RJ45) connectors If an (RT)Ethernet cable is led outside of the cabinet, the isolation of the ca ble must be opened ca. 2030 mm after the RJ45 plug and the cable shield must be contacted on the designated straps (lower end of the front plate) again. The following (RT)Ethernet connectors can be affected: Illustration 55: Cable shield ... Cable shield with shield clamp ... Control module ... Supply module ... Cabinet Encoder connectors All encoder cables must be shielded. All available cables from KEBA are listed in the appendix. For connecting thirdparty motors, equivalent cables must be used. Connectors for the motor All motor cables must be shielded. All available cables from KEBA are listed in the appendix. For connecting thirdparty motors, equivalent cables must be used. Project engineering manual V1.00 © KEBA...
- Page 28 Mounting and installation instructions D3DA 3xx/x Connector break resistor The cables to the break resistor must be shielded and connected to the re spective casing on both sides. The shield connection on the supply module (plug "BR") occurs via the shield plate of the included plug. The break resis tor is normally installed in a metal casing. If the break resistor is mounted on a metallic and conductive base plate, it is possible to manufacture the shield connection on the side of the the break resistor with a shield clamp on the base plate, as close as possible to the break resistor. All available break re sistors from KEBA are listed in the appendix. Supply connectors The supply connector X01A (Line IN) of the supply module must have an ap propriate filter. Appropriate filters are listed in the appendix. For demension ing on the one hand supply current and on the other hand the sum of the length of the motor cables are authoritative. A shielded cable must be used between the connector Line IN and the filter. The shield connection on the supply module occurs via the shield plate on the plug. The connection plug is part of the supply package of the supply module. The mains filter needs an appropriate shield connection to the metal casing of the mains filter. This is achieved if the mains filter is mounted on a metallic and conductive base plate and if the cable shield is connected to the base plate via a shield clamp as close as possible to the connector "load" of the mains filter. Project engineering manual V1.00 © KEBA...
- Page 29 D3DA 3xx/x Mounting and installation instructions Illustration 56: Connector mains filter ... Control module ... Supply module ... Axis module ... Earth potential ... Mains filter ... X01A (Line IN) connector ... Cable shield with shield clamp ... Grounded metallic base plate Equipotential bounding lines If the cabinet is not mounted directly on the machine or severals metres away from the machine, it is recommended to install a equipotential bound ing line parallel to the cables, which are lead from the cabinet to the ma chine. The reason for this is, that because of switching processes and indi rect lightning strikes lowfrequency high compensating currents can be cre ated, which may be too high for shieldings and especially for the shield con nectors and can so damage the shield connection. Project engineering manual V1.00 © KEBA...
-
Page 30: Space Requirements
Mounting and installation instructions D3DA 3xx/x Space requirements Caution The minimum clearance above and below (130 mm and 100 mm) stated in the figure applies to all devices. The clearance above is important to prevent the buildup of heat, the clearance underneath to permit correct cable lay ing. Illustration 57: Mounting clearances The bend radius of the connecting cables must be taken into account. alle dimensions in mm KeDrive D3 example (with control module with safety functionality and with supply module) Example with one axis module size 1. Project engineering manual V1.00 © KEBA... - Page 31 D3DA 3xx/x Mounting and installation instructions Illustration 58: Dimension with size 1 Dimension Height: 310 mm Width: 165 mm Depth: 241 mm Example with one axis module size 1 and size 2 each. Project engineering manual V1.00 © KEBA...
-
Page 32: Air Conditioning And Ventilation
Mounting and installation instructions D3DA 3xx/x Illustration 59: Dimension with size 2 Dimension Height: 310 mm Width: 273 mm Depth: 241 mm Air conditioning and ventilation Cooling air must be able to flow through the device without restriction. For in stallation in cabinets with convection (= heat loss is discharged to the out side via the cabinet walls), always fit an internal air circulation fan. If a tem perature cutout occurs, the cooling conditions must be improved. Project engineering manual V1.00 © KEBA... -
Page 33: Installation Of The Devices For Wall Mounting
D3DA 3xx/x Mounting and installation instructions Illustration 510: Cooling air flows unhindered through the device Installation of the devices for wall mounting 1) Arrange the axis modules on the mounting plate. Please also provide enough space to the left of the supply module for the D3DU 3xx/x con trol module. Align all the devices in the multiaxis group in a line along the top edge of the device. This action is necessary to be able to couple the DC link using the busbars. For information on the mounting clear ances see 5.2 Space requirements. 2) Mark out the position of the threaded holes on the mounting plate. Drill holes in the mounting plate and cut a thread for each fixing screw in the mounting plate. The bend radius of the connecting cables must be taken into account! 3) Mount the axis modules vertically and with the supply module abutting on the mounting plate. Make sure the surface of the cooler is free of drill chippings or other soil ing. The contact area must be metallic, bare and conductive. You can find the following steps to electrical installation in 6 Connections and wiring. 5.4.1 Dimensions and mounting clearances Housing with heat sink Project engineering manual V1.00 © KEBA... - Page 34 D3DA 320/A03xx ● D3DA 310/A16xx ● D3DA 330/A03xx ● D3DA 320/A16xx ● D3DA 310/A06xx ● D3DA 310/A24xx ● D3DA 320/A06xx ● D3DA 310/A32xx ● D3DA 330/A06xx ● D3DA 310/A12xx Weight: 2.65 kg 5.1 kg H (Height): B (Width): T (Total depth): 27.5 27.5 > 100 > 130 > 300 Side clearance: Direct mounting Screws: 2 x M4 4 x M4 in preparation all dimensions in mm Project engineering manual V1.00 © KEBA...
- Page 35 D3DA 3xx/x Mounting and installation instructions Illustration 511: Dimensional drawing D3DA 3xx/x axis module size 1, dimensions see table Illustration 512: Dimensional drawing D3DA 3xx/x axis module size 2, dimensions see table Project engineering manual V1.00 © KEBA...
-
Page 36: Installation Of The Devices For Cold Plate
D3DA 310/B01xx ● D3DA 320/B01xx ● D3DA 330/B01xx ● D3DA 310/B03xx ● D3DA 320/B12xx ● D3DA 320/B03xx ● D3DA 330/B12xx ● D3DA 330/B03xx ● D3DA 320/B16xx ● D3DA 310/B06xx ● D3DA 310/B24xx ● D3DA 320/B06xx ● D3DA 310/B32xx ● D3DA 330/B06xx ● D3DA 310/B12xx ● D3DA 310/B16xx Weight: 2.2 kg 4.2 kg H (Height): B (Width): T (Total depth): 188.5 Project engineering manual V1.00 © KEBA... - Page 37 D3DA 3xx/x Mounting and installation instructions KeDrive Size 1 Size 2 27.5 27.5 > 100 > 130 > 300 Side clearance: Direct mounting Screws: 2 x M4 4 x M4 in preparation all dimensions in mm Illustration 513: Dimensional drawing D3DA 3xx/x axis module size 1, dimensions see table Project engineering manual V1.00 © KEBA...
-
Page 38: Mounting On The Cooler
Mounting and installation instructions D3DA 3xx/x Illustration 514: Dimensional drawing D3DA 3xx/x axis module size 2, dimensions see table 5.5.2 Mounting on the cooler For the optimal transfer of heat from the rear wall of the device (cooling plate) to the cooler provided a thermally conductive film is already bonded to the cooling plate on the device (see following figure). The film is laminated with aluminium toward the cooler. The device can be mounted and also re moved with the film. Project engineering manual V1.00 © KEBA... - Page 39 D3DA 3xx/x Mounting and installation instructions Illustration 515: Rear wall with film D3DA 3xx/x axis module size 1 (Cold plate) Caution Please ensure that there are no particles of dirt between the cooler and the rear wall of the device during mounting. If this instruction is not followed, the device will overheat due to the poor thermal transfer. The device may fail as a result. As the devices of size 2 are twice as wide, two thermally conductive films are attached to the cooling plate (see following figure). Project engineering manual V1.00 © KEBA...
-
Page 40: Sizing The Cooler
Mounting and installation instructions D3DA 3xx/x Illustration 516: Rear wall with film D3DA 3xx/x axis module size 2 (Cold plate) 5.5.3 Sizing the cooler In this case the cooled rear panel for mounting the module is called as cooler. D3DA 3xx/x size 1 D3DA 3xx/x size 2 Thermal resistance R K 0,02 K/W 0,01 K/W Thermal capacity of the cool 390 Ws/K 780 Ws/K ing plate on the device Max. temperature cooling 85 °C plate Device Surface of the cooler max. roughness R = 6,3 Thermal resistance between active cooling surface on the device and cooler. Project engineering manual V1.00 © KEBA... -
Page 41: Connections And Wiring
D3DA 3xx/x Connections and wiring Connections and wiring Information Comply with the standards for electrical installations, such as regarding wire crosssection, PE conductor and earth connections. The following layout plan shows the layout of the D3DA 3xx/x axis module with the corresponding positions of connectors and terminals. To aid orienta tion, the connectors and terminals are labelled by abbreviations (X..). The following pages contain detailed layout diagrams on the D3DA 3xx/x singleaxis, doubleaxis and tripleaxis modules. Illustration 617: Overview D3DA 3xx/x axis modules Project engineering manual V1.00 © KEBA... - Page 42 X25A Digital inputs (programmable) X25A (standard functions) X48A Encoder interface X48B Encoder interface See 6.10 Encoder connec tions X48C Encoder interface X48D Encoder interface See 6.7.2 Safe digital inputs X26A Digital inputs (safety function) (terminal X26A) DIL switch bank for the con SADR figuration of the SD0 func See 8 Safety functions tionality X31A Power connection Motor 1 With integrated connections X31B Power connection Motor 2 for motor brake and tempera ture monitoring X31C Power connection Motor 3 D3DA 3xx/x singleaxis mod D3DA310/x D3DA 3xx/x doubleaxis D3DA320/x module D3DA 3xx/x tripleaxis mod D3DA330/x Project engineering manual V1.00 © KEBA...
-
Page 43: Singleaxis Module
D3DA 3xx/x Connections and wiring Singleaxis module Illustration 618: out singleaxis module X40A ... EtherCAT IN, input, field bus X26A ... Digital inputs safety function (configurable via software as Eth ernet) X40B ... EtherCAT OUT, output, field bus Axis 1 ... LED yellow (State axis 1 ERR LED red) X25A ... Digital inputs ... LED red (State axis 1 ERR LED red) X48A ... Encoder connection 1 (axis 1) ... LED green (State axis 1 ERR LED red) See X48B ... Additional encoder connection (axis 1) For informations about the status LEDs of the axes see 4.1 Status LEDs of the axis. Singleaxis module encoder axis 1 Project engineering manual V1.00 © KEBA... - Page 44 S4 / SIN(B) "712 V" (=11 V) R2 (resolver ex cit. ) R1 (resolver ex cit. +) B + + SIN S2 / SIN+ (B+) Safety Sense + Safety Sense CLK + CLK Illustration 620: Pin assignment connector X48B singleaxis module X48B Pin SinCos and TTL A A + max +5,25 V Project engineering manual V1.00 © KEBA...
-
Page 45: Doubleaxis Module
D3DA 3xx/x Connections and wiring X48B Pin SinCos and TTL R + R B B + Doubleaxis module Illustration 621: Layout doubleaxis module X40A ... EtherCAT IN, input, field bus X26A ... Digital inputs safety function (Konfigurierbar über Software als Ethernet) X40B ... EtherCAT OUT, output, field bus Axis 1 ... LED yellow (State axis 1 ERR LED red) Project engineering manual V1.00 © KEBA... - Page 46 R Data B REFSIN S4 / SIN(B) "712 V" (=11 V) R2 (resolver ex cit. ) R1 (resolver ex cit. +) B + + SIN S2 / SIN+ (B+) Safety Sense + Safety Sense CLK + CLK Project engineering manual V1.00 © KEBA...
- Page 47 D3DA 3xx/x Connections and wiring Illustration 623: Pin assignment connector X48B doubleaxis module X48B Pin SinCos and TTL A A + max +5,25 V R + R B B + Doubleaxis module encoder axis 2 Illustration 624: Pin assignment connector X48C doubleaxis module SinCos and X48C Pin EnDat / SSI Hiperface Resolver A REFCOS S3 / COS (A) A + + COS S1 / COS+ (A+) max +5,25 V Project engineering manual V1.00 © KEBA...
- Page 48 R1 (resolver ex cit. +) B + + SIN S2 / SIN+ (B+) Safety Sense + Safety Sense CLK + CLK Illustration 625: Pin assignment connector X48D doubleaxis module X48D Pin SinCos and TTL A A + max +5,25 V R + R B B + Project engineering manual V1.00 © KEBA...
-
Page 49: Tripleaxis Module
Tripleaxis module Illustration 626: Layout tripleaxis module X40A ... EtherCAT IN, input, field bus ... LED red (State axis 1) (Configurable via software as Eth ernet) X40B ... EtherCAT OUT, output, field bus ... LED green (State axis 1) X25A ... Digital inputs Axis 2 ... LED yellow (State axis 2) X48A ... Encoder connection 1 (axis 1) ... LED red (State axis 2) X48B ... Additional encoder connection ... LED green (State axis 2) (axis 1) X48C ... Encoder connection 1 (axis 2) Axis 3 ... LED yellow (State axis 3) X48D ... Additional encoder connection ... LED red (State axis 3) (axis 2) X26A ... Digital inputs safety function ... LED green (State axis 3) Axis 1 ... LED yellow (State axis 1 ERR LED red) For informations about the status LEDs of the axes see 4.1 Status LEDs of the axis. Tripleaxis module encoder axis 1 Project engineering manual V1.00 © KEBA... - Page 50 S4 / SIN(B) "712 V" (=11 V) R2 (resolver ex cit. ) R1 (resolver ex cit. +) B + + SIN S2 / SIN+ (B+) Safety Sense + Safety Sense CLK + CLK Illustration 628: Pin assignment connector X48B tripleaxis module X48B Pin SinCos and TTL A A + max +5,25 V Project engineering manual V1.00 © KEBA...
- Page 51 A + + COS S1 / COS+ (A+) max +5,25 V R + Data + R Data B REFSIN S4 / SIN(B) "712 V" (=11 V) R2 (resolver ex cit. ) R1 (resolver ex cit. +) B + + SIN S2 / SIN+ (B+) Safety Sense + Safety Sense Project engineering manual V1.00 © KEBA...
-
Page 52: Grounding
"712 V" (=11 V) R2 (resolver ex cit. ) R1 (resolver ex cit. +) B + + SIN S2 / SIN+ (B+) Safety Sense + Safety Sense CLK + CLK Grounding 1) Ground each device! Connect the PE connections (screw socket M4) on the supply module, the axis modules and the controller in series as shown in the following figure. Make a connection from one of the devices to the PE rail (main earth) in the cabinet. As the leakage current >3.5 mA, the following applies to the PE connec Project engineering manual V1.00 © KEBA... - Page 53 D3DA 3xx/x Connections and wiring tion: Use protective conductors with the same crosssection as the mains cables. If the crosssection of the mains cable is ≤10 mm² the PE connec tions are to be doubled, or a copper cable with a minimum crosssection 10 mm² is to be laid.. 2) Also connect the PEconductor terminals of all other components, such as main filters etc. in a star configuration with the PE bar (main earth) in the cabinet. These further components are only required for the D3DP 3xx/x supply module. Information Material of the cooler or cold plate: aluminium with high conductive trans parent passivation. Protective earth conductor with mains cable crosssection ≥ 10 mm² Illustration 631: Protective earth conductor ... D3DU 3xx/x control module ... D3DP 3xx/x supply module ... D3DA 3xx/x axis module size 1 ... D3DA 3xx/x axis module size 2 ... Mains choke ... Mains filters ... Series earthing from below ... Earthing alternatively from above ... Protective earth (PE) Project engineering manual V1.00 © KEBA...
- Page 54 Connections and wiring D3DA 3xx/x Information Also comply with local and national regulations and conditions. Caution The protective earth conductor connection is a safety feature. Therefore, make sure that all connections have good contact and are sufficiently se cure that they cannot come loose. Protective earth conductor with mains cable crosssection < 10 mm² Illustration 632: Double protective earth conductor ... D3DU 3xx/x control module ... D3DP 3xx/x supply module ... D3DA 3xx/x axis module ... Mains filters ... Mains choke ... Double protective earth conductor connection ... Protective earth (PE) Project engineering manual V1.00 © KEBA...
-
Page 55: Electrical Isolation Concept
Electrical isolation concept The control electronics, with its logic (μP), the encoder terminals and the in puts and outputs, are electrically isolated from the power section (power supply / intermediate circuit). All control terminals are designed as safety extralow voltage/protective ex tralow voltage (PELV) circuits and must only be operated with such PELV voltages, as per the relevant specification. This provides reliable protection against electric shock on the control side. The 24 V supply voltage necessary for the PELV circuit is provided by sup ply module D3DP 3xx/x via the busbar 24 V DC / GND. Information The electrical isolation concept complies with the product standard EN 6180051. Applies to safe digital inputs (X26A): ● The digital inputs SDI00/SDI01/GND are isolated against SDI02/SDI03/ ● All inputs are isolated against the 24 V supply. ● All inputs are isolated against PE. ● Max. permitted isolation voltage: PELV ● Max. permitted input voltage: 60 V ... 60 V Caution Both GND connectors of terminal X26A are electrical isolated to each other and so they are not connected to the GND busbars (24 V) under the cover. For each STO the according GND must be connected! Connection of supply voltages via busbars The voltage supply to the axis module is separate for the control and power sections. The control section receives its 24 V supply from switchedmode power supply in the supply module via the upper busbar (+24V DC and GND). The power section in the axis module receives its DC link supply from the supply module via the lower busbar (DCLink+ and DC Link). 1) First make sure that all D3DA 3xx/x axis modules with the D3DP 3xx/x supply module are arranged in a line and are in contact with each other. Project engineering manual V1.00 © KEBA... -
Page 56: Voltage Supply (Busbars)
Connections and wiring D3DA 3xx/x 2) Always first connect the 24 V power supply for the axis module. For this purpose use the preassembled busbar elements. To be able to rotate the busbar elements it is necessary to unscrew the screws slightly. 3) Only connect the DC link supply for the axis modules when you want to place the axis modules in operation. If you want to use several axis mod ules, all DC Link+ connections and all DC Link connections must be connected together. For this purpose also use the preassembled busbar elements. To be able to rotate the busbar elements it is necessary to unscrew the screws slightly. Caution Once all busbar elements have been fitted, make sure that all connections have good contact and are sufficiently secure (2.1 Nm) that they cannot come loose. On the usage of connection elements that do not meet the re quirements, KEBA does provide any guarantee for stable, reliable operation. Information You will find more detailed information on the mains connections for the supply module in the Project Manual for the D3DP 3xx/x supply module. 6.6.1 24 V voltage supply (busbars) Illustration 633: Connection 24 V supply voltage ● = +24 V DC ±20% stabilized and filtered ● Continuous output power of the switched mode power supply (SNT) max. 470 W ● Internal polarity reversal protection ● The power supply unit used must have a safe and reliable isolation in re lation to the mains acc. to EN 611312, EN 50178 oder EN 6180051 ● Tightening torque for the busbar fittings 2.1 Nm Project engineering manual V1.00 © KEBA... -
Page 57: Intermediate Circuit
D3DA 3xx/x Connections and wiring 6.6.2 Intermediate circuit Caution Busbars The busbars supplied are to be used for the electrical coupling of the de vices. On the usage of connection elements that do not meet the require ments, KEBA does provide any guarantee for stable, reliable operation. Illustration 634: Intermediate circuit ● Intermediate circuit 325 / 565 / 678 V DC depending on power supply voltage (230 / 400 / 480 V AC) of the power supply ● Tightening torque for the busbar 2,1 Nm Project engineering manual V1.00 © KEBA... -
Page 58: Overview Of Busbars
Connections and wiring D3DA 3xx/x 6.6.3 Overview of busbars Illustration 635: Cover ... Side cover ... Barrier strip DANGER! The multiaxis system is only allowed to be operated with the cover on the busbars closed! It is also important that the side covers (A) and the barrier strip (B) are fitted. Both provide protection against physical contact with bare and live parts. Death or serious injuries may occur if these protective mea sures are not taken. Control connections 1) Check whether a complete device setup is already available, i.e. whether the drive has already been configured. 2) If this is the case, a special control terminal assignment applies. Please contact your project engineer to obtain the terminal assignment! 3) Choose a terminal assignment. 4) Leave all contacts open (inputs inactive). 5) Check all connections again! Project engineering manual V1.00 © KEBA... -
Page 59: Digital Inputs On X25A (Standard Functions)
DI01 DI07 Digital input DI02 DI08 Digital input DI03 DI09 Fast digital input Touch Probe TP1 All axes DI10 Fast digital input Touch Probe TP2 All axes reference ground All axes Selection list, function of the control inputs Pos. limit switch Neg. Limit switch Axis 1/2/3 No function (LimP) (LimN) DI01 LimP(1) LimN(2) DI02 LimP(1) LimN(2) DI03 LimP(1) LimN(2) Project engineering manual V1.00 © KEBA... -
Page 60: Safe Digital Inputs (Terminal X26A)
Safe digital inputs (terminal X26A) Illustration 637: Terminal X26A Selection list, function of the control inputs X26A Function SDI00 Safe digital input STO 1 CH1 SDI01 Safe digital input STO 1 CH2 SDI02 Safe digital input STO 2 CH1 SDI03 Safe digital input STO 2 CH2 Reference ground Reference ground Information Further information about safety functions see 8 Safety functions. 6.7.3 Specification of the terminals The control terminal X25A is realised using a 2layer 2x 6 pole plugin termi nal with 3.5 mm spacing from PhoenixContact. ● Type: MCDN 1,5/6G13,5 The safety terminal X26A is realised using a 2layer 2x 3 pole plugin termi nal with 3.5 mm spacing from PhönixContact. ● Type: MCDN 1,5/3G13,5 Connector sets suitable Connector sets Order number KEBA. Singleaxis module, double D3XT230/A for control wires axis module, tripleaxis mod 94801 Project engineering manual V1.00 © KEBA... -
Page 61: Motor Connection
D3DA 3xx/x Connections and wiring Motor connection 1) Specify the cable crosssection dependent on the maximum current and ambient temperature. The best method is use the preassembled motor cable, for more de tailed information see 15.2 Connection technology. 2) Connect the shielded motor cable to terminals X31/A / X31/B / X31/C, U, V, W connect the motor to earth at earth symbol. Mount shield at both ends to reduce interference emission. Fasten shield connection plate for the motor connection Motor1 using both screws. When using the appropriate motor cable as described in 15.2 Connection technology, the shield contacts already exist on both sides. 3) Wire the temperature sensor (if fitted) to X31/A / X31/B / X31/C using separate shielded cables and activate the temperature evaluation using DriveManager. The motor cables described in 15.2 Connection technology have a shielded wire pair for temperature evaluation integrated and the shield has contact with the connectors on both sides. 4) If fitted, connect the motor brake to X31/A / X31/B / X31/C 1, 2. The motor cables described in 15.2 Connection technology have a shielded wire pair for motor brake integrated and the shield has contact with the connectors on both sides. Information Only use motors that permit connection of the motor temperature sensor exclusively to terminals X31/A / X31/B / X31/C 1, 2 on the axis module. This issue is to be expressly stated on ordering the motor. Motor cables: All motor cables must be shielded. The cables available from KEBA are listed on the appendix, see 15.2 Connection technology. Equivalent shielded cables must be used for the connection of motors from other manufacturers. Information In the event of a shortcircuit or earth fault in the motor cable, the power stage is disabled and an error message is issued. Project engineering manual V1.00 © KEBA... -
Page 62: Connection Diagram Motor Connections
Connections and wiring D3DA 3xx/x 6.8.1 Connection diagram motor connections Caution For the connections X31/A / X31/B / X31/C 1, 2 it is to be ensured that the temperature sensor used has basic isolation according to EN 6180051 in relation to the motor winding. Illustration 638: Connection of a servomotor with motor holding brake Information Recommended connection of the motor holding brake up to max. 2 A motor brake current. Project engineering manual V1.00 © KEBA... - Page 63 D3DA 3xx/x Connections and wiring Illustration 639: Connection of a servomotor with motor holding brake The temperature sensor connection is shown in the version with "standard encoder interface". Illustration 640: Connection of a servomotor with Hiperface DSL encoder system Information Recommended connection of the motor holding brake up to max. 2 A motor brake current. On the model "Hiperface DSL" the twowire connection for the encoder is connected to the terminals X31/A / X31/B / X31/C 1 + 2. You will find a suit able motor connecting cable (onecable solution) in 15.2 Connection tech nology. Project engineering manual V1.00 © KEBA...
-
Page 64: Monitoring Output Motor Holding Brake
Connections and wiring D3DA 3xx/x 6.8.2 Monitoring output motor holding brake The motor brake output (BRK_Out and BRKGND) is continuously monitored independently of the usage SBC. The monitoring uses shutdown pulses that are sent with a maximum time window of 7.5 ms (depending on the load) and a minimum time window of 1 .5 ms. Information Due to this brief shutdown, on high impedance loads the "Time window ex ceeded" error may be triggered. 6.8.3 Specification of motor connections The connections X31/A / X31/B / X31/C (Motor1 / Motor2 / Motor3)are pro vided for up to three motors with motor temperature monitoring and motor holding brake. The necessary motor connectors are to be ordered separately depending on the number of motors to be used. Illustration 641: Motor connection Project engineering manual V1.00 © KEBA... -
Page 65: Switching In The Motor Cable
3 (BRK_OUT) 4 (BRK_GND) ● = 2 A max. ● = 10 A U / V / W ● Connection motor phase Crosssection = 6 mm max. M4 screw with serrated washer, PESymbol ● Connection PE of the motor connection using ring lug ● Connection cable shield Connector set suitable Connector set Order number KEBA. singleaxis module: 1x 94503 benötigt D3XT231/A for motor con doubleaxis module: 2x 94503 nector benötigt tripleaxis module: 3x 94503 benötigt 6.8.4 Switching in the motor cable Caution Switching in the motor cable is not allowed. If this instruction is not followed, malfunctions may occur in the device and result in the shutdown of the axis module. It cannot be excluded that switching in the motor cable will result in the de struction of the axis module. -
Page 66: Encoder Connections
Connections and wiring D3DA 3xx/x ● Transfer rate 10/100 MBits/s BASET ● Transfer profile IEEE802.3 compliant Illustration 642: EtherCAT terminal (X40A / X40B) For shielded connection up to a length of ≤ 20 m the following tested cable or an equivalent cable must be used: ● "Silverline Gold" Cat. 7 patch cable, S/STP 4x2x0,14 mm , twisted pair and shielded data cable with characteristic impedance R = 100 Ω ±15 Information For cable lengths ≥ 20 m special installation cables with larger crosssec tions are to be used. All modules (axis and supply modules) have enclosed suitable EtherCAT cables. They can be used for a connection to the left, nearby module. 6.10 Encoder connections All encoder connections are located on the front of the device. All encoder cables must be shielded. The cables available from KEBA are listed in chap ter 15.2 Connection technology. Equivalent shielded cables must be used for the connection of motors from other manufacturers 6.10.1 Matching motor/encoder cables Compare the rating plates of the components. Make absolutely sure to use the correct components according to variant A, B or C! Project engineering manual V1.00 © KEBA... -
Page 67: Connection For Highresolution Encoder
D3DA 3xx/x Connections and wiring Illustration 643: Motor/encoder allocation (as an example a doubleaxis module is shown) Variants of motors, encoder types and encoder cables Servo motor (with installed Encoder cable Motor cable encoder) for servo motor With resolver Variant A e.g. DMS2xxxxxxxxxBx90xx XW R10 XW P0x without further option SinCos singleturn encoder with HIPERFACE® interface e.g. ● DMS2xxxxxxxxxBx1Sxx, Variant B XW E10 XW P0x ● DMS2xxxxxxxxxBx2Sxx, ● DMS2xxxxxxxxxBx5Sxx Information Do not split the encoder cable, for example to route the signals via termi nals in the cabinet. The knurled screws on the DSub connector housing must be tightly locked! 6.10.2 Connection for highresolution encoder The interfaces X48A to X48D make it possible to evaluate the encoder types listed in the following, as a function of the design as singleaxis, doubleaxis or tripleaxis module X40. The connection X48B can however, always only be SinCos or TTL. Project engineering manual V1.00 © KEBA... - Page 68 Connections and wiring D3DA 3xx/x Function SinCos encoder with zero pulse e.g. Heidenhain ERN1381, ROD486 Heidenhain SinCos encoder with EnDat interface e.g. 13 Bit singleturn encoder (ECN1313.EnDat01) and 25 Bit multiturn en coder (EQN1325EnDat01) SinCos encoder with SSI interface e.g. 13 Bit singleturn and 25 Bit multiturn encoder (ECN413SSI, EQN425 SSI) SickStegmann SinCos encoder with HIPERFACE® Interface single and multiturn encoder, e.g. SRS50, SRM50 The usage of encoders not included in the range supplied by KEBA requires special approval by KEBA. The maximum signal input frequency is 500 kHz. Encoders with a supply voltage of 5 V ± 5 % must use the supply voltage from pin 3 (max. 5.25V). The encoder cable detects the actual supply voltage at the encoder, thereby compensating for the voltage drop on the cable. Only use of the sensor ca ble ensures that the encoder is supplied with the correct voltage. The sensor cable must always be connected. Select the cable type specified by the motor or encoder manufacturer. Dur ing this process bear in mind the following: ● Always used shielded cables. Connect shield on both sides. ● Connect the differential track signals A/B, R or CLK, DATA to each other via twisted wires. Information The encoder supply on X48A to X48D is shortcircuit proof on both 5 V and 11 V operation. The module remains in operation enabling the generation of a corresponding error message when evaluating the encoder signals. Project engineering manual V1.00 © KEBA...
-
Page 69: Connection Diagram
D3DA 3xx/x Connections and wiring 6.11 Connection diagram Illustration 644: Connection overview supply modules as well as earth conductor in combina tion with supply module and axis module(s). ... Main fuse for intermediate circuit ... Main fuse for switchedmode power supply ... Mains contactor with protection cir ... Programmable switching contact for cuit mains contactor ... Mains choke ... Mains filter ... Main connection of power supply ... Main connection(24 V switched mode power supply) ... Busbar for 24 V circuit and interme ... D3DP 3xx/x power supply module diate circuit (DC Link) ... D3DA 3xx/x axis module ... Control cabinet ... Field ... Braking resistor ... EtherCAT connection ... Connection of PE conductor ... PE conductor ... conductive mounting plate Project engineering manual V1.00 © KEBA... -
Page 70: Operation On Special Systems
Connections and wiring D3DA 3xx/x 6.12 Operation on special systems TN and TT system Caution Operation is only permitted if: ● In the case of threephase devices with external conductor voltages 3x 230 V AC, 3x 400 V AC, 3x 480 V AC the star point of the supply system is earthed and the supply system conforms to the maximum overvoltage category III as per EN 6180051 at a system voltage (external conduc tor → star point) of maximum 277 V. ● At external conductor voltages 3x 230 V AC, 3x 400 V AC, 3x 480 V AC ● The star point of the supply system is earthed ● The supply system conforms to the maximum overvoltage category III as per EN 6180051 at a system voltage (external conductor > star point) of maximum 277 V. IT system Caution Operation is not permitted! In case of an earth fault the electrical stress is approx. twice as high. Clear ances and creepages to EN 6180051 are no longer maintained. The de vice may be destroyed in the process. 6.13 DIPSwitch (SADR) The DIPSwith SADR is located on the bottom side of the module and serves for configuration of the safety functions of the D3DA 3xx/x. For more details see 8 Safety functions. Project engineering manual V1.00 © KEBA... -
Page 71: Configuration
D3DA 3xx/x Configuration Configuration Information Information to the configuration see onlinehelp of KeStudio U4. Project engineering manual V1.00 © KEBA... -
Page 72: Safety Functions
Safety functions D3DA 3xx/x Safety functions Drive controller malfunctions must be detected by the superimposed moni toring of the movement or by other measures in the application.The detec tion and the reaction are the responsibility of the user. The D3DA 3xx/x pro vides the safety functions STO and SBC that the user can use as a reaction to drive controller malfunctions in the application. This chapter describes the following safety functions: ● STO (Safe Torque OFF) ● SBC (Safe Break Control) ● Diagnoses via cross circuit test The connection of this safety functions are done via terminal X26A. The de sired behaviour of the safety functions can be configured via DIP switch (S ADR). STO (Safe Torque OFF) The axis module supports the safety function ”STO” (safe torque off) in ac cordance with EN 6180052, EN ISO 138491 „PL e“ category 4 and EN 61508 / EN 62061 „SIL 3“. For the safety function STO the supply to the drive is interrupted safe (no galvanic isolation). The drive must not create torque and therefore dangerous movements. The stand still position is not monitored. The function "STO" corresponds to the stop categorie 0 accord ing to EN 602041. You will find the safety related characteristics in chapter "Technical Data". The STO shutdown takes place within 2,5 ms. The safetyrelated parts must be designed such that: ● A single failure in any of these parts does not result in the loss of the safety function. ● The single failure is detected on or before the next demand upon the safety function. Project engineering manual V1.00 © KEBA... -
Page 73: Configuration Of Sto Safety Function
● In the state "STO" motor and mains cable, braking resistor and DC link supply cable will carry dangerous voltages in relation to the PE conduc tor. ● Without additional measures it is not possible to implement "shutdown of the power supply in an emergency" using the function "STO". There is no galvanic isolation between motor and drive controller! As such there is a risk due to electric shock and other risks of an electrical origin DANGER! Hazard due to axis movement at the motor! ● If the action of external force has to be expected with the safety function "STO", e.g. due to a suspended load, this movement must be safely pre vented by additional measures, e.g. by means of two brakes, locking de vice or clamping device with brake. ● Despite correct shutdown, in the case of a shortcircuit in two offset branches of the power section an axis movement of max. 180° may be triggered electrically. 8.1.1 Configuration of STO safety function Via DIP switch (SADR) the desired behaviour of the safety function STO can be configured. Because the D3DA 3xx/x can be equipped as single, double or tripple axis module, it must be configured via DIP switch on which axis the STO takes affect. The following presettings can be choosen: Settings Description Function affect to STO1: Axis 1 Axis 2 Axis 3 Common switching of all existing axis STO2: Without function Project engineering manual V1.00 © KEBA... -
Page 74: Sbc (Safe Brake Control)
Safety functions D3DA 3xx/x Settings Description Function affect to STO1: Axis 1 Separate switching of all existing axis STO2: Axis 2 Axis 3 If axis exits Information All other combinations on the DIP switch are invalid and lead at the latest on demand of safety function (e.g. validating of safety function) to an error message and the system changes into safe state. SBC (Safe Brake Control) The function SBC is used for safe of controlling a holding brake. A holding brake, which is active in the unpowered state, is operated and monitored us ing twochannel technology. Depending on the preselection of the DIP switch (SADR) the SBC will be automatically activated in case of release parallely with STO1. The function SBC always effects to all brake outputs of the axis module. The function SBC is used in conjunction with the functions STO to prevent the movement of an axis in the torquefree state, e.g. due to gravity. The axis module supports the safety function ”SBC” (safe brake control), ac cording to the requirements of EN 6180052, EN, EN ISO 138491 „PL d“ category 3 and EN 61508 / EN 62061 „SIL 2“. You will find the safetyrelated characteristics in chapter „Technical Data“. The SBC shutdown takes place within 3 ms. Project engineering manual V1.00 © KEBA... -
Page 75: Configuration Sbc Safety Function
EN 62061 or have appropriate safetyrelated approval. The release of the brake can be delayed by up to 200 ms by the internal diagnostics on the brake output. Caution If the brake does not release due to a failure, the safety function may be lost due to wear or irreparable damage to the brake. The failure "Brake does not release" must be taken into account during the design of the brake(s) and the validation. The failure "Brake does not engage" must be excluded by one of the follow ing measures: ● Usage of a safety brake with a manufacturer's specification that ex cludes this failure with the necessary safety integrity. Definition and validation of a second means of braking in the application. For instance this feature can be achieved by using two brakes where each brake is in itself capable of applying the necessary braking torque. In addition, the function of the brakes must be validated regularly. 8.2.1 Configuration SBC safety function Via DIP switch (SADR) can be configured, if the safety function SBC should be activated additional to the safety function STO. Settings Description Function affect to STO1: STO axis 13 SBC axis 13 SBC activated STO2: Without function STO1: STO axis 13 SBC deactivated SBC deactivated STO2: Without function Depending on STO configuration Project engineering manual V1.00 © KEBA... -
Page 76: Diagnosis Via Cross Circuit Test
Safety functions D3DA 3xx/x Information The safety function SBC is bounded hard on the safe digital input STO1 (SDI00 and SDI01). Information All other combinations on the DIP switch are invalid and lead at the latest on demand of safety function (e.g. validating of safety function) to an error message and the system changes into safe state. Diagnosis via cross circuit test To detect short circuits and cross circuits in the wiring of safe digital inputs (terminal X26A) via DIP switch (SADR) a cross circuit test can be activated. In this case the testoutputs of the D3DP 3xx/x must be used or own testout puts which meet the signal format of the following table: Settings Description Signal format of testoutputs Cross circuit test activated Cross circuit test deacti vated Information All other combinations on the DIP switch are invalid and lead at the latest on demand of safety function (e.g. validating of safety function) to an error message and the system changes into safe state. Project engineering manual V1.00 © KEBA... -
Page 77: Recommended Connection Examples
On usage of redundant inputs different testoutputs msut be used. Recommended connection examples The following chapter describes recommended examples for connecting safety functions STO and SBC. In the following circuit examples it is a pre requisite that the switching elements used have safetyrelated approval or are designed as per the required PL in accordance with EN ISO 138491 or SIL in accordance with EN 61508 / EN 62061. In addition the following points must be noted: ● The safety regulations and EMC directives must be met ● In relation to the failure exclusions assumed, reference is made to the table in annex D of EN ISO 138492. The examples shown in the following and their characteristic architecture de fine the allocation to a category in accordance with EN ISO 138491. The re sulting maximum possible performance levels in accordance with EN ISO 13849 continue to be dependent on the following factors related to the exter nal components: ● Structure (single or redundant) ● Detection of common cause failures (CCF) ● Diagnostic coverage on demand (DC ● Time to the dangerous failure of a channel (MTTF 8.4.1 Example: STO and SBC control via safety control The control of safety function STO is done via corresponding logical pro cessing of the safety control, whereby the safety function STO and SBC of the single axis modules are controlled from the safety control via separate outputs. In this example multi axis, emergency stop switch, which activates STO and SBC on all axis and safety door are realized. To release after unlocking of emergency stop switch as well as closing the safety door a reset button (start test on switching module is activated) is implemented. In the shown DIP switch configuration it is configured, to use STO1 for all axes and SBC is released simultaneously with STO1. Project engineering manual V1.00 © KEBA... - Page 78 Safety functions D3DA 3xx/x Illustration 845: STO and SBC control ... D3DU 3x5/x ... D3DA 3xx/x Should safety functions STO and SBC of the single axis modules controlled via same outputs of the safety control, the wiring can be copied as shown below: Illustration 846: STO and SBC control ... D3DU 3x5/x ... D3DA 3xx/x Project engineering manual V1.00 © KEBA...
-
Page 79: Example: Sto Without Sbc Control Via Safety Control
D3DA 3xx/x Safety functions Information ● Short circuits on the OSSD outputs to 24 V an other outputs are de tected from the safety control via diagnosis measurements if the output test is activated. It is changed into safe state. ● The failure "Simultaneous short circuit of both outputs to 24 V" must be excluded by suitable wiring! 8.4.2 Example: STO without SBC control via safety control The D3DA 3xx/x supports a separate STO controlling of the axes. STO1 is fix assigned to the first axis, the both other axes can be assigned to STO1 or STO2 depending on the DIP switch setting. If sperated STO controlling is used the safety function SBC may not be activated, because it is always as signed to STO1. Illustration 847: STO without SBC control ... D3DU 3x5/x ... D3DA 3xx/x Caution By usage of STO1 and STO2 on an axis module the safety function SBC must be deactivated via DIP switch, because SBC is always released with STO1. Otherwise no SBC is released on the requested STO2 or SBC will be activated on all axes with the requested STO1, although axis 2 and 3 have no STO! Project engineering manual V1.00 © KEBA... -
Page 80: Example: Sto And Sbc Control Via Light Grid
Safety functions D3DA 3xx/x 8.4.3 Example: STO and SBC control via light grid The control of STO1 is done via a safety light grid with OSSD outputs. The reset button releases after leaving the danger area (start/restart interlock) Illustration 848: STO control via light grid ... Light grid ... D3DA 3xx/x Information ● Short circuits on the OSSD outputs to 24 V an other outputs must be detected from the light grid via diagnosis measurements and then changed into safe state. ● The failure "Simultaneous short circuit of both outputs to 24 V" must be excluded by suitable wiring! 8.4.4 Example: STO and SBC control directly via supply module It is for example possible to control the safety functions STO and SBC via safety door, without using the safety control. Therefore the door switch must be supplied via testoutputs of the D3DP 3xx/x (to recognize cross circuits in the input circuit). The cross circuit test must be configured suitable via the DIP switch. Information It is recommended to use a safety control and use prefered one of the above mentioned connection examples! Project engineering manual V1.00 © KEBA... -
Page 81: Validation Of Safety Functions
Validation of safety functions It is recommended to define always a validation plan. In the plan the tests and analyses used to demonstrate the compliance of the solution with the requirements from the application are defined. Validation of STO safety function The safety function STO is to be validated against the safety requirements from the application in the following cases: ● During commissioning ● After changes of the application ● After repair or device replacement The following table shows the test steps to be undertaken. The table has to be worked through from top to bottom. Description State/Event Expected result ● System is switched on ● Torque is enabled (STO Motor axis is actively in mo Initial state input is active). tion or torque is present. ● Drive controller gener ates torque. Motor axis coasts down or Test step 1 STO input becomes inactive. there is no torque and no er ror message occures. Drive controller can apply Test step 2 STO input becomes active. torque. Project engineering manual V1.00 © KEBA... -
Page 82: Validation Of Sbc Safety Function
Brake(s) is/are released. Validate cross circuit test If monitoring of STO inputs is undertaken by means of usage of testoutputs, e.g. usage of testoutputs of the supply module, this has to be validated in the following cases: ● During commissioning ● After changes to the application ● After repair or device replacement The following table shows the test steps to be undertaken. The table must worked through from top to bottom. Description State/Event Expected result ● System is switched on ● Inputs of safety func tions are active Brake and torque are en Initial state (switched on). abled. ● Drive controller has re leased brake(s). The safety system switchs off One of the testoutputs is break and torque after max. Test step 1 shorting against 24 V 2,4 s and an error message occures. Only applies in case SBC is active. Project engineering manual V1.00 © KEBA... - Page 83 D3DA 3xx/x Safety functions Information A restart is necessary to start the system again. Project engineering manual V1.00 © KEBA...
-
Page 84: Diagnosis
1 x 1 x Not ready (to switch on) 2 x 2 x Switch on disabled 3 x 3 x Axis ready (Ready to switch on) 4 x 4 x Axis switched on 5 x 5 x Operation enabled 6 x 6 x Quickstop Error code 7 x 7 x Fault reaction active Error code 8 x 8 x Error LED green long = in standby mode LED green short = control active Project engineering manual V1.00 © KEBA... -
Page 85: Maintenance
D3DA 3xx/x Maintenance Maintenance The D3DA 3xx/x is basically maintenance free. In case of error replace the device and send it back to KEBA. 10.1 Periodical functional test To guarantee the safety of the system once a year you must execute a func tional test of the SBC safety function. Therefore the safety function should be triggered with the corresponding sensor and the specified shutdown be haviour should be checked. Project engineering manual V1.00 © KEBA... -
Page 86: Disposal
Disposal D3DA 3xx/x Disposal 11.1 Disposal of the module Caution Please observe the regulations regarding disposal of electric appliances and electronic devices! ● The symbol with the crossedout waste container means that electrical and electronic devices including their accessories must not be disposed of in the household garbage. ● The materials are recyclable in accordance with their labeling. You can make an important contribution to protecting our envi ronment by reusing, renewing and recycling materials and old appliances. 11.2 Disposal of the battery Caution ● Pay attention to hazardous waste regulations when disposing of batter ies. ● Although batteries have a low voltage, they can provide enough current when shortcircuited to ignite flammable material. They should not be disposed of together with conductive material (e.g. iron filings, wire wool contaminated with oil, etc.) Project engineering manual V1.00 © KEBA... -
Page 87: Technical Data
Nominal power: 1.1 kW Power section Permissible switching frequencies: 2 / 4 / 8 / 12 / 16 kHz without motor holding brake with 10 m motor 3 8 kV / μs cable: Output frequency range @ 2/4 kHz 0 400 Hz Output frequency range @ 8 kHz 0 800 Hz Output frequency range @ 16 kHz 0 1600 Hz Ambient temperature 5 40 °C (up to 50 °C with derating) Axis module Dissipation @ (400 V / 4 kHz / I in the inte rior: ● D3DA 310/x01xx: 60.5 W ● D3DA 310/x03xx: 64 W ● D3DA 320/x01xx: 69 W ● D3DA 320/x03xx: 76 W ● D3DA 330/x01xx: 77.5 W ● D3DA 330/x03xx: 88 W Project engineering manual V1.00 © KEBA... -
Page 88: Current Data D3Da 3X0/X01Xx
At U = 480 V mains 2 kHz 4 kHz 8 kHz 12 kHz 16 kHz Nominal current: 1.5 A 1.5 A 1.3 A 0.7 A 0.3 A Maximum current for 10 s: 3 A 3 A 2.6 A 1.4 A 0.6 A Maximum current for 500 ms: 4.5 A 4.0 A 2.6 A 1.8 A 1.4 A Maximum current at F = 0 Hz: 3.1 A 2.6 A 1.7 A 1.2 A 0.9 A 12.1.2 Current data D3DA 3x0/x03xx Information Current data per axis in the axis module 400/480 V AC refers to the feed voltage for the supply module. Project engineering manual V1.00 © KEBA... -
Page 89: D3Da 3X0/X06Xx, D3Da 3X0/X12Xx
Control section Control voltage: 24 V DC +/ 10 % Control voltage on usage of a motor holding 24 V DC 5 % / + 10 % brake with cable length < 50 m: Power consumption mit Endstufe (without motor holding brake): ● D3DA 310/x 48 W ● D3DA 320/x 54 W ● D3DA 330/x 60 W Power output, output Motor holding brake: ● D3DA 310/x max. 48 W ● D3DA 320/x max. 2 x 48 W ● D3DA 330/x max. 3 x 48 W Intermediate circuit Capacity: ● D3DA 3x0/x06xx 165 μF ● D3DA 3x0/x12xx 405 μF DC resistance im intermediate circuit (DC+ to 146 kΩ DC): Project engineering manual V1.00 © KEBA... -
Page 90: Current Data D3Da 3X0/X06Xx
D3DA 330/x06xx 98.8 W ● D3DA 330/x12xx 141 W Dissipation @ (400 V/ 4 kHz/ P ) via heat sink: ● D3DA 310/x06xx 40 W ● D3DA 310/x12xx 87.3 W ● D3DA 320/x06xx 80 W ● D3DA 320/x12xx 174.7 W ● D3DA 330/x06xx 119 W ● D3DA 330/x12xx 262 W 12.2.1 Current data D3DA 3x0/x06xx Information Current data per axis in the axis module 400/480 V AC refers to the feed voltage for the supply module. Applies to each product variant: ● D3DA 310/x06xx: All values of the following tables ● D3DA 320/x06xx: All values of the following tables x 2 ● D3DA 330/x06xx: All values of the following tables x 3 Project engineering manual V1.00 © KEBA... -
Page 91: Current Data D3Da 3X0/X12Xx
36 A 29.5 A 20.2 A 13.7 A 10.1 A At U = 480 V mains 2 kHz 4 kHz 8 kHz 12 kHz 16 kHz Nominal current: 12 A 12 A 8.7 A 5.27 A 4 A Maximum current for 10 s: 24 A 24 A 17.4 A 10.4 A 8 A Maximum current for 500 ms: 36 A 36 A 20.9 A 15.5 A 12.4 A Maximum current at F = 0 Hz: 36 A 26 A 14.4 A 15.1 A 8.5 A Project engineering manual V1.00 © KEBA... -
Page 92: D3Da 310/X24Xx, D3Da 320/X16Xx
● D3DA 310/x24xx 5.2 kW ● D3DA 320/x16xx 3.1 kW Power section Permissible switching frequencies: 2 / 4 / 8 / 12 / 16 kHz Rate of rise of voltage on the output: 3 8 kV / μs (10%90%) Output frequency range @ 2/4 kHz: 0 400 Hz Output frequency range @ 8 kHz: 0 800 Hz Output frequency range @ 16 kHz: 0 1600 Hz Ambient temperature: 5 40 °C (up to 50 °C with derating) Axis module Dissipation @ (400 V/ 4 kHz/ I ) in the inte rior: ● D3DA 310/x24xx 103 W ● D3DA 320/x16xx 128.7 W Dissipation @ (400 V/ 4 kHz/ P ) via heat sink: ● D3DA 310/x24xx 176 W ● D3DA 320/x16xx 233 W Project engineering manual V1.00 © KEBA... -
Page 93: Current Data D3Da 310/X24Xx
72 A 59 A 40.4 A 27.4 A 20.2 A At U = 480 V mains 2 kHz 4 kHz 8 kHz 12 kHz 16 kHz Nominal current: 32 A 32 A 23.2 A 13.8 A 10.6 A Maximum current for 10 s: 64 A 64 A 42 A 27.6 A 21.2 A Maximum current for 500 ms: 80 A 75.6 A 41.8 A 31 A 24.8 A Maximum current at F = 0 Hz: 72 A 52 A 28.8 A 21.4 A 17 A Project engineering manual V1.00 © KEBA... -
Page 94: General Safety Specifications
System structure: 2channel 10 PFH: Typical: 3.55 * 10 Medium Prooftestinterval: 20 years "high demand" according to EN 61508 (high Dimensioning the operating mode: demand rate) Reaction time: 3 ms 12.5 Safe digital inputs Number of inputs: Inputtype: Type 1 (to EN 611312) Nominal voltage: 24 V DC PELV Max. input current: 15 mA Lowlevel range: 3 V DC to +5 V DC Highlevel range: +15 V DC to +30 V DC Electrical isolated: Crosscircuit detection: Yes, via test outputs OSSD compatible: Yes Effect by incorrectly connected inputs: Potential defect OSSD (Output Signal Switching Device) Testpulse, which should be fil tered, must get the following specifications: ● Duration of the test pulses must be ≤ 0.75 ms. Project engineering manual V1.00 © KEBA... -
Page 95: Ambient Conditions
Relative humidity of air: 5 to 85 % according to EN 618002, IEC 6072131 Storage: class 1K3 and 1K4 ● Temperature: 25 °C to +55 °C ● Relative humidity of air: 5 to 95% according to EN 618002, IEC 6072132 Transit: class 2K3 ● Temperature: 25 °C to +70 °C ● Relative humidity of air: 95% with max. +40 °C Vibration resistance: according to EN 618002 Shock resistance: according to EN 618002 IP20 (all connection terminals IP00), when Protection class: using safety functions, installation in IP54 cabinet necessary. to 1000 m over NN, above with performance Mounting height: reduction (1% per 100 m, max. 2000 mo. Contamination level: The absolute humidity is limited to max. 25 g/m³. That means that the max imum values for temperature and relative humidity stipulated in the table must not occur simultaneously. The absolute humidity is limited to max. 29 g/m³. So the maximum values for temperature and relative humidity stipulated in the table must not occur simultaneously. Project engineering manual V1.00 © KEBA... - Page 96 Technical Data D3DA 3xx/x 3) The absolute humidity is limited to max. 60 g/m³. This means, at 70 °C for example, that the relative humidity may only be max. 40 %. Caution The climatic conditions apply to the device. For this reason they must also be met in the cabinet. Caution The devices must not be installed in areas where they are exposed to con tinuous vibration. Project engineering manual V1.00 © KEBA...
-
Page 97: Ec Directives And Standards
13.2.1 Machine safety and functional safety Safetyrelated parts of control systems Part EN ISO 138491:2008 + AC:2009 1: General principles for design Functional safety of safetyrelated electrical, EN 62061:2005 electronic and programmable electronic con trol systems Functional Safety requirements of adjustable EN 6180052:2007 speed electrical power drive systems Functional safety of electrical, electronic, pro IEC 61508 17:2010 grammable electronic safetyrelated systems 13.2.2 EMC directives Adjustable speed electrical power drive sys EN 618003:2004 + A1:2012 tems – Part 3: EMC requirements and spe cific test methods Electrical equipment for measurement, con trol and laboratory use – EMC requirements Part 31: Immunity requirements for safety EN 6132631:2008 related systems and for equipment intended to perform safetyrelated functions (functional safety) – General industrial applications 13.2.3 Electrical safety and fire protection Safety of machinery Electrical equipment of EN 602041:2006 + A1:2009 machines Part 1: General requirements Adjustable speed electrical power drive sys EN 6180051:2007 tems Part 51: Safety requirements Elec trical, thermal and energy Project engineering manual V1.00 © KEBA... -
Page 98: Environmental And Surrounding Conditions
EC directives and standards D3DA 3xx/x 13.2.4 Environmental and surrounding conditions Adjustable speed electrical power drive sys tems Part 2: General requirements; rating EN 618002:1998 specifications for low voltage adjustable fre quency a.c. power drive systems 13.3 CE marking The D3DA 3xx/x meets the requirements for installation in a machine or plant in the context of the Machinery directive 2006/42/EG and the Low volt age directive 2006/95/EG. The D3DA 3xx/x is accordingly CE marked. The D3DA 3xx/x axis modules in a group with the D3DP 3xx/x supply modules and on observing the installation instructions and on the usage of cabels and accessories suggested in chapter 15.1 Accessories and 15.2 Connection technology meet the requirement of EMC directives 2004/108/EG. The CE marking on the type plate indicates conformity with the above directives. For validity of CE declaration see also chapter 15.3 Selection of mains filter (for number max. allowed axes and max. allowed complete cable length for all axes. 13.4 UL certification The UL certification is in preparation. 13.5 Loads on the mains due to harmonics Information to EN 6100032 :2006 The devices in the KeDrive are "professional equipment" in the context of EN61000 such that with a nominal connected load ≤ 1kW (or ≤ 16 A per mains phase) they fall within the scope of the standard. On the direct con nection of the supply module ≤ 1 kW to the public low voltage grid, either measures to conform with the standard are to be taken or the responsible utility must grant approval for connection. If you use our drives as a compo nent in your machine / system, the directive of the standards must be checked for the entire machine / system. Project engineering manual V1.00 © KEBA... -
Page 99: Declaration Of Conformity
D3DA 3xx/x Declaration of conformity Declaration of conformity Project engineering manual V1.00 © KEBA... - Page 100 Declaration of conformity D3DA 3xx/x Project engineering manual V1.00 © KEBA...
- Page 101 D3DA 3xx/x Declaration of conformity Project engineering manual V1.00 © KEBA...
- Page 102 Declaration of conformity D3DA 3xx/x Project engineering manual V1.00 © KEBA...
-
Page 103: Appendix
Appendix 15.1 Accessories The KeDrive system was supplemented with the following accessories: ● DMS2 synchronous servomotors, with: ● Encoders of type Hiperface, Hiperface DSL and Resolver ● Preassembled motor cable ● Preassembled encoder cable ● Data cables for fieldbus and communication with supply module ● Connector sets, PEconnection plate ● PCusersoftware e.g. KeStudioDriveManager ● Mains filter reduces conducted high frequency interference of the D3 DA 3xx/x axis module (For use on theD3DP 3xx/x supply module) ● Mains choke reduces the voltage distortions (THD) in the system and prolongs the life of the D3DA 3xx/x axis module (for use on the D3DP 3xx/x supply module) ● Brake resistor converts surplus regenerated energy into heat and in this way permits an even more dynamic movement process (for usage on the D3DP 3xx/x supply module). 15.2 Connection technology This chapter describes the various cables for connecting motors, which are available as accessories from KEBA KEBA . Caution If D3DA 3xx/x connection cables are equipped with an user specific con nector and not with KEBA's proposed connector, reduced electromagnetic immunity is possible. In this case the user has to ensure that the require ments of the EMC directive are met. Project engineering manual V1.00 © KEBA... -
Page 104: Connection Cable Xw P0Xxxx
... Outer and inner shields connected ... Shrinking tube overlaps the copper to copper strip strip (5 mm) ... Shield is fixed at the mounting plate ... Cable of length L ... Not connected Pin assignment at connection cable XW P0xxxx Connector S2 Connector S1 Color of wires / Signal (Drive control (Motorsided) identification systemsided) Black, white figure 1 Greenyellow n.c. Black, white figure 2 Black, white figure 3 Temp + Black, white figure 5 Temp Black, white figure 6 Br + Black, white figure 7 Br Black, white figure 8 15.2.2 Connection cable XW H0xxxx Information The cables are also used for signal connection of Hiperface DSL encoder and are only intended for a direct connection from the drive control system to the motor. If intermediate sockets are required, ensure that a continuous shielding of the Hiperface DSL elements from the drive control system to the motor is retained. The existing M23 connector may need to be replaced by another suitable connector. Project engineering manual V1.00 © KEBA... -
Page 105: Signal Cable Xw E10Xxx
... Connector drive control system sided ... Outer and inner shields connected ... Shrinking tube overlaps the copper to copper strip strip (5 mm) ... Shield is fixed at the mounting plate ... Cable of length L ... Not connected Pin assignment at connection cable XW H0xxxx Connector S2 Connector S1 Color of wires / Signal (Drive control (Motorsided) identification systemsided) Black, white imprint U U Greenyellow n.c. Black, white imprint V V Black, white imprint HDSL + White HDSL Brown Br + Black, white figure 5 Br Black, white figure 6 15.2.3 Signal cable XW E10xxx Illustration 1552: Structure of the signal cable XW E10xxx ... Connector motorsided ... Connector HDSUB Project engineering manual V1.00 © KEBA... -
Page 106: Signal Cable Xw R10Xxx
Data Black Sin + Purple Cos + Brown n.c. n.c. n.c. n.c. n.c. n.c. n.c. n.c. 15.2.4 Signal cable XW R10xxx Illustration 1553: Structure of the signal cable XWR10xxx ... Connector motorsided ... Connector HDSUB ... Cable of length L ... Outer shield connected with copper strip to housing Pin assignment at signal cable XW R10xxx Connector S2 Connector S1 Color of wires / Signal (Drive control (Motorsided) identification systemsided) Black Green Yellow Project engineering manual V1.00 © KEBA... -
Page 107: Signal Cable Xw 020
n.c. n.c. n.c. BrownBlue n.c. n.c. 15.2.5 Signal cable XW 020 Illustration 1554: Structure of the signal cable XW 020 ... Connector device 1 ... Connector device 2 ... Cable of length L Color of wires / Signal Connector S1 Connector S2 identification Tr. Data + WhiteOrange Tr. Data Orange Re. Data + Whitegreen BiData + Blue BiData WhiteBlue Re. Data Green BiData + WhiteBrown BiData Brown Project engineering manual V1.00 © KEBA... -
Page 108: Selection Of Mains Filter
15.3 Selection of mains filter The CE declaration of conformity currently only applies to variant 1 of the fol lowing table. max total Supply mod max. num length of Order num Filter type ber of axis motor ca bles NFD 3.1480 10 kW 120 m 78906 030 10 kW 450 m In preparation In preparation 10 kW 600 m In preparation In preparation 22 kW 120 m In preparation In preparation 22 kW 450 m In preparation In preparation 22 kW 600 m In preparation In preparation Project engineering manual V1.00 © KEBA... -
Page 109: Glossary
D3DA 3xx/x Glossary Glossary Project engineering manual V1.00 © KEBA... - Page 110 Glossary D3DA 3xx/x Project engineering manual V1.00 © KEBA...
-
Page 111: Index
D3DA 3xx/x Index Index Project engineering manual V1.00 © KEBA... - Page 112 Index D3DA 3xx/x Project engineering manual V1.00 © KEBA...
Need help?
Do you have a question about the D3-DA 3 Series and is the answer not in the manual?
Questions and answers