G3D T-1000 Manual
Uv 3d printers
Hide thumbs
Also See for T-1000:
- Quick start manual (4 pages) ,
- Manual (58 pages) ,
- Quick start manual (4 pages)

Related Manuals for G3D T-1000

Summary of Contents for G3D T-1000
- Page 1 UV 3D Printer Manual v1.8 The manual covers the most basic operations. For more information, please check g3dsys.com.
-
Page 2: Table Of Contents
Setting the build plate Setting the vat Removing the vat Powering on Powering down Connecting your device to T-1000 Printer WiFi Connecting via Ethernet Changing details of T-1000 Printer WiFi settings Connecting T-1000 to Home WiFi Resetting WiFi connection G3D Web User Interface... - Page 3 CONTENTS Cleaning guide Raising the build plate Removing the build plate G3D print workstation kit Removing the print Cleaning the print Cleaning the vat Cleaning the projector Cleaning the T-1000 Vat handling Troubleshooting Contact Resin Cure Matrix T-1000...
-
Page 4: Introduction
110 - 220 VAC, 0.8A 50 Hz - 60 Hz Operating Temperature 17ºC - 40ºC 62.6ºF - 104ºF SOFTWARE Connectivity WiFi / USB / Ethernet System compatibility Windows / Mac / Linux Supported file G3D, G3L / importable STL T-1000... - Page 5 153.6 mm x 115.2 mm x 300 mm 5308416 cu. mm 1.38 min/mm 7.06 in x 5.29 in x 11.81 in 440.92 cu. ln 35 min/in 175 μm 179.2 mm x 134.4 mm x 300 mm 7225344 cu. mm 1.38 min/mm T-1000...
-
Page 6: Package Contents
PACKAGE CONTENTS Be sure all items listed here were included with your printer. Resin Build Plate Clippers Scraper T-1000... -
Page 7: About 3D Printing
Z layer thickness or height. Once the model of the file is sliced, save the file as G3D file, this is now ready to upload in the G3D Web UI that will integrate with the T-1000 for printing. -
Page 8: Digital Light Processing
PASSWORD: G3D54321 DIGITAL LIGHT PROCESSING T-1000 has a completely custom designed UV LED light engine that uses the DLP technology to cure liquid resin into solid prints. Digital Light Processing (DLP) is a display device that uses a digital micromirror device. The display device is a projector that will flash a single image of each layer across the entire build plate at once. -
Page 9: Self-Leveling Vat
ABOUT 3D PRINTING SELF-LEVELING VAT The T-1000 has a self-leveling vat system which ensures accurate prints. After several prints there’s a possibility that the build plate can misalign after several usage. An unlevel build plate can cause first layer issues that can result in poor adhesion. -
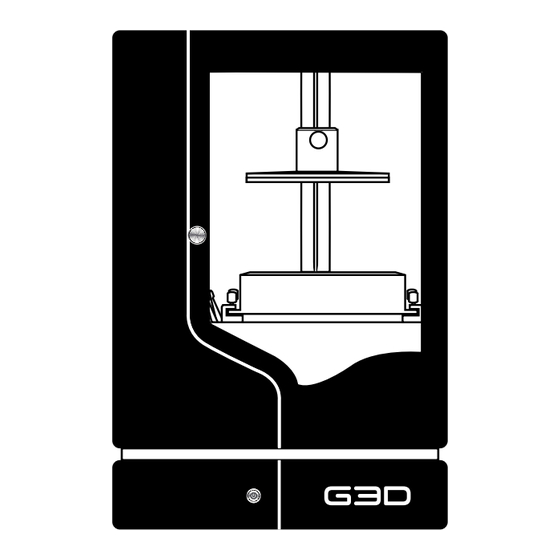
Page 10: Getting To Know The T-1000
GETTING TO KNOW THE T-1000 Build plate lock screw Servo panel Build plate USB port Acme thread Ethernet port WiFi reset Vat lock screw Power button Calibration lever T-1000... - Page 11 GETTING TO KNOW THE T-1000 Lifting handle Main switch Fuse holder Power cable T-1000...
-
Page 12: Safety
SAFETY Please read the following safety precautions before operating the T-1000 UV 3D printer. ELECTRICAL • Do not modify or disassemble the printer. • Modification to the printer voids warranty. • Ensure to discharge static electricity when you configure the printer or projector. -
Page 13: Explanation Of The Symbols
User has the choice to give his product to a competent recycling organization or to the retailer when he buys a new electrical or electronic equipment. Proof of compliance with the Canadian national standards adopted by the Standards Council of Canada (SCC) and US national standards. T-1000... -
Page 14: Terms And Conditions
G3D reserves the right to modify or revise this manual in its sole discretion and at any time. You agree to be bound by any modifications and/or revisions. Contact the G3D Support Team for up-to-date information. -
Page 15: Getting Started
GETTING STARTED SETTING THE BUILD PLATE 1. Remove the build plate lock screw. 2. Insert the build plate. 3. Insert and lock the build plate lock screw. T-1000... -
Page 16: Setting The Vat
See “Vat handling” on page 54. 1. Untighten all vat lock screws. VAT LOCK SCREW VAT INSERT 2. Insert the vat. *Spout should be at the back right of the printer. 3. Tighten all vat lock screws. VAT LOCK SCREW T-1000... -
Page 17: Removing The Vat
GETTING STARTED REMOVING THE VAT 1. Untighten all vat lock screws. VAT LOCK SCREW 2. Remove the vat. T-1000... -
Page 18: Powering On
1. Plug the power cable into a power outlet. Uninterruptible power supply recommended. POWER OUTLET 2. Turn on main switch. MAIN SWITCH 3. Press < > power button for 2-3 seconds. A red light-emitting diode (LED) will illuminate from the power button. POWER BUTTON T-1000... -
Page 19: Powering Down
POWERING DOWN 1. Press < > power button and hold it down for 5 seconds then release the power button. Wait until the light goes off. POWER BUTTON 2. Turn off main switch. MAIN SWITCH 3. Unplug the power cable. T-1000... -
Page 20: Connecting Your Device To T-1000 Printer Wifi
GETTING STARTED CONNECTING YOUR DEVICE TO T-1000 PRINTER WIFI 1. Search the “G3DPrinter” default (SSID) Printer WiFi in the network. It automatically appears 15 seconds after you power on the T-1000. Network Connected G3DPrinter Secured 2. Enter the password “G3D54321” to connect. -
Page 21: Connecting Via Ethernet
Information Filename Ethernet IP FE80::XXXX:XXFF:FE:XXXX%eth0 Wifi IP 10.0.0.1 Link Status Connected Vendor Global 3D Systems, Inc. Model T-1000 Software Version R.21 CONNECTING VIA ETHERNET Once you join your Home WiFi you can use Ethernet or use Ethernet only. ROUTER T-1000... - Page 22 2. Connect one end of an ethernet cable into your desktop’s network adapter. 3. Connect the other end of that ethernet cable on the port of your router. 4. Plug one end of an ethernet cable to ethernet port of T-1000. 5. Plug one end of that ethernet cable to the router.
-
Page 23: Changing Details Of T-1000 Printer Wifi Settings
GETTING STARTED CHANGING DETAILS OF T-1000 PRINTER WIFI SETTINGS This is optional unless you have multiple printers. 1. Press < >cogwheel icon. 2. Select <Printer WiFi>. Printer Configurations Printer WiFi Home WiFi Raise Plate 3. A printer configuration window will appear after you select the Printer WiFi. -
Page 24: Connecting T-1000 To Home Wifi
3. Open the web browser and type your <NewHostname:8080> to access the G3D Web UI. NewHostname:8080 CONNECTING T-1000 TO HOME WIFI This is optional, you do not necessarily need to connect the printer to your Home WiFi unless you want to receive updates. - Page 25 7. Connect the device to Home WiFi where the printer is also connected. 8. Wait 30 seconds and hit < > refresh button. 9. In web browser, if you haven’t changed the hostname configuration, type <g3dprint:8080> in the url box and press enter to access the G3D Web UI. T-1000...
-
Page 26: Resetting Wifi Connection
Once you are connected to your Home WiFi. The only way to re-connect your device to T-1000 Printer WiFi is to push manually the printer’s reset WiFi switch, located at the left panel of printer. Use a small pin to push the WiFi reset. This resets all of your WiFi settings to default. -
Page 27: G3D Web User Interface
Choose File Connected Vendor Delete File Global 3D Systems, Inc. Model Pre-print File T-1000 Software Version R.21 1. Press < Choose File> button. After you select the .g3d from the web browser, it will be uploaded in the Web UI. T-1000... -
Page 28: Updating The G3D Web User Interface
GETTING STARTED UPDATING THE G3D WEB UI When we update the G3D Web UI, you will receive a notification. 1. Make sure printer is connected to the internet. 2. Press < > update alert button. 3. Press <Yes> button to confirm. -
Page 29: Printing With T-1000
1. Press < New File> button. After you select the .g3d from the web browser, it will be uploaded in the Web UI. CHOOSING A FILE The G3D Web UI has several 3D files ready for printing. Layout and Slice software allows you to create .g3d files. -
Page 30: Uploading Files From Usb
PRINTING WITH T-1000 UPLOADING FILES FROM USB You can print a file from your USB by plugging it in the printer’s USB port. All .g3d files in the root of the USB will be automatically detected by the software and will be in the dropdown list of the G3D Web UI. -
Page 31: Setting Cure Time
3. Press < Pre-print File> button. After you select the .g3d from the web browser, it will be uploaded in the Web UI. After you select the .g3d from the web browser, it will be uploaded in the Web UI. - Page 32 PRINTING WITH T-1000 Check the XY resolution of the file in the info box. Always confirm that your printer is set to the correct XY. XY Resolution (µm) Information XY RESOLUTION OF FILE: 175 µm Filename Sphere.g3d XY Resolution (µm) Z Layer Thickness (µm)
-
Page 33: Calibrating The Vat
PRINTING WITH T-1000 CALIBRATING THE VAT It is important to level the vat after you purchase your printer or when you need to replace a vat. See “Removing the vat” on page 14 to replace a vat. See “Setting the vat” on page 13 to replace a vat. - Page 34 PRINTING WITH T-1000 CALIBRATING THE VAT 3. Gently push down the sides of the vat to check if the calibration levers are in unlocked position. 4. Press < Position Build Plate> button and <Yes> button to confirm. 5. Wait until movement has stopped.
- Page 35 PRINTING WITH T-1000 CALIBRATING THE VAT 7. Tighten all vat lock screws. VAT LOCK SCREW T-1000...
-
Page 36: Positioning The Build Plate
PRINTING WITH T-1000 POSITIONING THE BUILD PLATE You must always position the build plate before printing. 1. Untighten all vat lock screws. VAT LOCK SCREW 2. Press < Position Build Plate> button. Initial Layer Cure Time Tutorial Beginner Advanced Information No. - Page 37 PRINTING WITH T-1000 POSITIONING THE BUILD PLATE 3. Press <Yes> button to confirm. Initial Layer Cure Time Tutorial Beginner Advanced Information No. of Initial Layer Filename Sphere.g3d Confirm XY Resolution (µm) Initial Layer Cure Time Layers Cure Time The Build Plate and Vat will prepare for printing now.
-
Page 38: Filling The Vat
PRINTING WITH T-1000 FILLING THE VAT Shake the resin bottle before each use. Never overfill the vat past max line to avoid overflow and spill of resin inside the printer. 1. Pour resin into the vat before starting to print. -
Page 39: Pause Printing
PRINTING WITH T-1000 PAUSE PRINTING Pausing is not advised. 1. Press < Pause> button. Pause Tutorial Beginner Advanced Information Abort Filename Sphere.g3d Progress Estimated Time Remaining 00:30:20 Estimated Time Completion 12:07:50 You can add more resin during printing. ABORT PRINTING 1. -
Page 40: Adjusting The Projector
To effectively print a file, the XY resolution setting of the projector should have the same XY resolution indicated in the info box of G3D Web UI, if not issue will arise. Do not open the rear panel while the power is on. Before you remove the rear panel make sure to touch any metal frame of the printer to avoid electrostatic discharge damage. - Page 41 ADJUSTING THE PROJECTOR ADJUSTING THE XY RESOLUTION OF PROJECTOR 3. Unplug the power cable. 4. Remove screws. 5. Lift the panel to open. T-1000...
- Page 42 7. Set the required XY resolution of the file. XY RESOLUTION 100 u 125 u 150 u 175 u 175 (DEFAULT) PROJECTOR ADJUSTER KNOB 8. Put the projector adjuster knob into the slot for lock position. 100 u 125 u 150 u 175 u T-1000...
- Page 43 ADJUSTING THE PROJECTOR ADJUSTING THE XY RESOLUTION OF PROJECTOR 9. Tighten the projector adjuster knob, just enought to secure from slipping. 10. Insert hook panel to close. 11. Return screws. T-1000...
-
Page 44: Focusing The Projector
See “Calibrating the vat” on page 30. See “Raising the build plate” on page 47. Be alert of moving mechanism. 1. Remove the build plate lock screw. 2. Remove the build plate. T-1000... - Page 45 In preparation of focusing the projector, you need to open the front panel projector. Discharge static electricity. 3. Remove screws. 4. Lift to open the front panel projector. 5. Load a “G3D-TESTFILE-FOCUS” file with the same XY resolution setting as the printer. XY RESOLUTION CALIBRATION FOCUS TEST FILES 100 µm G3D-TESTFILE-FOCUS-XY100.g3d...
- Page 46 Pre-Print File> button. Pre-print File 7. Place a white paper with a square outline on top of the vat, dimension should be 50mm x 50mm. CALIBRATION SQUARE FOR FOCUS TEST 50mm x 50mm CALIBRATION SQUARE FOR FOCUS TEST 50mm 50mm T-1000...
- Page 47 Position Build Plate Cancel 10. Ensure that the projected uv light of “G3D-TESTFILE-FOCUS” has identical dimension with the calibration square. The projected UV light should be sharp. If the uv light is blurred, adjust the focus ring of the projector.
- Page 48 360 degree only. Do not remove the focus lock knob from the projector. FOCUS LOCK KNOB 12. Slowly dial the focus ring until the projected uv light of TestFocus appears sharp. FOCUS RING 13. After focus is perfect, lock the focus lock knob. FOCUS LOCK KNOB T-1000...
- Page 49 FOCUSING THE PROJECTOR 14. Press < Abort> button. Pause Abort 15. Insert and attach the front panel projector to the printer. 16. Return screws. 17. Attach the build plate to the bracket. See “Setting the vat” on page 13. T-1000...
-
Page 50: Cleaning Guide
REMOVING THE BUILD PLATE Do not remove the vat before the build plate to ensure that the resin will not drip inside the printer. Wear protective gloves. Wear safety glasses or goggles for eye protection. 1. Remove the build plate locking screw. T-1000... - Page 51 CLEANING GUIDE REMOVING THE BUILD PLATE 2. Remove the build plate from bracket. T-1000...
-
Page 52: G3D Print Workstation Kit
Print Workstation Tray Strainer *Build Plate Alcohol Tub Funnel *Clippers Water Tub *Bottle *Scraper *Not included in the G3D print workstation kit. *G3D Print Workstation Kit is optional, you can purchase separately. T-1000... -
Page 53: Removing The Print
1. Place the build plate with print on a flat ground. Use a scraper to remove the print from the build plate. 2. Use clippers to remove supports. CLEANING THE PRINT 1. Wash the print with grease cutting detergent soap. T-1000... - Page 54 CLEANING GUIDE CLEANING THE PRINT 2. Rinse the print with clean water. 3. Place the print inside the alcohol tub. 4. Soak the print for 2-3 minutes inside the alcohol tub. T-1000...
-
Page 55: Cleaning The Vat
■ Never mix used resin to new resin. Save old bottles for used resin storage. ■ Strainer not included in the print workstation kit. 1. Remove resin debris inside the vat. 2. Use a strainer to separate resin from any solid particles. Pour the left over resin to an empty bottle. T-1000... -
Page 56: Cleaning The Projector
2. Use a microfiber cloth if projector has dust. 3. Gently wipe the lens in a circular motion. CLEANING THE T-1000 AFTER PRINTING 1. Power down the printer. 2. Wipe the surface with a damp cloth to remove splash or splatter of resin. -
Page 57: Vat Handling
■ Replace the vat if there are any cracks or leaks. ■ Clean the vat after printing. ■ Do not leave the resin inside the vat when not in use or printing. ■ Do not expose the vat to excessive heat or direct sunlight. T-1000... -
Page 58: Troubleshooting
Q3. Why is the print misaligned after printing? 1. Make sure that the build plate is clean and without any evidence of residue. 2. Make sure to tighten the vat lock screws and calibration levers. T-1000... -
Page 59: Contact
CONTACT SUPPORT Our website has extensive documentation and troubleshooting information about your T-1000 3D printer. It’s a great resource when you want to try to solve issues quickly on your own. g3d@g3dsys.com If you need help resolving an issue with your T-1000 UV 3D printer, email our G3D Support Team. -
Page 60: Resin Cure Matrix
Z LAYER THICKNESS INITIAL LAYER CURE TIME NUMBER OF LAYERS CURE TIME (microns) (seconds) INITIAL LAYER (seconds) 97.5 67.5 37.5 97.5 67.5 37.5 97.5 67.5 37.5 97.5 67.5 37.5 Optimal Settings | (L) - Lowest Resolution | (H) - Highest Resolution T-1000... - Page 61 Z LAYER THICKNESS INITIAL LAYER CURE TIME NUMBER OF LAYERS CURE TIME (microns) (seconds) INITIAL LAYER (seconds) 97.5 67.5 37.5 97.5 67.5 37.5 97.5 67.5 37.5 97.5 67.5 37.5 Optimal Settings | (L) - Lowest Resolution | (H) - Highest Resolution T-1000...
- Page 62 Z LAYER THICKNESS INITIAL LAYER CURE TIME NUMBER OF LAYERS CURE TIME (microns) (seconds) INITIAL LAYER (seconds) 97.5 67.5 37.5 97.5 67.5 37.5 97.5 67.5 37.5 97.5 67.5 37.5 Optimal Settings | (L) - Lowest Resolution | (H) - Highest Resolution T-1000...
Need help?
Do you have a question about the T-1000 and is the answer not in the manual?
Questions and answers