
Related Manuals for Westermo Falcon Series


Summary of Contents for Westermo Falcon Series
- Page 1 User Guide 6660-2201 FDV-206-1D1S F A L C O N S E R I E S WeOS The Industrial Broadband Router www.westermo.com...
-
Page 2: Software Tools
Under no circumstances shall Westermo be responsible for any loss of data or income or any special, incidental, and consequential or indirect damages howsoever caused. -
Page 3: Before Installation
Do not use or store the unit in dusty, dirty areas, connectors as well as other mechanical part may be damaged. If the unit is not working properly, contact the place of purchase, nearest Westermo dis- tributor office or Westermo Tech support. -
Page 4: Agency Approvals And Standards Compliance
Agency approvals and standards compliance Type Approval / Compliance EN 61000-6-1, Immunity for residental environments EN 61000-6-2, Immunity industrial environments EN 61000-6-4, Emission industrial environments EN 50121-4, Railway signalling and telecommunications apparatus Safety EN 60950-1, IT equipment FCC Part 15.105 Notice: This equipment has been tested and found to comply with the limits for a Class B digital device, pursuant to Part 15 of the FCC Rules. -
Page 5: Declaration Of Conformity
Declaration of Conformity Westermo Teleindustri AB Declaration of Conformity The manufacturer Westermo Teleindustri AB SE-640 40 Stora Sundby, Sweden Herewith declares that the product(s) Type of product Model Art no Industrial ADSL/VDSL router FALCON, FDV-206-1D1S 3660-0100 is in conformity with the following EU directive(s). -
Page 6: Type Tests And Environmental Conditions
Type tests and environmental conditions Phenomena Test Description Test levels EN 61000-4-2 Enclosure contact ± 6 kV Enclosure air ± 8 kV RF field AM modulated EN 61000-4-3 Enclosure 20 V/m 80% AM (1 kHz), 80 – 2 700 MHz Fast transient EN 61000-4-4 Signal ports... - Page 7 RS-232 with its built in device server interface, making it perfect for analogue modem replacement projects. The Westermo Operating System (WeOS) is a feature rich operating system designed for the industrial markets. It provides the Falcon with cyber security functionality, such as DMZ, IPsec VPNs and a stateful inspection firewall configured to be secure by default.
-
Page 8: Interface Specifications
Interface specifications Power Rated voltage 24 to 48 VDC Operating voltage 19 to 60 VDC Rated current 460 mA @ 24 VDC 220 mA @ 48 VDC Rated frequency Inrush current, I 1 mA²s @ 24 VDC 3 mA²s @ 48 VDC Startup current* 760 mApeak @ 24 VDC 500 mApeak @ 48 VDC... - Page 9 115.2 kbit/s Data format 8 data bits, none parity, 1 stop bit, no flow control Circuit type SELV Transmission range 15 m Isolation to Power, DSL, Ethernet Galvanic connection to Serial, USB Connection 2.5 mm jack, use Westermo cable 1211-2027 6660-2201...
- Page 10 Electrical specification USB 2.0 host interface Data rate Up to 12 Mbit/s (full-speed mode) Circuit type SELV Maximum supply current 500 mA Isolation to Power, DSL, Ethernet Galvanic connection to Serial, Console Connection USB receptacle connector type A I/O / Relay output 30 Ω...
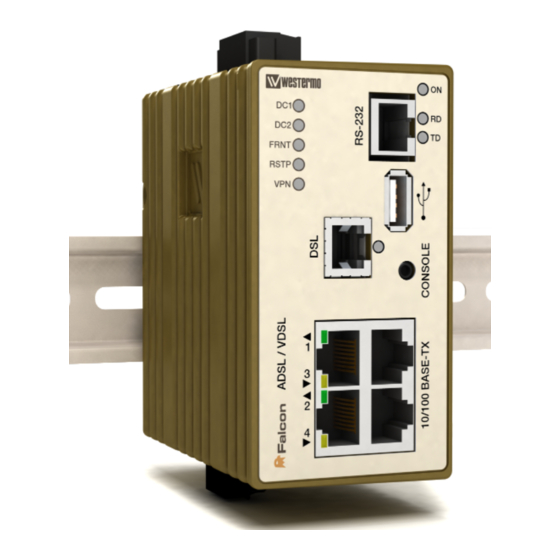
- Page 11 Location of interface ports and LED’s LED Indicators (for details see page 14) Power Connection (for details see page 8 and 12) RS-232 Position Direction* Description No. 1 DSR (Data Set ready) No. 2 DCD (Data Carrier Detect) No. 3 DTR (Data Terminal ready) No.
-
Page 12: Power Connection
Power connection 4-position Product marking Direction Description No. 1 +DC1 Input Supply voltage input DC1 No. 2 +DC2 Input Supply voltage input DC2 No. 3 -COM Input Common No. 4 -COM Input Common Falcon supports redundant power connection. The positive inputs are +DC1 and +DC2, the negative input for both supplies are –COM. -
Page 13: Connection To Console Port
The following steps needs to be taken 1. Connect the serial diagnostic cable to the console port (use only Westermo cable 1211-2027). 2. Connect cable to your computer (USB port, if drivers are needed they can be downloaded from our Web page). -
Page 14: Led Indicators
LED indicators Status Description Unit has no power GREEN All OK, no alarm condition. Alarm condition, or until unit has started up. (Alarm conditions are configurable, see ''WeOS Management Guide'') FLASH Location indicator ("Here I am!"). Activated when connected to IPConfig Tool, or upon request from Web or CLI. - Page 15 Mounting This unit should be mounted on 35 mm DIN-rail, which is horizontally mounted inside an apparatus cabinet or similar. It is recommended that the DIN-rail is connected to ground. Snap on mounting, see figure. Mounting Falcon with integrated DIN-clip: Removal Removing Falcon with integrated DIN-clip: Press down the support at the back of the unit using a screwdriver.
-
Page 16: Factory Default
1211-2027. IPConfig tool Discover your Westermo devices and configure basic settings, mainly the IP address. Use this tool if you cannot connect to the unit with it's current IP address. For more information about the IP Config Tool and how to use it, see chapter 4 in the Management Guide. - Page 17 Step-by-step guide to configure a DSL-connection using the web interface Power Connection ADSL/VDSL2 connection (RJ-11) PC/Ethernet connection (RJ-45) Step 1 – Power-up the unit and wait for it to become ready Connect the Falcon to the DSL-network using the RJ-11, connect an RJ-45 cable from one of the four Ethernet-ports to your PC, and then connect the unit to an appropriate PSU and power it up.
- Page 18 Please type in the following Username admin Password westermo Step 5 – Welcome screen You have now successfully logged into the unit and are ready to set up your DSL- connection using the simplified Basic setup-page Please click on Basic Setup under the Home-menu item.
- Page 19 Step 6 – Basic Setup The Falcon comes pre-configured to match connections using ADSL with VPI/VCI set to 8/35, no authentication and acquiring the IP via DHCP. Should the default settings not match your connection you can always change the parameters to match your specific details.
- Page 20 In the screen below the Falcon is reconfigured to use PPPoE with a username and a password as authentication, typically you would receive these details from your service provider. The unit is also changed from Annex A (PSTN) to Annex B (ISDN) and the VPI/VCI set- tings have been set to match a Deutsche Telekom connection in Germany.
- Page 21 → Network (IP) → Global settings and verify that you have an address in the Default Gateway-field. Step 10 – Test your connection In your Internet browser type in www.westermo.com and test your connection, you should be able to see the Westermo website. You are now ready to use the Falcon Industrial Broadband Router!
-
Page 22: Common Questions
WAN-interface (DSL) and the LAN-interface (Ethernet) to work correctly. If you disable the firewall those rules are removed. For more information read Chapter 23 in the Management Guide. Referring documents Type Description Document number Management Guide Westermo OS management guide 6101-3201 6660-2201... -
Page 24: Sales Units
France Singapore Other Offices infos@westermo.fr sales@westermo.com.sg www.westermo.fr www.westermo.com Germany Sweden info@westermo.de info.sverige@westermo.se www.westermo.de www.westermo.se For complete contact information, please visit our website at www.westermo.com/contact or scan the QR code REV. J 6660-2201 2016-06 Westermo Teleindustri AB, Sweden...
Need help?
Do you have a question about the Falcon Series and is the answer not in the manual?
Questions and answers