Advertisement
Quick Links
Download this manual
See also:
Operating Manual
YSI Model 550a Dissolved Oxygen (DO) Meter
The YSI 550a Dissolved Oxygen (DO) meter needs to be calibrated before being used in the field
each and every time you monitor. Once calibrated, the meter must be left on until you/your
team is done with monitoring activities for the day at all monitoring locations.
In order to avoid damaging the meter, do not let sponge inside the probe chamber dry.
Maintaining a damp environment in the chamber will help to ensure that your meter has high
quality performance throughout the field season. Keep sponge moist by re-wetting it, at least
bi-weekly, if not more frequently. If the sensor membrane becomes damaged, you will need to
replace it (contact the WAV coordinator for assistance) and then wait at least 1 hour before
calibrating and using the meter to monitor at your stream site.
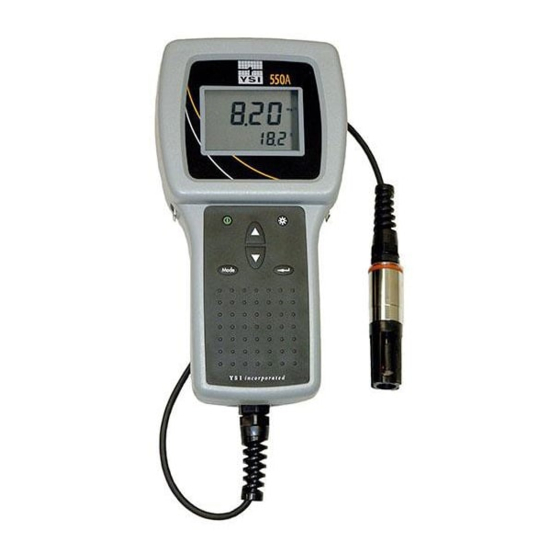
Get to know your YSI 550A DO meter
Probe: use to monitor water temp and dissolved oxygen content. Clean
the probe with DI water after each monitoring event and store in the
calibration chamber when not in use.
Maintaining your YSI 550A DO meter
Verify that the sensor membrane is in good condition by removing the sensor from the storage
chamber and check that the sponge is damp, if there are holes or tears in the membrane, and
for air bubbles beneath the membrane. If air bubbles or damage to the membrane is evident,
replace the membrane housing and solution. Ensure that membrane housing has been filled
with KCl solution for at least 1 hour before calibration and first use. Training videos for how to
calibrate the YSI 550A meter and monitor with it are available on the WAV website
(http://watermonitoring.uwex.edu/wav/monitoring/video.html). Please contact your local
coordinator or the WAV coordinator if you have any questions!
Water Action Volunteers – Level 2 Manual
I
n
s
t
r
u
m
e
n
t
d
i
s
p
l
a
y
I
n
s
t
r
u
m
e
n
t
d
i
s
p
l
a
y
I
n
s
t
r
u
m
e
n
t
d
i
s
p
l
a
y
: displays temperature in either °C or °F
and dissolved oxygen in either mg/L (milligrams per liter) or %
air saturation.
Power
button: powers the unit on or off.
Backlight
button: turns the display backlight on or off. The
light will turn off automatically after two minutes of non-use.
Mode
button: allows the user to select between % and mg/L
during calibration process. When monitoring, pushing 'Mode'
switches the instrument display between DO %, DO mg/L, and
salinity calibration.
Arrow
keys: increases or decreases the value during
calibrations.
: enter button
8
Updated January 2016
Advertisement

Related Manuals for YSI 550a


Summary of Contents for YSI 550a
- Page 1 YSI Model 550a Dissolved Oxygen (DO) Meter The YSI 550a Dissolved Oxygen (DO) meter needs to be calibrated before being used in the field each and every time you monitor. Once calibrated, the meter must be left on until you/your team is done with monitoring activities for the day at all monitoring locations.
- Page 2 YSI 550a DO Meter Calibration Procedure *Before calibrating your meter at the beginning of the field season, please fill out the top portion of the calibration log with the following information: Your name as well as that of any other team members ...
- Page 3 8. Press and release both the UP ARROW and DOWN ARROW keys at the same time to enter the calibration menu. The meter will say CAL on the screen in large letters and CAL in small letters in the lower left corner. This will stay on the screen until the calibration process is done.
- Page 4 15. Record the post-calibration D.O. (mg/L) on the calibration log. 16. Look up the calibration chart D.O. value (mg/L) from the table (available on the next two pages of this manual and as a laminated sheet in the monitoring kit). ...
- Page 7 YSI 550a DO Meter Monitoring Procedure Before going out to your stream site to monitor dissolved oxygen (or any parameter), please remember to fill out the top portion of the monitoring datasheet with your name (s), the station name, and the...
- Page 8 Oakton Acorn pH 5 and 5+ Meter WAV volunteers currently use one of three different pH meters: 1. pH 5 (original software and original outside casing) 2. pH 5 (updated software, but original outside casing) 3. pH 5+ (updated software and updated outside casing) pH 5 meter pH 5+ meter Which pH meter do I have?
- Page 9 In order to avoid damaging the meter, be sure to keep the pH electrode (specifically the bulb at the end of the probe) wet when not in use. Store the electrode in the electrode soaker bottle and keep it filled with electrode storage solution. Refresher storage solution can be found in your monitoring kit.
- Page 10 Cal. procedure - pH 5 meter with original software and original outside casing This calibration process will be completed by conducting two one-point calibrations. This means that the meter will complete a single point calibration and then exit calibration mode each time.
- Page 11 Cal. procedure - pH 5 meter with updated software, but original outside casing The updated software version in the pH 5 allows for you to complete a two-point calibration without ever leaving the calibration mode. After you press ENTER following the first calibration, the value on the screen will continue to blink, indicating that it is still in calibration mode (unlike the old version that stopped blinking after you hit ENTER and went into measuring mode).
- Page 12 **With the software update, the meter stays in calibration mode between buffer solutions in order to complete the two-point calibration. This means that you will not be able to record the temperature for the pH 10 buffer solution– either leave the space blank or scribble out the column ( ) so that you remember that you can’t fill in this column.
- Page 13 Oakton Acorn pH Meter Monitoring Procedure Before going out to your stream site to monitor pH (or any parameter), please remember to fill out the top portion of the monitoring datasheet with your name (s), the station name, and the station ID #, as well as the date and time of the monitoring...
- Page 14 Transparency Tube Sample Collection Collect the sample away from the stream bank in the main flow (well-mixed) area. Be careful not to disturb the stream bottom when you collect the water sample. If you get sediment from bottom disturbances, dump out the sample, move upstream (away from the disturbed area) and try again.
- Page 15 Transparency Tube Monitoring Procedure 1. Remove large objects from the water sample. a. If necessary, filter through a nylon stocking. 2. If the sample has settled, use a stirring stick to stir the sample, or pour the sample into a clean bucket and back into the transparency tube to suspend all materials.
- Page 16 Entering Monitoring Data into SWIMS NOTE: Your web browser should be Microsoft Internet Explorer version 5.5 or higher. 1. Use Internet Explorer and navigate to https://dnrx.wisconsin.gov/swims. 2. Enter your WAMS User ID and Password and click Sign In 3. Click the Submit Data tab along the menu bar at the top of the screen.
- Page 17 5. Select your monitoring site from the Project dropdown list a. Selecting the project SHOULD automatically select the monitoring station. i. Please double check that the project and the station match when entering your monitoring data. b. If your monitoring location is not listed in the drop down Project list, please do not enter your data at this time.
- Page 18 iii. To add a new person to the collector group, search their name in the ‘Search People/Groups’ field at the top of the window iv. Once complete, select Create and use this collector group to return to the main data entry screen 7.
- Page 19 11. Select the WAV Stream Monitoring 2015 form a. The WAV Stream Monitoring 2015 form should be selected automatically. If it is not, select it from the drop down list. b. If it is not available, you will need to contact the program coordinator to correct this before you will be able to enter your monitoring data.
- Page 20 14. Enter additional data in Comments a. Please, record any information that might help characterize your data. For instance, include information on any activity occurring upstream that may be affecting water quality, as well as observations you made regarding current weather, wildlife at the site, upcoming storms, etc.
- Page 21 19. This page is for entering streamflow data (green box) and monitoring equipment calibration information (orange box). a. If you did not monitor the streamflow, answer ‘No’ to the ‘Was streamflow monitored?’ question at the top of the page and LEAVE THE REST BLANK! b.
- Page 22 22. This page is for entering thermistor (continuous temperature monitoring device) data (blue box) on the back of the datasheet. a. Use the dropdown menus (when available) to record your responses b. Please remember to enter the time of deployment or retrieval of the thermistor (be sure to enter AM or PM using the dropdown menu to the right).
- Page 23 a. Enter the values recorded for each measured parameter. If you did not monitor the parameter, LEAVE IT BLANK! b. Use the dropdown menus when available to record your response. 25. If you entered biotic index data, click Save to save the data. a.
- Page 24 31. If you entered habitat data for streams >10m wide, click Save to save the data. a. You will now see the results for the calculated fields (grey lines). b. If not, skip this step and continue to Step 32. 32.
- Page 25 5. On this screen, you will be able to view all of the monitoring data that you recently updated or helped to collect (you were listed as a Data Collector) 6. Click the magnifying glass to view previously entered data or click on the pencil edit previously entered monitoring data.
- Page 26 d. WAV Citizen Monitoring Biotic Index - box on the back page of the monitoring datasheet (Step 24) e. WAV Streamflow - green orange boxes on the front page of the monitoring datasheet (Step 19) f. WAV_Thermistors - blue box on the back page of the monitoring datasheet (Step 9.
Need help?
Do you have a question about the 550a and is the answer not in the manual?
Questions and answers