
Related Manuals for Renkforce GX111


Summary of Contents for Renkforce GX111
- Page 1 Operating Instructions GSM Alarm Device with GPS Tracking „GX111“ Item No. 1168681...
-
Page 2: Table Of Contents
Table of Contents Page Introduction ................................4 Explanation of Symbols ............................4 Intended Use ...............................5 Scope of Delivery ..............................5 Safety Information ..............................6 Notes on Rechargeable Batteries ........................7 General Information .............................8 a) General Descriptions .............................8 b) Operating Mode .............................9 c) Alarm Mode ..............................10 d) Housing/Operating Elements ........................ - Page 3 Page 5. Temperature Limits („TEMP“) ........................27 6. Panic Alarm („S1“) ...........................28 d) Additional Functions ............................28 11. Location Determination ............................29 a) General GPS Localisation („GPS“) ......................29 b) Submission of a Web Link with GPS Position („GPSMAP“) ................30 c) Reading Date/Time and Synchronising clock („GPSDATE“) ...............30 d) Activate Position Tracking („TRACK“) ......................31 e) Programming the GPS Zone („GPSZONE“) ....................32 12. Email Dispatch of the Tracking Data ........................34 a) Configuration of the SMTP Access Data („SMTP“) ..................35 b) Configuration of the GPRS Access Data („GPRS“) ..................36...
-
Page 4: Introduction
1. Introduction Dear Customer, thank you for purchasing this product. This product complies with the statutory national and European requirements. To maintain this status and to ensure safe operation, you as the user must observe these operating instructions! These operating instructions are part of this product. They contain important notes on commissioning and handling. Also consider this if you pass on the product to any third party. Therefore, retain these operating instructions for reference! All company names and product names are trademarks of their respective owners. All rights reserved. If there are any technical questions, please contact: International: www.conrad.com/contact United Kingdom: www.conrad-electronic.co.uk/contact 2. -
Page 5: Intended Use
No part of this product must be modified or converted. The safety information must be observed at all times! This product complies with the statutory national and European requirements. All company names and product names are trademarks of their respective owners. All rights reserved. 4. Scope of Delivery • GX111 with rechargeable battery • Mini USB cable • Brief instructions The main manual for the product is available via download. Up-to-date operating instructions To download the latest operating instructions, visit www.conrad.com/downloads or scan the QR code on this page. Follow the instructions on the website. -
Page 6: Safety Information
5. Safety Information The guarantee/warranty will expire if damage is incurred resulting from non-compliance with these operating instructions. We do not assume any liability for consequential damage! Nor do we assume any liability for damage to property or personal injury caused by improper use or failure to observe the safety information. -
Page 7: Notes On Rechargeable Batteries
• Liquids leaking from rechargeable batteries are chemically highly aggressive. Objects or surfaces that come into contact with them may take severe damage. Therefore, keep rechargeable batteries in a suitable location. • Make sure that rechargeable batteries are not short-circuited, dismantled or thrown into fire. There is a danger of explosion! • Always observe correct polarity (observe plus/+ and minus/-) when connecting the rechargeable battery to the GX111. • Use only the enclosed rechargeable batteries or accessory rechargeable batteries of the same build to supply the GX111 with power. • If not used for a longer period (e.g. in case of storage), remove the inserted rechargeable battery from the GX111. If the rechargeable battery is too old, it may leak and cause damage to the product, which leads to the cancellation of the warranty/guarantee! • A damaged rechargeable battery must no longer be used. Dispose of it in an environmentally compatible manner. • Read chapter „Disposal“ about the environmentally friendly disposal of batteries. -
Page 8: General Information
7. General Information These operating instructions describe the function and operation at the time of printing (27 January 2014). Changes that serve product improvement can be performed by the manufacturer at any time. The most recent operating inst- ructions will be provided on the associated product page on www.conrad.com in a timely manner. The GX111 has an update function. However, an update should only be performed to solve wrong behaviour. Every update process has risks (e.g. cancellation during the update, etc.). It must be assumed that the product must be sent to the manufacturer after a defective update process. In the following, the most important items that you must observe when using the product are noted. All text message answer examples are to be understood symbolically. Actual implementation may vary. The examples should only show the information on the format and writing to be expected. -
Page 9: B) Operating Mode
b) Operating Mode The product is optimised for the longest battery life. This is achieved by targeted deactivation of the GSM-/GPS- module („OFFLINE“ mode). For the product to continue to be available, the GSM module will wake up automatically after a specific time („ONLINE“ mode) and check whether there are any new text messages. The standard settings are 15 minutes for the „ONLINE“ mode and 1425 minutes for the „OFFLINE“ mode (15 +1425 = 1440 minutes = 24 h). The „TIMEOUT“ command can be used to change these settings on demand (described farther towards the back of these instructions). A sensor alarm or push on the external button „S1“ will wake up the module at once. Each user activity (text message, USB data) will also reset the active timeout; you will have 15 minutes‘ time (by default) again after each action. -
Page 10: C) Alarm Mode
Alarm Mode There is the important alarm mode in parallel to and independent of the operating mode. This mode defines whether the GX111 is „armed“ as an alarm device and may send text message alarms when sensors are triggered and optio- nally issue an alarm sound. The conditions are as follows: ENABLE ALARM #1513 The alarm mode is switched on. DISABLE ALARM #1513 The alarm mode is switched off. Alarm mode on: This mode is entered via the command „ENABLE ALARM #<PIN>“. Whether the alarm mode is active or not can only be requested via the command „TEST STATUS #1513“. If the alarm mode is on and recognises an alarm incident via an activated alarm source (shock, position, …), all phone numbers in the phone book of the GX111 (not the SIM card!) will receive the corresponding alarm text message and an optional alarm sound can be issued. -
Page 11: D) Housing/Operating Elements
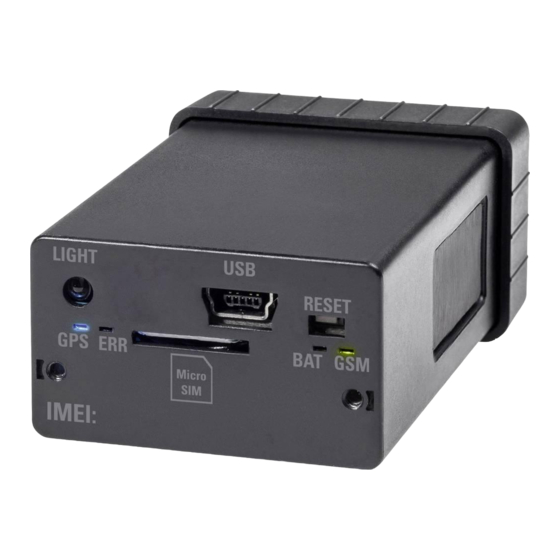
Housing/Operating Elements The GX111 has no further labels or LEDs on the outside because it is to be as unobtrusive and merge with its environment as well as possible. The figure shows the housing without the front cap. 3 11 1 Light sensor „LIGHT“ 2 USB-socket (charging rechargeable battery) 3 Button „RESET“ for resetting 4 Button „S1“ (wake up) 5 „GSM“ LED (green) 6 „AKKU“ LED (yellow) 7 Micro-SIM card holder (set the card‘s PIN to 1513!) 8 „ERR“ LED (red) 9 „GPS“... - Page 12 2 USB-socket (charging rechargeable battery) The rechargeable battery of the GX111 is charged via the USB socket and an interface is provided for control/ configuration of the GX111. Permanent operation (power supply) via USB is possible as well. Connected to the PC, a driver is needed for the „virtual COM port“ so that the GX111 can be configured/controlled via USB and a firmware update performed. The required software and firmware files are available online at www. conrad.com, in the download section for the product. The GX111 must only be used with the officially provided software (download area on the product website). 3 Button „RESET“ for resetting This button is used to restart the GX111. In combination with the button „S1“, the GX111 is reset to factory settings. For more information, see chapter „Factory settings“ farther back in these operating instructions. 4 Button „S1“ (wake up) This button wakes up the GX111 so that it can be configured in the „ONLINE“ mode via text message. USB con- figuration is only possible in „ONLINE“ mode either. The button for panic alarm can be configured as well. Once the button is pushed, a text message alarm is sent when the alarm mode is activated (command „S1“). 5 „GSM“ LED This LED is used to recognise the activity and status of the GPS module in the GX111. In the „ONLINE“ mode, this...
-
Page 13: E) Description Of The Connections
LED flashing sequences. 10 Screw connection The cover cap is attached here. 11 Position of the GPS receiver in the housing To warrant best GPS reception, the GX111 must have a free view of the GPS satellites in the sky. e) Description of the USB socket This connection is used to charge the rechargeable battery of the device with a charging current of 100 mA. This does not require drivers and any commercial USB plug-in mains unit can be used. A higher charging current (500 mA) requires release from a USB host (e.g. PC with USB-port). Only then will the charging times described in the technical data be available. -
Page 14: Commissioning - First Steps
8. Commissioning - First Steps The following is needed for operation and configuration of the device: • A conventional mobile phone that permits insertion of a micro SIM card for configuration of the GX111. If your mobile phone is not equipped for use with a micro-SIM card, you will need the corresponding adap- ter. • An additional micro SIM card for the GX111 • A USB port (PC, notebook or included mains adapter) with USB cable • A small Phillips screw driver for M2 screws to remove the covers of the GX111 a) Assembly and Charging of the Product The product is delivered with the rechargeable battery inserted. However, it is not connected to prevent deep dischar- Therefore, the housing of the GX111 must be opened and the PCB removed for first commissioning. Then the rechar- geable battery can be connected and the GX111 assembled again. Particularly observe the following items during assembly: Rechargeable battery connection: There is a connection for the rechargeable battery on the PCB side with the SIM holder right next to it. The plug is pushed onto the holder from the top. The plug is protected against polarity reversal. Rear cover (without opening for light sensor) The cover is firmly screwed to the housing and covers the large opening with the PCB and the rechargeable battery. -
Page 15: B) Changing The Pin Code To „1513
The following steps are required for this: • The micro SIM card intended for the product must be inserted in a mobile phone. If your mobile phone is not equip- ped for use with a micro-SIM card, you will need the corresponding adapter. • According to the operating instructions of the mobile phone, the PIN code must be changed to 1513. • The micro SIM card with the changed PIN code must be removed from the mobile phone. • The micro SIM card with the changed PIN code can now be inserted into the GX111 (see next chapter). We urgently advise against deactivating the SIM card PIN query. In addition to the risk at theft and con- nected illegal use, deactivation of the PIN function means that the device is used in a non-intended mode. There may be functional errors! c) Micro SIM Card Insertion The micro SIM card with the PIN number „1513“ must be inserted in the intended SIM card holder of the GX111. -
Page 16: Configuration Via Text Message
9. Configuration via Text Message To receive the full functional scope of the GX111, it must first be configured. The entire configuration is performed by simple text message commands you send to the GX111 (the phone number of the micro SIM card in the GX111) from your mobile phone. This method makes it possible to activate, deactivate or change the settings of the GX111 from anywhere. Alternatively, the GX111 can be configured via the USB interface using PC software (available via www.conrad.com). These operating instructions do not deal with configuration via PC software. This only describes how the product can be controlled via a mobile phone, without any other aids. To protect against unauthorised access, the GX111 generally reacts to authenticated messages only. In a text message, you authenticate yourself by including the correct SIM PIN of the GX111 (not the one of the mobile phone on which the text message has been written!). For your own safety, the SIM PIN number must be changed under all circumstances after commissioning of the product. This is described in the corresponding chapter. If the GX111 is in „OFFLINE“ mode (control commands via text message are not possible), the GX111 can be put into „ONLINE“ mode by pushing the button „S1“ on its side. The standard settings are 15 minutes for the „ONLINE“ mode and 1425 minutes for the „OFFLINE“ mode (15 + 1425 = 1440 minutes = 24 h). Introduction into the command format The text messages to program the GX111 are set up according to the following chart: <ACTION> <FUNCTION> <PARAMETER1> <…> <#PIN> Examples: SET TEL1 +49177556644221 #1513 (phone book) RESET... - Page 17 A parameter may be the following: List: You may choose a parameter from a pre-defined list. e.g.: DE, EN Writing: <DE/EN> Number: An integer without decimal digits. e.g.: 60 = time [seconds] (SET IDLEALARM 60 #1513) More information: • Capitalisation is not relevant; you may use capital and small letters as you wish. • Every new command of the same function will overwrite the previous settings. • After every valid text message command, the GX111 will send a text message answer to confirm programming to your mobile phone (if the PIN in the text message command was correct).
-
Page 18: Functional Descriptions
10. Functional Descriptions The following examples assume that the PIN is „1513“. The action „TEST“ ALWAYS contains answering with the correct parameters for the function and thus is not indicated. Several functions share one answer text message to use the maximum of a text message. The action „RESET“ is ALWAYS resetting of a function to the factory settings (all parameters). Deviations are indicated separately below. a) Determining „STATUS“ The command „STATUS“ returns a summary of the most important settings and conditions of the GX111. TEST STATUS #1513 Then the GX111 sends an answer text message. Example (the right column shows only a description; it is not contained in the text message): GX111 01.XX Name of the GX111, firmware version GSM: 59% GSM signal strength... -
Page 19: B) General Configuration Commands
SET PIN 1234 #1513 For every new text message command, the new PIN code now has to be appended (to stick with the example: 1234), preceded by a crosshatch (#). If the wrong PIN code is entered or the PIN code is not sent, you will not receive an answering text message. Changing of the PIN code will change both the settings of the product and the PIN code of the micro SIM card! The PIN code always has 4 digits. There is no „TEST“ action for testing this function. If you lose the PIN code, the GX111 can be reset to factory settings (see chapter „Factory Settings“). All settings will be lost when resetting! Then the device must be set again. Resetting the GX111 to factory settings will not affect the micro SIM card. The PIN code of the micro SIM card is not changed. 2. Changing the Device Name („NAME“) If several GX111 are operated at the same time, it is recommended to assign a different name to each GX111. This makes it easier to assign alarm messages to the correct device. -
Page 20: Setting The Language (Function „Language")
3. Setting the Language (Function „LANGUAGE“) The GX111 sends alarm text messages in the German language. If the text messages are to be sent in the English language, send the following text message command to the GX111: SET LANGUAGE EN #1513 To receive the text message in German again, send the following text message command to the GX111: SET LANGUAGE DE #1513 4. Administration of the Phone Book (Functions „TEL“, „TEL1“,…) The GX111 can save up to 4 phone numbers. In case of alarm, a notification text message is sent to each of these phone numbers. These phone numbers can also use the function „INCALL“. If the same number is in the list several times, it will receive the same text message as many times. The GX111 may process phone numbers in national and international format. However, the international format should be used at all times, since use abroad may cause problems otherwise. Example: 0172/xxxxxxxx (national) becomes +49172xxxxxxxx (international) Saving Phone Numbers Use the following command to save a phone number in the GX111: SET TEL1 +49111… #1513 SET TEL2 +49222…... - Page 21 After sending the command „SET TEL1..“, you will receive a text message answer with a list of saved phone num- bers: GX111 1.xx TEL1: +49111… TEL2: +49222… TEL3: +49333… TEL3: +49444… Deleting the phone numbers saved To delete phone number 1 and 3, for example, you need to send two text messages: RESET TEL1 #1513 RESET TEL3 #1513 After sending the command „RESET TEL...“, you will receive a text message answer. Testing phone numbers To check the phone numbers stored in the product, use the following command: TEST TEL #1513 The text message commands (SET TEL1, SET TEL2, SET TEL3,…) with a specified phone number only change the phone number of the corresponding memory. The numbers of the other phone book entries are retained.
-
Page 22: C) Configuration Of The Sensors
Configuration of the Sensors The GX111 has various sensors that can be used to trigger an alarm. The shock sensor reacts to mechanical shock, e.g. when an object drops down. The position sensor recognises inclinations/position changes and falling over of the object. The brightness sensor can record a change of brightness of the ambience lighting, e.g. opening of a drawer (the sensor also recognises UV and IR light). Whether alarm is triggered at all (sending text message) is centrally controlled by the command „ENABLE ALARM“ or „DISABLE ALARM“. The following commands are used to configure which of the sensors are allowed to trigger alarm at once and where the acceptance thresholds are. -
Page 23: Shock („Shock")
2. Shock („SHOCK“) This sensor reacts to shock from any direction. An internal measured value is determined that is derived from the acceleration. Even movements and permanent accelerations below the threshold do not trigger alarm. The following command sets the threshold for shock to the value <threshold> and the minimum time for occurrence of the shock to 1 second: SET SHOCK <threshold> #1513 Threshold: 1 - 10 (1 = minimum sensitivity, 10 = maximum sensitivity) The following command sets the threshold for shock to the value <threshold> and the minimum time for occurrence of the shock to <trigger time>. SET SHOCK <threshold> <trigger time> #1513 Threshold: 1 - 10 (1 = minimum sensitivity, 10 = maximum sensitivity) Trigger time: 1 - 255 (seconds); this corresponds to the time that a shock must persist before an alarm is triggered. The following command sets the threshold for shock to the value <threshold> and the minimum time during which no shock occurs to <trigger time>. The additional parameter „INV“ inverts the alarm criteria, i.e. the alarm is triggered if there is no shock for a set period of time. - Page 24 Description: The top line shows the „shock impulses“ above the set shock threshold „8/10“. Above it, it has been marked from when onwards which „SHOCK“ settings are valid. The middle line shows the „IDLE TIMER“ described in the chapter on the command „IDLEALARM“. The „IDLE TIMER“ defines the shortest distance between two text message alarms. This is particularly important for fast alarm sources that would otherwise cause many alarm messages to be sent before you can react (e.g. shock from movement of a stolen vehicle). The bottom line shows when the sensor would trigger an alarm message („ALARM SMS“) at the valid settings and which ones would be blocked by the „IDLE TIMER“ („IDLE“). „SET SHOCK #1513“ (without time) or „SET SHOCK 1 #1513“ ( time = 1 s) cause immediate alarm once a shock is above the threshold. The shock is measured at 250 kHz. When the alarm is triggered, the „IDLE TIMER“ is started at the same time. During this time, the sensor cannot trigger a new alarm even if the condition for a new alarm would be present. „SET SHOCK xxx #1513“ (xxx = time indicated in seconds) requires all (!) sensor values to be above the shock threshold within these, e.g., 10 seconds.
-
Page 25: Position Change („Slope")
Diagonal angles are not considered. A „diagonal“ zero position of the GX111 can reduce the accuracy of the angle calculation. The GX111 therefore should always be in parallel with the surface of the earth on the one side. -
Page 26: Brightness Change („Light")
4. Brightness Change („LIGHT“) At the front, there is a brightness sensor that can be used to monitor light intensity. The following command measures the current ambience brightness and sets the next-higher (!) threshold as refe- rence. When this (higher) threshold is exceeded, alarm is triggered. SET LIGHT #1513 The following command specifies the indicated ambience brightness threshold. When this threshold is exceeded, alarm is triggered. SET LIGHT <threshold> #1513 Threshold: 1 - 10 (1 = minimum sensitivity, 10 = maximum sensitivity) Example: 1 = GX111 in a dark room will recognise light 10 = GX111 in a bright room will recognise additional light Deactivate the alarm with the following command: RESET LIGHT #1513 The sensor has a wider range than the human eye. Accordingly, observe light sources outside of the visible range (IR = infrared and UV = ultraviolet), particularly in case of continuous wrong alarms. The cap and its window for the sensor reduce sensitivity and the measurable spectrum of light. You need to consider the effects depending on site of use; in any case, check that the alarm is triggered correctly at the installation site of the GX111. -
Page 27: Temperature Limits („Temp")
5. Temperature Limits („TEMP“) The sensor is located on the PCB and thus only determines the temperature within the housing. Quick temperature changes thus cannot be recognised since the housing of the GX111 has to heat up or cool down first. You can set a MAX and MIN temperature value for the temperature sensor. If the MIN value is undercut or the MAX value exceeded, an alarm message is sent to all stored phone numbers. SET TEMP <upper threshold> <lower threshold> #1513 Upper threshold: max. 55 °C (corresponds to the standard value for the upper threshold) Lower threshold: min. -4 °C (corresponds to the standard value for the lower threshold) -
Page 28: Panic Alarm („S1")
RESET S1 #1513 The answer to this command can be delayed by up to 1 minute due to the GPS search. Immediate locali- sation is more important, since this documents the location of the incident. The time of reaction to the alarm text message, in contrast, is not known at all - therefore, GPS search takes precedence. d) Additional Functions Alarm History („ALARMHISTORY“) The triggered alarm is logged in the device using a list. The list can save 2730 alarm entries. If the number of alarms exceeds the threshold of 2730, the oldest entries are overwritten. Since the alarm entry contains the date and time, alarm entries are only written into the list if the date in the GX111 has been set (see chapter „GPSDATE“). The time is indicated in UTC. If the following command was sent to the GX111, the two latest alarms are returned. TEST ALARMHISTORY #1513 If more alarm entries are to be sent, you can add another parameter. This parameter is only considered when sending command by text message, to avoid undesired costs. TEST ALARMHISTORY <n> #1513 The parameter <n> specifies the number of Alarm entries to be sent out (1 to 10 of the latest alarms). Up to 2 Alarm messages from the history per text message can be sent. To delete the entire list of alarm entries in the GX111, use the following command:... -
Page 29: Location Determination
GX111 leaves a pre-defined (permitted) area („GeoFence“). All functions in connection with position determination are explained below. First a few technical notes: Depending on receiver position in the GX111, sight connection to the sky and the weather situation, it may take up to 5 minutes until a GPS localisation can be performed. The time until the first location is recognised may be reduced by optimised receiver location. Within the first 30 minutes after first location determination, the GPS position data may have a higher deviation. This is connected with the GPS signal that requires correction data for high accuracy (keyword:... -
Page 30: B) Submission Of A Web Link With Gps Position („Gpsmap")
The command for this function is: TEST GPSMAP #1513 If the link is opened with a Smartphone, the current location will be displayed. An example for what this may look like is shown in the figure on the right. The linked-to OpenStreetMap.org website requires a current browser to display and control the map material. Therefore, a cur- rent Smartphone with an internet connection is needed. c) Reading Date/Time and Synchronising clock („GPSDATE“) The clock in the GX111 is automatically synchronised with the time delivered by the GPS signal and the date during system start. If no GPS signal is available, the system time of the GPS signal is unchanged (the clock installed in the GX111 is not updated and thus continues to run unchanged). In this case, you will receive the answering text message „No GPS reception!“. This command manually starts a search for the current time via GPS: SET GPSDATE #1513 The current date and time are read from the GPS signal and the internal clock is synchronised. If no GPS is available, the clock is not set. -
Page 31: D) Activate Position Tracking („Track")
64512 position entries are saved in the GX111. If the number of entries is exceeded, the oldest 64 entries are deleted and overwritten with new data. Save settings: Use the following command to configure and activate the records: SET TRACK [<Name>] #1513 The parameter <Name> is optional and serves only to assign an internal name for recording (up to 10 characters). In the basic settings, the name is „TRACKING“. If the character length is exceeded, the GX111 returns an error message and tracking is not started. If tracking is activated, the GX111 remains in „ONLINE“ mode at all times. The „TIMEOUT“ settings no longer have any effect. If no GPS data can be found, recording is interrupted for this period. Once new GPS data are received, recording continues. Checking settings: To check the settings for the recording mode, use the command: TEST TRACK #1513 After sending the command, you will receive an answer text message (the time is indicated in UTC time). Example: GX111 1.xx... -
Page 32: E) Programming The Gps Zone („Gpszone")
Stopping recording: To stop recording of the tracking data, send the command: RESET TRACK #1513 The tracking data should be primarily downloaded via USB. Optionally, there is the operation of email dispatch as well. Email dispatch requires higher technical knowledge. For more detailed information, see the chapters on the commands „GPRS“, „SMTP“ and „TRACKDATA“. e) Programming the GPS Zone („GPSZONE“) The GX111 may be used for zone monitoring („GeoFence“). After programming the approved zone, each time the zone border is crossed, an alarm message with the current GPS coordinates will be sent to all saved phone numbers. If the zone monitoring is activated, the GX111 is always in „ONLINE“ mode. This reduces battery life con- siderably. Therefore, this function should only be used when supplied with power externally via USB. The following command sets the zone parameters and activates them automatically: SET GPSZONE <latitude1> <direction> <longitude1> <direction> <latidude2> <direction> <longitude2> <direction> [<ZoneName>] #1513 Important prerequisites: • <Latitude1> must be further North than <Latitude2>. The following must apply: <Latitude1> larger than <Latitude2>. The <direction> for the latitude is N (North) or S (South). • <Longitude1> must be further West than <Longitude2>. - Page 33 The format of latitude and longitude must be indicated in the „NMEA-0183“ format. The following example shows the data input format: SET GPSZONE 4932.4457 N 01156.5208 E 4932.4101 N 01156.8533 E test #1513...
-
Page 34: Email Dispatch Of The Tracking Data
12. Email Dispatch of the Tracking Data The GX111 is able to send the tracking data saved with the command TRACK by email. However, this requires advan- ced knowledge in the area of SMTP protocol, internet architecture, email configuration, etc. Problem server timeout, bad data connection, GPRS speed: The product has a GPRS module and thus a maximum upload data speed (from the GX111 to the Internet) of 53.6 kbit/s. Even under the best conditions, complete uploading of the tracking data would take at least 8 minutes. At GSM radio mast change, in rural areas (weak signal), with high network utilisation (conurbations) or other difficul- ties, there may be interruptions of the email-server connection. The longer a connection takes, the higher the probability of cancellation. It cannot be predicted how long the connec- tion is retained and how high the data rate will be. Therefore, you as the user of the GX111 must decide what „Risk“ is to be taken for the transmission volume. Each unsuccessful attempt will be charged by the GSM provider, no matter if the email was sent successfully or not. For this reason, the area and thus the data volume to be transferred, is chosen when sending the tracking data. The bigger the data volume, the bigger the risk. The area input permits transmission of the memory in several small steps. Due to the complexity of the many variation options, the technical support for this area is limited. Only help with configuration on the side of the GSM module can be offered. -
Page 35: A) Configuration Of The Smtp Access Data (Smtp)
Login name: max. 30 characters Password: max. 15 characters EHLO means „Extended HELO“ and is part of the SMTP protocol. Some servers require EHLO. Example: SET SMTP xxxgx111@yahoo.de smtp.mail.yahoo.com 25 1 xxxgx111@yahoo.de Password #1513 The following command will return the current configuration by text message: TEST SMTP #1513 You will receive, e.g., the following confirmation text message: GX111 01.xx SMTP: smtp.mail.yahoo.de Addr: xxxgx111@yahoo.de Port: 25 Login: xxxgx111@yahoo.de PW: XXX Config: SSL The password is not indicated in plain text in the answer, but as a character string „XXX“. Here some examples for email configuration: Yahoo.com Arcor.de Google SMTP smtp.mail.yahoo.com... -
Page 36: B) Configuration Of The Gprs Access Data („Gprs")
APN server settings and account data. You may need to research how this is implemented abroad via your provider. SET GPRS <APN> [<User name>] [<Password>] #1513 APN: Access point name, max. 30 characters User name: optional, max. 10 characters Password: optional, max. 10 characters If one of the character lengths is exceeded, the GX111 returns an error message and the values are not saved. Both optional parameters or no optional parameter must be indicated at all times! Example: SET GPRS internet.eplus.de eplus eplus #1513 You will receive, e.g., the following confirmation text message: GX111 01.xx APN: internet.eplus.de Login: eplus... -
Page 37: C) Transmission Of The Tracking Data („Trackdata")
Transmission of the Tracking Data („TRACKDATA“) The command TRACKDATA only works via text message if SMTP and GPRS have been set first. After receipt of this command, the GX111 will send an email via SMTP server with the tracking data as an attached file. The size of the file can be up to approx. 3.26 MByte. The tracking data are present in CSV format and prepared for further processing, e.g., in a spreadsheet programme (e.g. Microsoft Excel). The data are present in the text file as described below: Date, time, latitude, direction, longitude, direction, track name <line change> Example: 13.05.2013,16:10:41,01156.6192,E,4932.4173,N,Name The time is indicated in UTC time, the GPS data are indicated in the format „NMEA-0183“, the name cor- responds to the respective programming by TRACK command Conversion of tracking data (NMEA) to decimal digits: Latitude: 01156.6192 = 011 degrees, 56.6192 minutes = 011 + (56.6192 / 60) = 11.943653 degrees Longitude: 4932.4173 = 49 degrees, 32.4173 minutes = 49 + (32.4173 / 60) = 49.540288 degrees Command to read the tracking data: The following command indicates which area of the tracking memory is to be sent by email: TEST TRACKDATA <First entry> <Last entry> #1513... - Page 38 If a memory area that has not been filled yet is requested, an empty file is returned. Important! During the transmission time of the email, the GX111 will not accept any commands, no tracking data are saved and no alarm situations are recognised. Command to delete the tracking data: The following command deletes all tracking data in the memory of the GX111: RESET TRACKDATA #1513...
-
Page 39: System Functions
13. System Functions This chapter explains various important system functions. The basic settings of these system functions are usually already selected perfectly for most areas of application. Therefore, we recommend only adjusting these parameters in the respective application cases. If the GX111 has any malfunctions, reactivate the default settings first. Before contacting our hotline (see chapter 1), always ensure that the GX111 is in the standard configuration (factory settings) again. a) Time between Two Alarm Messages („IDLEALARM“) In case of alarm, the GX111 will send an alarm message. From this time onwards, a time window (idle window) starts for this input (sensor, GPS, etc...); during this time, no other alarm can be triggered. This reduces the text message costs caused by an incorrectly set configuration of the GX111. Every alarm source has its own idle time window. A value of 120 seconds is set in the factory for the idle time window. -
Page 40: B) Online/Offline Times Of Gsm („Timeout")
Resetting online/offline times to the default settings Send the following command to restore the factory settings: RESET TIMEOUT #1513 „ONLINE“ mode: 15 minutes „OFFLINE“ mode: 1425 minutes Time conduct of the GX111 without a triggering alarm: The GX111 switches its mode in the configured intervals. Timeout SET TIMEOUT <online> <offline> #1513 offline offline offline... - Page 41 Time conduct of the GX111 with a triggering alarm: Online time: 15 minutes, offline time: 60 minutes The GX111 is in „OFFLINE“ mode (60 minutes). After the alarm was detected, the GX111 will switch to „ONLINE“ mode for 15 minutes. In these 15 minutes, the alarm text message is sent to all entered phone numbers before the device waits for the end of the 15 minutes. The GX111 switches back to „OFFLINE“ mode for the configured 60 minutes.
-
Page 42: Error And Led Flashing Sequences
„ERR“ LED The „ERR“ LED displays different error messages and „Busy“ signals. The messages are put out with a flashing code for better differentiation. This sequence is repeated. Additionally, there is the diagnosis mode in which the function of the „ERR“ LED is assumed. For more information, see chapter 10. c) on the command „DIAGNOSE“. „ERR“ LED is not lit • no error has occurred • GX111 is not supplied with power or the rechargeable battery is flat • Booting and self-test completed „ERR“ LED is always lit • PIN-error • PUK-must be entered • a hardware error has been found during the self-test (connect the GX111 to a PC and check the USB-protocol) „ERR“ LED flashes slowly, LED on for 1 second, off for 1 second • GX111 is booting... -
Page 43: B) „Gsm" Led
„GSM“ LED „GSM“ LED is not lit • The GX111 is not supplied with power. • The GX111 is in „OFFLINE“ mode. „GSM“ LED flashes quickly, LED on for 0.5 seconds, off for 0.5 seconds • Searching for GSM network. „GSM“ LED flashes slowly, LED on for 1 second, off for 1 second • The GX111 is logged on to the GSM network or the GPRS connection is active. -
Page 44: Reset To Default
Important! The PIN of the GX111 is reset to the default value #1513 in the reset. The PIN of the SIM card remains unchanged, however. If you have set the SIM card‘s PIN to any other value than 1513, the GX111 will no longer work after the reset, and you have to change the PIN of the GX111 accordingly! To reset the GX111 to the factory settings via the buttons, proceed as follows (this must be done within 3 seconds): • Keep the button „S1“ pushed • Briefly push the button „RESET“. • Release the button „S1“ again. If the button „S1“ is pushed for more than 3 seconds in total, the GX111 will not be reset to the factory settings, since it is assumed that you pushed the button by accident. After successful resetting to factory settings, a flashing pattern is output via the „ERR“ LED. The „ERR“ LED flashes 3 times in quick sequence (0.25 seconds on, 0.25 seconds pause, etc.). 16. Maintenance and Cleaning The product is maintenance-free for you. Servicing or repair must only be carried out by a specialist or specialist workshop. There are no components on the inside of the product that need maintenance by you. This is why you should never open/disassemble it (apart from the work described in these operating instructions for inserting/changing the rechargeable battery). -
Page 45: Declaration Of Conformity (Doc)
17. Declaration of Conformity (DOC) Conrad Electronic SE, Klaus-Conrad-Straße 1, D-92240 Hirschau, hereby declares that this product conforms to the 2014/53/EU directive. Click on the following link to read the full text of the EU declaration of conformity: www.conrad.com/downloads Select a language by clicking on the corresponding flag symbol, and then enter the product order number in the search box. The EU Declaration of Conformity is available for download in PDF format. 18. Disposal a) General Information Electrical and electronic products must not be disposed of in domestic waste. Dispose of the product according to the relevant statutory regulations at the end of its service life. -
Page 46: Technical Data
19. Technical Data Operating voltage ..........5 V/DC via USB Current consumption via PC ........< 500 mA Required battery ............LiPo, 1500 mAh, rated voltage 3.7 V Rechargeable battery charging time (min = at the PC) ...........Sleep mode min/max 3.5 h / 16 h Tracking min/max 4.2 h / 160 h Rechargeable battery runtime (at +22 °C) ....+ SHOCK / SLOPE 104 days + LIGHT 38 days + VOICE 24 days + GSM + GPS tracking 0.5 days Accuracy TIMEOUT ..........±3% GSM module ............GE864-GPS GSM frequency bands ...........GSM 850 (824 - 894 MHz) GSM 900 (880 - 960 MHz) - Page 48 This is a publication by Conrad Electronic SE, Klaus-Conrad-Str. 1, D-92240 Hirschau (www.conrad.com). All rights including translation reserved. Reproduction by any method, e.g. photocopy, microfilming, or the capture in electronic data processing systems require the prior written approval by the editor. Reprinting, also in part, is prohibited. This publication represent the technical status at the time of printing. Copyright 2018 by Conrad Electronic SE. 1168681_V5_0618_01_VTP_m_en...
Need help?
Do you have a question about the GX111 and is the answer not in the manual?
Questions and answers