
Related Manuals for Unitron 12100 Series


Summary of Contents for Unitron 12100 Series
- Page 1 12100 Polarizing MICROSCOPE SERIES MANUAL 100 Lauman Lane, Suite A, Hicksville, NY 11801 Tel: (877) 877-7274 | Fax: (516) 801-2046 Email: Info@nyscopes.com www.microscopeinternational.com...
-
Page 2: Table Of Contents
ADJUSTING INTERPUPILLARY DISTANCE..............13 FOCUSING ........................13 ADJUSTING FOCUSING TENSION ................14 ADJUSTING THE CONDENSER APERTURE DIAPHRAGM ........14 CENTRATION ....................... 15 REPLACING THE FUSE ....................16 SPECIFICATIONS ......................16 TROUBLESHOOTING ......................19 MAINTENANCE........................20 SERVICE ..........................20 WARRANTY ........................20 ® UNITRON... -
Page 3: Safety Notes
A regular schedule of preventative ® maintenance by qualified service personnel is highly recommended. Your authorized UNITRON distributor can arrange for this service. ®... -
Page 4: Introduction
12100 POLARIZING MICROSCOPE SERIES INTRODUCTION ® ® Congratulations on the purchase of your new UNITRON microscope. UNITRON microscopes are engineered and manufactured to the highest quality standards. Your microscope will last a lifetime if ® used and maintained properly. UNITRON microscopes are carefully assembled, inspected and tested by our staff of trained technicians in our New York facility. - Page 5 Shipping NOTE: Retain this clamp and screws for reuse in Clamp the event the microscope is reshipped. Replace the Illuminator Housing, making certain it is pushed fully back onto the microscope frame. Illuminator Housing ® UNITRON...
-
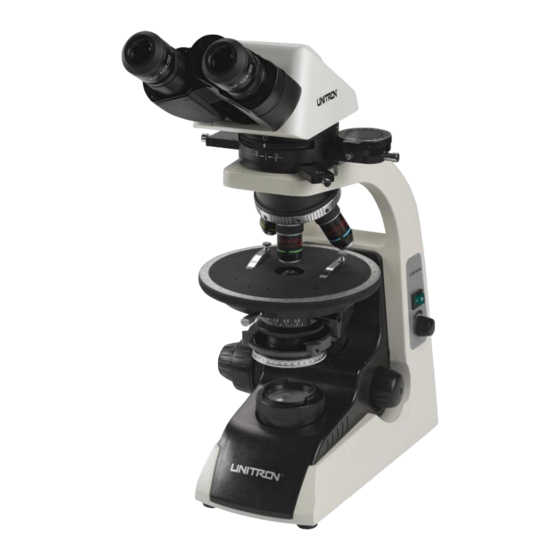
Page 6: Components Diagram
12100 POLARIZING MICROSCOPE SERIES COMPONENTS DIAGRAM 1 Reticle Eyepiece Standard Binocular Head Eyepiece Bertrand Lens Turret Bertrand Lens Nosepiece Centering Screw Analyzer Nosepiece Microscope Frame Objective Rotating Stage On/Off Switch Lamp Intensity Condenser Control Knob Fine Focusing Knob Illuminator Housing ® UNITRON... - Page 7 Intermediate Tube Wheel Analyzer Rotator Lock Screw Objective Centering Intermediate Tube Screw Lock Screw Condenser Adjustment Knob Stage Vernier Tension With Lock Screw Adjustment Collar Condenser Swing-out Top Lens Coarse Focusing Knob Condenser Fine Focusing Knob Condenser Centering Screws ® UNITRON...
-
Page 8: Assembly
Secure the viewing head by tightening the hex type set screw on the right side of the Bertrand/Analyzer assembly. Mounting The Condenser The condenser incorporates a registration pin on its mounting flange. This pin engages a corresponding groove in the condenser mounting bracket. ® UNITRON... -
Page 9: Eyepiece Installation
(it will stop rotating when engaged). NOTE: Only one orientation on the right Measuring eyepiece is correct: the one in which the numbered scale is horizontal when you look through the eyepiece. ® UNITRON... -
Page 10: Component Specifications
10x Standard eyepiece (no reticle) 10x Measuring eyepiece with 0.1mm/division horizontal scale and vertical crosshair Eyepieces Also supplied: Plain 20mm field-stop eyepiece insert Optional: 10x eyepiece with crosshair reticle RMS Thread Nosepiece 4-position, one fixed and three individually centerable ® UNITRON... - Page 11 The movement range is 30X40mm Two finger-type spring clips are supplied to assist in securing specimens on Stage spring clips the stage. These clips provide an alternative method of securing the specimen slide on the stage. ® UNITRON...
- Page 12 Transmitted light observation Illumination Continuously variable intensity 5 watt LED lamp Frame Rigid cast aluminum 1.0 Amp (T1 AL 250) – CAT# 149-30-37 Fuse Filter 45mm Clear Blue Power Cord 110V with integral ground wire; 220V version optional ® UNITRON...
-
Page 13: Adjustment And Operation
Now look through the left eyepiece. Do not adjust the microscope’s focusing knobs. Rotate the left eyepiece diopter collar to obtain the sharpest focus of the specimen. CAUTION: DO NOT turn the focusing knobs in opposite directions – this will seriously damage the focusing mechanism. ® UNITRON... -
Page 14: Adjusting Focusing Tension
The optimal setting often depends on the characteristics of the specimen and the viewing conditions. For general observing, we recommend the aperture diaphragm setting be adjusted to match the magnification of the objective in the optical path. ® UNITRON... -
Page 15: Centration
Measuring eyepiece horizontal scale. 10. Remove the two stage-centering tools when satisfied with the centration. 11. Tighten the stage-rotation clamp thumbscrew. The stage now rotates on the optic axis of the 10x objective. Do not move the specimen. ® UNITRON... -
Page 16: Replacing The Fuse
Press the tab on the bottom of the fuse holder to release the fuse. Insert a new fuse into the holder and slide the fuse holder back into the bottom of the plug receptacle making sure it is firmly in place. ® UNITRON... - Page 17 Dirt or dust on the field of view Dirt or dust on the lens - eyepiece, Clean the lens condenser, objective, collector lens or specimen ® UNITRON...
- Page 18 Lamp intensity is too low Adjust the light intensity by rotating the intensity control dial and/or iris diaphragm Open to the proper setting Position the condenser slightly Aperture diaphragm closed too far lower than the upper limit Condenser position too low ® UNITRON...
-
Page 19: Troubleshooting
Slippage of focus when using the Tension adjustment is set too low Increase the tension on the coarse focusing knob focusing knobs Fine focus is ineffective Tension adjustment is set too high Loosen the tension on the focusing knobs ® UNITRON... -
Page 20: Maintenance
(631) 543-2000. This warranty is limited to the continental United States of America. All items returned for warranty repair must be sent freight prepaid and insured to Unitron Ltd., 73 Mall Drive, Commack, NY 11725 – USA. All warranty repairs will be returned freight prepaid to any destination within the continental United States of America.
Need help?
Do you have a question about the 12100 Series and is the answer not in the manual?
Questions and answers