
Related Manuals for Molecular Devices FLIPR Tetra


Summary of Contents for Molecular Devices FLIPR Tetra
- Page 1 FLIPR Tetra ® High Throughput Cellular Screening System User Guide 0112-0109 H December 2011...
- Page 2 Molecular Devices equipment, software, reagents, and consumables. This document is copyright protected and any reproduction of this document, in whole or any part, is strictly prohibited, except as Molecular Devices may authorize in writing. Software that may be described in this document is furnished under a license agreement.
-
Page 3: Table Of Contents
Chapter 2: System Hardware Features ... . . 17 Overview of FLIPR Tetra System Hardware Features ..17 System Diagram ......18 Plate-Handling System . - Page 4 Experiment Window ......69 Constructing Protocols Using FLIPR Tetra Processes ..70 Settings Process .
- Page 5 Installing Wash Reservoir Top ....134 Resetting FLIPR Tetra System after Changing Pipettor Heads Exchanging the 1536 Tip Gasket ....135 Installing the Gasket .
- Page 6 Contents Uninstalling LED Modules ..... . 138 Installing LED Modules ..... . . 139 Changing Filters .
- Page 7 FLIPR Tetra High Throughput Cellular Screening System User Guide ® Compound Plates for Suspension Assays... 163 Setting Up an Assay Protocol....164 Creating a Protocol File .
- Page 8 Required access areas ......230 FLIPR Tetra System Control Architecture ... . 233 General Description .
- Page 9 FLIPR Tetra High Throughput Cellular Screening System User Guide ® Transfer Fluid Processes ..... . 243 Wash Tips Processes ......244 Mix Fluid Processes .
- Page 10 Appendix C: Consumables and Accessories ..283 FLIPR Tetra System Accessories ....283 Field Installations ......283 Pipettor Heads .
- Page 11 Equipment and Supplies Suggested to Perform Assays with Your FLIPR Tetra System....293 Appendix D: Using AquaMax Sterilant ... . . 295 Principle of Use .
- Page 12 Contents 0112-0109 H...
-
Page 13: Chapter 1: System Overview
System Overview This chapter provides an overview of the FLIPR Tetra High Throughput ® Cellular Screening System requirements. FLIPR Tetra Systems are fluorescence- and luminescence-based ® microplate readers with an integrated 1536-, 384- or 96-pipettor. They perform rapid throughput cell-based assays while providing accurate and precise kinetic data. -
Page 14: Luminescence Mode
System Overview Light-emitting diodes (LEDs) in the FLIPR Tetra System produce light ® at distinct wavelength ranges to excite the fluorescent dye that has been added to the cells in the read plate wells. The entire well plate bottom is illuminated. Fluorescent light emitted by the dye—again, for the entire plate—passes through an emission filter before being captured in a CCD camera, standard EMCCD or Aequorin ICCD. -
Page 15: Minimum Space
FLIPR Tetra High Throughput Cellular Screening System User Guide ® Minimum Space System dimensions are as follows: • Without Cell Suspension Module or TETRAcycler™: approximately 39 inches wide 27 inches deep 70 inches high (991 mm wide 686 mm deep 1780 mm high). •... - Page 16 System Overview 0112-0109 H...
-
Page 17: Chapter 2: System Hardware Features
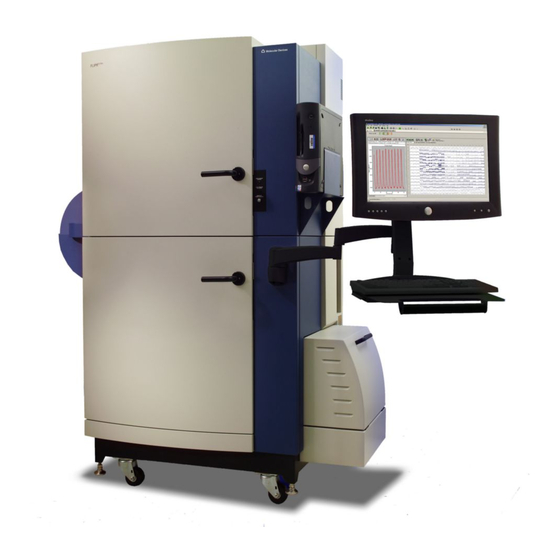
System Hardware Features Overview of FLIPR Tetra System Hardware Features The FLIPR Tetra System consists of a cabinet 39” (965 mm) wide 27” ® (686 mm) deep 70” (1780 mm) high, with a number of components, including wash bottles, Cell Suspension module, chiller, host computer and monitor, outside the cabinet. -
Page 18: System Diagram
System Hardware Features Containers for tip washer fill fluid and waste are placed outside the cabinet beneath the computer. Further information on these subsystems is presented in the following sections. System Diagram Figure 2-1 Diagram of the complete FLIPR Tetra System. ®... - Page 19 FLIPR Tetra High Throughput Cellular Screening System User Guide ® them. Plates can be loaded manually through the upper compartment door, prior to an experiment, or robotically, as the experiment proceeds , using the TETRAcycler. The five positions of the stage are, from left to right: •...
- Page 20 System Hardware Features FLIPR Tetra System pipettor heads. When the Cell Reservoir is not ® present, this position can be used as a source plate position. Positions 1–4 have a mechanical plate sensor to identify the presence of plates, tips or reservoirs. Robotic integration enables the TETRAcycler to exchange up to 12 source plates and tip racks, and one read plate, in an experiment.
-
Page 21: Plates
FLIPR Tetra High Throughput Cellular Screening System User Guide ® Plates FLIPR Tetra System accepts 96-, 384- and 1536-well plates that ® conform to the proposed ANSI standards submitted by the Society for Biomolecular Sciences. A sample of suitable source and read plates is provided in Appendix C: Consumables and Accessories on page 283. -
Page 22: Manual Mode
System Hardware Features The panel has two lights as well as the Interrupt button. From the top of the panel these are: • Assay Running (Locked)—Yellow light The FLIPR Tetra System is performing a task. The upper and ® lower doors are locked and cannot be opened until the task finishes or is halted using the Interrupt button. -
Page 23: Robotic Integration
1536-well plates that conform to propose ANSI standards submitted by the Society for Biomolecular Sciences. In addition, the TETRAcycler handles Molecular Devices qualified tips. Reservoirs can be used during robotic integration, however the TETRAcycler is not able to move these. All reservoirs must be loaded manually prior to running an experiment, including the Cell Reservoir. -
Page 24: Observation Panel
System Hardware Features Note: While the system is compatible with plates that conform to proposed ANSI standards submitted by the Society for Biomolecular Sciences, some plates may not be handled as reliably by the TETRAcycler due to their low plate weight. During robotic integration, it is recommended that handling of the plates and tips by the TETRAcycler be evaluated for plate handling robustness prior to starting a screen. -
Page 25: Liquid-Handling System
FLIPR Tetra High Throughput Cellular Screening System User Guide ® To acquire quality data, reaffix the observation panel to the inner door prior to running an experiment. WARNING! If pretending to run in luminescence mode with the Aequorin ICCD camera, DO NOT touch the white door switches. Room light will damage the Intensifier. - Page 26 6% for 3 μL additions (1536-well) Performance is dependent on tip/gasket seating and can be compromised if the seal is broken. Use only Molecular Devices recommended tips and gaskets to ensure the highest accuracy and to reduce the possibility of damaging the pipettor. See...
-
Page 27: Cell Suspension
FLIPR Tetra High Throughput Cellular Screening System User Guide ® Consumables and Accessories on page 283 for recommended tips. Cell Suspension The Cell Suspension option consists of two components: • The Cell Reservoir installable in Position 4 (Source 3) in the 5 position stage. - Page 28 Cell Suspension option. Cell Reservoir can be washed by either adding the Wash Reservoir process to the protocol (see Constructing Protocols Using FLIPR Tetra Processes on page 70), selecting Wash Reservoir in the Instrument > Manual Operation menu, or manually removing the reservoir and autoclaving it.
-
Page 29: Pin Tool Head
FLIPR Tetra High Throughput Cellular Screening System User Guide ® Figure 2-7 Cell Suspension Module connections. Pin Tool Head Pin tools are blocks of solid or slotted pins, where the pins replace the hollow tips used with a standard pipettor. The pins use capillary action to pick up and transfer liquid from one plate to another. -
Page 30: Compatible Plate Configurations
System Hardware Features Each pin size has a specified volume range that it carries: • The lowest reported volume is for a tip removal speed of 7.8 mm/s. • The highest reported volume is for a tip removal speed of 57.0 mm/s. -
Page 31: Tip And Pin Tool Loading
FLIPR Tetra High Throughput Cellular Screening System User Guide ® Tip and Pin Tool Loading For all pipettor and pin tool heads, a sensor informs the software whether or not tips or a pin tool are loaded. If desired, at the start of an experiment, tips or a pin tool can be automatically loaded onto the pipettor head by selecting Load Tips Position in the Settings process. -
Page 32: Optical System
System Hardware Features Pin tools are supplied with blotting stations that can be loaded into one of the plate positions. Blot pin steps can be configured in the protocol to remove fluid from the pins, for example, following pin washing. Note: A waste bottle sensor override (P/N 0700-0827) is available in the FLIPR Tetra System accessory kit to bypass the waste sensor and... -
Page 33: Ccd Camera Options
FLIPR Tetra High Throughput Cellular Screening System User Guide ® CCD Camera Options Two camera options are available for purchase with the FLIPR Tetra ® System. A standard, EMCCD (Electron Multiplying CCD) camera is recommended for fluorescence only experiments, while the more sensitive Aequorin ICCD (Intensified CCD) camera is designed for both fluorescence as well as luminescence assays. - Page 34 System Hardware Features luminescence assays should use 200 as a starting point. Gain optimization should be done during assay development to determine optimal conditions for your screen. When a luminescence experiment follows a fluorescence experiment we recommend that you cycle the camera temperature to eliminate ghost images that may have been created during the fluorescence assay.
-
Page 35: Led Modules
FLIPR Tetra High Throughput Cellular Screening System User Guide ® of the frames collected during the exposure time. This controls the signal intensity of the assay. The recommended value range for the ICCD camera is 40,000 to 50,000 (at maximum signal). This camera does not require temperature cycling when changing between Fluorescence and Luminescence modes. - Page 36 System Hardware Features Typically, the two LED bank pairs are set up with LEDs of different wavelengths, for example., one pair might have LEDs of range 470 nm to 495 nm, while the other pair might be 510 nm to 545 nm. Ratiometric experiments can be set up to use both of these wavelengths, in which case the paired banks fire alternately.
-
Page 37: Emission Filters
FLIPR Tetra High Throughput Cellular Screening System User Guide ® Figure 2-9 LED configuration. Emission Filters A three-position filter slider holding up to three 60 mm diameter interference filters is located in front of the CCD camera. The slider can be alternated in front of the camera to separate out the emission band of the dye being used. -
Page 38: Chiller
2 GB of SDRAM (or above) • Hard Disk Drive (160 GB or above) • Ethernet adapter • DVD-CDRW drive • 1 PCI expansion slot (or above) Please contact Molecular Devices for any specific questions regarding the system’s host computer. 0112-0109 H... -
Page 39: Embedded Computer
FLIPR Tetra High Throughput Cellular Screening System User Guide ® Embedded Computer An embedded computer located in the lower chamber controls basic FLIPR Tetra System functions. These functions are initiated through ® the ScreenWorks Software control software installed on the host computer and sent to the embedded computer to execute the function. - Page 40 System Hardware Features 0112-0109 H...
-
Page 41: Chapter 3: Startup And Shutdown
Startup and Shutdown This chapter provides procedures for starting up and shutting down the FLIPR Tetra High Throughput Cellular Screening System. These ® procedures should be followed closely in order to ensure proper communication between ScreenWorks Software and the hardware. ®... -
Page 42: Shutting Down The System
Startup and Shutdown Shutting Down the System To shut down the FLIPR Tetra System: ® 1. At the end of a programmed experiment, wait for the Assay Finished (Unlocked) light on the Instrument Status Panel to turn green, indicating the experiment is finished. 2. -
Page 43: Chapter 4: Software Installation
Software Installation This chapter describes how to install ScreenWorks System Control ® Software. You must have administrative privileges on the computer operating system to install ScreenWorks Software. Installing ScreenWorks Software As of version 3.1, the installer automatically uninstalls the old software version as long as it is same major release (3.1 to 3.2). -
Page 44: Activating The Screenworks Peak Pro License
Software Installation 9. In the Configuring the ScreenWorks installation dialog, if you want to make any changes, click Back to go to the previous screen, otherwise click Next to start the installation. 10. When the installation is complete, the Completing the installation process dialog appears. -
Page 45: Online Vs. Offline Installation
FLIPR Tetra High Throughput Cellular Screening System User Guide ® Online vs. Offline Installation The software has two start-up modes: • Offline (Desktop) • Online (Instrument) The default start-up mode is determined during software installation in the Online/Offline dialog. After the software is open, you can switch modes by selecting Go Online or Go Offline from the Instrument menu. -
Page 46: Offline (Desktop) Mode
Software Installation Offline (Desktop) Mode When ScreenWorks Software is launched in Offline mode, you can configure the following hardware options: • Camera Type • Excitation Wavelengths • Emission Wavelengths • Pipettor (automatically selects matching tip washer type) • Cell suspension •... -
Page 47: Chapter 5: Screenworks Software Overview
ScreenWorks Software Overview This chapter has descriptions of windows, menus, dialog boxes, and toolbar icons of the ScreenWorks System Control Software. ® ScreenWorks Software Main Screen The ScreenWorks Software main screen includes title, menu, and toolbars across the top, and a status bar at the bottom. The main working area in the middle can have up to two sections: •... -
Page 48: Title Bar
ScreenWorks Software Overview Title Bar The title bar extends across the top of the ScreenWorks Software window. It reports the application name—ScreenWorks and version number—followed by the name of the currently active protocol or data file, open in the Experiment window. Title bar color indicates whether or not the window is active: the title bar of an active window is typically a different color from (and usually brighter than) other window title bars for programs that are inactive... - Page 49 FLIPR Tetra High Throughput Cellular Screening System User Guide ® Button Name Description Save File Opens the Save File dialog that allows you to save the current file in the desired location. Export File Opens the Export File dialog that allows you to manually export the current file in the desired location.
- Page 50 ScreenWorks Software Overview Button Name Description Offline Mode ScreenWorks This button is displayed when Software is in Online Mode. Click to disconnect from the instrument and go into Offline Mode. This button toggles with Online Mode. Remote Mode ScreenWorks Software Instructs to disable manual connection and to only receive...
-
Page 51: Status Bar
FLIPR Tetra High Throughput Cellular Screening System User Guide ® Button Name Description Restore Layout 1 Restores the Experiment window layout to those defined as Save To Layout 1 in the View menu. Restore Layout 2 Restores the Experiment window layout to those defined as Save To Layout 2 in the View menu. -
Page 52: File Menu
ScreenWorks Software Overview File Menu The File menu contains commands that enable you to open, close, save and print FLIPR Tetra System data and protocol files. ® Keyboard Item Description Shortcut Opens a new protocol (*.fmp) in the Experiment Ctrl+N window, with default settings for one read with fluid transfer. - Page 53 FLIPR Tetra High Throughput Cellular Screening System User Guide ® Keyboard Item Description Shortcut Close All Closes all of the opened protocol and data files. If Files any of the files had changes since they were opened or the default protocol file was opened, the Save or Save As dialog is displayed so that you can name the files.
-
Page 54: View Menu
ScreenWorks Software Overview Saving Data Files as Protocol Files When the active file is a protocol file, you can add, remove, or change processes in the file, then save the amended protocol and run it. Protocol information stored in data files cannot be edited, nor used to run a new experiment, however it is possible to extract this information to a new protocol file. -
Page 55: Instrument Menu
FLIPR Tetra High Throughput Cellular Screening System User Guide ® Instrument Menu Instrument menu commands enable you to access instrument communication and manual dialogs. Item Description A toggle that switches the instrument between Online and Online/Offline Offline modes (see Online vs. Offline Installation on page 45). - Page 56 ScreenWorks Software Overview Item Description Manual Yellow Plate Signal Test—Instructs the instrument to Operation take a reading of the read plate for the current protocol and (continued) to display the numerical results in the Signal Test dialog box. For detailed information on the features and functions of the signal test, see Signal Test on page Protocol Signal Test—Instructs the instrument to take a...
- Page 57 FLIPR Tetra High Throughput Cellular Screening System User Guide ® Item Description Set Remote/ A toggle that switches the instrument between manual and Manual Mode remote modes. Set Remote Mode—Enables you to integrate a third-party robotics system with FLIPR Tetra System. See Appendix A: ®...
- Page 58 ScreenWorks Software Overview The table below describes the settings in the Yellow Plate Signal Test and Protocol Signal Test dialog: Item Description Select Plate Choose the plate type from the drop-down list. Excitation/Emission Select the appropriate excitation/emission wavelength Wavelength pair for the signal test from the drop-down list. Note: Only calibrated excitation/emission wavelength pairs are displayed in the drop-down list.
- Page 59 FLIPR Tetra High Throughput Cellular Screening System User Guide ® Item Description Save When clicked, saves the signal test as an ASCII text file (*.sig). Print When clicked, prints the signal test. Image Viewer Displays the CCD image showing where RLU values were derived for the signal test.
- Page 60 ScreenWorks Software Overview Prior to selecting Run, please make sure all output racks are empty prior to beginning the experiment. When plates are in position and the FLIPR Tetra System ready, click Run in the SynchroMax dialog. After ® checking that the plate configuration is compatible with the protocol Settings configuration, the instrument runs until all plates have been used.
-
Page 61: Tools Menu
FLIPR Tetra High Throughput Cellular Screening System User Guide ® Tools Menu Item Description Set Default Opens the Set Default Directories dialog to Directories designate directories in which to store protocol and data files, signal tests, group templates and to which export files are written. - Page 62 Save error logs. Logs are saved as *.fel (FLIPR ® System Error Log) encrypted files. The files can be forwarded to Molecular Devices Technical Support. Assay Log For data files only, opens a dialog reporting when the protocol steps were applied.
- Page 63 FLIPR Tetra High Throughput Cellular Screening System User Guide ® • Default Cell Reservoir 384 • Default Cell Reservoir 1536 Item Description Close Closes the Plate Process Definition dialog. Open Plate Opens the Define Basic Plate Parameters dialog for the plate selected in the tree view.
- Page 64 For best results, obtain the plate dimensions from the plate manufacturer. Note: Molecular Devices is not responsible for instrument malfunctions if plate specifications are not correct. Rows—Enter the number of rows on the plate.
-
Page 65: Window Menu
, the Firmware EC, Firmware Motion and Remote Interface. MDC on the Displays links to a number of Molecular Devices support ScreenWorks Software pages on the Web, such as the Update page, the Technical Support page, and Technical Support Request page. -
Page 66: Instrument Status
ScreenWorks Software Overview Instrument Status The Instrument Status panel, by default located on the bottom of the main screen, reports the status of and settings for the FLIPR Tetra ® System hardware in addition to including the processes used to create protocols. - Page 67 FLIPR Tetra High Throughput Cellular Screening System User Guide ® Item Description Chiller Status Indicates whether the status of the chiller. Read Plate Reports when a plate is present in Position 3 (Read Plate position). Source Plate 1 Reports when a plate is present in Position 1 (Source Plate 1 or Tip Loading position).
-
Page 68: Instrument Configuration Tab
ScreenWorks Software Overview Item Description Status Message and Current instrument status, or fault conditions, are History reported at the bottom of the tab. To see the full text of the message in a timed list of the last thousand status messages, press the button beside the colored Communication field. -
Page 69: Process Explorer Tab
To add a process step to a protocol, drag the process into the protocol setup at the top of the Experiment window. Constructing Protocols Using FLIPR Tetra Processes on page Note: The processes available on the screen may change based on the instrument status, for example, the Wash Tips process is not shown if a tip wash malfunction has occurred. -
Page 70: Constructing Protocols Using Flipr Tetra Processes
Untitled 1, containing four processes. This can be used to start construction of a new protocol, or closed or ignored if you wish to work with existing protocol or data files. Constructing Protocols Using FLIPR Tetra Processes Protocols are comprised of combinations of the following processes: •... -
Page 71: Settings Process
FLIPR Tetra High Throughput Cellular Screening System User Guide ® Processes can be added to the end of a protocol, or, using the right edge of a new process you drag over, inserted between other processes already in the protocol, providing you do not attempt to insert between processes that are internally linked, for example, a Transfer Fluid and associated Mix with TF. -
Page 72: Setup Read Mode
• Excitation intensity • Gate open (ICCD camera only) Molecular Devices FLIPR Calcium and Membrane Potential Assay Kits ® use a single read mode, but ratiometric assays, such as the Voltage Sensor Probes, require two read modes. In these cases the instrument alternates between the two read modes for each time point, outputting two distinct sets of readings, one for each mode. - Page 73 FLIPR Tetra High Throughput Cellular Screening System User Guide ® Edit Read Mode To enable a read mode, click the check box in the far left of the Set Read Mode table. Then double-click in the row or select the row and press the Edit Mode button below the table to configure it.
-
Page 74: Assign Plate To Position
ScreenWorks Software Overview Note: Differences in Camera Gain or Exposure Time between read modes drastically increase the minimum update time. For fastest update time, use the same gain and exposure time for all read modes. Assign Plate to Position The five-position stage has four positions for plates: one for the read plate and three for compound source plates. - Page 75 FLIPR Tetra High Throughput Cellular Screening System User Guide ® Edit Plate To change the plate configuration for a particular position, double-click on the relevant row or select it and press the Edit Plate button, to open the Edit Plate dialog. Item Description Position...
-
Page 76: Data File Name
Use the two fields here to designate directories into which data and export files will be saved. By default, data, image and export files are stored under: C:\Documents and Settings\[your user name]\My Documents\Molecular Devices\ScreenWorks\MyData\ Change—An option that allows the user to pick a different directory. 0112-0109 H... -
Page 77: Temperature Control
FLIPR Tetra High Throughput Cellular Screening System User Guide ® Open Folder—An option which opens the Windows Explorer dialog box directly to the directory designated. Temperature Control The Temperature Control field allows you to set the plate-stage heaters to a desired temperature for an experiment. Temperature range is from ambient 25 °C to 40 °C. -
Page 78: Auto Print Options
ScreenWorks Software Overview Auto Print Options In the Auto Print Options section, select information to be automatically printed at the end of each experiment run with the protocol. Note: These are print options only—to save files of data generated in experiments use the Auto-Export option (see Exporting Data on page... -
Page 79: Analysis Process
FLIPR Tetra High Throughput Cellular Screening System User Guide ® Analysis Process The Analysis process is included in all protocols, and is always the second process after Settings. In the sections below: • Data viewing options on the Analysis process page are covered Viewing Data on page •... - Page 80 ScreenWorks Software Overview Button Name Description Configure Opens the Grouping dialog to classify wells in the Groups plate into groups (for example, positive and negative controls). Groups created in protocol files are transferred to all the data files generated by the protocol.
- Page 81 Configuration dialog. Available options depend on the software version in use. A separate software license for ScreenWorks Peak ® adds advanced peak detection and characterization measurements to the field of standard measurement options (see Figure 5-2). Contact your Molecular Devices Sales Representative for details. 0112-0109 H...
- Page 82 ScreenWorks Software Overview Figure 5-2 Additional ScreenWorks Peak Pro Kinetic Reduction Types Standard measurement options and definitions include: • Average: Numerical average of RLU counts of the selected reads. • Maximum: Highest detected count (a single number) of all the selected reads.
- Page 83 FLIPR Tetra High Throughput Cellular Screening System User Guide ® (With optional license) Peak Pro measurement options and definitions include: • Peak Frequency (BPM): The Beats-Per-Minute frequency of the peaks detected based on the inverse of the peak temporal spacing. At least two peaks are required for this measurement. •...
- Page 84 ScreenWorks Software Overview Figure 5-3 Configure Peak Detection button activation Configure Peak Detection dialog options include: • Smooth Width • Fit Width • Slope Threshold • Amplitude Threshold Dynamic • Amplitude Threshold Fixed Figure 5-4 Configure Peak Detection dialog 0112-0109 H...
- Page 85 FLIPR Tetra High Throughput Cellular Screening System User Guide ® Detail Graph All the read modes for wells selected in the multi-well graph can be displayed enlarged in a detail graph. You can select individual or multiple wells to view, or select by group. Note: When the FLIPR Tetra System is configured for two or more ®...
- Page 86 ScreenWorks Software Overview Button Name Description Auto Scale Automatically scales the Detail Graph and Multi-Well Always Graph to include all data points of the desired traces without manual prompting. Undo Rescales a graph to the original settings. Zoom Manual Opens the Manual Scale Graph dialog to set the Scale maximum and minimum values for the X- and Y-axis of Graph...
-
Page 87: Analyzing Data
FLIPR Tetra High Throughput Cellular Screening System User Guide ® Individual Well Selections To view a single well in the Detail Graph, double-click or drag the mouse cursor inside the well of interest. To view the traces of multiple wells overlaid in the Detail Graph, drag the cursor over the wells you want to view. - Page 88 ScreenWorks Software Overview Settings made in these dialogs in a protocol file affect the way that data, in data files generated with the protocol, are displayed when first viewed in ScreenWorks Software. They also affect data in automatic output options that occur when the protocol is run: automatic print output options (see Settings Process on page 71, and...
- Page 89 FLIPR Tetra High Throughput Cellular Screening System User Guide ® The table below describes the settings and options in the Grouping dialog box: Item Description Groups Displays the list of defined groups, including group name (typically compound name), concentration and notes associated with the group.
- Page 90 ScreenWorks Software Overview Item Description Delete All Groups Deletes all user-defined groups. Note: Positive, negative and background fluorescence control groups cannot be deleted, however this command deletes all wells assigned to these groups. Clear All Selections Removes all group assignments from all wells. Group names in the top list are not affected.
- Page 91 FLIPR Tetra High Throughput Cellular Screening System User Guide ® 3. To assign a single group concentration, click the Group tab and do the following: Enter a name for the group (for example, compound name) in the Group Name field. Select or enter the concentration in the Concentration box.
- Page 92 ScreenWorks Software Overview Correction Use the Correction dialog to apply data-correction algorithms, and to view ratiometric data. These changes affect: • Data displayed in the Multi-Well Graph and Detail Graph. • Data displayed in group statistic table and graphs. • Data in files are exported manually or automatically (see Exporting Data on page 99).
- Page 93 FLIPR Tetra High Throughput Cellular Screening System User Guide ® Item Description Spatial Check this option to use the initial signal to normalize signal Uniformity in each well, removing fluctuations due to well-to-well Correction variation in cell density and dye loading. The processing algorithm averages the initial signal from all wells together.
- Page 94 ScreenWorks Software Overview Ratiometric Options Where two read modes are configured, you can view the data as a ratio of one read mode to the other, for each data point. When this option is enabled, traces of the calculated ratio can be displayed in the multi-well and detail graphs.
- Page 95 FLIPR Tetra High Throughput Cellular Screening System User Guide ® Group Statistics Below the Multi-Well and Detail Graphs on the Analysis process page, the Group Statistics Table is used to analyze data produced during an experiment. Groups defined in the Grouping dialog can only be analyzed in this section.
- Page 96 ScreenWorks Software Overview Button Name Description Select Opens the Choose Statistics dialog box which enables Statistics for example users to define groups statistics ( Average, Standard Deviation and Z-score) are displayed in the table. Group statistics available include the following: Concentration—Numerical concentration values assigned to each group in the Grouping dialog.
- Page 97 FLIPR Tetra High Throughput Cellular Screening System User Guide ® Button Name Description Select Z Score—Used to evaluate quality or performance of Statistics the assay and is dependant on the concentration (continued evaluated Z-factor—Used to evaluate the quality or performance of the assay at a given concentration. This is typically used for all concentrations, not including the positive control.
- Page 98 ScreenWorks Software Overview Features of the Group Statistic Graph are explained in separate sections below. Button Name Description Copy Graph Copies data in the Group Statistic Graph to the clipboard so it can be pasted in a different program such as Microsoft Word. Copy Graph Copies Graph Data in the Group Statistic Graph Data...
-
Page 99: Exporting Data
In the Auto-Export option, files go to the folder defined in the Settings process. The default export folder is: C:\Documents and Settings\[your_user_name]\My Documents\Molecular Devices\ScreenWorks\MyData 0112-0109 H... - Page 100 ScreenWorks Software Overview The Auto-Export dialog has three tabs: • Time Sequence—Exports time-point measurements for selected read modes. The measurement values that are exported have any corrections configured in the Correction dialog applied. If there are two read modes and Ratiometric Options is selected in the Correction dialog, you can also export the ratio for each time point.
- Page 101 FLIPR Tetra High Throughput Cellular Screening System User Guide ® Export Time Sequence Configure parameters for export of time-sequence data in this tab. The exported files contain a value for every read interval for each well, for the read mode or ratio selected. This contrasts with the Statistics file, which contains one kinetic reduction per well.
- Page 102 ScreenWorks Software Overview Item Description Individual File Use the bottom section of the dialog to choose the Parameters number and type of time sequence files to be created from the same data set. Number of Files—Click the Add File button to add to the number of statistic files to be created from the same data set.
- Page 103 FLIPR Tetra High Throughput Cellular Screening System User Guide ® Export Statistics Use this tab to configure kinetic reductions, , averages and for example maximum and minimum values, for selected numbers of reads within each well. Multiple kinetic reductions can be configured, each resulting in another export file.
- Page 104 ScreenWorks Software Overview Item Description Individual File Use the bottom section of the dialog to designate the Parameters number and type of statistic files to be created from the same data set. Number of Files—Click the Add File button to add to the number of statistic files to be created from the same data set.
- Page 105 FLIPR Tetra High Throughput Cellular Screening System User Guide ® Export Group Statistics Use this tab to configure group statistics (for example, average, standard deviation and z-scores) based on the kinetic reduction defined for a select number of reads. The table below describes the settings and options of this dialog box: Item Description Enable Group...
-
Page 106: Batch Export
ScreenWorks Software Overview Batch Export Manual export of files is accessed through File > Export, File or Batch Export. Manual Export allows the same files as defined above to be exported. In addition to individually exporting files, Batch Export enables batches of data files to be exported to individual or single export files. -
Page 107: Image Display
FLIPR Tetra High Throughput Cellular Screening System User Guide ® method will be labeled with the name of the data file it was created from. However, if a single export file is desired that contains information for multiple data files, select Use user-defined name in the respective section. -
Page 108: Transfer Fluid Process
ScreenWorks Software Overview Transfer Fluid Process This process enables you to program reagent or cell additions and to execute them in conjunction with other processes. The default protocol has one Transfer Fluid process. A blue Transfer Fluid icon indicates that the process occurs in series with other blue-colored processes in the protocol. -
Page 109: Aspirate Table (Standard Pipettor)
FLIPR Tetra High Throughput Cellular Screening System User Guide ® Aspirate Table (Standard Pipettor) The following table describes configuration options for the upper, Aspirate, section on the Transfer Fluid process page when a standard pipettor is selected. Item Description Fluid Transfer Select a type of fluid transfer: Type Single Aspirate–Single Dispense—Aspirates one liquid... - Page 110 ScreenWorks Software Overview Item Description Aspirate Check the check box at the start of a row to activate an aspirate sequence. If Multiple Aspirate has been selected as Fluid Transfer Type, enter an aspirate volume less than the dispense volume to add another aspirate step. Note: Only checked aspirate sequences are active in the experimental protocol.
- Page 111 FLIPR Tetra High Throughput Cellular Screening System User Guide ® Item Description Edit Aspirate Drain Reservoir Speed —Select the speed with which to (continued) drain the cells from Cell Reservoir to drain destination. Drain Destination —Select a destination where cells should be drained from Cell Reservoir after pipettor aspiration.
-
Page 112: Dispense Table (Standard Pipettor)
ScreenWorks Software Overview Dispense Table (Standard Pipettor) The following table describes Dispense configuration on the Transfer Fluid process page when a standard pipettor is selected. Item Description Dispense Check the check box at the start of a row to activate a dispense sequence. - Page 113 FLIPR Tetra High Throughput Cellular Screening System User Guide ® Item Description Edit Dispense Configure a dispense step in the table by selecting it and pressing the Edit Dispense button, or double-click on the row. This opens the Edit Dispense dialog. Use this dialog to define dispense parameters reported in the table.
- Page 114 ScreenWorks Software Overview Item Description Edit Dispense Speed—Enter speed at which to dispense (in μL/s). Ideal (continued) dispense speed takes into account the volume added, how fast the signal increases in response to compounds and strength of the attached cells at the bottom of the plate. Expel Volume—Enter an additional volume (in μL) the pipettor dispenses over the dispense volume.
-
Page 115: Aspirate Configuration (Pin Tool)
FLIPR Tetra High Throughput Cellular Screening System User Guide ® Item Description Unload Tips Instructs the instrument to unload tips after the Fluid after Fluid Transfer process. Typically, this is used when changing the Transfer tips during an experiment or when reducing down-time between experiments. -
Page 116: Dispense Configuration (Pin Tool)
ScreenWorks Software Overview Item Description Removal Speed Enter the speed (in mm/s) at which the pin tool is removed from the source plate. The speed of removal determines the volume of fluid remaining on the pins. Note: Increasing the removal speed increases the volume of compound on the pin after aspiration. -
Page 117: Mix Fluid Process
FLIPR Tetra High Throughput Cellular Screening System User Guide ® Item Description Read Check this box to link a Read process to the Transfer Fluid process. This automatically adds a Read with TF step to the protocol, and opens the configuration page for that step. - Page 118 ScreenWorks Software Overview The table below describes the options available on the Mix Fluid process page: Item Description Mix Plate Select the plate that has the fluid to be mixed. Typically, it is a source plate from which you will be transferring fluid.
-
Page 119: Mix Fluid (Pin Tool)
FLIPR Tetra High Throughput Cellular Screening System User Guide ® Mix Fluid (Pin Tool) Fluid mixing with a pin tool consists of a sequence of up and down motions of the pin block. Item Description Mix Plate Select the plate that has the fluid to be mixed. Typically, it is a source plate from which you will be transferring fluid. -
Page 120: Mix With Tf
ScreenWorks Software Overview Mix with TF Fluid can be mixed immediately after dispense to ensure proper mixing of agonists and antagonists with the cell monolayer. Typically, this is necessary when transferring fluids one-tenth or less of the total fluid volume of a well. To add a mix after dispense, check the Mix After Fluid Dispense (Mix Fluid for the Pin Tool) option in the Transfer Fluid process dialog box. - Page 121 FLIPR Tetra High Throughput Cellular Screening System User Guide ® rates. Typically this is used to take images at a high rate while compound is being added, and shortly thereafter, to best capture kinetic effects, then images can be taken at a less frequent rate as cells settle and less change occurs.
-
Page 122: Read With Tf
ScreenWorks Software Overview Item Description Second Interval Configure the second series of reads taken during the Read process. If you do not want a second series with a different read interval, make Number of Reads zero. Read Interval—Enter time (in seconds) between reads. The for example same interval is used for each read mode ( , the... -
Page 123: Wash Tips Or Pins Process
FLIPR Tetra High Throughput Cellular Screening System User Guide ® The table below describes the additional options in the Read with TF dialog box: Item Description Number of Enter the number of reads to be taken before fluid is Reads Before added to the plate. -
Page 124: Wash Tips (Standard Pipettor)
Pump Speed Select the speed (slow or fast) you want the pump to fill and empty the wash reservoir. Note: Molecular Devices recommends you use Fast except with volatile solvents. Wash Cycles From the list, select the number of times that fluid cycles through the wash reservoir. -
Page 125: Wash Pins (Pin Tool)
Pump Speed Select the speed (slow or fast) you want the pump to fill and empty the wash reservoir. Note: Molecular Devices recommends you use Fast except with volatile solvents. Wash Cycles From the list, select the number of times that fluid cycles through the wash reservoir (up to 5). -
Page 126: Blot Pins Process
ScreenWorks Software Overview Blot Pins Process The Blot Pins process is only available for the pin tool. This function is used to dry the pins between transfers or washes, to prevent carry-over. Settings/Options Description Target Plate Select the plate. Height Enter distance (measured in μL) from the bottom of the well to place the pins. -
Page 127: Wash Cell Reservoir Process
FLIPR Tetra High Throughput Cellular Screening System User Guide ® Wash Cell Reservoir Process This process is only available when the Cell Reservoir is installed and is recommended for use before and after using cells in suspension. This process can be used as a way of priming the reservoir with cells prior to an assay or for cleaning purposes. -
Page 128: Finish With Source
ScreenWorks Software Overview Finish With Source In Remote Mode, the Finish with Source process instructs the instrument to notify the robot controller to remove the desired source plate. This option is required when using multiple plates in a single source location. Note: This process is not active in Manual Mode or for the read plate position. -
Page 129: Chapter 6: Exchanging Hardware
If you have any questions or concerns regarding the above procedure, please contact Molecular Devices Technical Support at +1-800-635-5577. Uninstalling a Pipettor or Pin Tool Head The following procedure uninstalls a 384 pipettor head as an example. - Page 130 Exchanging Hardware 5. Turn the Head Clamp Knob (see below) counter-clockwise until the head is loose and can be lifted off its mounting position. 6. To remove pipettor head, grasp the pipettor head’s silver Guide Shaft, lift upward (to unseat from Alignment Pins and to 0112-0109 H...
-
Page 131: Installing The Pipettor Head
FLIPR Tetra High Throughput Cellular Screening System User Guide ® lower plunger pins allowing a lift gap) and then slide to the left off the pipettor mount. Note: If the pipettor head does not easily slide off, try grabbing the D-axis knurled nut receiver and pressing it downward to give the pipettor head additional clearance from the D-axis knurled nut prior to trying again. - Page 132 Exchanging Hardware 2. Tighten the Head Clamp knob by turning it clockwise (see below). Note: For 1536 pipettor heads only: Remove the guard covering the 1536 pipettor head plungers by loosening the two thumb screws. This allows the D-axis to move freely so it can be attached to the D-axis knurled nut in the next step.
-
Page 133: Uninstalling Wash Reservoir Top
FLIPR Tetra High Throughput Cellular Screening System User Guide ® 4. Once the pipettor head is fastened, see the following procedure to exchange the tip wash reservoir to match the pipettor head format. Uninstalling Wash Reservoir Top The following procedure uninstalls a 1536 wash reservoir top as an example. -
Page 134: Installing Wash Reservoir Top
3. Tighten both Captive Thumb Screws to ensure the reservoir top is fastened to the base. 4. Go to the following procedure to reset the instrument. Resetting FLIPR Tetra System after Changing Pipettor Heads To reset the FLIPR Tetra System: ®... -
Page 135: Exchanging The 1536 Tip Gasket
FLIPR Tetra High Throughput Cellular Screening System User Guide ® 3. When the reset cycle is complete, the green Assay Finished (Unlock) light will be the only indicator light illuminated on the front of the instrument. Exchanging the 1536 Tip Gasket Installing the Gasket Note: Gaskets should be replaced approximately every 200 plates (~3200 strokes). -
Page 136: Removing The Tip Block And Gasket
Exchanging Hardware Removing the Tip Block and Gasket During the unloading, the tip block grippers will unclamp and release the gasket and tip block into the rack assembly. Once unloaded, we recommend you dispose the gasket and use a new one the next time the block is loaded. -
Page 137: Exchanging Pin Tools
FLIPR Tetra High Throughput Cellular Screening System User Guide ® Once loaded, a source plate can be placed in Source 1 in both manual and robotic modes. Note: Sensors indicate only the presence of an object in plate position and do not indicate whether it is a source plate or tip rack. Exchanging Pin Tools Loading and Unloading the Pin Tool Pin tools are blocks loaded with pins, which are loaded onto a pin tool... -
Page 138: Exchanging Led Modules
Exchanging Hardware Exchanging LED Modules WARNING! During the exchange procedure, you will have access to precision optical components. Use appropriate care not to damage them. Specifically, do not touch the surfaces of the LED filters with your bare fingers or other objects. Uninstalling LED Modules To uninstall LED banks: 1. -
Page 139: Installing Led Modules
FLIPR Tetra High Throughput Cellular Screening System User Guide ® 4. Loosen the two Captive Thumb Screws holding the LED banks together, and then pull the banks apart so they can be exchanged for new wavelengths. 5. Repeat for the LED module mounted to the right light pipe. 6. - Page 140 Exchanging Hardware 2. Once aligned, push the two LED banks of different wavelengths together and tighten the two Captive Thumb Screws with firm finger pressure. 3. Place the Foam Insert on the rear end of the excitation optics module. Note: Make sure that the foam piece fits inside the LED Frame. 4.
-
Page 141: Changing Filters
FLIPR Tetra High Throughput Cellular Screening System User Guide ® self-aligning, but observe engagement of the two Power Connectors and confirm they are aligned before applying mating pressure. 5. Once the connectors are mated, engage and tighten the two Latching Clamps that secure each module to the Light Pipe. 6. -
Page 142: Uninstalling A Filter
Exchanging Hardware Uninstalling a Filter To uninstall a filter: 1. Open the lower front door of the FLIPR Tetra System. ® Note: Once the lower front door is open, system power is disengaged. 2. Remove the Filter Cover, located below the left LED module. 3. -
Page 143: Installing An Emission Filter
FLIPR Tetra High Throughput Cellular Screening System User Guide ® 5. Once desired emission filters are removed, replace the Filter Cover. Or, if you want to install new emission filters into the system, proceed to the next section for instructions. Installing an Emission Filter The emission filter wavelengths are automatically identified by the system and can be selected from the ScreenWorks Software menu. -
Page 144: Installation Of Plate Hold-Down Devices
Exchanging Hardware Note: If a desired filter is not available, three custom filter cassettes are available for purchase (see Optics Consumables on page 284) to place filters created by an outside vendor. Once installed, these filters appear as 1_1, 2_2, 3_3 in the software protocol. - Page 145 FLIPR Tetra High Throughput Cellular Screening System User Guide ® To remove the existing plate hold-down: 1. Clear the system of plate or tips that may interfere with the position from which you are removing the plate hold-down device. 2. Use a Phillips #2 or #3 screwdriver to loosen and remove the screws from the center of the devices.
-
Page 146: Cell Reservoir
Cell Reservoir Installing Cell Reservoir Initial installation has to be performed by a Molecular Devices certified field service engineer, however if the Cell Reservoir was removed following instructions in Uninstalling Cell Reservoir. on page... -
Page 147: Uninstalling Cell Reservoir
FLIPR Tetra High Throughput Cellular Screening System User Guide ® Uninstalling Cell Reservoir. When the Cell Reservoir is configured and detected by the instrument, it will be the only available choice as the Source Plate 3 selection. ScreenWorks displays Cell Reservoir: OK in the Instrument Status tab. - Page 148 Exchanging Hardware 0112-0109 H...
-
Page 149: Chapter 7: Calibration And Signal Test
Calibration and Signal Test Chapter 7 provides the procedures and information required to calibrate the optics and run a signal test of the FLIPR Tetra System. ® Optical Calibration Calibrating the optics of FLIPR Tetra System requires taking an image ®... -
Page 150: Recalibrating The Optics
Calibration and Signal Test 7. Enter the Plate Specifications: Enter a Plate Name. Select Read Plate as the Plate Type. Type in the plate dimensions. 8. Click Finish to create a new read plate with mask. Plate mask definition is complete when the green Assay Finished (Unlocked) light is illuminated. - Page 151 4. Place the Flat Field Calibration Plate into the Read Position. The Flat Field Calibration Plate may be a Molecular Devices supplied plate or a Read Plate loaded with an appropriate dye for the LED/Filter wavelength pair being calibrated.
- Page 152 Calibration and Signal Test Coumarin 1. Required material: Black clear-bottom plate of desired format and brand for assay (96, 384, or 1536). Coumarin (7-diethylaminocoumarin-3-carboxylic acid, Cat# D-1421, Molecular Probes, Eugene, OR) 2. Make a 0.02 M stock solution of Coumarin in Dimethyl Sulfoxide (DMSO).
-
Page 153: Running A Signal Test
FLIPR Tetra High Throughput Cellular Screening System User Guide ® bottom of the well uniformly. The following quantities are recommended: 96-well plate, 100 μL/well 384-well plate, 40 μL/well 1536-well plate, 6 μL/well 6. Check the plate visually to make sure there are no bubbles or unfilled wells. -
Page 154: Running A Plate Prior To An Experiment
Calibration and Signal Test Running the Yellow Plate Signal Test To run a Yellow Plate Signal Test: 1. Select Yellow Plate Signal Test from the Instrument/Manual Operation menu or click on the appropriate button. 2. Depending on the camera type installed in your instrument, the settings will vary for the Fluorescence signal test. - Page 155 FLIPR Tetra High Throughput Cellular Screening System User Guide ® Change the settings as desired, and then click Test Signal to recheck the settings. Settings defined in the Protocol Signal Test can be saved to the open protocol when OK is selected to close the dialog. Note: Signals displayed in the Protocol Signal Test dialog are not saved as part of the data file.
- Page 156 Calibration and Signal Test 0112-0109 H...
-
Page 157: Chapter 8: Running An Experiment
Preparing Cells for Adherent Assays Location of Cells in the Plate The excellent signal-to-background noise ratio of the FLIPR Tetra System is made possible by the instrument’s bottom illumination and detection system. The read plate is illuminated by the LED modules at an angle approximately 45. -
Page 158: Cell Densities
AquaMax DW4 Dispenser from ® Molecular Devices. We recommend seeding a 1536-or 384-well cell plate using an automatic instrument rather than seeding manually. Thin needles used in automatic liquid-dispensing instruments prevent air bubble formation in well bottoms—a problem commonly encountered when cells are seeded with a manual pipettor. -
Page 159: Preparing Cells For Suspension Assays
FLIPR Tetra High Throughput Cellular Screening System User Guide ® Preparing Cells for Suspension Assays Location of Cells in the Plate Suspension cells can be used for luminescence experiments. In this case, cells are kept in uniform suspension by the Cell Suspension option, which consists of a cell suspension module and reservoir system. -
Page 160: Checking The System
Running an Experiment components are installed, see the appropriate section in Exchanging Hardware on page 129 for installation instructions. Note: Please do not attempt to change pipettor heads, wash reservoirs, LED banks and filters while the instrument is running. All features must be exchanged in the appropriate instrument mode. -
Page 161: Dye-Loading The Cells For Fluorescence Assays
FLIPR Tetra High Throughput Cellular Screening System User Guide ® 8. Set the Camera Gain to 80 (EMCCD camera). 9. Set the Gate Factor to 3% (ICCD camera). 10. Place the yellow signal test plate on the stage in the read position. -
Page 162: Preparing A Source/Compound Plate
Running an Experiment at 37 °C is usually effective for most cell lines and is the recommended starting point for calcium mobilization assay development. Note: If loading for 30 min yields an acceptable fluorescence signal, as has been observed for some cell lines, use the shorter loading time. In some cases, incubation at room temperature may work as well or better than 37°... -
Page 163: Compound Plates For Suspension Assays
FLIPR Tetra High Throughput Cellular Screening System User Guide ® between wells may be signs that mixing is too slow or not uniform. Optimal addition parameters typically consist of a fast dispense speed, low pipettor height, and large addition volume. Assay optimization is always recommended to determine the proper assay conditions prior to running a screen. -
Page 164: Setting Up An Assay Protocol
Running an Experiment Setting Up an Assay Protocol An effective way to reduce time and ensure consistent screening parameters is to preconfigure protocol (*.fmp) files. Some users define and save protocol files for each cell line, project or user. Saved protocol files are opened from File > Open > Protocol File. In addition, the last 10 files (6 data and 4 protocol) opened in ScreenWorks Software are listed in the bottom portion of the File menu. -
Page 165: Optimizing The Optics And Fluid Dispensing
FLIPR Tetra High Throughput Cellular Screening System User Guide ® Choosing Analysis Options In the Analysis process, click on the Grouping, Correction or Export buttons to define the analysis parameters to be applied to the experimental data. For more information about these options see Analysis Process on page When Finished Creating the Protocol When you have finished defining the experiment parameters of the... - Page 166 Running an Experiment Membrane Potential Calcium Assay Assay Camera Type EMCCD ICCD EMCCD ICCD Excitation wavelength 470–495 470–495 510–545 510–545 (nm) Emission Wavelength 515–575 515–575 565–625 565–625 (nm) Excitation Intensity Exposure Time (s) 0.533 0.533 Camera Gain 2000 2000 Gate Open —...
-
Page 167: Adjusting The Pipettor Height
FLIPR Tetra High Throughput Cellular Screening System User Guide ® Basal fluorescence too high: • Decrease the Excitation Intensity. • Decrease the Exposure Time. • Decrease the Camera Gain (EMCCD camera). • Decrease the Gate Open (ICCD camera). Adjusting the Pipettor Height To ensure prompt compound delivery, the pipettor height can be adjusted. -
Page 168: Adjusting The Fluid Dispensing Speed
Running an Experiment Adjusting the Fluid Dispensing Speed Default dispense speed is 50 μL/s, 20 μL/s and 2 μL/s when dispensing to 96-, 384- and 1536-well plates respectively. The table below provides recommended fluid dispense speeds for all three plate formats. -
Page 169: Optimizing Pin Tool Delivery
FLIPR Tetra High Throughput Cellular Screening System User Guide ® Optimizing Pin Tool Delivery To ensure proper transfer of compound using a pin tool to your target plate, we recommend you evaluate the following factors during assay development. Controlling and standardizing these factors for a given application will help you deliver reproducible volumes. -
Page 170: Flipr Calcium Assay Kit Protocol
Required Materials The following items are required for running the FLIPR Calcium Assay ® Kit: Item Source Molecular Devices FLIPR Tetra System with Calcium Optics Kit ® installed (default with instrument): See Appendix C. FLIPR Tetra System LED Module 470–495 nm ®... - Page 171 Note: The Kit includes masking dye technology covered by issued and pending patents including US 6,420,183, US 7,063,952 and EP 0,906,572, licensed exclusively from Bayer AG to Molecular Devices. About Exchange Protein Inhibitors Some cell types use mechanisms such as anion exchange proteins to export anionic molecules from cells, including anionic forms of fluorescent dyes.
-
Page 172: Calcium Assay Kit Experimental Protocol
Running an Experiment probenecid can be useful in slowing dye leakage from cells, it is toxic to cells, and therefore inclusion and duration of dye loading step should be kept to a minimum. Calcium Assay Kit Experimental Protocol Cell Handling The FLIPR Calcium Assay Kit is designed to work with many cell types, ®... - Page 173 FLIPR Tetra High Throughput Cellular Screening System User Guide ® 2. Remove one vial of FLIPR Calcium Assay Reagent (Component A) and equilibrate to room temperature. 3. Dissolve contents of Component A vial by adding the appropriate amount of 1X HBSS Buffer plus 20 mM HPES as outlined in the table below.
-
Page 174: Running The Flipr Calcium Assay Kit
AquaMax DW4 or equivalent device. ® Note: Although Molecular Devices does not recommend washing cells before dye loading growth medium and serum may interfere with certain assays. In this case, the supernatant can be aspirated and replaced with an equal volume of serum- free HBSS plus 20 mM HEPES buffer before adding the Loading Buffer. - Page 175 FLIPR Tetra High Throughput Cellular Screening System User Guide ® monolayer are recommended to ensure better mixing of compounds and lower signal variance across the plate. However, further assay development, adjustment of the volume, height and speed of dispense, is recommended to optimize your cell response.
-
Page 176: Troubleshooting Guide
Running an Experiment Troubleshooting Guide This section presents solutions to problems that users may encounter when running calcium flux assays. Fluorescence Drop Upon Compound Addition This may be the result of dislodging cells from the well bottom during addition. Lowering the addition/dispense speed or adjusting the addition height or both should solve the problem in this case. -
Page 177: Flipr Membrane Potential Assay Kit Protocol
Troubleshooting tips for membrane potential assays Required Materials The following materials are required for running a membrane potential assay: Item Source FLIPR Tetra System with Membrane Potential Molecular Devices ® Optics Kit installed: See Appendix C FLIPR Tetra System LED Module 510–545 nm ® FLIPR Tetra System Emission Filter 565–625... - Page 178 1 N NaOH Note: The Kit includes masking dye technology covered by issued and pending patents including US 6,420,183, US 7,063,952 and EP 0,906,572, licensed exclusively from Bayer AG to Molecular Devices. FLIPR Membrane Potential Assay Kit The FLIPR Membrane Potential Assay Kits from Molecular Devices ®...
-
Page 179: Cell Preparation For The Flipr Membrane Potential Assay179
• Requirement for precise temperature control • Variation in fluorescence according to ionic concentrations Molecular Devices has developed the FLIPR Membrane Potential Assay ® Kits to maximize cell line/channel/compound applicability while eliminating causes of variability in the data and reducing the number of steps in the conventional protocol. -
Page 180: Dye Loading Using The Flipr Membrane Potential Assay Kit
Running an Experiment Dye Loading Using the FLIPR Membrane Potential Assay Kit Preparation of Loading Buffer The following procedure is designed for preparation of the Loading Buffer for either of the Membrane Potential Assay Kits, BLUE (R8034) or RED (R8123) in the Bulk format. Blue or Red To prepare loading buffer: 1. -
Page 181: Running The Flipr Membrane Potential Assay
μL per well for 96-well plates, 25 μL for 384-well or 2 μL for 1536-well plates). Note: Although Molecular Devices does not recommend washing cells before dye loading, growth medium and serum factors can be washed away before adding the Loading Buffer, provided residual volumes after the wash step are as described. - Page 182 Running an Experiment Recommended Setup Parameters Recommended experimental setup parameters are provided below. Note that the addition speeds are faster than in the conventional protocol because of the increased robustness of the cells after the new loading procedure. Faster addition speeds can lead to better mixing of compounds and lower signal variance across the plate.
-
Page 183: Troubleshooting The Flipr Membrane Potential Assay Kit
FLIPR Tetra High Throughput Cellular Screening System User Guide ® Troubleshooting the FLIPR Membrane Potential Assay Kit This section presents solutions to problems that users may encounter when running membrane potential assays. Fluorescence Drop Upon Compound Addition This may result from dislodging cells from the wells during addition. Shortening incubation times, plating cells on poly-D-lysine plates or slowing the dispense speed should solve the problem in this case. -
Page 184: Voltage Sensor Probes Assay Protocol
• Dye loading procedure Required Materials The following materials are required for running a membrane potential assay: Item Source Molecular Devices FLIPR Tetra System with Voltage ® Sensor Probes Optics Kit installed: See Appendix C FLIPR Tetra System LED Module ®... -
Page 185: Cell Preparation For The Voltage Sensor Probe Assay
FLIPR Tetra High Throughput Cellular Screening System User Guide ® Item Source Growth medium Major Laboratory Supplier (MLS) Incubator Centrifuge Pipettor and sterile tips suitable for use with microplates 1 N NaOH About the Fluorescent Dye Voltage Sensor Probes are a Fluorescence Resonance Energy Transfer (FRET) based assay technology used for high-throughput ion channel drug discovery. - Page 186 Running an Experiment 96-Well Plate 384-Well Plate Cell Type (100 μL growth (25 μL growth (cells/well) medium) medium) Adherent cells 20,000–50,000 5,000–30,000 Non-adherent cells 40,000–100,000 10,000–60,000 Preparation of Loading Buffer To prepare loading buffer: 1. CC2-DMPE: A 5 mM stock solution can be prepared in DMSO and stored at -20°...
-
Page 187: Running The Voltage Sensor Probe Assay
FLIPR Tetra High Throughput Cellular Screening System User Guide ® Running the Voltage Sensor Probe Assay Before incubation, ensure that the FLIPR Tetra System is equipped ® with the 390–420 nm LED module plus the 440-480 nm and 565-625 nm emission filter. See LED module and emission filter installation instructions in Chapter 6, <italic>“Exchanging Hardware”. -
Page 188: Luminescence Assay Protocol
Cell Suspension option. Required Materials The following materials are required for running a luminescence assay: Table 8-3 Cell Preparation for Aequorin Assays. Item Source Molecular Devices FLIPR Tetra System with Aequorin, ® ICCD camera option and Cell Suspension option... -
Page 189: Coelenterazine Loading For Adherent Assays
FLIPR Tetra High Throughput Cellular Screening System User Guide ® Item Source Incubator Centrifuge Pipettor and sterile tips suitable for use with microplates Cell Densities A variety of cell handling conditions may be adopted at your discretion based on standard operating procedures in the laboratory. Non-adherent cells are typically plated on the day of experiment on a coated plate (for example, poly-d-lysine or collagen) to assist cell adherence to the plate bottom. -
Page 190: Coelenterazine Loading For Suspension Cell Assays
Running an Experiment plates), or 3 μL (1536-well plate) per well. Final concentration in the well should be 5–10 μM. 4. Incubate the cells for 4–6 hrs at room temperature (22 °C or lower). Cover the plates with aluminum foil to protect from light and to avoid degradation of coelenterazine. -
Page 191: Preparation Of Cell Reservoir And Running The Assay
2. If the Cell Reservoir was not cleaned after previous assay, follow instructions for making AquaMax Sterilant Kit Procedure (Cat# R8156, Molecular Devices). See Appendix C. 3. Fill a flask with the sterilant solution and run 3–4 Cell Reservoir wash cycles including a 2 minute soak (Hold Time = 120 s). - Page 192 Running an Experiment Experimental Setup Parameter Parameter Setting Read Mode Luminescence Excitation Wavelength None Emission Wavelength None Camera Gain 70,000–280,000 Exposure Time 0.53 s LED Excitation Intensity Gate Open 100% Read Interval Reads before pipetting Reads during first interval 50–90 Save Assay Images Possible, but creates very large files May be adjusted to compensate for cell brightness or saturation problems.
- Page 193 FLIPR Tetra High Throughput Cellular Screening System User Guide ® Fluid Transfer Settings—Dispense Parameter Suspension Setting Adherent Settings Target Plate Read Plate Read Plate Volume 25 μL 25 μL Height 15 μL 30 μL Speed 30 μL/s 20 μL/s Removal Speed 10 mm/s 10 mm/s Expel Volume...
-
Page 194: Optimizing An Assay
Running an Experiment 5 times with 70% Ethanol and leave system and all tubing dry. 6. The cell flask also must be washed each time after use: Rinse flask, spinner, caps, and all tubing with Endotoxin-free DI water. Use glassware detergent safe for use with cell culture vessel. - Page 195 FLIPR Tetra High Throughput Cellular Screening System User Guide ® Loading Coelenterazine Conditions to check: • Loading buffer (inclusion of FBS or BSA, type of buffer). • Dye loading temperature and duration below 22 °C. • Coelenterazine specific for Photoproteins. •...
- Page 196 Running an Experiment 0112-0109 H...
-
Page 197: Chapter 9: Troubleshooting
This chapter contains tables of symptoms and solutions to help you diagnose and repair problems with the FLIPR Tetra System. In some ® cases, you will need to contact Molecular Devices Technical Support group: +1-800-635-5577. Instrument Status Colors ScreenWorks System Control Software is designed to handle most ®... -
Page 198: Troubleshooting Start-Up
Troubleshooting Troubleshooting Start-Up Table 9-2 Troubleshooting Start-up Symptom or Error Possible Causes Solutions Message “Connecting to the ScreenWorks Wait until Assay Finished instrument, please wait. Will Software is waiting (Unlocked) light is the enter offline if the only light illuminated on for the FLIPR ®... - Page 199 FLIPR Tetra High Throughput Cellular Screening System User Guide ® Table 9-2 Troubleshooting Start-up (cont’d) Symptom or Error Possible Causes Solutions Message Instrument Configuration Instrument does Install proper components does not show desired not have proper and restart system. components installed on components instrument.
-
Page 200: General Troubleshooting
Troubleshooting General Troubleshooting Table 9-3 General Troubleshooting Symptom or Error Possible Causes Solutions Message 201: “Upper door open”. Upper door (outer) is Close outer (upper) door. not closed. 202: “Both upper and Both upper (outer) Close outer (upper) and lower doors open”. and lower doors are lower doors. - Page 201 FLIPR Tetra High Throughput Cellular Screening System User Guide ® Table 9-3 General Troubleshooting (cont’d) Symptom or Error Possible Causes Solutions Message 103: “Invalid start of Start of command is Contact Technical Support command.” not valid. See appended string on +1-800-635-5577.
- Page 202 Troubleshooting Table 9-3 General Troubleshooting (cont’d) Symptom or Error Possible Causes Solutions Message “Input not accepted”. Input value is not Change the input value so valid (e.g., select it is within the specified greater than 16 time range. sequence files in the Export menu).
- Page 203 FLIPR Tetra High Throughput Cellular Screening System User Guide ® Table 9-3 General Troubleshooting (cont’d) Symptom or Error Possible Causes Solutions Message 401: “Input/Output PCB Input/Output PCB not Contact Technical Support not functional. Please functional. contact Technical Support. +1-800-635-5577. You will not be able to run protocols until it is repaired.”...
- Page 204 Troubleshooting Table 9-3 General Troubleshooting (cont’d) Symptom or Error Possible Causes Solutions Message 408: “Plate format file Plate format file fault. Select Reset from the fault. Please contact Instrument menu. Technical Support. You will Contact Technical Support be unable to use this plate until repaired.”...
-
Page 205: Troubleshooting The Pipettor
FLIPR Tetra High Throughput Cellular Screening System User Guide ® Troubleshooting the Pipettor Table 9-4 Troubleshooting the Pipettor Symptom or Error Possible Causes Solutions Message Cannot uninstall pipettor The D-Axis Knurled Grasp the D-Axis Knurled head. Nut is caught on the Nut receiver and press D-Axis receiver. - Page 206 Troubleshooting Table 9-4 Troubleshooting the Pipettor (cont’d) Symptom or Error Possible Causes Solutions Message 208: “Unable to load tips. Tips are already If you would like to change Tips are already on present on pipettor. tips, select Unload Tips pipettor.” from the Instrument/Manual Operation drop-down...
- Page 207 FLIPR Tetra High Throughput Cellular Screening System User Guide ® Table 9-4 Troubleshooting the Pipettor (cont’d) Symptom or Error Possible Causes Solutions Message 235: “Unable to place tips No tips are present Load tips manually on the in well. No tips loaded on on the pipettor pipettor head using the pipettor.”...
- Page 208 Troubleshooting Table 9-4 Troubleshooting the Pipettor (cont’d) Symptom or Error Possible Causes Solutions Message Some tips are left on the Pipettor calibration Contact Technical Support pipettor after unloading. failure. +1-800-635-5577. The tip rack is attached to Tip box failure. Remove tip box from tips. the tips.
- Page 209 FLIPR Tetra High Throughput Cellular Screening System User Guide ® Table 9-4 Troubleshooting the Pipettor (cont’d) Symptom or Error Possible Causes Solutions Message “Volume is too large.” Volume is too large Reduce the volume that for the pipettor head you are or plate format you aspirating/dispensing so it are using.
-
Page 210: Troubleshooting The Optics
Troubleshooting Table 9-4 Troubleshooting the Pipettor (cont’d) Symptom or Error Possible Causes Solutions Message “Done with plate after TETRAcycler is not Must install TETRAcycler on dispense” is not present. present on instrument for command to instrument. be available. Dialog does not Read plate is automatically appear because you changed at the end of an... - Page 211 FLIPR Tetra High Throughput Cellular Screening System User Guide ® Table 9-5 Troubleshooting the Optics (cont’d) Symptom or Error Possible Causes Solutions Message 214: “The 2 upper LED The upper pair of LED Make sure LEDs of the banks are not identical banks has mismatched same wavelength are wavelengths.
- Page 212 Troubleshooting Table 9-5 Troubleshooting the Optics (cont’d) Symptom or Error Possible Causes Solutions Message 218: “Unable to define The 515–575 nm Install the 515–575 nm plate mask. Please install emission filter is not emission filter to match 515–575 nm emission installed.
- Page 213 FLIPR Tetra High Throughput Cellular Screening System User Guide ® Table 9-5 Troubleshooting the Optics (cont’d) Symptom or Error Possible Causes Solutions Message Excitation/Emission Instrument was not Calibrate instrument for wavelength is not calibrated for the the Excitation/Emission available in the “edit read excitation/emission pair you are looking for.
- Page 214 Troubleshooting Table 9-5 Troubleshooting the Optics (cont’d) Symptom or Error Possible Causes Solutions Message “Number of reads before Number of reads prior Decrease the number of dispense are too large.” to dispense are larger reads before dispense so than the number of it is within the specified reads in the first range.
-
Page 215: Troubleshooting The Yellow Plate
FLIPR Tetra High Throughput Cellular Screening System User Guide ® Troubleshooting the Yellow Plate Table 9-6 Troubleshooting the Yellow Plate Symptom or Error Possible Causes Solutions Message “Saturation detected, Incorrect settings. Set excitation intensity to data may be invalid.” 80%, exposure length to 0.1 s and for EMCCD gain to 80, for ICCD gate to 3%. -
Page 216: Troubleshooting The Tip Washer
Troubleshooting Table 9-6 Troubleshooting the Yellow Plate (cont’d) Symptom or Error Possible Causes Solutions Message Standard deviation for Instrument was If instrument was calibrated the signal test is calibrated with yellow using the yellow boat, the greater than 5% and boat. - Page 217 FLIPR Tetra High Throughput Cellular Screening System User Guide ® Table 9-7 Troubleshooting the Tip Washer (cont’d) Symptom or Error Possible Causes Solutions Message 224: "Check Waste Bottle Waste bottle B is full Empty tip wash solvent B - sensor indicates full." with tip wash solvent.
-
Page 218: Troubleshooting The Cell Reservoir
Troubleshooting Troubleshooting the Cell Reservoir Table 9-8 Troubleshooting the Cell Reservoir Symptom or Error Possible Causes Solutions Message 255 “CellReservoir: Reservoir Instrument cannot Check to make sure not detected. Please install it at detect the cell the Cell Reservoir is Source 3 position and select reservoir. -
Page 219: Troubleshooting Robotic Integration
FLIPR Tetra High Throughput Cellular Screening System User Guide ® Table 9-9 Troubleshooting Data (cont’d) Symptom or Error Possible Causes Solutions Message Data parameters need to *.vamp file Select the Grouping or be reset (subtract bias, parameters not set up Correction buttons to spatial uniformity correctly. - Page 220 Troubleshooting Table 9-10 Troubleshooting Robotic Integration (cont’d) Symptom or Error Possible Causes Solutions Message 222: “Unable to unload plate. Plate already present Remove plate on Plate already detected at landing on landing pad. landing pad prior to pad.” unloading a new plate.
-
Page 221: Appendix A: Robotic Integration
Robotic Integration Introduction Purpose This document describes the interface between a FLIPR Tetra System ® and a robotic instrument. The intention of the document is to provide a general overview of the interface between the instrument and robot and a detailed description of the communication protocol between the ScreenWorks Software, which will run on the host computer of the FLIPR Tetra System instrument, and the robotic control software. -
Page 222: Instrument Overview
Robotic Integration Instrument Overview Instrument Basic Function FLIPR Tetra System is a fluorescence microplate reader used primarily ® for kinetic live cell-based fluorescence and luminescence assays. A typical assay involves the following steps: • Introduction of a read plate containing cells in solution or compounds into the instrument. - Page 223 FLIPR Tetra High Throughput Cellular Screening System User Guide ® metal tip block. Alternatively, 384- and 1536-well pin tool heads have replaceable pin tools. • Tip and pin washer: Each instrument includes a washer which can be used to wash tips or pins between fluid transfers. The washer consists of two parts—a washer control module and a wash reservoir.
-
Page 224: Instrument Layout
Robotic Integration Instrument Layout The basic layout of the instrument subsystems is demonstrated in the following illustration: As the illustration indicates, the top instrument compartment contains the pipettor and plate platform (stage). Plates are placed in the read position of the 5-position platform in order to be read by the plate reader, which is located in the optics compartment below the platform. -
Page 225: Plate Layout
FLIPR Tetra High Throughput Cellular Screening System User Guide ® Plate Layout The stage has 4 positions where plates and/or tips may be placed. These may be: • Position 1: Source Plate 1 or Tip-loading • Position 2: Source Plate 2 •... -
Page 226: Instrument Layout Terminology (I.e., Where's The Front?)
Robotic Integration operation. In manual mode, this latch will be automatically disengaged at the end of the assay. For robotic integration, plates are delivered to a single location outside of the instrument. The placement area for robotic delivery of plates to the instrument is to the left of the instrument. -
Page 227: Optics Access Door
FLIPR Tetra High Throughput Cellular Screening System User Guide ® A reverse process is used when unloading plates in remote mode. Optics Access Door The plate reader’s optics are mounted to the plate stage directly below the read plate position. A door is provided to the optics compartment for users to change emission filters and LED modules. -
Page 228: Cell Suspension Placement
Robotic Integration Cell Suspension Placement A Cell Suspension option is available with the FLIPR Tetra System. ® When present the Cell Suspension module is mounted on the lower right side of the instrument and the Cell Reservoir is inside of the instrument. - Page 229 FLIPR Tetra High Throughput Cellular Screening System User Guide ® The panel has two lights as well as the Interrupt button. From the top of the panel these are: • Assay Running (Locked)—Yellow light The FLIPR Tetra System is performing a task. The upper and ®...
-
Page 230: Monitor And Keyboard Placement
Robotic Integration Monitor and Keyboard Placement The host computer provided with FLIPR Tetra System is mounted to ® the instrument’s right side. This computer provides the only direct user interface and path to control the instrument. Monitor and keyboard for this computer are mounted to an adjustable arm on the instrument’s front right. - Page 231 FLIPR Tetra High Throughput Cellular Screening System User Guide ® wash bottles and chiller is required to the right side of the instrument. This space is also recommended to allow access to the main power- switch, washer tubing and communication connections. The cabinet should have a user access space of 48 inches (1219 mm) in front for users to exchange tips, plates and reservoirs.
- Page 232 Robotic Integration The following drawings illustrate these requirements: 0112-0109 H...
-
Page 233: Flipr Tetra System Control Architecture
ScreenWorks Software communicates to the stand- alone instrument with a dedicated connection using a communication protocol proprietary to Molecular Devices. The status of the instrument and assay is monitored by ScreenWorks Software, which then displays data as it is collected. -
Page 234: Manual Mode
Robotic Integration Manual Mode Upon startup, the instrument will be in Manual mode by default. In Manual mode, the user configures assays in ScreenWorks Software and manually loads plates and tips into the instrument. A simple diagram illustrating this interaction follows: In manual mode, a second network connection on the host computer is not monitored. - Page 235 FLIPR Tetra High Throughput Cellular Screening System User Guide ® illustrations are provided to illustrate the range of options available. These examples are not exhaustive. Third-party software via network Third-party software on FLIPR Tetra System host computer 0112-0109 H...
-
Page 236: Communication Protocol And Address
Robotic Integration Direct connection from third-party software host to FLIPR Tetra System host Communication Protocol and Address Communication between third-party software and ScreenWorks Software utilizes the TCP/IP protocol. The third-party software may be resident on another computer outside of the FLIPR Tetra System or on the instrument host computer. - Page 237 FLIPR Tetra High Throughput Cellular Screening System User Guide ® Instrument Startup When the instrument is powered on, it performs a series of initialization steps which may take several minutes. These steps include: • Configuring the camera • Initializing the pipettor •...
- Page 238 Robotic Integration If tips will be used for an extended period of time and the user wishes to use the tips/source 1 position as a source position, it is generally easier to load the tips manually before placing the instrument into remote mode.
- Page 239 FLIPR Tetra High Throughput Cellular Screening System User Guide ® Plate Status tracking The most important information in the status command is the status of the plates in the instrument. From the status response, four possible information items may be determined about the plates in each of the four plate positions.
-
Page 240: Setting Up Protocols For Remote Control Use
Robotic Integration is started, since all required plates may not be present in the instrument. Since the software can be configured to name the data file based on the bar codes of the plates used, it is possible that the data file name will change as an assay is completed. - Page 241 FLIPR Tetra High Throughput Cellular Screening System User Guide ® the same time. Plates should be arranged to minimize potential interactions between the plate handler and the pipettor. The following guidelines may be helpful in assigning plate positions for automation: Open reservoirs with very large wells cannot be handled by the plate handler.
-
Page 242: Analysis Screen
Robotic Integration base name. Using this option will ensure that no data is lost due to file overwriting. Folder settings This area is used to assign the directories used in saving the data and export files. There is no difference between settings for these directories in remote control mode and in manual mode. -
Page 243: Transfer Fluid Processes
FLIPR Tetra High Throughput Cellular Screening System User Guide ® Transfer Fluid Processes In general, settings for transferring fluids in remote control are the same as in manual mode—with three exceptions. These are in aspiration height over multiple plates, and the Pause In Well edit box. Aspiration Height over Multiple Plates When running in remote mode, a user may wish to use a common addition source plate over a series of plates. -
Page 244: Wash Tips Processes
Robotic Integration Pause in Well Edit box The Pause in Well edit box on the Edit Dispense screen allows the user to require that the pipettor remain in the well after dispensing. This pipettor operation will leave the tips in the well for the time specified. -
Page 245: Version
FLIPR Tetra High Throughput Cellular Screening System User Guide ® ok<CR> errorcode, error string<CR> status<CR> • ok<CR> indicates the command was started successfully or command is executed successfully. • errorcode, error string<CR> indicates command failed because of either an indicated condition or an instrument error. Error codes will be followed by a comma, a space, and then a string describing the error of up to 300 characters. -
Page 246: Status
Robotic Integration Status<CR> Command Description The status command returns the status of the instrument. The status response will be an ASCII text string which includes: • Information about the instrument type and firmware version. • Whether the instrument is functioning normally or an error occurred. - Page 247 FLIPR Tetra High Throughput Cellular Screening System User Guide ® Response Format instrument <SP>instrument name<TAB> version<SP>mm/dd/yyyy<TAB> function<SP>ok|errorcode|fatalcode,[errorstring]<TAB> inst_status<SP>busy|fault|error|resetting|abort|idle,remote|manual,o ffline|online<TAB> exp_running<SP>yes|no<TAB> readplate<SP>platename|none,have|empty<TAB> sourceplate1<SP>platename|none,have|empty<TAB> sourceplate2<SP>platename|none,have|empty<TAB> sourceplate3<SP>platename|none,have|empty<TAB> loadplates<SP>re[,s1,s2,s3,ti]|none<TAB> removeplates<SP>re[,s1,s2,s3,ti]|none<TAB> platehandler<SP>idle|busy_load|busy_remove<TAB> plate_on<SP>yes|no<TAB> camera_temp<SP>ok|not ok|off,temp,setpoint<TAB> chamber_temp<SP>ok|not_ok|fault|off<TAB> waste_bottlea<SP>ok|full<TAB> waste_bottleb<SP>ok|full<TAB> fill_bottlea<SP>ok|empty<TAB> fill_bottleb<SP>ok|empty<TAB> tips<SP>on|off<TAB> outer_auto_door<SP>open|closed<CR> Example Response instrument<SP> tetra<TAB> version<SP>...
-
Page 248: Loadplate
Robotic Integration removeplates<SP>none<TAB> platehandler<SP>idle<TAB> plate_on<SP>no<TAB> camera_temp<SP>ok,-35,-35<TAB> chamber_temp<SP>off,0,0<TAB> waste_bottlea<SP>ok<TAB> waste_bottleb<SP>ok<TAB> fill_bottlea<SP>ok<TAB> fill_bottleb<SP>ok<TAB> tips<SP>on<TAB> outer_auto_door<SP>closed<CR> Suggested Steps in Command Usage • Send status command • Response will be instrument status Loadplate<TAB>Location, Last Plate[, BAR CODE] <CR> Command Description Loads plate or tips to the specified location from landing pad. The plates or tips must have been placed on the instrument landing pad prior to the command being issued.Location, Last Plate[, Bar Code] - Page 249 FLIPR Tetra High Throughput Cellular Screening System User Guide ® The tips and source 1 location are the same position. Either the “ti” or “s1” parameter may be used to indicate this position. Bar code parameter must be: • String up to 20 characters. •...
-
Page 250: Removeplate
Robotic Integration Removeplate<TAB>location <CR> Command Description Removes plate or tips from the specified location. If source plate3 location is set for tips in the current experiment, the instrument will assume tips are present in that position. Command Parameters There is one parameter, location, for this command. Location parameter must be one of following: •...Location -
Page 251: Openprotocol
FLIPR Tetra High Throughput Cellular Screening System User Guide ® Openprotocol<TAB>File Name<CR> Command Description This command opens the specified protocol. Any documents open before this command is sent will be closed automatically. Only one protocol may be open at the time. Command Parameters There is one parameter, file name, for this command.File Name -
Page 252: Runexperiment
Robotic Integration Command Parameters There is one parameter, folder, for this command. The folder parameter identifies the folder for which a list of all *.fmp type files will be returned. The folder must be complete and in the correct Windows format, including the drive identifier and a closing backslash(\).[Data File Name] -
Page 253: Stopexperiment
FLIPR Tetra High Throughput Cellular Screening System User Guide ® data file name containing a full path. If the data file name parameter is not given, the data file created will be saved with auto save name as indicated in the Settings screen in the ScreenWorks Software. -
Page 254: Clearerror
Robotic Integration Command Parameters There are no parameters associated with this command. Example Command Line stopexperiment<CR> Example Response ok<CR> or c55, error string <CR> Suggested Steps in Command Usage • Check if instrument is functioning fine. • Make sure experiment is running. •... -
Page 255: Loadtips
FLIPR Tetra High Throughput Cellular Screening System User Guide ® • Response will be OK confirming the software has attempted to clear the error. • Monitor status for error is cleared. Loadtips<CR> Command Description This command loads the tips onto the pipettor head from position s1. This command will execute when commanded if tips are not already loaded and any plate is in the tips position. -
Page 256: Unloadtips
Robotic Integration Unloadtips<CR> Command Description This command unloads the pipette tips from the pipettor head into an empty tip rack placed into the tip load position. This command will execute when commanded if tips are loaded and any plate is in the tips position. The instrument is not capable of confirming that the plate in the tip load position is actually an empty tip rack. -
Page 257: Cyclecameratemp
FLIPR Tetra High Throughput Cellular Screening System User Guide ® Cyclecameratemp<CR> Command Description This operation cycles the camera temperature by setting the camera setpoint to 20 °C, waiting for the camera to reach this setpoint, resetting the camera to -45 °C, and then waiting for the camera to return to this temperature. -
Page 258: Washtips
Robotic Integration Command Parameters There is one required parameter, temp, for this command. If a value of zero is used for the temp parameter, temperature control for the chamber will be turned off. If a valid value for temp is used, temperature control will be turned on and this value will become the current setpoint for the chamber temperature.Fluid Type, Wash Cycles, Volume/Stroke, Aspirate Speed, Pump Speed, Strokes, Hold Time, Dispense Speed - Page 259 FLIPR Tetra High Throughput Cellular Screening System User Guide ® the parameters, their purpose, and the appropriate range for the commands. Table A-1 Washtips<TAB>Fluid Type, Wash Cycles, Volume/Stroke, Aspirate Speed, Pump Speed, Strokes, Hold Time, Dispense Speed<CR> command parameters Acceptable values or range Parameter Description 96-well...
-
Page 260: Configuration
Robotic Integration Table A-1 Washtips<TAB>Fluid Type, Wash Cycles, Volume/Stroke, Aspirate Speed, Pump Speed, Strokes, Hold Time, Dispense Speed<CR> command parameters (cont’d) Acceptable values or range Parameter Description 96-well 384-well 1536- head head well head Dispense Pipettor aspiration 5–200 1–50 .1–10 speed speed in micro liters (double) - Page 261 FLIPR Tetra High Throughput Cellular Screening System User Guide ® • Camera type installed. • Chiller installed or not. • LEDs installed. • Emission filters’ wavelength. Example Command Line configuration<CR> Response format instrument<SP>name<TAB> version<SP>version#<TAB> pipettor<SP>96|384|1536|384pintool| 1536pintool|no<TAB> tip_washer<SP>96|384|1536|no<TAB> bar_code<SP>installed|not installed<TAB> plate_handler<SP>installed|not installed<TAB> cell_reservoir<SP>installed|not installed<TAB>...
-
Page 262: Statusex
Robotic Integration bar_code<SP>installed<TAB> plate_handler<SP>installed<TAB> cell_reservoir<SP>installed<TAB> camera_installed<SP>emccd<TAB> chiller_installed<SP>installed<TAB> wave1<SP>470-495 nm<TAB> wave2<SP>510-545 nm<TAB> emfilt1<SP>515-575 nm<TAB> emfilt2<SP>515-575 nm<TAB> emfilt3<SP>515-575 nm<CR> Suggested Steps in Command Usage • Send configuration command. • Response will be instrument configuration. Statusex<CR> Command Description The statusex command is an extension of status command. It returns the status of the instrument in more details than the status command. - Page 263 FLIPR Tetra High Throughput Cellular Screening System User Guide ® sourceplate2<SP>platename|none,have|empty<TAB> sourceplate3<SP>platename|none,have|empty<TAB> loadplates<SP>re[,s1,s2,s3,ti]|none<TAB> removeplates<SP>re[,s1,s2,s3,ti]|none<TAB> platehandler<SP>idle|busy_load|busy_remove<TAB> plate_on<SP>yes|no<TAB> camera_temp<SP>ok|not ok|off|busy|fault,temp,setpoint<TAB> chamber_temp<SP>ok|not_ok|fault|off|busy<TAB> waste_bottlea<SP>ok|full<TAB> waste_bottleb<SP>ok|full<TAB> fill_bottlea<SP>ok|empty<TAB> fill_bottleb<SP>ok|empty<TAB> tips<SP>on|off<TAB> outer_auto_door<SP>open|closed<TAB> tip_washer<SP>ok|not_ok|off|busy|fault<TAB> cell_reservoir<SP>ok|not_ok|off|busy|fault,stir rate<TAB> chiller_status<SP>ok|not_ok|off|busy|fault,temp,setpoint<TAB> intensifier_status ok|not_ok|off|busy|fault<CR> Example Response instrument<SP> tetra<TAB> version<SP>2.1.0.0<TAB> function<SP>ok<TAB> inst_status<SP>idle,remote,online<TAB> exp_running<SP>no<TAB> readplate<SP>default96,have<TAB> sourceplate1<SP>default96,have<TAB>...
-
Page 264: Cellflaskcontrol
Robotic Integration waste_bottleb<SP>ok<TAB> fill_bottlea<SP>ok<TAB> fill_bottleb<SP>ok<TAB> tips<SP>on<TAB> outer_auto_door<SP>open<TAB> tip_washer<SP>ok<TAB> cell_reservoir<SP>not_ok,0<TAB> chiller_status<SP>ok,18.0, 18.0<TAB> intensifier_status<SP>ok<CR> Cellflaskcontrol<TAB>Rate<CR> Command Description This command sets the stir-rate for the cell-flask control. After sending this command, the robotic controller should monitor the instrument stir-rate to confirm that the instrument reaches the setpoint. Command Parameters There is one required parameter, rate, for this command.Rate -
Page 265: Washcellreservoir
FLIPR Tetra High Throughput Cellular Screening System User Guide ® C77–Parameter is out of range. Range is … Washcellreservoir<TAB>Fluid Type, Fill Speed, Drain Destination, Drain Speed, Wash Cycles, Hold Time, Volume Level<CR> Command Description This command is the equivalent of selecting Instrument/ Manual Operation/Wash Cell Reservoir from the main menu of the ScreenWorks Software.Fluid Type, Fill Speed, Drain Destination, Drain Speed, Wash Cycles, Hold Time, Volume Level - Page 266 Robotic Integration Table A-2 Washcellreservoir<TAB>Fluid Type, Fill Speed, Drain Destination, Drain Speed, Wash Cycles, Hold Time, Volume Level<CR> command parameters (cont’d) Acceptable values Parameter Type Description or range Hold time float Pause time in seconds, 0–300 leaving the fluid in the reservoir for desired period of time before draining it.
-
Page 267: Error Handling And Reporting
FLIPR Tetra High Throughput Cellular Screening System User Guide ® Error Handling and Reporting Error Types Interface Errors Interface errors are errors that are generated by issuing a command. These errors are detected upon receipt of the command by ScreenWorks Software and will be reported in the response to the command. - Page 268 Robotic Integration Table A-3 Error Types interface errors (cont’d) Error Description Code The pump speed can only be Slow or Fast. Invalid number of wash strokes. Invalid number of parameters for the wash tips command. Invalid number of wash cycles. Invalid protocol parameters discovered at runtime.
- Page 269 FLIPR Tetra High Throughput Cellular Screening System User Guide ® Table A-4 runexperiment command errors (cont’d) Error Description Code E112 Door(s) are opened. Close the doors before start your experiment. E113 Load Tips position not checked! Check Load Tips position for auto load tips or manually load tips before running experiment.
-
Page 270: Appendix A-Remote Interface Revision History
Robotic Integration Instrument errors Instrument errors are errors that are generated by executing a command. These errors are detected during the execution of the command by the instrument. They will be reported in the status response in the function line. These errors consist of a three-digit numeric code. -
Page 271: V1.3
FLIPR Tetra High Throughput Cellular Screening System User Guide ® Bug Fix: Commands made to the remote interface could sometimes take a long time and cause the remote interface to not respond to the client application within an acceptable timeframe. Client applications were able to work around this bug with massive TCP/IP timeouts (minutes) which made a true hang or network dropout undetectable. -
Page 272: Bar Code Specifications
Robotic Integration Before adjusting the bar code scanner to the bar code label location on the microplate, some general guidelines to the preparation and quality of the bar code label need to be followed for optimum performance: • The minimum height or size of the symbol bars will depend on the code symbol and the density used. -
Page 273: Appendix B: Data Processing Algorithms
Data Processing Algorithms This appendix uses results of a hypothetical experiment to describe the algorithms that can be used to adjust data. These options are all applied from the Correction dialog. Hypothetical Experiment Consider the results from an experiment consisting of wells A1–A9. The wells are classified into three groups: •... -
Page 274: Crosstalk Correction
Data Processing Algorithms In the table below, the results of the experiment are presented without Spatial Uniformity Correction, Negative Control Correction, Positive Control Scaling, or Subtract Bias Value. Well Sample Time – Ctrl – Ctrl – Ctrl + Ctrl + Ctrl + Ctrl 8000 8500... -
Page 275: Spatial Uniformity Correction
FLIPR Tetra High Throughput Cellular Screening System User Guide ® done in real time and no resulting data will be stored. it is recommended to test this correction during assay optimization. Spatial Uniformity Correction The spatial uniformity correction algorithm compensates, to a certain extent, for of the above-mentioned variations using a correction factor applied to all plate wells and samples. -
Page 276: Negative Control Correction
Data Processing Algorithms Each well-specific spatial uniformity correction factor is calculated by dividing the mean fluorescence counts of all wells by the fluorescence counts of each well (taken at Sample 1.) The table above also presents the correction factor for wells A1–A9. All samples taken from a particular well are multiplied by their well- specific correction factor. -
Page 277: Determining Negative Control Correction
FLIPR Tetra High Throughput Cellular Screening System User Guide ® Determining Negative Control Correction The negative control correction factor is derived by first calculating the mean fluorescence of each of the samples of the negative control wells. Well Sample Time Correction Mean –... -
Page 278: Positive Control Scaling
Data Processing Algorithms Positive Control Scaling The positive control algorithm compares the percent change in fluorescence counts of the positive control wells with all wells. This algorithm facilitates comparisons of results between data runs (i.e., different plates) by controlling factors such as cell density, cell response, laser power, or exposure time. -
Page 279: Subtract Bias
FLIPR Tetra High Throughput Cellular Screening System User Guide ® Well Sample Time – Ctrl – Ctrl + Ctrl + Ctrl + Ctrl – Ctrl Note: All wells, at samples 1–3, range from 20 to 23%. The positive control wells at Sample 4 range from 114 to 130% while the negative control wells remain at around 20% throughout the experiment. -
Page 280: Response Over Baseline
Data Processing Algorithms The results show only numbers above zero. The subtract bias algorithm places the data in a readily interpretable form. The positive control wells at Sample 4 range from 93–109% positive. In contrast, the negative control wells remain close to zero percent positive throughout the experiment. - Page 281 FLIPR Tetra High Throughput Cellular Screening System User Guide ® a fold increase of the response compared to the baseline with Sample values ranging in the single digits (0–6). Well Sample Time A1 – A2 – A3 – A7 + A8 + Ctrl Ctrl...
- Page 282 Data Processing Algorithms 0112-0109 H...
-
Page 283: Appendix C: Consumables And Accessories
Tool Head Kit, 384 Tool Hd Kit +1-408-747-1700 FLIPR Tetra System Pin Molecular Devices +1-800-635-5577 1536 Pin ® Tool Head Kit, 1536 +1-408-747-1700 Tool Hd Kit Please contact your local Molecular Devices Sales Representative for details regarding this configure-to- order item. 0112-0109 H... -
Page 284: Optics Consumables
Consumables and Accessories Optics Consumables Table C-3 Suggested Item Item Phone Number Supplier Number FLIPR Tetra System Molecular Devices +1-800-635-5577 0200-6206 ® Calcium Optics Kit +1-408-747-1700 FLIPR Tetra System Molecular Devices +1-800-635-5577 0200-6207 ® Membrane Potential +1-408-747-1700 Optics Kit FLIPR... -
Page 285: Pipetting Consumables
FLIPR Tetra High Throughput Cellular Screening System User Guide ® Table C-3 Suggested Item Item Phone Number Supplier Number FLIPR Tetra System Molecular Devices +1-800-635-5577 0200-6203 ® Emission Filter, +1-408-747-1700 515–575 nm (Calcium) FLIPR Tetra System Molecular Devices +1-800-635-5577 0200-6212 ®... -
Page 286: Cell Reservoir Consumables
FLIPR Tetra System Molecular Devices +1-800-635-5577 1536 Pin ® Pin Tool, 1536 +1-408-747-1700 Tool Please contact your local Molecular Devices Sales Representative for details regarding this configure-to- order item. Cell Reservoir Consumables Table C-5 Suggested Item Item Phone Number Supplier... -
Page 287: Plates
FLIPR Tetra High Throughput Cellular Screening System User Guide ® Plates 96-Well Read Plates Table C-6 96-Well Read Suggested Phone Number Item # Plates Supplier Black, clear, tissue Becton Dickinson +1-800-343-2035 353948 culture treated, sterile Corning/Costar +1-800-492-1110 3603 Greiner +1-408-378-2013 655090 (distributed by E&K) Nalge/Nunc +1-800-766-7000 165305... -
Page 288: 96-Well Source Plates
Consumables and Accessories 96-Well Source Plates Table C-8 96-well Source Suggested Phone Number Item # Plates Supplier V-bottom plate, Becton Dickinson +1-800-343-2035 353263 96-well polypropylene Greiner +1-408-378-2013 651201 (distributed by E&K) polypropylene Nalge/Nunc +1-800-766-7000 249944 U-bottomed plate, Becton Dickinson +1-800-343-2035 351190 96-well polypropylene Corning/Costar... -
Page 289: 384-Well Read Plates
FLIPR Tetra High Throughput Cellular Screening System User Guide ® 384-Well Read Plates Table C-9 384-well Read Suggested Phone Number Item # Plates Supplier Black, clear, tissue Becton Dickinson +1-800-343-2035 353262 culture treated, sterile Corning/Costar +1-800-492-1110 3712 Greiner with lids +1-408-378-2013 781091 (distributed by E&K) Matrical... -
Page 290: 384-Well Source Plates
Consumables and Accessories 384-Well Source Plates Table C-10 384-well Suggested Phone Number Item # Source Plates Supplier Flat bottom plate Becton Dickinson +1-800-343-2035 353265 polypropylene Corning/Costar +1-800-492-1110 3702 polystyrene Greiner (distributed +1-408-378-2013 781201 by E&K) polypropylene Nalge/Nunc +1-800-766-7000 265496 polystyrene UV-bottom plate Corning/Costar +1-800-492-1110 3657... -
Page 291: 1536-Well Source Plates
Source Suggested Phone Number Item # Reservoirs Supplier Omni tray Nalge/Nunc +1-800-786-7000 2428110 polystyrene Assays Performed on the FLIPR Tetra System Calcium Flux Consumables Table C-14 Suggested Item Phone Number Item# Supplier FLIPR Calcium 5 Assay Kit: Molecular Devices +1-800-635-5577 ®... - Page 292 Consumables and Accessories Table C-14 Suggested Item Phone Number Item# Supplier FLIPR Tetra System Molecular Devices +1-800-635-5577 0200- ® Calcium Optics Kit: 6206 +1-408-747-1700 FLIPR Tetra System ® LED Module, 470-495 FLIPR Tetra System ® Emission Filter, 515-575 Hank’s Balanced Salt...
-
Page 293: Flipr Membrane Potential Assay Kit Consumables
Irvine Scientific +1-800-437-5706 9319 Carbachol Sigma +1-800-325-3010 C4382 (receptor-mediated positive control) Equipment and Supplies Suggested to Perform Assays with Your FLIPR Tetra System • AquaMax DW4 96/384/1536 Dispenser/Washer, Molecular ® Devices. • 5 mL, 10 mL, 25 mL sterile serological pipettes. - Page 294 Consumables and Accessories 0112-0109 H...
-
Page 295: Appendix D: Using Aquamax Sterilant
Using AquaMax Sterilant AquaMax Sterilant can be used to clean and sterilize the fluid paths in the Cell Reservoir and Cell Suspension module. Principle of Use Accumulated residues and contaminating microorganisms have the potential for causing significant adverse effects on the operation of liquid handling equipment. -
Page 296: Storage
Using AquaMax Sterilant Storage The unopened kit package may be stored at room temperature (between 10° and 40 °C). After opening the kit, store 4X Concentrated Solution A and 1X Solution A (prepared by mixing 1 volume of 4X Concentrate Solution A with 3 volumes of deionized water) between 10°... - Page 297 4. The following information is being provided in compliance with Worker and Community Right-To-Know Regulations: Solution A, 4X Concentrate Chemical Composition The chemical composition of this solution is a trade secret and proprietary property of Molecular Devices. Solution B Chemical Composition, CAS # Sodium Hypochlorite, Solution, 7681-52-9 0112-0109 H...
- Page 298 Using AquaMax Sterilant 0112-0109 H...
-
Page 299: Appendix E: Decontamination Certificate
Decontamination Certificate Procedure for Completing the Certificate Circle the appropriate statement and complete both pages of the form as necessary. 1. The instrument or parts that are being returned for rework were not used for any application involving blood or other potentially infectious material. - Page 300 Decontamination Certificate Enclose this sheet with the part or instrument being shipped to another location or returned to the factory. Please enclose the sheet in such a manner that it can be easily read when the package is opened. 0112-0109 H...
-
Page 301: Appendix F: Electromagnetic Compatibility (Emc)
Electromagnetic Compatibility (EMC) REGULATORY INFORMATION FOR CANADA (ICES/NMB-001:2006) This ISM device complies with Canadian ICES-001. Cet appareil ISM est confomre à la norme NMB-001 du Canada. ISM EQUIPMENT CLASSIFICATION (Group 1, Class A) This equipment is designated as scientific equipment for laboratory use that intentionally generate and/or use conductively coupled radio- frequency energy for internal functioning, and are suitable for use in all establishments, other than domestic and those directly connected to a... - Page 302 Electromagnetic Compatibility (EMC) 0112-0109 H...
Need help?
Do you have a question about the FLIPR Tetra and is the answer not in the manual?
Questions and answers