Table of Contents
Advertisement
Advertisement
Table of Contents
Troubleshooting

Related Manuals for Molecular Devices SkanWasher 300


Summary of Contents for Molecular Devices SkanWasher 300
- Page 1 SkanWasher 300 User Guide NCLUSIVE UTOMATIC ICROPLATE ASHER...
- Page 2 Orleans Drive, Sunnyvale, California, 94089, USA. Trademarks and Patents SkanWasher is a trademark of Molecular Devices Corporation (MDC) and is not to be used in any type of promotion or advertising without permission from MDC. All other trademarks or registered trademarks are the property of their respective owners.
-
Page 3: Table Of Contents
Clogged Probes or Rinse Inlet Channels... . . 28 Removal of wash head ......31 SkanWasher 300 User Guide... - Page 4 Compare pump with internal vacuum sensor ..43 Application Tips: SkanWasher 300/ SkanStacker ..44 Appendix A: Serial Communication Option (RS-232) ....A-1 Installation of Serial Communication option .
- Page 5 Figure 5: Washhead with locking screws and spirit level ..2-8 Figure 6: SkanWasher 300 ....... 3-9 Figure 7: Control Panel, LCD and Touch Keys .
- Page 6 Table 1: Wash Step Selections ......4-18 Table 2: Troubleshooting Chart ......7-39 SkanWasher 300 User Guide...
-
Page 7: Chapter 1: Introduction
96-well microplates where thorough washing is an essential component of the assay. The SkanWasher 300 is designed to wash 96-well microplates. The process of setting up wash parameters is flexible and allows you to modify or choose the... -
Page 8: About This Guide
Alerts user to CAUTION: situations that could result in instrument damage or failure to complete a procedure. !! IMPORTANT: Information that you need to know to perform a task properly. TIP: Helpful information that can simplify a task SkanWasher 300 User Guide... -
Page 9: Safety Features
Introduction Safety Features The SkanWasher 300 is equipped with four sensors that help to safeguard operation before the actual wash. When starting the program, the SkanWasher 300 automatically verifies the status of the following: Pressure pump operating at the correct level... -
Page 11: Chapter 2: Installation
Before connecting CAUTION: the main power, ensure voltage setting is correct (Step 1). Insert the power cord into the receptacle located on the back of the instrument. Plug the power cord into the main power outlet. SkanWasher 300 User Guide... -
Page 12: Figure 1: Waste Reservoir And Vacuum Pump
Devices. These bottles are implosion proof with a “tankful” sensor and a built-in foam reducer. Connect the pressure tubing (yellow) from the wash buffer and rinse reservoir to the Pressure port on the side of the instrument. SkanWasher 300 User Guide... -
Page 13: Figure 2: Wash And Rinse Liquid Reservoirs
(See Figure 3). Push the plate holder onto the two rods on the microplate lift until it snaps in place. (see Figure 4). SkanWasher 300 User Guide... -
Page 14: Figure 3: Microplate Holder, Flat- Or Round-Bottom Plates
Installation Figure 3: Microplate holder, flat- or round-bottom plates Figure 4: Microplate holder and lift SkanWasher 300 User Guide... -
Page 15: Figure 5: Washhead With Locking Screws And Spirit Level
Replace screws with two (2) PCV grip screws (included with packaging) using the Allen key from tool kit. Step 8 Set up vacuum pump and adjust if necessary. Figure 5: Washhead with locking screws and spirit level SkanWasher 300 User Guide... -
Page 17: Chapter 3: Parts And Description
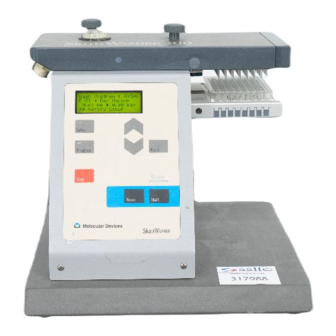
Adjustment knobs Washhead Microplate lift Control panel Figure 6: SkanWasher 300 Wash Head The wash head contains 96 paired probes: the longer probes are used when aspirating and the shorter probes are used when dispensing.The wash head is a combined manifold and wash head, equipped with 3 valves, electronic sensors, and a level to assist in leveling the wash head. -
Page 18: Control Panel
The lift automatically returns to the home position (lower) when the instrument is powered on. Control Panel The control panel located on the front of the SkanWasher 300 contains eight touch keys, three LEDs, and an LCD display, all of which are used to program and control the instrument. -
Page 19: Led Display
[Start] [Rinse] [Stop] to run a pre-selected wash sequence or rinse or prime. When the SkanWasher 300 is ready for wash, the LED light turns on. Ready key is used to halt operation in the event of a prob- [Stop] lem. - Page 20 The instrument is factory set for flat- and round-bottom microplates. To ensure excellent aspiration and low residual volume, the aspiration probe must be positioned at the bottom of the well. This can be adjusted through the on-board software program. SkanWasher 300 User Guide...
-
Page 21: Pressure/Vacuum Washer Parts
TIP: Adjusting the level of the air pressure also adjusts the flow rate of the liquid entering the microplate wells. It does not have an effect on the volume. SkanWasher 300 User Guide... -
Page 23: Chapter 4: Software Configuration
Chapter 4: Software Configuration The SkanWasher 300 allows up to eight different user-defined and pro- grammed wash sequences to be stored in memory with a battery backup. Each wash program has the following options: Air pressure from the internal pressure pump can be varied to control inlet liquid flow. -
Page 24: Setup Function
Select the program to be edited or select an open space to create a new wash program. Use the arrow keys to move cursor to selection. Press [Enter] !! IMPORTANT: To save changes, Exit/Save must be selected after program setting completed. SkanWasher 300 User Guide... - Page 25 Use arrow keys to set at correct height (see Figure 9). For low residual volume, the aspirate probe must be close to the bottom of the well. Total adjustable distance is 6 mm. SkanWasher 300 User Guide...
-
Page 26: Figure 9: Aspirate Probe Height Position
Soak / Pause, Wash volume, Wash time, Aspi- rate, and End Wash. See Table 1 on page 18 for descrip- tions. h = 0-6 mm 200 L Figure 9: Aspirate probe height position h = 0-6 mm Figure 10: Dispense probe height position SkanWasher 300 User Guide... - Page 27 Aspirate time = 5 seconds lift velocity approximately 4 seconds. End Wash Set for last step of wash. Table 1: Wash Step Selections !! IMPORTANT: To save changes, Exit/Save must be selected after program setting completed. SkanWasher 300 User Guide...
-
Page 28: Edit Options
Step 2 Press Down-arrow key to select Edit Options. Step 3 Press [Enter] Step 4 Select Sensor On/Off by pressing [Enter] Step 5 Use Up arrow key to select either Enabled or Disabled. Step 6 Press [Enter] SkanWasher 300 User Guide... - Page 29 Shows the status of the plate lift 0-position sensor. Dis- plays in (+) or (-). Shows the status of the waste level sensor. Displays in (+) or (-). This sensor can be disabled through Edit Options/Sensor On/Off. SkanWasher 300 User Guide...
-
Page 31: Chapter 5: Operation
Ready. (Ready LED will illuminate). If system is in Setup menu, press key to return to Main Menu. Setup To exit the Program mode with- out selecting a program, press the ]key. Program SkanWasher 300 User Guide... - Page 32 Step 7 Press key. [Start] Step 8 Repeat Step 5-8 to wash additional plates. Step 9 At end of run, run a rinse program using rinse solution (consult page 23). SkanWasher 300 User Guide...
-
Page 33: Chapter 6: Maintenance
[Stop] Step 7 If end of the day, proceed with Empty Wash Head Procedure. If further washing will be performed later the same day, turn instru- ment off and start new wash with prime. SkanWasher 300 User Guide... -
Page 34: Empty Wash Head Procedure
Press the key to start the prime program. [Start] (This will blow air through the washhead to remove any remaining liquid.) Move waste tubing from vacuum port to “Inlet” port just prior to dispensing. Repeat 2x. SkanWasher 300 User Guide... - Page 35 Go to Setup Main Menu, select Edit Options, choose Sensor On/ Off. Enable sensors. Step 11 Instrument may be turned off. !! IMPORTANT: Prime instrument at next day of use with buffer solution. Follow instructions in Operation chapter. SkanWasher 300 User Guide...
-
Page 36: Weekly Maintenance
Connect tubing from reservoir bottle to Rinse port and pressure tubing to pressure port. Verify waste tubing is connected to vacuum port and vacuum pump. Step 4 Insert a clean microplate into the microplate holder. SkanWasher 300 User Guide... -
Page 37: Monthly Maintenance
Check tubing and quick connects for wear and contamination. Replace if indicated. Check reservoir bottles. Clean reservoir bottles with decontaminate solution, flush well with water. Check reservoir bottles for contamination (algae). Replace if indi- cated. SkanWasher 300 User Guide... -
Page 38: Advanced Maintenance
Perform a forward flush to remove the particles. Insert a clean microplate into the microplate holder. Press the key to enter the Rinse/Prime mode. [Rinse] Press the key a second time to start the prime program. [Start] Repeat 3 times. SkanWasher 300 User Guide... - Page 39 Run a wash program to verify that particles are removed (see Opera- tion, Step 5). Step 9 If particles not removed, and one probe can be identified to be clogged, replace probe. If particles not removed, please consult Technical Support to have inlet channel replaced. SkanWasher 300 User Guide...
-
Page 40: Figure 11: Wash Head Inlet Channel Seal Block
Maintenance Figure 11: Wash Head Inlet Channel Seal Block SkanWasher 300 User Guide... -
Page 41: Removal Of Wash Head
Step 2 Turn instrument off. Step 3 Unscrew the wash head locking screws (2). Step 4 Lift the wash head up slowly. Disconnect the air pressure supply tube and the ribbon cable from the wash head. SkanWasher 300 User Guide... -
Page 42: Replacing Probes
Commercially available glue recommended: Loctite QuickTite Super Glue Easy Squeeze Gel or Loctite 290 Loctite Threadlocker Green (does not set up as quickly as QuickTite). Step 5 Wash excess glue off wash head after 15 minutes using water. SkanWasher 300 User Guide... -
Page 43: Microplate Lift Adjustment (Tilt And Vertical)
Adjust the microplate platform by tilting until all probes aligned into wells. Step 4 Fasten the screws labeled 1, 2, and 3 (see Figure 14). Step 5 Verify the aspiration probes are aligned to columns 1 through 12. If necessary, re-adjust if indicated. SkanWasher 300 User Guide... - Page 44 Loosen the two set-screws that secure the two rods to the plate lift mechanism. Step 4 Adjust rods in or out as necessary. Step 5 Fasten both screws. Step 6 Remount wash head and verify positioning of probes. Step 7 If necessary, re-adjust. SkanWasher 300 User Guide...
-
Page 45: Figure 14: Adjustment Procedure Lift Version A
Maintenance Figure 14: Adjustment Procedure Lift Version A SkanWasher 300 User Guide... - Page 46 Turning screws counterclockwise will move row H away from the aspiration probes. Step 4 Fasten the locknuts labeled L1 and L2. Step 5 Verify the aspiration probes are aligned to rows A through H. If nec- essary, re-adjust. SkanWasher 300 User Guide...
-
Page 47: Figure 15: Version B Microplate Lift Adjustment
Step 4 Adjust rods in or out as necessary. Step 5 Fasten both screws. Step 6 Remount wash head and verify positioning of probes. Step 7 If necessary, re-adjust. Figure 15: Version B Microplate Lift Adjustment SkanWasher 300 User Guide... -
Page 48: Figure 16: Row Angle Adjustment, Lift Version B
Maintenance Figure 16: Row Angle Adjustment, Lift Version B SkanWasher 300 User Guide... -
Page 49: Chapter 7: Troubleshooting
Chapter 7: Troubleshooting Troubleshooting Chart If you experience a problem during operation of the SkanWasher 300 and don’t know how to resolve it, the following table may prove helpful. Table 2 below lists problems and possible resolutions. For problems not listed here, or if the listed resolution does not fix the problem, please call the Technical Sup- port department at Molecular Devices (outside the U.S. - Page 50 Remove tubing from side of washer at pressure fit- ting. If pump stops, the problem is probably the tubing caps. If the pump continues running, it is most likely another internal problem. Call Techni- cal Support. SkanWasher 300 User Guide...
-
Page 51: Error Messages
The LED Ready light flashes and a message is shown in the display. The sensor check is performed once when the key is pressed to ini- [Start] tiate a wash. During the wash, the SkanWasher 300 does not check the sen- sors. Error Cause Things to Try... -
Page 52: Vacuum Pump Troubleshooting
With a start value of 1000 mbar, reading after a few minutes should be 100 mbar. Step 6 Evaluate system if performance not met. Rule out leaks in the sys- tem and/or build up of condensated particles in filter. Repeat test if indicated. SkanWasher 300 User Guide... -
Page 53: Discharge Test For Vacuum Pump
Step 2 Record the internal vacuum sensor reading Step 3 Record the pump gauge reading Step 4 Compare two readings. If the readings are not the same, check for leaks or blockage in the vacuum system. SkanWasher 300 User Guide... -
Page 54: Application Tips: Skanwasher 300/ Skanstacker
Troubleshooting Application Tips: SkanWasher 300/ SkanStacker Instrument Functions Air Pressure Internal pressure pump creates air pressure within the liquid reservoir. Air pressure increases the flow rate and has no effect on volume. Increase the air pressure for higher pressure, decrease for lower pressure. - Page 55 For low residual volume, the aspirate probe must be close to the bottom of the well. If residual volume too low, check also for clogged probes. Is volume low in certain wells? SkanWasher 300 User Guide...
-
Page 57: Appendix A: Serial Communication Option (Rs-232
The standard protocol contains the following communications: start, stop,and program selection. The RS-232 connection on the SkanWasher 300 is a 5-pin connector that is exchanged for the 3-pin connector used to connect the waste level alarm. The connector is then used for both the waste reservoir alarm and serial interface. -
Page 58: Parameters
Stop bits The communication protocol is designed for single-character commands. No data handshake control is implemented, nor are hardware, DTR/DSR, RTS/ CTS, software, or Xon/Xoff. Hardware handshake lines are interconnected in the 9-pin female D-SUB connector. SkanWasher 300 User Guide... -
Page 59: Communication Protocol
‘G’ - 47h 47h/67h pressing the Start key on the control panel. The ‘E’ - 45h SkanWasher 300 begins washing the micro- ‘!’ - 21h plate using the currently selected wash pro- gram. If sensor check is enabled, vacuum level, air pressure, waste level, and microplate sensor will be verified prior to initiating the wash. - Page 60 ‘#’ / 23h The host tried to select a wash program that was not defined. The SkanWasher 300 will accept a select program command only if the wash program number (between 1 and 8) has been defined.
- Page 61 Stop key on the control panel. The Stop command must be sent twice: → → 1. Stop Interrupt operation Reply ‘S’ → → 2. Stop Return to Ready mode Reply ‘!’ SkanWasher 300 User Guide...
-
Page 63: Appendix B: Specifications
Appendix B: Specifications Physical Dimensions Length ....33 cm Width....34 cm Height . -
Page 65: Appendix C: Shipment
Appendix C: Shipment Prior to transporting the SkanWasher 300, carry out the following steps. Step 1 Decontaminate the system following Weekly Maintenance proce- dure. If radioactive materials are used, use appropriate decontami- nate solution for each material. Step 2 Perform Empty Head procedure to empty dispense head of all fluid. -
Page 67: Appendix D: Decontamination Form
Name: ________________________________________________________ Institution: ____________________________________________________ Address: ______________________________________________________ _____________________________________________________________ City/State/Zip: _________________________________________________ Country: ______________________________________________________ Date: ________________ Signed: __________________________________ SkanWasher 300 User Guide... -
Page 69: Appendix E: Wash Program Sheets
Appendix E: Wash Program Sheets SkanWasher 300 Wash Program Sheet Program 1 Wash programs are pre-set at the factory. These programs may be edited. Program Number Program Name A + 3 * W Date 1997-03-07 Signature Description Demo program, Aspirate followed by 3 times wash. - Page 70 Appendix E: Wash Program Sheets SkanWasher 300 Wash Program Sheet Program 2 Wash programs are pre-set at the factory. These programs may be edited. Program Number Program Name A + 4 * W Date 1997-03-07 Signature Description Demo program, Aspirate followed by 4 times wash 250 µl &...
- Page 71 Appendix E: Wash Program Sheets SkanWasher 300 Wash Program Sheet Program 3 Wash programs are pre-set at the factory. These programs may be edited. Program Number Program Name A 2 W S A Date 1997-03-07 Signature Description Demo program, Aspirate followed by two times wash.
- Page 72 Appendix E: Wash Program Sheets SkanWasher 300 Wash Program Sheet Program 4 Wash programs are pre-set at the factory. These programs may be edited. Program Number Program Name C: A + D Date 1997-03-07 Signature Description Demo program, to be used with Coomb’s wash.
- Page 73 Appendix E: Wash Program Sheets SkanWasher 300 Wash Program Sheet Program Number Program Name Date Signature Description Instrument Parameters [bar] Volume Adjust σV Air Pressure Aspirate Probe [mm] Dispense Probe [mm] Wash Sequence Wash Step Aspirate Wash Dispense Soak Rinse _____ sec/____ µl...
- Page 74 Appendix E: Wash Program Sheets SkanWasher 300 Wash Program Sheet Program Number Program Name Date Signature Description Instrument Parameters [bar] Volume Adjust σV Air Pressure Aspirate Probe [mm] Dispense Probe [mm] Wash Sequence Wash Step Aspirate Wash Dispense Soak Rinse _____ sec/____ µl...
-
Page 75: Appendix F: Warranty
Molecular Devices Corporation service facility. You must call or write to the nearest Molecular Devices Cor- poration service facility to schedule warranty service. You may call Molecular Devices Corporation at the telephone number or address below to locate the nearest service facility. - Page 76 For the name of the nearest authorized Molecular Devices Corporation ser- vice facility, please contact Molecular Devices at one of the following tele- phone numbers: 408-747-1700 800-735-5577 (US &...
-
Page 77: Index
Index Empty Wash Head Procedure 6-24 EPROM Adjustment knobs Error messages 7-41 Advanced maintenance Ethanol 6-28 6-24 6-26 Application tips 7-44 Application tips, troubleshooting Fuse Aspirate 4-16 4-18 Aspiration probes 4-14 4-16 Hydrophobic filter 3-13 Battery 7-40 Bleach 6-26 Inlet ports 3-11 3-12 Installation... - Page 78 Specifications Stop key 3-11 Operation Symbols 5-21 Outlet port 3-12 Transportation screws Pressure ports Troubleshooting 3-12 7-39 Pressure pump advanced 3-13 4-16 4-20 7-41 Prime 5-21 Probes clogged 6-28 Vacuum port 3-12 replacement 6-32 Vacuum pump 7-44 Program selections 4-18 Adjusting 7-42 Protection filter...
Need help?
Do you have a question about the SkanWasher 300 and is the answer not in the manual?
Questions and answers