Table of Contents
Advertisement
Quick Links
Advertisement
Table of Contents

Related Manuals for Sinclair XK64


Summary of Contents for Sinclair XK64
- Page 1 USER'S MANUAL SINCLAIR WATER HEATER Wired controller XK64 H E A T P U M P S...
- Page 2 “Original instructions” ...
-
Page 3: Table Of Contents
Contents 1. Appearance ..................1 2. Button Descriptions ................1 3. Introduction to LCD Icons ..............2 4. Operation Modes ................3 4.1 Common Modes ................. 3 4.2 Special Modes ................3 5. Functions ..................4 6. Operation Instructions ..............5 6.1 On/Off Setting ................ -
Page 4: Appearance
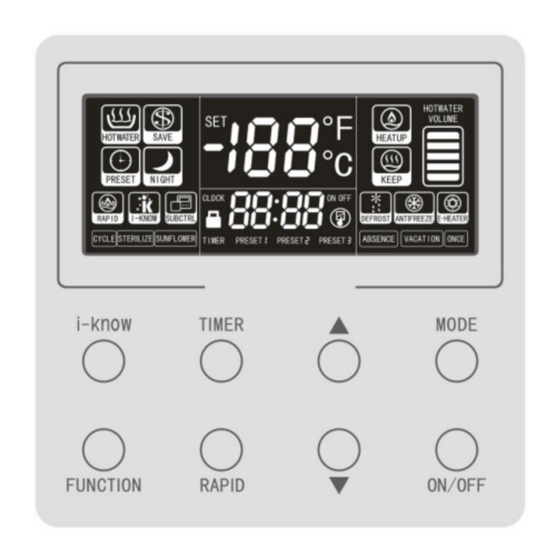
1. Appearance 2. Button Descriptions i-know button Timer button Function button Rapid button Mode button Up button On/Off button Down button... -
Page 5: Introduction To Lcd Icons
3. Introduction to LCD Icons Display of Common Operation Display of defrost, antifreeze Modes: running, and e-heater running (or HOTWATER, SAVE, PRESET and display of the Special E-HEATER NIGHT mode. Mode). Display of hot water volume (this Display of RAPID and I-KNOW function is unavailable to models function. -
Page 6: Operation Modes
4. Operation Modes 4.1 Common Modes Mode Name Description In the standard hot water mode, the uint will start or stop based on the difference between the temperature setpoint and the actual water HOTWATER temperature. If the temperature setpoint is higher than that can be achieved by the heat pump, only the electrical heater will be used for heating when the heat pump is unavailable.) This mode is similar to the HOTWATER mode. -
Page 7: Functions
5. Functions Function Name Description The unit starts and stops as the timer setting. TIMER Once setup, this function works circularly every day. The electrical heater is started to prepare hot water rapidly to meet RAPID the urgent need for hot water.This function is available only when the water tank equipped with the auxiliary electrical heater. -
Page 8: Operation Instructions
6. Operation Instructions 6.1 On/Off Setting The unit will be started or stopped by pressing the “On/Off” button. Note: After energization and under normal communication, the LCD will display the water temperature, time, and hot water volume (for models with dual temperature sensor) under both On and Off states of the unit. -
Page 9: Special Modes Setting
6.3 Special Modes Setting If the heat pump of a water heater equipped with an electrical heater is faulty, users can press and hold MODE+RAPID for 5 seconds in any mode under the On state to enter the E-HEATER mode. Note: The E-HEATER mode can be used only when the heat pump is faulty. -
Page 10: Water Temperature Setting
the HOTWATER mode will be started upon restart of the water heater in the case of blackout. 6.4 Water Temperature Setting In the On state, press ▲ to increase or press ▼ to decrease the temperature setpoint. The water temperature will increase or decrease continuously by 1° C when the button is pressed and held. - Page 11 press the TIMER button to enter the timer setting interface. The TIMER and ON icons are on and the hour value blinks. Press ▲ or ▼ to adjust the hour value and press the TIMER button to confirm setting. Then the minute value flickers. Press ▲ or ▼ to adjust the minute value and press the TIMER button to confirm setting.
-
Page 12: Preset Time Setting
6.5.3 Preset Time Setting In the PRESET mode, hot water is prepared in advance by the preset time. In the main interface of the PRESET mode, press the TIMER button to enter the selection interface. PRESET 1 blinks while PRESET 2 and PRESET 3 are not displayed. - Page 13 as that for PRESET 2. Preset time for PRESET 1 cannot be cancelled. If users select PRESET 1, the time setting interface will be displayed. PRESET 2 or Press ▲ or ▼ to select Press the PRESET 1 Main interface PRESET 3 TIMER button.
-
Page 14: Function Setting
6.6 Function Setting 6.6.1 I-KNOW In the On state, press the i-know button to select the I-KNOW function. To cancel this function, press the i-know button again. 6.6.2 RAPID In the On state, press the RAPID button to select the RAPID function. The electrical heater is started for heat up. - Page 15 During this period, the following operations can be performed: 1) Press ▲ or ▼ to start or cancel the STERILIZE function. If this function is started, the STERILIZE icon is displayed without blinking. Sterilization will be performed circularly by the preset d and h value; If this function is canceled, the STERILIZE icon is not displayed.
- Page 16 Sterilization is performed circularly by the d value. Once the circular sterilization conditions are met, sterilization is performed regardless of on/off status of the controller and beyond limit of common modes and functions except VACATION. However, users can stop sterilization under process by pressing the ON/OFF button to shut it down. (But it can only stop sterilization for this time without affecting circular sterilization, the preset circular sterilization function still works.) OFF reminder for sterilization failure:...
-
Page 17: Vacation
③ After the circular sterilization function is set, the water heater can still precisely calculate the day interval for sterilization accumulatively and the circular sterilization function can still work in the case of short-term power failure. If the time point for sterilization is within the power failure duration, sterilization will be made up once power is provided again. -
Page 18: Cycle
2) Press the TIMER button to set the number of vacation days. Press ▲ or ▼ to select the number of vacation days from 3 to 120 days and press the TIMER button to confirm setting. Then press ▲ or ▼ to start or cancel the VACATION function. When the VACATION function is started under the On state, the water heater calculates the number of vacation days accumulatively. - Page 19 hot water is needed by the user. The CYCLE icon blinks. Press ▲ or ▼,the CYCLE icon keeps on and then blinks if the manual return function is started.The unit preheats the water pipe with hot water in the water tank. This method requires manual operation but minimizes energy consumption.
-
Page 20: Special Function
The water return The water return Press the The CYCLE icon Press the Press the timer is on and the Main interface timer is on and the FUNCTION button. blinks. TIMER button. TIMER button. minute value hour value blinks. blinks. The water return The water return Schedule time for... -
Page 21: Cleaning (Available To Circular Models Only)
6.7.2 Cleaning (available to circular models only) In the Off state of a normal unit, press and hold MODE+▼ for 5 seconds. The unit starts the cleaning function and HOTWATER, SAVE, PRESET, and NIGHT icons are displayed on the LCD. To cancel the cleaning function, press and hold MODE+▼ for 5 seconds again. -
Page 22: Temperature Sensor Setting For On/Off Control
caused. 6.7.5 Temperature sensor setting for ON/OFF control In the Off state of the wired controller, press and hold MODE+▲ on the main interface for 5 seconds to enter the query interface. Then the query code 00 is displayed, press and hold MODE+▲ for 5 seconds to display the configurable parameter codes and values. -
Page 23: Precautions
7. Precautions (1) Do not perform operations to the controller with wet hands. (2) Do not install the wired controller at a wet place. (3) Do not beat, throw, or frequently disassemble and assemble the wired controller. (4) The water outlet temperature of the water tank is set to 50° C before delivery. Users can adjust the temperature as required when the unit is running. -
Page 24: Appendix: Errors And Symptoms
Appendix: Errors and Symptoms Please contact the SINCLAIR appointed service center in case of any of following conditions. Symptom Errors The unit is shut down and E1 is displayed High pressure protection on the controller. The unit is shut down and E4 is displayed Discharge protection on the controller. - Page 25 The unit is shut down and P5 is displayed Compressor current protection on the controller. The unit is shut down and LF is displayed compressor power protection on the controller. The unit is shut down and Pc is displayed Compressor Current sensor malfunction on the controller.
- Page 26 Air switch or circuit breaker tripping and it is high recommended to stop and frequently unplug the unit. After-sales Service If the air source water heater you purchase from SINCLAIR encounters quality problems or other problems, contact your local maintenance centers authorized by SINCLAIR.
- Page 28 SINCLAIR CORPORATION Ltd. 1-4 Argyll St. London W1F 7LD Great Britain www.sinclair-world.com This product was manufactured in China (Made in China). REPRESENTATIVE SINCLAIR Global Group s.r.o. Purkynova 45 612 00 Brno Czech Republic TECHNICAL SUPPORT SINCLAIR Global Group s.r.o. Purkynova 45...
Need help?
Do you have a question about the XK64 and is the answer not in the manual?
Questions and answers