Table of Contents
Advertisement
Quick Links
Advertisement
Table of Contents

Related Manuals for TOORX SRX3500


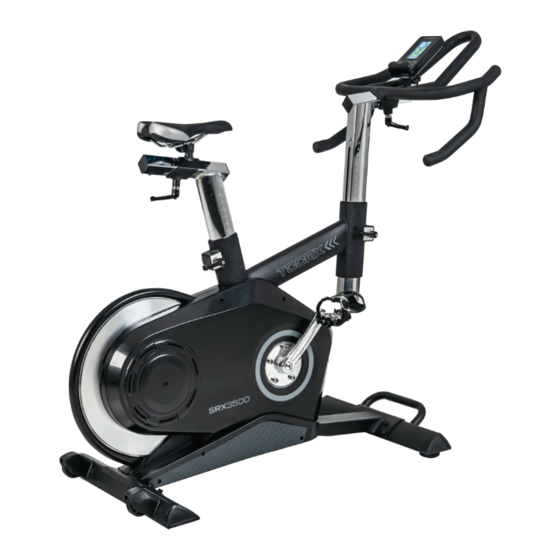
Summary of Contents for TOORX SRX3500
- Page 1 INSTRUCTION iConsole App Manual www.toorx.it/iconsole...
- Page 2 CHECK LIST (CONTENTS OF PACKAGE): STEP- 1 STEP- 3 M 8x1. 25x20L 8PC S 2PC S D 16xD 8. 5x1. 2T 8PC S STEP- 4 41 1pcs M 5* 10L 1PC S M 5* 0. 8* 15L 2PC S ( m m )
-
Page 3: Exploded Drawing
Exploded drawing: 19 20 2122 66 68 74 72 7 55 54 47 48 49 56 96 64 98 99... -
Page 4: Part List
Part list Part NO. Description Material Specification Main frame Front stabilizer Rear stabilizer Tri-angle cap(left) 95.7*57.2*51.3 Tri-angle cap(right) 95.7*57.2*51.3 Allen bolt SUS304 M8x1.25x20L,8.8 Spring washer SUS304 D15.4xD8.2x2T Flat washer SUS304 D16xD8.5x1.2T Seat post ... -
Page 5: Specification
Part NO. Description Material Specification Belt PK5,1370L Belt wheel D285-,PK6 BB sets 127.5L Flat washer Q235A D25*D8.5*2T Outer flywheel A1050 D420*17 Inner flywheel FC20 D290*34.3 Cable plug D4*D12*13 Swing connection fixing bracket Protecting ring Screw M6*1*15L,8.8 ... - Page 6 Allen screw M8*1.25*16L Part NO. Description Material Specification Spring D1.4*55L Fixing plate of brake strap Q235A 100*63*3.0T Hex bolt M8*52L Wheel cover 93.2*64.7*62 Brake plate 54.5*37*13 Cow leather 52*31*4T Allen bolt SUS304 M8x1.25x45L 8.8 Square cap 38x38x18L,2.0T Bolt Q235A M5*0.8*10L ...
- Page 7 STEP 1 ( x8) M8*1.25*20 L ( x8) D15.4*D8.2*2 T ( x8) D16*D8.5*1.2 T Step-1 1) Assemble the front stabilizer (2) and rear stabilizer (3) onto the main frame (1) by using the flat washer (7), spring washer (6), and Allen bolt (5). 2) Assemble the Wheel cover(79) on the wheel of rear stabilizer.
- Page 8 STEP 2 D O W N D O W N Step-2 1) Handlebar post (8)and seat post (9) has been preassembled, you can adjust them stepless up and down by L knob(22)
- Page 9 STEP 3 ( x1) M5*10L 13 12 Step-3 1) Fix the handlebar (13) onto the front post by L knob (12). 2) Assemble the saddle (10) onto the seat post (9) by L knob (12) and screw (97).
- Page 10 STEP 4 ( x4) M5*10L ( x2) M5*15L Step-4 1) Fix the computer fixing plate (14) onto front post by using bolt (86) fig. a. 2) Through the upper computer cable (105) from the hole of computer fixing plate fig. b. 3) Insert the cable plug (41) fig.
- Page 11 STEP 5 Step-5 1) assemble the left pedal(25L) onto left crank by anti-clockwise, and fix the right pedal (25R) onto right crank by clockwise 2) connect the adaptor(100) with the machine and a socket...
- Page 12 You can move the machine easily as following:...
-
Page 13: Instruction Manual
INSTRUCTION MANUAL DISPLAY FUNCTIONS ITEM DESCRIPTION TIME Workout time displayed during exercise. Range 0:00 ~ 99:00 SPEED Workout speed displayed during exercise. Range 0.0 ~ 990 DISTANCE Workout distance displayed during exercise. Range 0.0 ~ 99.00 CALORIES Burned calories during workout display. Range 0 ~ 9990 PULSE Pulse bpm displayed during exercise. - Page 14 KEY FUNCTION ITEM DESCRIPTION Increase resistance level; Adjust function value up and setting selection. Decrease resistance level; Down Adjust function value down and setting selection. Mode Confirm/Enter setting or selection. Total Reset: Hold on pressing for 2 seconds, computer will reboot and start from user setting. Reset Reset: Reverse to main menu during presetting workout value or stop mode.
- Page 15 Picture3 Picture4 Picture5 Picture6 4. Beginner Mode Press UP or DOWN to select Beginner mode and press MODE to confirm. Press UP or DOWN to select Beginner 1~4 (Picture 7) and press MODE to confirm. Press UP or DOWN to set TIME and press START/STOP key to start workout. Then press UP or DOWN to adjust resistance level.
- Page 16 Picture 9 Picture 10 7. Cardio Mode Press UP or DOWN to select Cardio mode and press MODE to get into (Picture 10). Press UP or Down to set AGE, then select 55%.75%.90% or TAG (TARGET H.R) and press MODE to confirm. Press UP or DOWN to preset workout TIME.
-
Page 17: System Reminder
10. i-Console+ APP The console has been built-in Bluetooth 4.0 module for APP function. First, download i-Console+ APP to tablet or mobile device from App Store or Google play firs; Then, turn on Bluetooth on tablet, search for console device and press connect. (password:0000) Pair tablet and console thru BT. - Page 18 GARLANDO SPA Via Regione Piemonte, 32 - Zona Industriale D1 15068 - Pozzolo Formigaro (AL) - Italy contact@toorxprofessional.it www.toorxprofessional.it...
Need help?
Do you have a question about the SRX3500 and is the answer not in the manual?
Questions and answers