Pego ECP300 Expert U VD Series Use And Maintenance Manual
Electrical boards for refrigerating installations
Hide thumbs
Also See for ECP300 Expert U VD Series:
- Operation and maintenance manual (48 pages) ,
- Use and maintenance manual (40 pages)

Related Manuals for Pego ECP300 Expert U VD Series


Summary of Contents for Pego ECP300 Expert U VD Series
- Page 1 ECP300 EXPERT Use and maintenance manual READ AND KEEP REV. 01-12 ELECTRICAL BOARDS FOR REFRIGERATING INSTALLATIONS...
- Page 2 ECP300 EXPERT Thanks for choosing this PEGO electrical panel. This manual gives detailed information on installation, use and maintenance of ECP300 EXPERT series electrical panels and special version. Our products are designed and built in compliance with current standards, on the specific field of refrigeration and conditioning systems.
-
Page 3: Table Of Contents
Index ECP300 EXPERT CONTENTS INTRODUCTION CHAP. 1 Pag. 4 General TECHNICAL CHARACTERISTICS CHAP. 2 Pag. 5 Product ID codes Pag. 6 Product series - Technical characteristics Pag. 8 Overall dimensions Pag. 9 Identification data Pag. 10 Transport and storage Pag. 11 Warranty INSTALLATION CHAP. -
Page 4: General
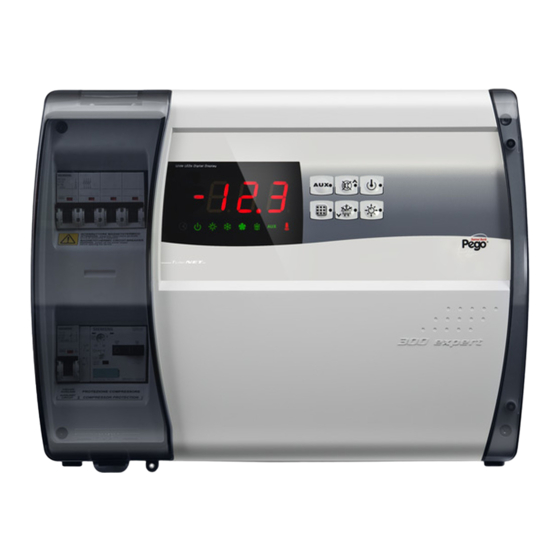
CHAP. 1 - Introduction ECP300 EXPERT CHAPTER 1: INTRODUCTION GENERAL DESCRIPTION: A line of power and control panels for refrigeration systems with three-phase compressor or to control only the three-phase evaporating unit, for the complete management of the room. Magnetothermic protection and motor circuit breaker for the compressor accessible from the front panel linked to an innovative form makes it a perfect and functional choice. -
Page 5: Product Id Codes
110300EVD722 9-14A 110300EVD702 (*) 7-10A 110300EVD723 13-18A 110300EVD703 9-12,5A 110300EVD704 11-16A 110300EVD705 14-20A Panels line ECP300 Expert U VD series Siemens components Telemecanique components Heaters electrical PEGO identification codes Heaters electrical defrost PEGO identification codes 110300EUVD01 defrost 110300EUVD21 110300EUVD02 12kW... -
Page 6: Pag.
Pump-down / Thermostat Pump-down / Thermostat Outputs Compressor See motor circuit breaker thermal range See motor circuit breaker thermal range relative to PEGO panel ID code relative to PEGO panel ID code Condenser fans output 1 800W (1ph) 800W (1ph) - Page 7 Interruption power Icn=6kA / Ics=8kA / Icu=15kA Icn=6kA / Ics=8kA / Icu=15kA Room light protection Differential magnetothermic circuit breaker Differential magnetothermic circuit breaker Id=30mA Id=30mA Control PEGO PEGO Defrosting Electrical Electrical Status indicators LED + display LED + display Alarm signals...
- Page 8 CHAP. 2 - Technical characteristics ECP300 EXPERT OVERALL DIMENSIONS USE AND MAINTENANCE MANUAL Pag. 8 Rev. 01-12...
- Page 9 CHAP. 2 - Technical characteristics ECP300 EXPERT IDENTIFICATION DATA The product descripted in this manual is provided on the side with a label where its identification data are written : • Name of Manufacturer • Code and model of unit electrical board •...
- Page 10 CHAP. 2 - Technical characteristics ECP300 EXPERT TRANSPORT AND STORAGE Every panel is packed to be delivered without damages in normal transport conditions. In case of following transport it must be verified that : No objects or free parts could be inside the panel. The door is correctly closed and locked.
- Page 11 For every controversy we mean elected and recognized by the parts the competence of “Foro di Rovigo”. PEGO S.r.l. cannot be held liable for possible errors or inaccuracies written in this manual as a result of printing or transcription errors PEGO S.r.l.
-
Page 12: Standard Assembly Kit
CHAP. 3 - Installation ECP300 EXPERT CHAPTER 3: INSTALLATION STANDARD ASSEMBLY KIT For the purposes of assembly and use, the electronic ECP300 EXPERT control unit comes with: • N° 4 seals, to be fitted between the fixing screws and the box back panel •... - Page 13 CHAP. 3 - Installation ECP300 EXPERT Fig. 1: Pull up transparent cover protecting the general magnetothermic circuit breaker. Fig. 2: Remove screw cover on the right-hand side. Fig. 3: Undo the 4 fixing screws at the front of the box. USE AND MAINTENANCE MANUAL Pag.
- Page 14 CHAP. 3 - Installation ECP300 EXPERT Fig. 4: Close the transparent protection cover. Fig. 5: Open the front of the box, lift it and slide the two hinges out as far as they will go. Fig. 6: Bend the hinges and rotate the front panel by 180°...
- Page 15 CHAP. 3 - Installation ECP300 EXPERT Fig. 7: Press on the sides of the hinges to remove them from their seats and so completely remove the front panel Fig. 8: Press with a screwdriver on the 4 preimpressed holes on the bottom to prepare fixing of the panel.
- Page 16 CHAP. 3 - Installation ECP300 EXPERT Fig.10: Using holes made on previous point fix the bottom with 4 screws of a length suitable for the thickness of the wall to which the panel will be attached. Fit a o-ring (supplied) between each screw and the box backing.
- Page 17 CHAP. 3 - Installation ECP300 EXPERT ELECTRICAL WIRINGS For the electrical wirings please refer to the wiring diagram and technical characteristics of the panel model to be installed. Panel power supply must be on a dedicated line, and must be placed a device suitable for protection against indirect contacts upstream the line (differential interruptor).
- Page 18 CHAP. 3 - Installation ECP300 EXPERT FRONT PANEL CONNECTION Hook front panel and reconnect the electronic card connector as indicated below. Fig.12: Hook the frontal panel back up to the lower part of the box by inserting the two hinges in their seats. Fig.13: Bend the hinges and rotate the front panel downwards 180°...
- Page 19 CHAP. 3 - Installation ECP300 EXPERT VERIFICATIONS BEFORE USE After doing the wirings, please verify using the wiring diagram on the correct execution of the connections. Please check the correct screw clamping. Check, when possible, the correct functioning of the outside protection devices.
- Page 20 CHAP. 3 - Installation ECP300 EXPERT COMPRESSOR MOTOR CIRCUIT BREAKER CALIBRATION Below we show step by step how to correctly calibrate motor circuit breaker dedicated to the compressor. Fig.12: When the system is started for first time it’s suggested to calibrate the motor circuit breaker...
- Page 21 CHAP. 3 - Installation ECP300 EXPERT ELECTRICAL PANEL CLOSING When electrical wirings, verifications and calibrations are finished continue with the panel closing. Fig.15: Close the front panel, making sure that all the wires are inside the box and that the box seal sits in its seat properly Fig.16: Tighten the front panel using the 4 screws, making sure the O-rings on the head of each screw are used.
-
Page 22: Ecp300 Expert Panel Functions
CHAP. 4 - Functions ECP300 EXPERT CHAPTER 4: FUNCTIONS ECP300 EXPERT PANEL FUNCTIONS Signaling with LED icons of the plant status. Electronic control with wide LED display and easy to use buttons. Display and adjustment of cold room temperature accurate to 0.1 °C. Display of evaporator temperature from parameter. -
Page 23: Control Panel
CHAP. 5 - Data programming ECP300 EXPERT CHAPTER 5: DATA PROGRAMMING CONTROL PANEL FRONT KEYPAD key: AUXILIARY RELAY CONTROL (on the version with alarm relay manually controls the relay if parameter AU=1) key: UP / MUTE WARNING BUZZER key: STAND BY (if the system shuts down the LED flashes) key: room temperature SETTING key: DOWN / MANUAL DEFROST key: ROOM LIGHT... - Page 24 CHAP. 5 - Data programming ECP300 EXPERT LED DISPLAY 1. Cold room temperature / parameters 2. Stand-by (flashes on stand-by. Outputs are deactivated) 3. Room light (flashes if door switch activated) 4. Cold (indicates activation of compressor) 5. Fans 6. Defrosting 7.
- Page 25 CHAP. 5 - Data programming ECP300 EXPERT GENERAL To enhance safety and simplify the operator’s work, the ECP300 EXPERT has two programming levels; the first level (Level 1) is used to configure the frequently-modified SETPOINT parameters. The second programming level (Level 2) is for general parameter programming of the various controller work.
- Page 26 CHAP. 5 - Data programming ECP300 EXPERT LEVEL 1 PROGRAMMING (User Level) To gain access to the Level 1 configuration menu proceed as follows: 1. Press the (t) and (u) keys simultaneously and keep them pressed for a few seconds until the first programming variable appears on the display.
- Page 27 CHAP. 5 - Data programming ECP300 EXPERT LIST OF LEVEL 1 VARIABLES (User Level) VARIABLES MEANING VALUE DEFAULT Temperature difference compared to main SETPOINT 0.2 - 10 °C 2°C Defrost interval (hours) 0 - 24 hours 4 hours End-of-defrost setpoint. Defrost is not executed if the temperature read by the defrost sensor is greater than d2 -35 - 45 °C...
- Page 28 CHAP. 5 - Data programming ECP300 EXPERT LEVEL 2 PROGRAMMING (Installer Level) To access the second programming level press the UP (t) and DOWN (u) keys and the LIGHT key simultaneously for a few seconds. When the first programming variable appears the system automatically goes to stand-by. 1.
- Page 29 CHAP. 5 - Data programming ECP300 EXPERT Compressor safety time for door switch: when the door is opened the evaporator fans shut down and the 0…5 minutes compressor will continue working for time doC, after which it will shut down. Compressor restart time after door opening.
- Page 30 CHAP. 5 - Data programming ECP300 EXPERT SWITCHING ON ECP300 EXPERT PANEL 5.11 After wiring the electronic controller correctly, power up at 400 V AC; the display panel will immediately emit a beep and all the LEDs will come on simultaneously for a few seconds. COMPRESSOR ACTIVATION/DEACTIVATION CONDITIONS 5.12 The ECP300 EXPERT controller activates the compressor when cold room temperature...
- Page 31 CHAP. 5 - Data programming ECP300 EXPERT PUMP DOWN FUNCTION 5.14 Selection of PUMP DOWN functioning mode for the compressor working on X1 terminal block, changing the selection connection as indicated in the wiring diagram. AU parameter must never be set up on 4, because PUMP DOWN function is made electromechanically inside the panel.
- Page 32 For RS485 connections with Modbus-RTU protocol, to enable RS485 output as indicated at chapter 6.3 and follow the scheme below. Refer to MODBUS-RTU_ECP200T1 user manual (available on Pego Internet web site) for MODBUS-RTU communication protocol specification. USE AND MAINTENANCE MANUAL Pag.
- Page 33 CHAP. 6 - Optional kits ECP300 EXPERT TeleNET - Alarm/AUX RELAY SWITCHING Fig. 18: Open the front panel as described in Chap. 3.2 (page 13) Fig. 19: Bend the hinges and rotate front panel downwards 180° to gain access to the electronic card.
- Page 34 CHAP. 6 - Optional kits ECP300 EXPERT Fig. 20: Undo the 6 CPU board cover fixing screws: remove the board from the frontal part of the box in ABS. Fig. 21: Remove the jumper from JUMPER JP2. USE AND MAINTENANCE MANUAL Pag.
- Page 35 CHAP. 6 - Optional kits ECP300 EXPERT Fig. 22: TeleNET Selection: Insert the jumper TeleNET Selection in JUMPER JP2 in position 3-2 and set level 2 variable AU=3. Terminal blocks TeleNET connection 7=RS485_(A) and 8=RS485_(B) on the electronic card. Remember then to assign a LAN address compatible with existing TeleNET...
-
Page 36: Alarm Codes
CHAP. 7 - Troubleshooting ECP300 EXPERT CHAPTER 7: TROUBLESHOOTING ALARM CODES ECP300 EXPERT In the event of any anomalies the warns the operator by displaying alarm codes and sounding the warning buzzer inside the control panel. If an alarm is tripped the display will show one of the following messages: ALARM CODE POSSIBLE CAUSE... -
Page 37: Troubleshooting
CHAP. 7 - Troubleshooting ECP300 EXPERT TROUBLESHOOTING In case no alarm code is present below are indicated some of the most common causes that can result in anomalies. These causes may be referable to internal or external problems of the panel. EVENTS POSSIBLE CAUSE SOLUTION... -
Page 38: General Security Rules
Switch off safely the panel power supply in one of the following ways: 1) Put 300 Expert main switch on OFF position and block it with a mechanical block (Pego accessories ACC5ST3801) and then using a padlock. 2) Cut off power supply upstream the panel permanently, using a padlock (on OFF position). - Page 39 Wires tightening Terminal block After first 20 days of functioning Terminal block Wires tightening Annual SPARE PARTS ECP300 Expert panels spare parts Codici di identificazione PEGO Descrizione 200SCH200BASE4A SPARE PART ELECTRONIC CARD MECHANICAL BLOCK FOR GENERAL MAIN SWITCH ACC5ST3801 (SIEMENS) …………………...
- Page 40 ALLEGATI / APPENDICES CONFORMITA’ ALLE DIRETTIVE CE / EC CONFORMITY Costruttore / Manufacturer PEGO S.r.l. Via Piacentina, 6/b 45030 Occhiobello (RO) – Italy – Tel. (+39) 0425 762906 Fax. (+39) 0425 762905 Denominazione del prodotto / Name of the product...
- Page 41 Allegati / Appendices ECP300 EXPERT TeleNET CONNECTION DIAGRAM Before proceeding with the wiring please select AUX/Alarm relay function by JP2 jumper and level 2 parameter AU as indicated on chapter 6. Remember then to assign a LAN address compatible with existing TeleNET network, if present.
- Page 42 Allegati / Appendices ECP300 EXPERT PART LIST LEGENDA RIF. DESCRIZIONE Box rear in ABS 4 poles magnetothermic circuit breaker con finzione di Interruttore generale / protezione generale Contactors for units control Compressor protection motor circuit breaker Auxiliary protection 1-pole magnetothermic circuit breaker Box front opening hinges Front cover in transparent polycarbonate Transparent polycarbonate screw cover...
- Page 43 ECP300 EXPERT NOTE USE AND MAINTENANCE MANUAL Pag. 43 Rev. 01-12...
- Page 44 PEGO S.r.l. Distributore: Via Piacentina, 6/b 45030 Occhiobello Rovigo – Italy Tel. +39 0425 762906 Fax +39 0425 762905 www.pego.it e-mail: info@pego.it PEGO S.r.l. reserves the right to modify this user manual as it deems necessary.
Need help?
Do you have a question about the ECP300 Expert U VD Series and is the answer not in the manual?
Questions and answers
How to set defrost time