Table of Contents
Advertisement
Quick Links
Advertisement
Table of Contents

Related Manuals for Aqua Lung Rapid Diver


Summary of Contents for Aqua Lung Rapid Diver
- Page 1 Rapid Diver™ System User's Manual Rev 2/18...
- Page 2 Rapid Diver™ User's Manual INTRODUCTION Congratulations and thank you for choosing Aqua Lung. Your Rapid Diver System meets all existing standards for quality and performance and has been designed and manufactured with the greatest care. COPYRIGHT NOTICE This user's manual is copyrighted, all rights reserved. It may not, in whole...
-
Page 3: Table Of Contents
TABLE OF CONTENTS General Precautions and Warnings ............4 Product Description ..................7 Assembling a Rapid Diver System .............. 8 Donning and Adjustment ................15 Inflation Methods ..................18 Deflation Methods ..................19 Buoyancy and Cylinder Capabilities ............21 Pre-Dive Inspection ..................22 Post-Dive Inspection .................. -
Page 4: General Precautions And Warnings
WARNING: This manual provides user instructions for the Rapid Diver Pro BC and Rapid Diver System as a complete unit. Products that make up a Rapid Diver System will have user specific manuals included with each product. - Page 5 WARNING: This BC is designed for use with compressed air or Nitrox/EAN (enriched air nitrox) mixtures not exceeding 40% oxygen. Any use of gas mixtures with increased oxygen content or the addition of helium or other substances may cause corrosion, deterioration and/or premature aging of the BC leading to component failure of the metal and rubber parts.
- Page 6 13008 Marseille -France. If you have any questions regarding your Buoyancy Compensator or these instructions, please contact your Authorized Aqua Lung Dealer or Distributor. Distributor information is available on the Aqua Lung website at: www.aqualung.com/militaryandprofessional...
-
Page 7: Product Description
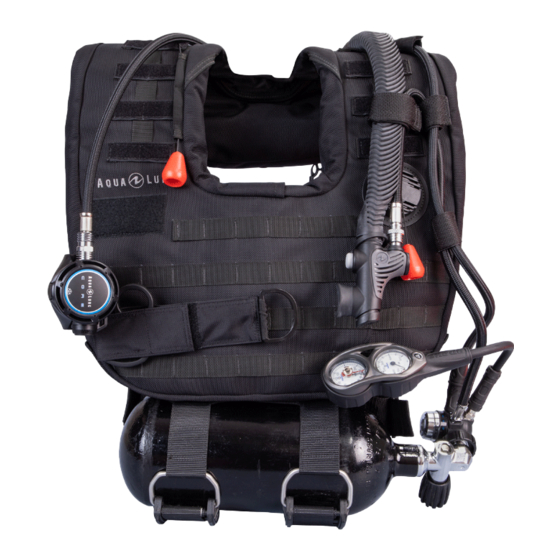
PRODUCT DESCRIPTION Rapid Diver System consists of the following items: NOTE: Components that are included with the Rapid Diver System will vary depending on the part number ordered. (1) Rapid Diver Pro BC (6) 27 cubic foot (4 L) Steel Cylinder... -
Page 8: Assembling A Rapid Diver System
It is beyond the scope of this manual to cover the assembly of Life Support equipment, as this requires professional training. It will be necessary to take your Rapid Diver System into an Authorized Aqua Lung Dealer to have your Rapid Diver System assembled. - Page 9 2. Insert the open end of the cylinder band through the webbing on the bottom of the BC. Position the ribbed side of the traction sleeve face up. Insert the cylinder band into the top of the traction sleeve, under the front cylinder mount straps and out the bottom of the traction sleeve (Fig.
- Page 10 10. The two gauge console may be attached to the BC according to the divers preference. 11. Slowly pressurize the system while carefully listening for leaks. If any leaks are detected, do not dive with your Rapid Diver System until the source of the leak has been corrected.
- Page 11 Rear Mount Assembly A cylinder can be attached vertically to the soft pack on the rear of the Rapid Diver Pro BC (Fig. 6). This configuration allows for larger cylinders to be used when needed. 1. Place the soft pack on a flat surface Rear Cylinder with the rear cylinder mount face-up Mount...
- Page 12 7. Assemble the regulator first stage to the cylinder valve (See manual provided with regulator for attachment instructions). NOTE: When using the Rapid Diver System with a rear mount cylinder set up, a standard SCUBA regulator configuration must be used.
- Page 13 Threading the Cam Buckle 1. Firmly grasp the metal D-ring with your left hand (Fig. 10) Fig. 10 2. While firmly holding the metal D-ring, TOP VIEW rotate buckle back towards the webbing. The buckle should form an angle with the metal D-ring as shown in the top view (Fig.
- Page 14 Rapid Diver™ User's Manual Securing the Band to the Cylinder WARNING: The cylinder band will initially stretch as it becomes wet. Always wet the band before making the final adjustment; apply enough tension to ensure that the cylinder is completely secure. Test this connection before every dive. If the cylinder slips free from the BC during the dive, you may loose your air supply, which could lead to serious injury or death.
-
Page 15: Donning And Adjustment
DONNING AND ADJUSTMENT PROCEDURES NOTE: The Rapid Diver system can be balanced on the cam buckles for quick access when donning the system. Rapid Diver is a universal fit system. To ensure proper performance, make sure your system is set-up and adjusted as follows: (Fig. 17) 1. - Page 16 Rapid Diver™ User's Manual 5. Place your arms through the waist straps and grab the outside of the BC. Raise the Rapid Diver up and place your head through the opening in the BC and lower it onto your shoulders (Fig. 18).
- Page 17 8. Bring the free end of the crotch strap between your legs and fasten it to the front buckle (Fig. 21). Fig. 21 WARNING: Adjust the BC so it does not restrict your breathing. Restriction of normal breathing while wearing your BC could result in serious injury or death. Before each dive, check all bands, straps and buckles for proper adjustment.
-
Page 18: Inflation Methods
Rapid Diver™ User's Manual INFLATION METHODS Power Inflation For the power inflator to operate, the medium pressure (MP) inflator hose must be connected. To connect the MP hose, grip the grooved sleeve at the connection fitting (Fig. 22d) with your thumb and forefinger and slide the sleeve back. Place the connection fitting over the quick disconnect fitting (Fig. -
Page 19: Deflation Methods
DEFLATION METHODS Throughout the course of a dive, it will be necessary to release air from the BC using one of the three methods described in the following instructions. Each method uses a valve that is in a different location. The method you choose at any time may depend on whether you are making your initial descent feet first, head first or maintaining neutral buoyancy underwater. - Page 20 Rapid Diver™ User's Manual Deflation (Dump Valve) Your BC comes equipped with a dump valve / over pressure relief valve (OPRV) (Fig. 23g). The primary function is to relieve excess air pressure inside the bladder. If the internal pressure exceeds the spring pressure, the OPRV automatically opens to release air, preventing damage to the BC.
-
Page 21: Buoyancy And Cylinder Capabilities
BC. Fig. 24 NOTE: The BC tag above is an example only. Reference the specific tag located on your model BC. Rapid Diver Pro BC Chart BC Size One size fits all Cylinder Capacity... -
Page 22: Pre-Dive Inspection
NEVER dive with a BC that shows signs of damage to any of it’s components until it has received a complete inspection and service from an authorized Aqua Lung Dealer or Distributor. 1. Visually inspect the entire BC for cuts, punctures, frayed seams, excessive abrasion, damaged or missing hardware and other damage of any kind. -
Page 23: Post-Dive Inspection
0ºF (-18ºC) or rise above 120ºF (49ºC). Transport To avoid damage, store the Rapid Diver appropriately in the carry case provided with this product. An optional hard case (sold separately) is available for added protection in more rugged environments. -
Page 24: Rapid Diver System And Accessories
Rapid Diver™ User's Manual RAPID DIVER SYSTEM AND ACCESSORIES 27 cf (4 L) Steel Cylinder, Black Core Supreme Regulator Apeks Console (PN 129990) (PN AP0635IMP280) (PN 079170) Strap Kit Outer Bag (PN 769412) (PN 769413) Tank Band, 2.0, 80 cf GrimLoc, Black Tank Band, 2.0, 27 cf... - Page 25 Bladder, Rapid Diver Powerline Inflator Micro Mask, Black Cutting Shears (PN 769415) (PN 42810) (PN 505495) (PN 102125) Carry Case, Rapid Diver Hard Case, Rapid Diver (PN 769400) (Sold Separately) (PN 769470) Rapid Diver Hoses Description Part Number Hose Length...
-
Page 26: Technical Specifications
Number / Size of Ports 2 HP 7/16", 4 MP 3/8" Hose Length 52 inch (132 cm) braided MP hose BC Model Rapid Diver Pro with Soft Pack Outer Container 1050 Light Ballistic with MOLLE attachments Bladder Heavy duty urethane Inflator &... -
Page 27: Dealer Inspection And Service
WARNING: DO NOT attempt to perform any disassembly or service of your Rapid Diver System. Service requiring disassembly must only be performed by a factory-trained Aqua Lung technician. To obtain service or repair, see an Authorized Aqua Lung Dealer or Distributor. - Page 28 Rapid Diver™ User's Manual Annual Service and Inspection Record Purchase Date: BC Model: Serial Number: Serial # Serial # is located on BC tag DATE TECHNICIAN TECHNICIAN STAMP NAME SIGNATURE...
-
Page 29: Warranty Information
For detailed information on product warranties, please refer to the Terms and Conditions Section of the Aqua Lung Military and Professional Buyers Guide. The buyers guide can be viewed or downloaded from the Aqua Lung Military and Professional website at www.aqualung.com/militaryandprofessional... -
Page 30: Notes
Rapid Diver™ User's Manual NOTES... - Page 31 NOTES...
- Page 32 Rapid Diver System User’s Manual 2340 Cousteau Court • Vista, CA 92081 Phone (760) 597-5000 • Fax (760) 597-4900 www.aqualung.com/militaryandprofessional ©2018 Aqua Lung International...
Need help?
Do you have a question about the Rapid Diver and is the answer not in the manual?
Questions and answers