Advertisement
Quick Links
Advertisement

Subscribe to Our Youtube Channel
Summary of Contents for Filmcity FC-02
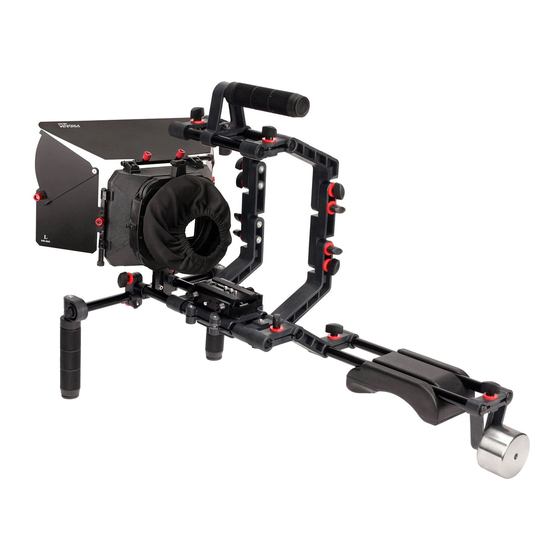
- Page 1 Camera Cage Shoulder Rig Kit (FC-02) Instruction Manual...
- Page 2 At Filmcity, our goal is to ensure 100% Customer Satisfaction in all that we do. We back our sales with a 1 year warranty from the date of purchase and work hard to resolve any problems in the unlikely event one should arise.
- Page 3 On behalf of all the people that work so hard to provide you with the most up-to-date, flexible and cost-efficient production gear, we would like to welcome you into the Filmcity family. By purchasing your Camera Cage Shoulder Rig Kit, you have just joined a host of designers, engineers, machinists, assembly, customer service and office staff that take great pride in all that they do.
- Page 4 Introduction A shoulder rig becomes invaluable equipment when you want to put the audience into the heart of the action. It lets you move with the subject matter while keeping the camera stable, thus increasing the efficiency of the production. What’s In The Box Please inspect the contents of your shipped package to ensure you have received everything that is listed below.
- Page 5 Assembling MB-600 Matte Box Insert French Flag into Matte Box and tighten the screws. In the same way, insert Side Flags into (big) slots provided and secure with the screws. NOTE: If the French Flag remains loose even after tightening the knob, then slightly tighten the allen bolt as shown.
- Page 6 Assembling the Shoulder Kit Insert 300mm Female threaded Rods into Camera Base with Quick Release. Tighten bolts with the help of provided allen key to secure them properly. Fix the Quick Release of your fluid head to the bottom of Camera Base and tighten bolts with screw driver.
- Page 7 Mounting Camera Quick Release Ratchet Knob Loosen Ratchet Knob and remove Quick Release Plate by pressing the Quick Release Pin. Fix the quick release plate with camera and tighten bolts using screw driver. Now mount camera with Quick Release Plate on the Camera Base and tighten knob properly to secure it.
- Page 8 Attach both Cage Brackets with rods and tighten the knobs to secure them appropriately. Insert 2x200mm female threaded rods into Cage Brackets on the top. Attach Top Handle with 200mm Rods and tighten the knobs to secure it properly. ...
- Page 9 Then insert 300mm male threaded rods into the Straight Bracket and tighten knob to properly lock them. Attach Shoulder Pad and insert Counterweight into the rods and secure them properly. Then attach 150mm male rods towards the front to extend it for mounting other accessories...
-
Page 10: Attaching Accessories
Attaching Accessories Attach Junction Rod Adapters with Front Handle Bracket. Then attach it with rods and secure it properly with the help of allen key. Now slide-in 300mm Knurling Rod through the Front Bracket and tighten the knobs to secure properly. ... - Page 11 Finally mount Matte Box to the front of rods, align Knicker with Lens Barrel and tighten its knot. YOUR FILMCITY CAMERA CAGE SHOULDER RIG KIT ALL DRESSED UP AND READY TO GO! (SHOWN WITH OPTIONAL ACCESSORIES)
- Page 12 WARRANTY We offer a one year warranty for our products from the date of purchase. We will repair or replace your product, free of charge, in the event of a defect in materials or craftsmanship obtained during normal use or handling based on the user manual. Please note that we will not cover any shipping costs for returning the product to us.


Need help?
Do you have a question about the FC-02 and is the answer not in the manual?
Questions and answers