Advertisement
Quick Links
BELLY CRUZER– DSLR Steady
Camera Rig
(FC-BC-DSR)
Setup and Operational Manual
All rights reserved
No part of this document may be reproduced, stored in a retrieval system, or transmitted by any form or by any
means, electronic, mechanical, photocopying, recording, or otherwise, except as may be expressly permitted
by the applicable copyright statutes or in writing by the Publisher.
Advertisement

Subscribe to Our Youtube Channel
Related Manuals for Filmcity BELLY CRUZER DSLR STEADY CAMERA RIG


Summary of Contents for Filmcity BELLY CRUZER DSLR STEADY CAMERA RIG
- Page 1 BELLY CRUZER– DSLR Steady Camera Rig (FC-BC-DSR) Setup and Operational Manual All rights reserved No part of this document may be reproduced, stored in a retrieval system, or transmitted by any form or by any means, electronic, mechanical, photocopying, recording, or otherwise, except as may be expressly permitted by the applicable copyright statutes or in writing by the Publisher.
- Page 2 I N T R O D U C T I O N Keeping pace with the advancements in today's DSLR and Camcorder technology, Amazingly ad- vanced and totally re-engineered BELLY CRUZER DSLR STEADY CAMERA RIG from FILMCITY represents lightweight and state-of-art Rig. A lightweight, modular solution that is designed to be mobile and flexible so you can capture your footage smoothly, the way you want it to be seen.
- Page 3 FILMCITY BELLY CRUZER DSLR STEADY CAMERA RIG A S S E M B L I N G YO U R M B - 6 0 0 M AT T E B OX Insert the French flag in to the Matte Box and tighten the screws. Using the same approach, insert the side flags into the (big) slots provided in the hinges and secure with the screws.
- Page 4 FILMCITY BELLY CRUZER DSLR STEADY CAMERA RIG Attach knicker on conversion ring, then screw in the conversion ring on ring holder. Attach Base Plate to your tripod plate and tighten it with help of screw driver. Now attach set-up to your tripod stand and tighten with provided knob to ensure slip free connection.
- Page 5 FILMCITY BELLY CRUZER DSLR STEADY CAMERA RIG Attach quick release plate to camera base and secure with screw driver. Now mount your camera set-up onto tripod and secure with provided knobs. Insert 4x 250mm female rods onto base plate and tighten knobs to secure.
- Page 6 FILMCITY BELLY CRUZER DSLR STEADY CAMERA RIG Now loosen the allen bolts on top plate and insert 2x 300mm male rods to it. Now insert top handle to the back of 300mm rails, loosen the knob in order to attach2x 300mm male rods to female rods as shown below.
- Page 7 FILMCITY BELLY CRUZER DSLR STEADY CAMERA RIG Attach rod adapter to front of top rails and secure. Now loosen the knob in order to insert 300mm female rod to it. Now attach side handles to both ends of 300mm rail as shown below.
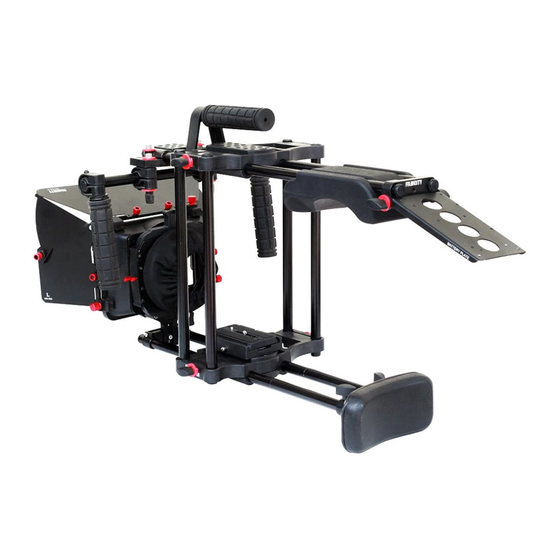
- Page 8 FILMCITY BELLY CRUZER DSLR STEADY CAMERA RIG Adjust knicker to camera lens and tighten the knot properly. YO U R F I L M C I T Y B E L LY C R U Z E R D S L R S T E A D Y C A M E R A R I G...
-
Page 9: Warranty
FILMCITY BELLY CRUZER DSLR STEADY CAMERA RIG WARRANTY We offer a limited time warranty for our products. For Mechanical products we provide a 6 month warranty & for electronic products we provide a 3 month warranty from the date of purchase.
Need help?
Do you have a question about the BELLY CRUZER DSLR STEADY CAMERA RIG and is the answer not in the manual?
Questions and answers