
Related Manuals for Kramer VS-42H2


Summary of Contents for Kramer VS-42H2
- Page 1 USER MANUAL MODEL: VS-42H2 4K 4x2 HDMI Matrix Switcher P/N: 2900-301289 Rev 1 www.kramerAV.com...
-
Page 2: Table Of Contents
Connecting to VS-42H2 via Ethernet Connecting the Remote Input Selection Switches Connecting to VS-42H2 via RS -232 Operating and Controlling VS-42H2 via Front Panel Buttons Locking and Unlocking Front Panel Buttons Acquiring an EDID f rom an Output Muting and Unmuting Output AV... -
Page 3: Introduction
Kramer Electronics Ltd. Introduction Welcome to Kramer Electronics! Since 1981, Kramer Electronics has been providing a world of unique, creative, and affordable solutions to the vast range of problems that confront the video, audio, presentation, and broadcasting professional on a daily basis. In recent years, we... -
Page 4: Overview
European Advanced Recycling Network (EARN) and will cover any costs of treatment, recycling and recovery of waste Kramer Electronics branded equipment on arrival at the EARN facility. For details of Kramer’s recycling arrangements in your particular country go to our recycling pages at www.kramerav.com/support/recycling. -
Page 5: Typical Applications
15m away from the machine. This distance can be extended to up to 60m when used with three extension cables. Before using the external IR receiver, be sure to arrange for your Kramer dealer to insert the internal IR connection cable with the 3.5mm connector that fits into the REMOTE IR opening on the rear panel. -
Page 6: Defining Vs-42H2 4K 4X2 Hdmi Matrix Switcher
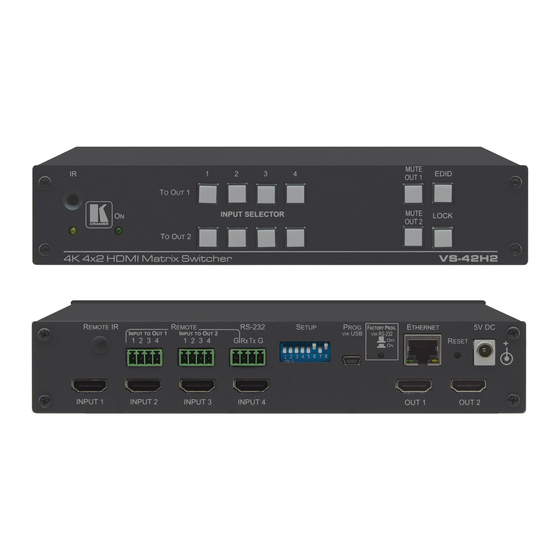
Kramer Electronics Ltd. Defining VS-42H2 4K 4x2 HDMI Matrix Switcher This section defines VS-42H2. Figure 1: VS-42H2 4K 4x2 HDMI Matrix Switcher Front Panel Feature Function IR LED Lights yellow when receiving an IR signal. IR Sensor Receives signals f rom the inf rared remote-control transmitter. - Page 7 Kramer Electronics Ltd. Figure 2: VS-42H2 4K 4x2 HDMI Matrix Switcher Rear Panel Feature Function INPUT HDMI Input Connect to up to f our HDMI sources. Connectors (1 to 4) REMOTE IR Opening Connect to an external IR receiver f or controlling the device via an IR remote-controller.
-
Page 8: Mounting Vs-42H2
Kramer Electronics Ltd. Mounting VS-42H2 This section provides instructions for mounting VS-42H2. Before installing, verify that the environment is within the recommended range: • Operation temperature – 0 to 40C (32 to 104F). • Storage temperature – -40 to +70C (-40 to +158F). -
Page 9: Connecting Vs-42H2
Kramer Electronics Ltd. Connecting VS-42H2 Always switch off the power to each device before connecting it to your VS-42H2. After connecting your VS-42H2, connect its power and then switch on the power to each device. Figure 3: Connecting to the VS-42H2 Rear Panel To connect the VS-42H2 as illustrated in the example in Figure 3: 1. -
Page 10: Connecting To Vs-42H2 Via Ethernet
Kramer Electronics Ltd. Connecting to VS-42H2 via Ethernet You can connect to the VS-42H2 via Ethernet using either of the following methods: • Directly to the PC using a crossover cable (see Connecting the Ethernet Port Directly to a PC on page 8). - Page 11 8. Click Close. Connecting the Ethernet Port via a Network Hub or Switch You can connect the Ethernet port of the VS-42H2 to the Ethernet port on a network hub or using a straight-through cable with RJ-45 connectors. VS-42H2 – Connecting VS-42H2...
-
Page 12: Connecting The Remote Input Selection Switches
Kramer Electronics Ltd. Connecting the Remote Input Selection Switches These remote switches replicate the input selection buttons on the front panel of VS-42H2. You can connect up to four remote, contact-closure switches per output to control the VS-42H2 remotely. Figure 7 illustrates the wiring of the switch connections to the terminal block. -
Page 13: Operating And Controlling Vs-42H2 Via Front Panel Buttons
(bottom) row, press each of the Input buttons to deselect or select which inputs you want to copy the Output 2 EDID. Each button press toggles the input button’s light on or off . VS-42H2 – Operating and Controlling VS-42H2 via Front Panel Buttons... -
Page 14: Muting And Unmuting Output Av
To route an input to output 2: • From the TO OUT 2 (bottom) row, press an input button. The selected input button lights and the input is routed to output 2. VS-42H2 – Operating and Controlling VS-42H2 via Front Panel Buttons... -
Page 15: Configuring And Maintaining Vs-42H2
Kramer Electronics Ltd. Configuring and Maintaining VS-42H2 Setting DIP-Switches The eight DIP-switches located on the back panel dictate the behavior of the VS-42H2. Figure 8: DIP-Switches Feature Description Of f (up) – Input 1 does not support HDCP. Input 1 HDCP support On (down) –... -
Page 16: Resetting Vs-42H2 To Factory Default Settings
The latest version of K-UPLOAD and installation instructions can be downloaded from our website at: www.kramerav.com/support/product_downloads.asp. Note that in order to use the micro USB port, you need to install the Kramer USB driver, available at: www.kramerav.com/support/product_downloads.asp. VS-42H2 – Configuring and Maintaining VS-42H2... -
Page 17: Using Embedded Web Pages
Kramer Electronics Ltd. Using Embedded Web Pages VS-42H2 enables you to configure settings via Ethernet using built-in, user-friendly web pages. If a web page does not update correctly, clear your Web browser’s cache. 1. Type the IP address of the device in the address bar of your internet browser (default = 192.168.1.39). -
Page 18: Routing And Setting The Inputs And Outputs
Switching an Input to an Output To switch an Input to an Output: 1. Click Routing on the Navigation List. The Routing page appears. Figure 11: The Routing Page 2. Click Output1 or Output2. VS-42H2 – Using Embedded Web Pages... - Page 19 The selected output's audio and video are no longer muted and the Mute icon changes Locking and Unlocking Controls To lock all the VS-42H2 controls: 1. Click Routing, EDID, or Device Settings on the Navigation List. The navigated page appears.
-
Page 20: Managing Edid
3. Click one or more destination inputs or select all inputs by checking the Inputs check-box. All selected Input buttons change color and the EDID summary information reflects the Input selection(s). 4. Click the Copy button. VS-42H2 – Using Embedded Web Pages... - Page 21 You can check or uncheck the Inputs checkbox to select or deselect all 4 inputs. 5. Click the Copy button. The “EDID was copied” success message is displayed and the EDID data are copied to the selected Input(s). 6. Click OK. VS-42H2 – Using Embedded Web Pages...
-
Page 22: Setting Device Parameters
The Device Settings page appears. Figure 13: The Device Setting Page 2. Adjust the parameters as required, either by entering the parameters directly or by using the drop-down list and click set. The changes are saved. VS-42H2 – Using Embedded Web Pages... - Page 23 The Device Settings page appears. 2. Click Factory Reset. The following window appears: Figure 14: Factory Reset message 3. Choose whether to include resetting Ethernet parameters and click OK. The device resets to its default parameters. VS-42H2 – Using Embedded Web Pages...
-
Page 24: Upgrade The Firmware
The firmware file is loaded and a progress bar is displayed. Do not interrupt the process or the VS-42H2 may be damaged. 5. When the process is complete reboot the device. The firmware is upgraded. VS-42H2 – Using Embedded Web Pages... -
Page 25: Viewing The About Us Page
Kramer Electronics Ltd. Viewing the About Us Page VS-42H2 About Us page displays the Web page version and Kramer Electronics Ltd company details. Figure 16: The About Us Page VS-42H2 – Using Embedded Web Pages... -
Page 26: Technical Specifications
1.6kg (3.5lbs) approx. Accessories Included Power adapter and cord Rubber f eet Optional To achieve specif ied extension distances, use the recommended Kramer cables available at www.kramerav.com/product/VS-42H2 Specif ications are subject to change without notice at www.kramerav.com VS-42H2 – Technical Specifications... -
Page 27: Default Communication Parameters
640 x 480p at 72Hz - VESA 640 x 480p at 75Hz - VESA 800 x 600p at 56Hz - VESA 800 x 600p at 60Hz - VESA 800 x 600p at 72Hz - VESA 800 x 600p at 75Hz - VESA VS-42H2 – Technical Specifications... - Page 28 Supports YCbCr 4:4:4..Yes Supports dual-link DVI... No Maximum TMDS clock..300MHz Audio/video latency (p).. n/a Audio/video latency (i).. n/a HDMI video capabilities.. Yes EDID screen size..No additional info 3D formats supported..Not supported Data payload..... 030C001000383C20008001020304 VS-42H2 – Technical Specifications...
- Page 29 Reserved video related data Data payload..... 0F000003 Report information Date generated... 12/03/2018 Software revision..2.70.0.989 Data source....Real-time 0x0071 Operating system..6.1.7601.2.Service Pack 1 Raw data 00,FF,FF,FF,FF,FF,FF,00,2D,B2,1D,03,31,00,00,00,13,1A,01,03,80,24,24,8C,E2,90,20,9C,54,50, 8F,26, 21,52,56,2F,CF,00,A9,40,81,80,90,40,D1,C0,31,59,45,59,61,59,81,99,08,E8,00,30,F 2,70,5A,80,B0,58, 8A,00,BA,88,21,00,00,1E,02,3A,80,18,71,38,2D,40,58,2C,45,00,BA,88,21,00,00,1E,00,00,00,FC,00,56, 53,2D,34,32,48,32,0A,20,20,20,20,20,0A,00,00,FD,00,17,3D,0F,88,3C,00,0A,20,20,20,20,20,20,01,C4, 02,03,50,F0,52,10,1F,04,13,05,14,02,11,06,15,22,21,20,5D,5E,5F,60,61,38,09,07,07,15,07,50,3E,07, C0,57,07,00,5F,07,01,67,07,00,0D,07,07,0F,07,07,83,4F,00,00,6E,03,0C,00,10,00,38,3C,20,00,80,01, 02,03,04,67,D8,5D,C4,01,78,80,07,E4,0F,00,00,03,9A,29,A0,D0,51,84,22,30,50,98,36,00,10,0A,00,00, 00,1C,66,21,56,AA,51,00,1E,30,46,8F,33,00,10,09,00,00,00,1E,28,3C,80,00,00,00,00,00,00,00,00,A9 VS-42H2 – Technical Specifications...
-
Page 30: Protocol 3000
(<…>) and must be separated by a period (.). The command framing varies according to how you interface with the VS-42H2. The following figure displays how the # command is framed using terminal communication software (such as Hercules): VS-42H2 –... -
Page 31: Protocol 3000 Commands
1 – indicates that EDID data is copied to this destination. – Safe mode safe_mode 0 – device accepts the EDID as is without trying to adjust 1 – device tries to adjust the EDID (default value if no parameter is sent) VS-42H2 – Protocol 3000... - Page 32 OUT 1, OUT 2. If the connected display on OUT 2 supports HDCP, but OUT 1 does not, then HDCP is defined as not supported. If OUT 1 is not connected, then HDCP is defined by OUT VS-42H2 – Protocol 3000...
- Page 33 Get the device model: printable ASCII chars #MODEL?<CR> #MODEL?<CR> This command FEEDBACK identifies equipment ~nn@MODELmodel_name<CR><LF> connected to VS-42H2 and notifies of identity changes to the connected equipment. The Matrix saves this data in memory to answer REMOTE-INFO requests. VS-42H2 – Protocol 3000...
- Page 34 NET-GATE ip_address 192.168.0.1: xxx.xxx.xxx.xxx #NET-GATEip_address<CR> A network gateway #NET- FEEDBACK connects the device via GATE192.168.000.001<CR ~nn@NET-GATEip_address<CR><LF> another network and > maybe over the Internet. Be careful of security issues. For proper settings consult your network administrator. VS-42H2 – Protocol 3000...
- Page 35 ~nn@ROUTElayer_type, out_index, in_index<CR><LF> commands. 2 – OUT 2 HDMI * – ALL – Source id in_index 1 – IN 1 HDMI 2 – IN 2 HDMI 3 – IN 3 HDMI 4 – IN 4 HDMI VS-42H2 – Protocol 3000...
- Page 36 1 or 2 #VMUTE?out_index<CR> #VMUTE?2<CR> Video mute parameter – Video Mute flag FEEDBACK 2 (blank picture) is not 0 – Video enabled ~nn@VMUTEout_index, flag<CR><LF> supported. 1 – Video disabled 2 – Blank picture VS-42H2 – Protocol 3000...
-
Page 37: Result And Error Codes
(Reserved) ERR_RESERVED_8 (Reserved) ERR_RESERVED_9 (Reserved) ERR_RESERVED_10 (Reserved) ERR_RESERVED_11 (Reserved) ERR_RESERVED_12 (Reserved) ERR_EDID_CORRUPTED EDID corrupted ERR_NON_LISTED Device specific errors File has the same CRC – no changed ERR_SAME_CRC ERR_WRONG_MODE Wrong operation mode ERR_NOT_CONFIGURED Device/chip was not initialized VS-42H2 – Protocol 3000... - Page 38 Electronics products, this product must be insured during shipment, with the insurance and shipping charges prepaid by you. I f this product is returned uninsured, you assume all risks of loss or damage during shipment. Kramer Electronics will not be responsible for any costs related to the removal or re - installation of this product from or into any installation.
- Page 39 SAFETY WARNING Disconnect the unit f rom the power supply bef ore opening and servicing For the latest information on our products and a list of Kramer distributors, visit our website where updates to this user manual may be found.
Need help?
Do you have a question about the VS-42H2 and is the answer not in the manual?
Questions and answers