Table of Contents
Advertisement
Available languages
Available languages
Advertisement
Table of Contents

Related Manuals for U-tec Ultraloq UL300


Summary of Contents for U-tec Ultraloq UL300
- Page 1 Ultraloq UL300 Fingerprint and Touchscreen Smart Lock User Guide (V1.1)
- Page 2 Before using all Ultraloq products, please read all applicable terms, rules, policies and usage provisions found at www.u-tec.com/company/privacy. By using your Ultraloq, you agree to be bound by the U-tec Privacy Policy. Need Help? For technical documents and more information, please visit www.u-tec.com/support...
- Page 3 AA Alkaline Batteries User Guide Drill Template Fold UL300 Drill Template EDGE OF DOOR V1.3 1” (25mm) ” (14mm) Centerline Ultraloq UL300 ” (15mm) Centerline Centerline Fingerprint and Touchscreen Smart Lock ” (15mm) User Guide Stud Screw/Connection Cable Hole (V1.1) ”...
- Page 4 Installation Guide Installation Video Please scan this QR code to watch the easy step by step installation video before attempting to install Ultraloq UL300. Or you can also view www.u-tec.com/lock/Ul300/guide directly. 1. Door Dimensions If you have a new door,...
- Page 5 2. Installing Mortise and Strike 2.1 Mortise Overview Direction Switch: Used to Mortise Handing. Latch: Used to lock and unlock. Bolt: Used to lock and unlock for securer. Spindle Hole: The spindle goes through this hole to drag Latch and Bolt. Extra Bolt: Used for double locked.
- Page 6 2. 2 Mortise Handing Please make sure the inclined corner is facing the frame. If the Mortise is in the correct handing for the door, you may skip the next section on Reversing the Mortise Handing. 2.3 Reversing the Mortise Handing Step 1.
- Page 7 2.4 Installing Mortise Keep the Bolt and Extra Bolt retracted (unlocked status), then insert the Mortise and tighten 4 Screws A. Note: The Mortise position should be Latch on top and Bolt in the Bottom. ● The inclined corner of the Latch must be facing towards the Strike in the door's frame. ●...
- Page 8 3. Installing Exterior Assembly 3.1 Adjust the handle direction of the Exterior Assembly Step 1. Loose the screw inside the hole. Please don’t take the screw out during the operation. Step 2. Take out the handle and adjust it to the correct direction. Step 3.
- Page 9 3.2 Installing Exterior Assembly Step 1. Insert the spindle into the Exterior Assembly’s hole. If the thickness of the door is between 1-9/16'' to 2-3/8'' (40mm to 60mm), please use Spindle A (3-1/8'', 80mm). If the thickness of the door is between 2-3/8'' to 3-1/8'' (60mm to 80mm), please use Spindle B (4'',100mm). If the thickness of the door is between 3-1/8'' to 4'' (80mm to 100mm), please use Spindle C (4-3/4'', 120mm).
- Page 10 4. Installing in the interior Mounting Plate Step 1. Route the cable through the hole on Interior Assembly Mounting Plate. Step 2. Attach the Interior Assembly Mounting Plate on the door and tighten two Screws B. If the thickness of the door is between 1-9/16'' to 2-3/8'' (40mm to 60mm), please use Screw B1. If the thickness of the door is between 2-3/8'' to 3-1/8'' (60mm to 80mm), please use Screw B2.
- Page 11 Step 3. Insert the Spring into the hole of the interior handle. Note: This step is important, otherwise the spindle will not drag the Mortise by turning handle. Step 4. Insert the connector of the cable to the socket of the Interior Assembly. Press the connector firmly until you hear a click.
- Page 12 UL300. Although, U-tec recommends installing the 8 AA batteries from the beggining to have a longer battery life. Lithium batteries may have a longer life, but when they begin to run out of battery, they drain fast. U-tec ●...
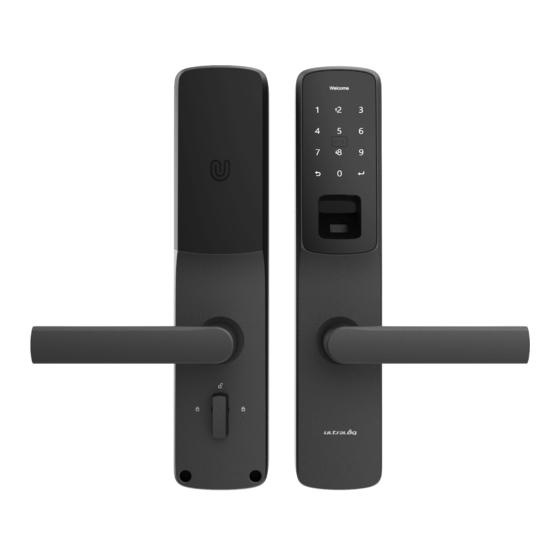
- Page 13 User Guide User Guide Video Please watch our easy step by step User Guide video before attempting to use your Ultraloq UL300 Smart Lock. 1. Product Overview 1.1 Exterior Message Display Screen Anti-peep Keypad Key Fob Reader Fingerprint Reader Outside Handle...
- Page 14 Anti-peep Keypad Used to enter the code and unlock from the outside. Fingerprint Reader Used to verify your finger and unlock from the outside. Key Fob Reader Used to verify your key fob and unlock from the outside. Message Display Screen An OLED display with intuitive information will walk you through the whole operation.
- Page 15 1.2 Interior Bluetooth LED Indicator Reset Button Battery Cover Inside Handle Extra Bolt Knob Bluetooth LED Indicator When connecting UL300 by App, there will be a steady blue light, otherwise a blue light will blink every second. Reset Button Used to reset UL300 to factory default settings. Inside Handle Used to lock or unlock UL300.
- Page 16 2. Basic Operation 2.1 Cleaning the Keypad and Finger Reader Use a microfiber cloth and wipe across the Anti-peep Keypad, Fingerprint Reader and Key Fob Reader. 2.2 Lock Activation Place a finger on the Fingerprint Reader, touch the Anti-peep keypad with the back of your hand or fingers, or, present the Fob on the Key Fob Reader.
- Page 17 2.3.4 Unlock by Smartphone Step 1. Press the Unlock Button in the U-tec App. Step 2. Rotate the handle all the way down to unlock UL300. 2.3.5 Backup Key Step 1. Open the black rubber cover at the bottom of UL300’s Exterior Assembly.
- Page 18 "No user" Step3. If UL300 is paired with the U-tec App you must tap "Delete" to remove UL300 from your U-tec account. 2.8 5V Emergency Power The micro USB port can be used to connect a regular 5V power bank.
- Page 19 2.9 Anti-peep Keypad The lock support up to 16 digit Vague Code. Just enter any 16 digit code, as long as a correct code is included in what you entered, you will be able to open the door. Example User Code: 123456 Vague Code Method 1 2 3 4 5 6 X X X X X X...
- Page 20 2.11 Use the Key Fob (1)When using the Key Fob access, please place the Key Fob at the center to cover the reader. (2)Approach the sensor with medium speed (instead of sudden motion). If it's not working, move the Key Fob away and re-approach.
- Page 21 3. Lock Programming 3.1 Basic Introduction 3.1.1 Factory Default Factory setting means that any fingerprint, Code or key fob can unlock UL300. You will hear a voice “Factory default mode, please register Admin”, and the message display shows “No User”. 3.1.2 User ID User ID is used to distinguish different users.
- Page 22 3.2 Programming by U-tec App 3.2.1 Add Admin First Admin (special for Admin Code) must be created by keypad prior to any other programming. Note: (1)Add admin first, the Admin User ID is set as default User ID 001. (2)If you don’t need to add Fingerprint, Code or Key Fob, please press Enter Button to skip this step directly.
- Page 23 Note: (1)If you have multiple locks, please remove all batteries to power off the other unregistered UL300 temporarily. You don’t need to power off the registered UL300 due to U-tec App shows these locks as Registered. (2)Admin Code needs to be programmed in the first step, if you haven't set it up, please Program it.
- Page 24 3.3 Keypad Programming by UL300 It is recommended to use U-tec App to program your lock. If you don’t have a smart phone or don’t want to use the App, you can use the programming instructions below. U-tec App Programming and Keypad Programming are NOT independent, you can use both modes.
- Page 25 3.3.3 Add Admin Admin can always unlock via fingerprint, fob, code or App. Admin can add or delete Admin and Users, control all lock settings and view logs. Admin is only adaptive for User ID 001~020. Fingerprint Press Enter Press Enter Activate Verify Code...
- Page 26 3.3.5 Delete Normal or Temporary User You can delete a specific normal user or temporary user. You need to remember the User ID, otherwise you can only reset the lock to factory settings. Fingerprint Press Number Activate Press Enter Code Verify Welcome Add User...
- Page 27 3.3.7 Delete Admin Admin can delete other specific Admins. You need to remember the User ID, otherwise you can only reset the lock to factory settings. Fingerprint Press Number Activate Press Enter Verify Code Welcome Add User Delete User 8 twice Admin Key Fob Input User ID...
- Page 28 3.3.9 Modify Lock's Status You can switch Normal Mode, Passage Mode and Lockout Mode to meet your specific requirements. Fingerprint Activate Press Enter Press Number System Verify Code Welcome Add User Setup Admin Key Fob 8 three times Press Enter Press Normal Passage...
- Page 29 3.3.12 Date and Time You can set the date and time of UL300. If you are using the U-tec App, the date and time will synchronize to the smart phone’s time automatically once you go to Settings Page in the App.
- Page 30 3.3.13 Reset as Factory Default Please note all data will be erased if you reset UL300 to factory default. If you are using U-tec App, please delete UL300 from your U-tec Account after operating Reset by UL300’s keypad. Fingerprint Press Enter...
- Page 31 UL300 control it remotely via U-tec App. 2. What if I lost the paired smartphone? Please go to www.u-tec.com/myutec.html or login U-tec App via another smartphone to change your U-tec Account password 3. How can I unlock UL300 if the battery runs out? There will be a low battery alert on the lock and App when battery is low.
- Page 32 © 2019 U-tec Group Inc. U-tec and Ultraloq brands and products are trademarked and protected under law in the United States. Unauthorized use is prohibited. Ultraloq is sub-brand of U-tec Group Inc.
- Page 33 Ultraloq UL300 Cerradura Inteligente con Lector de Huella Dactilar Guía de Uso (V1.1)
- Page 34 Antes de usar todos los productos de Ultraloq, lea todos los términos, reglas, políticas y disposiciones de uso aplicables que se encuentran en www.u-tec.com/company/privacy. Al utilizar su Ultraloq, usted acepta estar sujeto a la Política de privacidad de U-tec. ¿Necesita ayuda? Para obtener documentos técnicos y más información, visite...
- Page 35 Guia de Usuario Plantilla de Perforación Fold UL300 Drill Template EDGE OF DOOR V1.3 1” (25mm) ” (14mm) Centerline Ultraloq UL300 ” (15mm) Centerline Centerline Cerradura Inteligente con Lector de Huella Dactilar ” Guía de Uso (15mm) Stud Screw/Connection Cable Hole (V1.1) ”...
- Page 36 Guía de Instalación Video de Instalación Escanee este código QR para ver el video de instalación paso a paso antes de intentar instalar Ultraloq UL300. O también, puede entrar a www.u-tec.com/lock/Ul300/guide directamente. 1. Dimensiones de la Puerta Si tiene una puerta nueva, Fold perfore los orificios de...
- Page 37 2. Instalación de la Cerradura y Contrachapa 2.1 Resumen de la Cerradura Interruptor de dirección: Se utiliza para operar la cerradura. Cierre de Puerta: Se utiliza para bloquear y desbloquear. Cerrojo: Se utiliza para bloquear y desbloquear para asegurar. Orificio del eje: El eje pasa por este agujero para arrastrar el Cierre de Puerta y el Cerrojo. Cerrojo extra: Se utiliza para doble bloqueo.
- Page 38 2. 2 Operacion de Uso de Cerradura Por favor, asegúrese de que la esquina inclinada esté orientada hacia el marco. Si la Cerradura está del lado correcto, puede omitir la siguiente sección sobre cómo invertirla 2.3 Invirtiendo el Uso de la Cerradura Paso 1.
- Page 39 2.4 Instalación de Cerradura Mantenga el Cerrojo y el Cerrojo Extra retraídos (estado desbloqueado), luego inserte la cerradura y apriete los 4 tornillos A Note: La posición de la Cerradura debe ser, Cierre de Puerta o Pestillo en la parte superior y Cerrojo ●...
- Page 40 3. Instalación de Ensable Exterior 3.1 Ajuste la dirección de la manija del Ensamble Exterior Paso 1. Afloje el tornillo dentro del agujero. Por favor, no saque el tornillo durante la operación. Paso 2. Saque la manija y ajústela en la dirección correcta. Paso 3.
- Page 41 3.2 Instalación del Ensamble Exterior Paso 1. Inserte el eje en el orificio del Ensamble Exterior. Si el grosor de la puerta es de 1-9 / 16 '' a 2-3 / 8 '' (40 mm a 60 mm), utilice el eje A (3-1 / 8 '', 80 mm). Si el grosor de la puerta está...
- Page 42 4. Instalación de la placa de Ensamble Interior Paso 1. Pase el cable a través del orificio en la placa de montaje del Ensamble Interior. Paso 2. Fije la placa de montaje del Ensamble Interior en la puerta y apriete los dos tornillos B. Si el grosor de la puerta es de 1-9 / 16 '' a 2-3 / 8 '' (40 mm a 60 mm), utilice el tornillo B1.
- Page 43 Paso 3. Inserte el resorte en el agujero de la manija interior. Note: este paso es importante, de lo contrario, el eje no arrastrará la Cerradura girando la manija. Paso 4. Inserte el conector del cable al puerto del Ensamble Interior. Presione firmemente el conector hasta que escuche un clic.
- Page 44 UL300 tiene un diseño de doble potencia. Si solo instala 4 baterías AA juntas, arriba o abajo (no en el ● medio) es suficiente para alimentar el UL300. Aunque, U-tec recomienda instalar las 8 baterías AA desde el principio para tener una vida útil más larga.
- Page 45 Guía de Usuario Video de Instalación Mire nuestro video paso a paso de la Guía del usuario antes de intentar usar su Ultraloq UL300. 1. Descripción del Producto 1.1 Exterior Pantalla de visualización de mensajes Teclado Anti-peep Lector de llavero/tarjeta...
- Page 46 Teclado Anti-peep Se utiliza para introducir el código y desbloquear desde el exterior. Lector de huellas dactilares Se utiliza para verificar su dedo y desbloquear desde el exterior. Lector de llavero/tarjeta Se utiliza para verificar su llavero y desbloquear desde el exterior. Pantalla de visualización de mensajes Una pantalla OLED con información intuitiva lo guiará...
- Page 47 1.2 Interior Indicador LED bluetooth Botón de Reseteo Tapa de la batería Manija Interior Cerrojo Extra Indicador LED Bluetooth Al conectar el UL300 con la aplicación, habrá una luz azul fija, de lo contrario, una luz azul parpadeará cada segundo. Botón de Reseteo Se utiliza para restablecer el UL300 a la configuración predeterminada de fábrica.
- Page 48 2. Operación básica 2.1 Limpieza del teclado y el lector de huella dactilar Use un paño de microfibra y paselo por el teclado anti-peep, el lector de huellas dactilares y el lector de llavero. 2.2 Activación de Cerradura Coloque un dedo en el lector de huellas dactilares, toque el teclado Anti-peep con el dorso de la mano o los dedos, o presente el llavero en el lector de llavero.
- Page 49 2.3.4 Desbloqueo por Celular Inteligente Paso 1. Presione el botón Desbloquear en la aplicación U-tec. Paso 2. Gire la manija completamente hacia abajo para desbloquear UL300. 2.3.5 Llave de Repuesto Paso 1. Abra la cubierta de goma negra en la parte inferior del Ensamble Exterior de UL300.
- Page 50 Use la aguja de reinicio y presione el botón de reinicio durante 5 segundos hasta que escuche "Exito"; aparecerá un mensaje "No Usuario" Paso 3. Si el UL300 está emparejado con la aplicación U-tec, debe tocar "Eliminar" para eliminar el UL300 de su cuenta de U-tec. 2.8 5V de Alimentación de emergencia El puerto micro USB se puede usar para conectar una pila externa de 5V regular.
- Page 51 2.9 Teclado Anti-peep UL300 soporta un código vago de hasta 16 dígitos. Simplemente ingrese cualquier código de 16 dígitos, siempre que se incluya un código correcto en lo que ingresó, podrá abrir la puerta. Ejemplo Código de usuario: 123456 Metodo Vago 1 2 3 4 5 6 X X X X X X 1 2 3 4 5 6...
- Page 52 2.11 Use el llavero/tarjeta (1) Cuando utilice el acceso a por medio del Llavero, coloquelo en el centro para cubrir el lector. (2) Acérquese al sensor con velocidad media (en lugar de movimiento repentino). Si no funciona, aleje el llavero y vuelva a acercarse. 2.12 Status de la Cerradura Modo Normal Es el modo predeterminado, el usuario debe pasar la verificación de acceso a la huella digital, el código, el...
- Page 53 3. Programación de Cerradura 3.1 Introducción básica 3.1.1 Predeterminado de fábrica La configuración de fábrica significa que cualquier huella digital, código o llavero puede desbloquear el UL300. Escuchará una voz "Modo predeterminado de fábrica, registre Admin", y la pantalla de mensajes muestra "No hay usuario".
- Page 54 3.2 Programación por la aplicación de U-tec 3.2.1 Añadir administrador primero El Admin (especial para el código de administrador) debe crearse mediante el teclado antes de cualquier otra programación. Note: (1) Agregue un administrador primero, el ID de usuario del administrador se configura como ID de usuario predeterminada 001.
- Page 55 Note: (1) Si tiene varios UL300, retire todas las baterías para apagar los UL300 no registrados temporalmente. No necesita apagar el UL300 que ya esté registrado debido a que la U-tec App muestra estos UL300 como Registrados. (2) El código de administrador debe programarse en el primer paso, si no lo ha configurado, prográmelo.
- Page 56 3.3 Programación del teclado por UL300 Se recomienda utilizar la aplicación U-tec para programar su UL300. Si no tiene un teléfono inteligente o no quiere usar la aplicación, puede usar las instrucciones de programación a continuación. La programación de la aplicación U-tec y la programación del teclado NO son independientes, puede usar ambos modos.
- Page 57 3.3.3 Agregar Administrador El administrador siempre puede desbloquear mediante huella digital, llavero, código o aplicación. El administrador puede agregar o eliminar administradores y usuarios, controlar todas las configuraciones de bloqueo y ver los registros. El administrador solo es adaptable para el ID de usuario 001 ~ 020. Huella Activar Código...
- Page 58 3.3.5 Eliminar usuario normal o temporal Puede eliminar un usuario normal específico o un usuario temporal. Debe recordar el ID de usuario, de lo contrario, solo podrá restablecer el UL300 a la configuración de fábrica. Huella Código Presione Activar Presione Elimine Verifique Bienvenido...
- Page 59 3.3.7 Eliminar Administrador El administrador puede eliminar otros administradores específicos. Debe recordar el ID de usuario, de lo contrario, solo puede restablecer el UL300 a la configuración de fábrica. Huella Presione Activar Código Numero 8 Presione Verifique Elimine Bienvenido Anade User User Admin Enter...
- Page 60 3.3.9 Modificar el estado de la Cerradura Puede cambiar el Modo normal, el Modo de paso y el Modo de bloqueo para cumplir con sus requisitos específicos. Huella Presione Activar Código Numero 8 Presione Verifique Ajuste Anade Bienvenido Admin Llavero User Sistema Enter...
- Page 61 3.3.12 Fecha y hora Puede configurar la fecha y la hora del UL300. Si está utilizando la aplicación U-tec, la fecha y la hora se sincronizarán automáticamente con la hora del teléfono inteligente una vez que vaya a la página de configuración en la aplicación.
- Page 62 Tenga en cuenta que todos los datos se borrarán si restablece el UL300 a los valores predeterminados de fábrica. Si está utilizando la aplicación U-tec, elimine el UL300 de su cuenta U-tec después de operar Restablecer con el teclado del UL300.
- Page 63 U-tec. 2. ¿Qué pasa si pierdo el teléfono inteligente emparejado? Vaya a www.u-tec.com/myutec.html o inicie sesión en la aplicación U-tec a través de otro teléfono inteligen- te para cambiar su contraseña de cuenta U-tec 3.
- Page 64 © 2019 U-tec Group Inc. Las marcas y productos U-tec y Ultraloq son marcas registradas y protegidas por la ley en los Estados Unidos. El uso no autorizado está prohibido. Ultraloq es una sub-marca de U-tec Group Inc.
Need help?
Do you have a question about the Ultraloq UL300 and is the answer not in the manual?
Questions and answers