Steelcase RoomWizard II System Manager's Manual
Scheduling system. microsoft exchange
Hide thumbs
Also See for RoomWizard II:
- User manual (52 pages) ,
- Installation manual (20 pages) ,
- Manual (12 pages)
Table of Contents
Advertisement
Advertisement
Table of Contents
Troubleshooting

Related Manuals for Steelcase RoomWizard II


Summary of Contents for Steelcase RoomWizard II
- Page 1 RoomWizard ® Scheduling System Microsoft Exchange ®...
- Page 2 Information in this document is subject to change without notice. Reproduction in any manner without written permission of Steelcase Corporation is forbidden. Steelcase Corporation reserves the right to make changes in product design, or detail, and to discontinue any product or material without notice.
-
Page 3: Table Of Contents
CONTENTS WELCOME ABOUT ROOMWIZARD Power and data requirements Overview Creating a RoomWizard system Linking multiple networks Security ROOMWIZARD SETUP What you’ll need before starting Step 1: Add each RoomWizard to your network Step 2: Set up groups of RoomWizards Step 3: Verify firmware Step 4: Set up for Microsoft Exchange Step 5: Configure other options Backing up data... -
Page 4: Table Of Contents
CONTENTS Continued HOW TO USE A ROOMWIZARD WEB PAGES Web page features Making a simple reservation Making an advanced reservation Reservation options Finding an existing reservation Finding an available room Changing or deleting a reservation CREATING ROOMWIZARD REPORTS Download the RoomWizard Reporting Tool How to create reports TECHNICAL SUPPORT FCC COMPLIANCE... -
Page 5: Welcome
WELCOME Schedule meetings faster and easier with RoomWizard ® The RoomWizard is an interactive touch-screen device mounted near a meeting room entrance or open group area. It’s a web-based room reservation system you can access from any computer on the web. RoomWizard is easy to install and maintain. -
Page 6: About Roomwizard
ABOUT ROOMWIZARD POWER AND DATA REQUIREMENTS Each RoomWizard requires a Power-over-Ethernet (PoE) 802.11af/t • switch or a network connection with a Power Injector. 10baseT or 100baseT Ethernet • A web browser is required to access the web-based room • reservation system. A Lotus Domino , Microsoft Exchange, or other third-party... - Page 7 RoomWizard and an existing reservation system. The API depends on the synchronization software to accomplish this synchronization. See RoomWizard API at www.steelcase.com/roomwizard. Mail server integration If your network includes an SMTP server, RoomWizard can access it to send email messages.
- Page 8 One-Click Publishing The RoomWizard One-Click Publishing option provides a web-based communication link between a room’s RoomWizard and that room’s CopyCam. CopyCam captures anything written or drawn on a room’s whiteboard. Together, they can email the whiteboard’s content to the meeting host and invitees. One-Click Publishing depends on configuring the RoomWizard with the address of your SMTP server.
-
Page 9: Creating A Roomwizard System
CREATING A ROOMWIZARD SYSTEM One RoomWizard, with its web-enabled options, serves as the building block for creating a highly configurable system. See “Step 2: Set Up Groups of RoomWizards” on page 23. RoomWizard options enable you to design a system including: Groups of up to 20 RoomWizards that can share functions. -
Page 10: Linking Multiple Networks
Users can look for an existing reservation or for a suitable meeting • room using the RoomWizard “Find” function, which searches across all RoomWizards in the group. Grouping is a powerful strategy for designing a RoomWizard system. LINKS BETWEEN GROUPS Since groups should include no more than 20 RoomWizard, you can link groups to allow you to expand the system. -
Page 11: Security
NETWORK LINK EXAMPLE You manage IT for a building with several tenant companies. Each company has its own network, but they share conference rooms. To add a RoomWizard to this configuration, simply create a separate network for the RoomWizard system and link that network to each company’s private network via a gateway/firewall. -
Page 12: Roomwizard Setup
ROOMWIZARD SETUP Every RoomWizard is a first-class host on your IP network. This means that each RoomWizard has a unique IP address and optional hostname. Almost all configuration and management takes place via the network using RoomWizard’s build-in web pages. WHAT YOU’LL NEED BEFORE STARTING At least one RoomWizard installed and connected to the network. - Page 13 ASSIGN AN IP ADDRESS TO EACH ROOMWIZARD use DHCP to acquire an IP address. Your DHCP server must provide an IP address, gateway, and domain name or the RoomWizard will reject the DHCP settings. If no DHCP server is available or the RoomWizard rejects the DHCP settings, press the “About”...
- Page 14 3 Press the “IP” button beside “Configure Network Settings.” 4 Select “Don’t use DHCP” on the Network Settings screen. 5 Enter an IP address using the keypad. 6 Press “Ok.” RoomWizard | SYSTEM MANAGER MANUAL...
- Page 15 DHCP 1 Press and hold the “About” button on the RoomWizard’s front panel 2 Enter the default system manager password: 79201 (this password is case sensitive). You can change the default system manager password at any time. See “RoomWizard Settings” on page 4 Make a note of the MAC address that appears on the Network Settings screen.
- Page 16 5 Select “Use DHCP.” DHCP must provide an IP address, gateway, and domain name or the RoomWizard will reject the DHCP settings. If the RoomWizard rejects the DHCP settings, it will adopt a default static address. You can use this default or another static address to access the RoomWizard’s web-based setup pages and enter DHCP settings manually.
- Page 17 NOTE If you entered the RoomWizard’s address manually, your computer must be on the same subnet as the RoomWizard. 2 Click “RoomWizard Setup.” 3 Enter the default system manager password: 79201 (this password is case sensitive). You can change the default system manager password at any time.
- Page 18 1 Go to Device > Network and configure the network settings. To learn more about network configuration setting options, see “About the Network Configuration Settings” on page 17 and “Configuring RoomWizard for Secure Servers” on page 18. 2 Click “Save on THIS Wizard.” When you change any network settings, you may make the RoomWizard unreachable.
- Page 19 About the Network Configuration Settings If you use DHCP to acquire IP addresses and DNS to resolve a • hostname for each IP address, create an address reservation in your DHCP server using the MAC address for each RoomWizard. Specify an optional Hostname for each individual RoomWizard. You •...
- Page 20 Use a class “C” setting for maximum security. The class C setting is 255.255.255.0. The Default Gateway is the IP address of the router or gateway that • provides internet access. (This could also be a server address.) Use this only when you update firmware over the internet. It is set automatically by DHCP, or you may assign it here manually, if “Use DHCP to get these”...
- Page 21 2 Click “RoomWizard Setup.” 3 Enter the default system manager password: 79201 (this password is case sensitive). You can change the default system manager password at any time. See “RoomWizard Settings” on page 55. RoomWizard MICROSOFT EXCHANGE |...
- Page 22 4 Go to Firmware > Configure SSL and enter the domain name, company name, division name, city, state, and country. 5 Click the “Generate CSR” button. Wait for the CSR Value to appear in a text box. 6 Copy the text that appears in the CSR Value text box. 7 Acquire a certificate from a certificate authority on the internet.
- Page 23 9 Click the “Browse” button and navigate to the certificate text file just created. 10 Click “Save on THIS Wizard.” If an error message appears while uploading the certificate file, open the certificate file and enter two empty paragraphs at the end of the file.
- Page 24 CUSTOMIZE GRAPHICS ON FRONT PANEL You can upload an optional image that will appear in the title bar of all web pages and a second image that will appear on the RoomWizard touch screen. Go to the Device > Logo tab and follow these image guidelines.
-
Page 25: Step 2: Set Up Groups Of Roomwizards
STEP 2: SET UP GROUPS OF ROOMWIZARDS Before configuring RoomWizard groups, consider the simplified maintenance and strategic opportunities that groups provide. See “RoomWizard Groups” on page 7. NOTE Every RoomWizard must be in a group, even if it is a group of one. SET UP A GROUP Each RoomWizard in a group holds an identical list of the members in its group, including itself. - Page 26 2 Go to the Setup pages for the gateway RoomWizard. 3 Click “Group” in the menu bar and go to the “Members” tab. 4 Enter the IP address of the gateway RoomWizard. RoomWizard | SYSTEM MANAGER MANUAL...
- Page 27 5 Click “Add.” 6 Enter the IP address and click “Add” for each RoomWizard you want to include in this group. Each time you add an IP address, the gateway RoomWizard contacts the newly added RoomWizard to obtain its Room Name and Room Location.
- Page 28 7 Click “Synchronize Group Membership” when the list of group members on the gateway RoomWizard is complete. The gateway RoomWizard will now send the group member list to each member of the group and verify that each member has the same list as the gateway RoomWizard.
- Page 29 You can use your DNS to resolve the group virtual hostname to an IP address or assign one RoomWizard to be the virtual host. We recommend that the group’s virtual hostname be a separate hostname, distinct from the hostnames given to the individual RoomWizards. Configure a group name and virtual hostname with DNS 1 Set up a virtual host name in your DNS.
- Page 30 6 Click “Save on ALL Wizards” to ensure that all RoomWizards in the group know which access address is being used. The gateway RoomWizard will display a confirmation page while all other RoomWizards in the group reboot. Wait for all the RoomWizards to reboot before you proceed to the next step.
- Page 31 1 Go to the Setup > Group > Name page of any RoomWizard in the group. This will become the host RoomWizard. 2 Enter a Group Name. 3 Enter the IP address of the host RoomWizard in the “Virtual Host” field and add “/GroupView”...
- Page 32 LINK TO OTHER GROUPS If you are configuring a RoomWizard system that includes more than one group, you can link some or all of the groups together. Linked groups appear in a drop-down menu on the GroupView web page. 1 Go to the Setup > Group > Links to Other Groups page of any RoomWizard in the group.
- Page 33 RE-SYNCING GROUP MEMBERSHIPS Every member of a RoomWizard group must have an identical list of group members. If there is any discrepancy, the entire group is considered out of sync. There several causes for a group becoming out of sync, including an unreachable or powered off RoomWizard.
-
Page 34: Step 3: Verify Firmware
RoomWizard does not lose any reservation or configuration information. UPGRADE FIRMWARE Firmware upgrades are available for download from www.steelcase. com/roomwizard. Before beginning the firmware upgrade process, determine how you will transfer the upgrade to the RoomWizard. You have three options: Download the latest version of the firmware directly to the •... - Page 35 BEGIN FIRMWARE UPGRADE 1 Go to the Setup > Firmware > Upgrade page of the RoomWizard you wish to upgrade. You must log in as an administrator. 2 Begin the upgrade by selecting the upgrade method you will use. If downloading directly from the website, enter the URL. •...
- Page 36 3 Select the check boxes if you want RoomWizard to back up and restore room reservation and configuration information. 4 Click on “Upgrade ALL Wizards” to upgrade the firmware on all the RoomWizards in the group. Click on “Upgrade THIS Wizard” to upgrade only this RoomWizard.
- Page 37 Servers. A single installation of the synchronization software is capable of handling communication for all RoomWizards simultaneously. Software requirements The following software must be installed and configured prior to installing the RoomWizard Synchronization Software: Exchange Server 2007/2010 • Microsoft PowerShell 1.0 •...
- Page 38 NOTE In Exchange Server mode the Installer must be executed from the computer where Exchange Server is installed. Installing on Web Server Select Web Server mode to install and configure the RoomWizard Synchronization Software website. The mode creates, configures and updates the RoomWizard Synchronization Software website under Internet Information Server (IIS).
- Page 39 To allow the RoomWizard Synchronization Software Installer to make the changes: 1 Select the “Confirm Changes” check box. 2 Click “Continue.” Once the installer is done, installation of the RoomWizard Synchronization Software is complete. To make changes manually: 1 Click “Cancel.” 2 Complete the required changes and click “Install”...
- Page 40 Configuring the software during installation During installation, you will configure the synchronization software. The installation mode you selected determines which configuration screens will appear during installation. IIS WebSite Settings (Web Server mode only) Select the website where you want the installer to create the virtual •...
- Page 41 resource accounts created or updated during the installation process. Only this account will be able to access resource mailboxes via delegate access. The RoomWizard Service Account must exist on the domain for as long as the RoomWizards are used in synchronized mode.
- Page 42 RoomWizard to access via the Synchronization Software. You can also use existing resource accounts or import resources from a Microsoft Excel, .csv or .txt file. See “Importing Resource Names” on page 42 and “Using Existing Resource Accounts” on page 43. Navigate to an Active Directory Location using the “Browse”...
- Page 43 domain name and HTTPS. Enable SSL if SSL is configured on the Exchange Server. To include attendee information such as Attendee Phone in the • Synchronization Software response, select “Enable Attendee Details.” To enable caching on the Synchronization Software side, select •...
- Page 44 Enter the log level that supports you logging needs. Events are • logged in the EventLog. The default value is 0. Valid values are: 0 = Logs all 1 = Logs errors only 2 = Logs errors and warnings only Enter a cache refresh time interval.
- Page 45 2 Click the “Import File” button and navigate to the desired file. 3 To import the displayed rooms, click the “Import Rooms” button. NOTE Excel Import is not supported in x64 bit versions. Only x86 bit versions of the operating system support Excel Import. Using existing resource accounts You can use an existing resource account with the Synchronization Software Installer if the alias and user logon name are the same.
- Page 46 Completing software installation The Synchronization Software Installer will display an “Installation Successful” screen that lists the executed tasks and their status. Configuring Exchange resource accounts manually The RoomWizard Synchronization Software Installer configures RoomWizard mailbox resources with identical display and alias names. You can edit the display name of the resources using the Exchange Management Console.
- Page 47 Adding a license key manually To add a license key: 1 Login to the Exchange server computer where you have configured the RoomWizard Synchronization Software. 2 Go to the physical directory you provided during the installation. For example, if you have provided “C:\RWCEC” as the directory, navigate to that directory using Windows Explorer.
- Page 48 7 Type exit to exit the command prompt. Creating a RoomWizard service account Follow these steps to create a service account: 1 Launch the Exchange Management Console. 2 Expand “Recipient Configuration” and select “Mailbox.” 3 In the Actions Pane select “New Mailbox…” 4 Select “User Mailbox”...
- Page 49 5 Select “New user” or “Existing user” and click “Next.” 6 Enter the user information and click “Next.” RoomWizard MICROSOFT EXCHANGE |...
- Page 50 7 Select “Mailbox Database” and click “Ok.” 8 Enter “Mailbox Settings” and click “Next.” 9 Click “New” and confirm that the new mailbox has been created. RoomWizard | SYSTEM MANAGER MANUAL...
- Page 51 10 Click “Finish.” Configuring a RoomWizard to access its calendar Follow these steps to configure calendar access: 1 Configure the RoomWizard Server Access. Enter the URL in the format: http://WebServer/VirtualDirectory/ rwceconnector.aspx Enter the Username of the “Service Account” in the format: Domain\ Username.
- Page 52 5 Click the “RoomWizard setup” link. 6 Enter the default system manager password: 79201 (this password is case sensitive). 7 Go to the Device > Synchronization tab. e-mail address, or where there are multiple e-mail domains, the complete SMTP e-mail address. Exchange does not require a room password.
- Page 53 9 Click “Save on THIS Wizard.” TROUBLESHOOTING MICROSOFT EXCHANGE SETUP Use a web browser to verify the RoomWizard Synchronization Software installation and conduct a more in-depth analysis. To conduct the tests listed in this section, enter the command strings into your browser’s address box.
- Page 54 <kwe:short>RWSS_3.0.0</kwe:short> </kwe:connector> </kwe:result> If an error occurs, verify the following: The RoomWizard Synchronization Software is installed on a machine • with IIS server running. IIS has been configured by the lockdown tool to prevent execution of • ASP code. COM objects are available. (Check in the registry.) •...
- Page 55 B2ZGV2dGVzdDMu 29tAEYAAAAAAEWqK9CKhutNnFjVxsJxZZ wHAPTpnVF32rJ hWRXVFLpF44ACp4+6qAAAPTpnVF32rJHh W RXVFLpF44ACp4/dDEAAA==” confidentia l=”no”password_ protected=”no”> <rb:purpose>Hello!</rb:purpose> <rb:notes>When: Thursday, September 17, 2009 3:00 PM-4:00 PM. Pacific Standard Time Where: ConferenceRoom *~*~*~*~*~*~*~*~*~*</rb:notes> <rb:repetition>N</rb:repetition> <rb:start_time>150000</rb:start_time> <rb:start_date>20090917</rb:start_date> <rb:end_time>160000</rb:end_time> <rb:end_date>20090917</rb:end_date> <rb:booking_creation_time>151755</rb:booking_creation_ time> <rb:booking_creation_date>20090917</rb:booking_ creation_date> <rb:booking_modification_time>151755</rb:booking_ modification_time> <rb:booking_modification_time>20090917</rb:booking_ modification_time> - <rb:attendees> - <rb:attendee role=”host” status=”noresponse”> <rb:name>Administrator</rb:name>...
- Page 56 Common errors Check this list of common errors and their corrective actions. Directory Not Empty Error Complete the following tasks. Then enter ‘iisreset’ on the command prompt and run the RoomWizard Synchronization Software Installer again. Check that Internet Information Services Manager (IIS) is not open. If •...
-
Page 57: Step 5: Configure Other Options
STEP 5: CONFIGURE OTHER OPTIONS You can now configure the remaining options for each RoomWizard or group of RoomWizards. ROOMWIZARD SETTINGS The additional options found under Setup > Device are described below. These options allow you to adjust setting for one specific RoomWizard or all RoomWizards in a group. - Page 58 Device > Security enables you to change the password needed to access the RoomWizard Setup pages. The default password is: 79201 (this password is case sensitive). You can also enable use on page 18. Device > Email enables you to specify the SMTP and LDAP servers used for RoomWizard email functions.
- Page 59 Port numbers are supported in this field (for example ldap.Steelcase. com:390). Port 389 is the default, if no port address is designated. If LDAP support is available, choose the LDAP Search Attributes used. Enter the LDAP username required to access your LDAP server.
- Page 60 Check the Enable Start button to require a user to verify that he or • she has shown up for a meeting. Select the Start Early function to allow users to start a scheduled • meeting early, if the room is available, by pressing the “Start Early” button on the front panel.
- Page 61 ROOM SETTINGS Settings available under Setup > Room relate to the room associated with the RoomWizard or to the room reservation options for the RoomWizard. Room > Name/Location enables you to enter the name of the room and a one- or two-word description of the room’s location. The Room Name appears on the RoomWizard’s touch screen and the web page’s reservation timeline.
- Page 62 Configure the One-Click Publishing option by adding the internal web server address for the CopyCam whiteboard(s) associated with this meeting room. If the whiteboard is not reachable on the network, this page displays “Unavailable.” There is no limit to the number of whiteboards you can add to one RoomWizard.
- Page 63 You can: Make all meetings confidential by default. • Make the advanced registration form the default. • Decide to display only a first name on the front panel when a meeting • is in progress. When the One-Click Publishing option is active, choose when •...
- Page 64 Grayed-out fields always appear on any reservation form. • You can choose to make Host or Purpose a required field. • If you add a field to the simple registration form, it is automatically • added to the advanced registration form. RoomWizard | SYSTEM MANAGER MANUAL...
- Page 65 Room > Usage enables you to export a subset or all of the reservation data to the desktop of the computer you are using. You can also choose to export the data in a format compatible with the RoomWizard Reporting Tool. See “Exporting Graph Data” on page 113. Schedule RoomWizard to run monthly reports automatically and send them to an FTP location.
- Page 66 You can set up services once and apply it to other RoomWizards in the same group. If you have other RoomWizard groups, you can copy and paste the form. To set up a service menu in RoomWizard: 1 Go to Setup > Services > Management. 2 Select Enable service.
- Page 67 5 Select Enable service to enable it. Deselect it to disable it. 6 Select “Use cost center” to require users to enter a cost center number before requesting the service. 7 Enter the email address associated with the service. This email recipient is notified when the service is requested and whenever the reservation changes.
- Page 68 9 Enter the service menu. This is the form users see when reserving a room. A text-based form requesting catering services could look like this: This example shows how the free-text edit box enables a user to express their exact needs for the meeting. This also provides the system manager with the flexibility to set up the services available to users.
- Page 69 This example shows how the HTML service menu option enables you to create any type of HTML command. This can be used to link to additional online menus, for example. 10 Click “Save on THIS Wizard” or “Save on ALL Wizards.” RoomWizard MICROSOFT EXCHANGE |...
-
Page 70: Backing Up Data
RoomWizard to the desktop of the computer you are using. The exported data is compatible with the RoomWizard Reporting Tool. You can download a copy of the “RoomWizard Reporting Tool” from www. steelcase.com/roomwizard. PERFORM A BACKUP To make and restore backups, RoomWizard uses FTP to send files to a central server that you control. - Page 71 If you do not have a backup server that supports FTP and do not want to set one up, you can choose to backup a RoomWizard to another RoomWizard. Although this does not provide a highly secure backup, it does provide some redundancy in situations where an external FTP server is inappropriate or unavailable.
- Page 72 RESTORE DATA FROM A BACKUP 1 Go to the Setup > Backup > Restore page on the RoomWizard you want to restore. The RoomWizard provides the date/time and location of its most recent backup. If you replaced a faulty RoomWizard or swapped units between rooms, this may not be the backup you want to restore.
-
Page 73: Troubleshooting Setup
TROUBLESHOOTING SETUP RoomWizards can be operated in a wide variety of configurations and in an almost unlimited number of network environments. This section will help you troubleshoot potential problems. Almost all problems with RoomWizard installations are related to network connectivity or group configuration. It is a good idea to eliminate these possibilities first. - Page 74 PROBLEMS WITH GROUP CONFIGURATION If you see strange behavior in the GroupView web page (for example, certain rooms are missing intermittently), you should suspect that the group configuration is inconsistent among the RoomWizards in the group. The rooms you see in the GroupView page depend on which RoomWizard is serving up the GroupView page—which RoomWizard is the virtual host.
- Page 75 OTHER PROBLEMS Once a RoomWizard can be reached on the network and in its group, other problems are very rare. Checking the configuration of the RoomWizard through the Setup pages and resetting any deviant parameters can correct most problems. If this fails and rebooting the RoomWizard does not fix the problem, it is possible that the RoomWizard is in an incorrect state internally.
- Page 76 ANNOUNCE ROOMWIZARD SYSTEM TO STAFF The following sample email suggests how a facility manager might announce installation of a new RoomWizard system and get coworkers up and running on the system. Customize this sample email as appropriate. Subject: Scheduling meetings just got easier… You may have seen digital displays being placed throughout our office.
-
Page 77: How To Use A Roomwizard
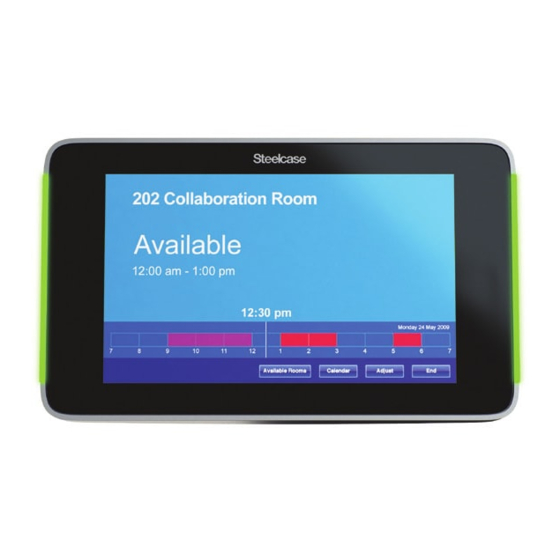
HOW TO USE A ROOMWIZARD RoomWizard transforms a meeting room by giving it the ability to share its reservation schedule and details about its amenities. RoomWizard lets you know the room’s current availability and schedule for the day. While a reservation is in progress, RoomWizard displays the meeting’s purpose and host. -
Page 78: Interacting With A Roomwizard
NOTE These buttons may not appear on all systems. A RoomWizard also indicates a room’s availability quickly, even from a distance. If a room is in use, the RoomWizard LED status lights are red. Green indicates the room is available. INTERACTING WITH A ROOMWIZARD When you interact with a RoomWizard touch screen, you are interacting with the entire web-based RoomWizard room reservation... - Page 79 To view information about any reservation in the timeline: 1 Press a red block of time. RoomWizard shows you the meeting host and purpose as they were entered. You can get more information if you press the “Details” button. See “Getting Room and Invitee Details” on page 78.
- Page 80 If you do not press the “Start” button within an allotted amount of time, the reservation is abandoned and the room becomes available for others to use. If you miss your meeting start time and still need to use the room, press the red block on the timeline associated with the abandoned meeting.
- Page 81 To view the invitees for the current reservation: 1 Press “Details” on the touch screen. 2 Press “Invitees.” Invitees are displayed if they were entered when the reservation was made. An email address is listed if a name is unavailable. If RoomWizard is integrated with your corporate email database, this list may also include the invitees’...
- Page 82 If you complete a meeting early, you can end the reservation and free up the room for others to use. To end the current reservation before the specified end time: 1 Press “End” button on the touch screen. 2 Press “Yes” to confirm. RoomWizard will terminate your reservation and indicate that the room is available.
- Page 83 2 Press “Ok” to adjust the reservation or “Quit” to return to the current reservation without making any changes. NOTE Reservations can be password protected. If your system administrator has enabled this option and a reservation is password protected, you cannot change it from the RoomWizard touch screen.
-
Page 84: Cleaning The Touch Screen
2 Enter the reservation end time by pressing the “+” or “–” buttons to adjust the default end time. 3 Press “Ok.” RoomWizard displays “Local Reservation In Use.” NOTE This feature may not be available on all systems. One-Click Publishing and impromptu meetings When you make an impromptu meeting reservation, there is no record of the host or attendees, so captured whiteboard notes are emailed to the room administrator. -
Page 85: Web Page Features
HOW TO USE ROOMWIZARD WEB PAGES RoomWizard web pages enable you to make, change, and delete reservations from any computer connected to the same local area network (LAN). You can access a RoomWizard’s web page using any common web browser with Windows , Macintosh , or other operating ®... - Page 86 WEB PAGE MENU The menu is the blue horizontal bar immediately below the logo. The menu appears on every RoomWizard page and enables you to navigate between the Reservation, Find, Help, and About pages. The first page you see is the Reservation page. You can always return to it at any time by clicking “Reservation”...
- Page 87 OTHER GROUPS OF ROOMWIZARDS Your system manager may create groups of RoomWizards and link several groups for easy access from the web page. If the web page is for a group of RoomWizards, you will see a room name and a timeline for each room in the group.
-
Page 88: Making A Simple Reservation
Room name Click blue Click red area to make area to view/ reservation edit a current reservation You can click on almost any part of a timeline. Click the room name to view a description of the room’s features, • facilities, location, and a photograph of the room, if available. - Page 89 To go to a specific room, go to the RoomWizard link or URL provided • by your system manager. To choose from among a group of rooms, go to the Reservation • page for the group of RoomWizards using the link or URL provided by your system manager.
- Page 90 The simple reservation form appears. This form enables you to enter the minimum information for a reservation. NOTE Depending on your system configuration, you may see different fields on your Simple or Advanced Reservation Form. See “Making an Advanced Reservation” on page 90. 5 Enter the Purpose of the reservation.
- Page 91 6 Enter the Host associated with the reservation. The host appears on the RoomWizard outside of the meeting room during the meeting. RoomWizard MICROSOFT EXCHANGE |...
-
Page 92: Making An Advanced Reservation
7 Adjust the reservation start or end time, if necessary. 8 Click “Save” to save the reservation or “Quit” to cancel the reservation. NOTE The reservation is not made until you click “Save.” MAKING AN ADVANCED RESERVATION The RoomWizard’s advanced reservation form enables you to specify additional reservation information. - Page 93 To use the advanced reservation form: 1 Click an available (dark blue) time in the room’s timeline. 2 If the simple reservation form appears, click the advanced reservation link. 3 Enter the information and select the options you want to include in your reservation.
-
Page 94: Reservation Options
RESERVATION OPTIONS You may not see all the options described below, or they may be set as required on your system. PURPOSE AND HOST Enter one or two words in the “Purpose” field to explain what the meeting is about. For example, “Project Meeting,” “Sales Lunch” or “Training Session.”... - Page 95 HOST EMAIL Enter an email address in the “Host email” field to send the host: An automatic reminder email about the pending reservation, • including a link to the RoomWizard reservation web page. See “Send Reservation Details to Attendees” on page 97. Meeting notes captured on CopyCam whiteboards, if the One-Click •...
- Page 96 INVITE PEOPLE Enter meeting participants in the “Invite people” field. Invitees will receive: An automatic reminder email, including a link to the reservation form. • See “Send Reservation Details to Attendees” on page 97. Meeting notes captured on CopyCam whiteboards, if the One-Click •...
- Page 97 If there is more than match for a name or email address, a dialog will list the possible matches. Select the correct name or address and click “Save.” If no names or addresses match what you typed, RoomWizard will display a scrolling list of everyone in the company database. Select the name or address of the host or invitee and click “Save.”...
- Page 98 1 Click “Add.” 2 Select a name from the corporate email database. 3 Click “Add.” 4 Repeat for each person you wish to invite. 5 Click “Save.” Valid names and addresses may already appear in the “Invite…” list before you click the “Add” button. If RoomWizard encounters names it does not recognize, you will see a list of partial matches to select from.
- Page 99 SEND RESERVATION DETAILS TO ATTENDEES If a meeting room is reserved but not being used, RoomWizard can email the “Host” and “Invited people” a link to the reservation web page where they can view the reservation details. To have RoomWizard automatically email a reminder that includes reservation details to invitees and the host, check the box “Send reservation details to attendees.”...
- Page 100 To learn the name of the room administrator: Press “Details” on the touch screen, then press “Room.” • Press the One-Click Publishing icon on the touch screen. • NOTE You can adjust your reservation using the RoomWizard touch screen, so captured whiteboard notes continue to be emailed to the host and invitees.
- Page 101 NOTE A room is not reserved until you click the “Save” button. If another person saves a reservation while you are in the process of completing a reservation form, RoomWizard displays a reservation conflict when you save your reservation. RoomWizard saves on a “first come, first serve”...
- Page 102 USER-DEFINED TEXT FIELDS Your system configuration may contain up to three additional custom text fields. PASSWORDS FOR MEETINGS By default, room reservations can be modified or deleted by anyone. You can protect a reservation to prevent others from viewing, modifying, or deleting it. Anyone wanting to view or change the reservation must enter the password.
- Page 103 To make changes to a password-protected reservation: 1 From any computer on the network, enter the RoomWizard address in a web browser. 2 Navigate to the room and date of the meeting. 3 Click on your reservation in the timeline. 4 Enter the password.
- Page 104 When you save your room reservation, RoomWizard emails your request(s) to the service provider(s). If you change your reservation date, location, or time, or cancel your meeting, the service provider(s) are notified. During your reservation, the RoomWizard touch screen displays the requested services to help service providers locate the correct room.
-
Page 105: Finding An Existing Reservation
If schedule conflicts occur, RoomWizard saves the reservations that are available and provides a report of the dates with conflicts. You can then schedule room reservations individually for those dates. NOTE If you create alternate reservations for the recurring reservations with conflicts, those reservations are distinct and separate. - Page 106 4 Select “Find” in the RoomWizard menu. 5 Click “Find existing reservation.” 6 Enter any information about the meeting. You can enter the host or purpose of the reservation and the earliest and latest dates between which you want to search. If you do not provide a host or purpose, you receive a complete list of reservations between the dates you specified.
-
Page 107: Finding An Available Room
FINDING AN AVAILABLE ROOM Use the “Find available rooms” option to find an appropriate room when you need it. You can enter reservation criteria and receive a list of available rooms in the selected group that meets your criteria. To find an available room: 1 On any networked computer, enter the RoomWizard web address to view the web page. -
Page 108: Changing Or Deleting A Reservation
A room that holds at least or at most a certain number of people • (capacity) Keywords about a room’s location • Facilities available in the room (For example, you can search for a • room for your conference call by putting “speaker phone” in the facilities field on the search form.) 7 Click “Find”... - Page 109 To change an existing reservation: 1 Locate your reservation on a timeline and select it. Enter the reservation password, if necessary. • If the reservation is a recurring reservation, select “just open this • occurrence,” or “open all occurrences.” 2 Edit the reservation. You can: Examine all the reservation information.
-
Page 110: Creating Roomwizard Reports
CREATING ROOMWIZARD REPORTS RoomWizard provides statistics and trends on how meeting rooms are actually used. You can obtain a comma delimited (CSV) report from the RoomWizard setup pages. In classic mode, RoomWizard can report on data for the previous year, the current calendar year, and next calendar year. -
Page 111: How To Create Reports
HOW TO CREATE REPORTS DOWNLOAD USAGE REPORT 1 Go to the homepage of the desired RoomWizard report. Click on the RoomWizard Setup link and enter the system manager password: RoomWizard MICROSOFT EXCHANGE |... - Page 112 2 Go to Room > Usage. Select the date range to report on. To get a report for only this room, click “Export from THIS Wizard.” To get a report from all rooms in the group, click “Export from ALL Wizards.” 3 In the File Download window, choose “Save this file to disk”...
- Page 113 NOTE To generate a report on multiple RoomWizard groups at once, upload additional files by clicking on the “To upload additional files click here.” link. 3 Select the data to report on in the Graph Options section. 4 Select the desired Graph Style. 5 Select a date range from the available dates.
- Page 114 Number of RoomWizards shows the number of RoomWizards • represented in the usage file(s). Graph Options • Advance Reservations vs. Impromptu Meetings shows the number of hours a room was occupied by a meeting that had been scheduled in advance versus the amount of time a room was occupied by an impromptu meeting.
- Page 115 GRAPH DATA ASSUMPTIONS AND CALCULATIONS Some graphs rely on calculating the total available meeting time • available during the date range chosen. The business day is nine hours and does not include weekends. If • the used time exceeds nine hours, the actual time is used. If a reservation exceeds one day, nine hours per day is used for the •...
- Page 116 To export reservation data: 1 Go to the RoomWizard web page. 2 Go to Setup > Room > Usage. 3 Choose the date range of the reservations you want to export. 4 Select the type of file to export. Select “Export file for reporting” to export a file compatible with the •...
- Page 117 REPORTING TOOL ERROR MESSAGES Front Panel Availability Error messages about front panel availability are related to the “Adjust,” “End,” and “Use Now” buttons on the RoomWizard touch screen. If you are not able to adjust meetings, end meetings early, or grab a room with the “Use Now”...
-
Page 118: Technical Support
TECHNICAL SUPPORT In the USA and Canada, contact Steelcase USA Technical Support: Phone: 1.800.334.4922 (24-hour support Monday through Friday) • Email: techsupport@steelcase.com • www.steelcase.com URL: • Outside North America, contact Steelcase Europe/Asia Technical Support: Phone: +33 3 88 13 36 36 (Support available in English, French, •... -
Page 119: Fcc Compliance
FCC COMPLIANCE This equipment has been tested and found to comply with the limits for a Class A digital device, pursuant to Part 15 of the FCC Rules. These limits are designed to provide reasonable protection against harmful interference when the equipment is operated in a commercial environment. -
Page 120: Warranty
Steelcase warrants the RoomWizard appliance to be free from defects in material and workmanship under normal use and care for three (3) years from the date of shipment except as noted below. Steelcase will repair or replace, at its option, any RoomWizard product or part thereof which fails as a result of such a defect during the warranty period. -
Page 121: Appendix To The Roomwizard Warranty Statement
1.800.334.4922; for warranty service in Europe call +32 (0) 89 32 31 30; for all other countries email techsupport@steelcase. com. If warranty service is required, Steelcase will issue a Return Authorization Number. In most cases, a working unit will be sent to you with original packaging. -
Page 122: Index
INDEX About menu 77 Email function 57 Adjust button 58 End button 58 API 5 End reservation 81 Availability 42 Error codes 73 Ethernet bandwidth 5 Event log 42 Backup 32, 69 Facilities 60 Calendar 50, 85 Find Catering 101 available room 105 Check names 94 existing reservation 103... - Page 123 Menu options 85 Help 85 Microsoft Exchange errors 55 Home page 84 installation 34 Host name 10 server 35, 40 HTTP 21 troubleshooting 52 HTTPS 18, 21, 41 Name/Location 60 IIS 36 .NET 36 Impromptu meetings 82 Network access 9, 10, 84 Installation modes 35 configuring 15 Invitees 79, 80, 94, 95...
- Page 124 INDEX RoomWizard address 4, 10, 11 Rebooting 6 configuration 10, 11, 18, 50, 56 Recurring meetings 102 groups 7, 23, 86 Reporting tool 108 home page 84 host name 10, 17 Reporting tool errors 115 mailbox 53 Reports security 57 automatic usage 114 service account 39, 47 create 109, 110...
- Page 125 Technical support 116 Telephone 99 Timeline 86 Time zone 56 Troubleshooting 52, 72 Upgrades, firmware 32 Usage 64 Use now 58, 76, 83 User-defined text fields 100 User logon 44 Virtual host for groups 26 Virtual host name 26, 27, 28 Volume 58 Web-base configuration 14 Web page...
- Page 126 Call 800.333.9939 or visit www.steelcase.com/roomwizard for product demonstrations and documentation, firmware downloads and more. ©2010 Steelcase Inc. All rights reserved. All specifications subject to change without notice. Printed in U.S.A. on 30% post- consumer recycled paper. Trademarks used herein are the property of Steelcase Inc. or of their respective owners.
Need help?
Do you have a question about the RoomWizard II and is the answer not in the manual?
Questions and answers