Table of Contents
Advertisement
Advertisement
Table of Contents

Related Manuals for Stanley M200


Summary of Contents for Stanley M200
- Page 1 Fall Management System M200 Fall Monitor Setup & User Guide...
-
Page 2: Important Recommendation
Trademark displayed herein without the prior consent of the Trademark owner. STANLEY and the STANLEY design are two of the trademarks owned by STANLEY Healthcare and/or its Affiliates (“STANLEY Trademarks”). STANLEY Trademarks may not be used in connection with any product or service that is not manufactured by or under license from STANLEY Healthcare or its appropriate Affiliate. - Page 3 M200 Fall Monitor system alarm. • The M200 Fall Monitor system will not stop a person from leaving a bed or chair. It is intended only to alert a caregiver that a patient or resident may need assistance.
-
Page 4: Table Of Contents
Audible Alerts .................... 11 Pad Alarms ........................11 Confirmation Tones ....................... 11 Low Battery Beep ......................11 Monitor Setup ................... 12 Volume (Speaker icon) ....................12 Tone Selection (Music Note icon) ................12 Illumination Intensity (Lightbulb icon) ..............13 Recording Custom Pad Alarms ................. 14 DIP Switch Settings ....................... 15 M200 Fall Monitor – Setup & User Guide... - Page 5 Monitor Mounting/Installation Options ..........27 Wall Mounting ........................27 Chair or Bed Footboard/Headboard Mounting (Optional)......29 Interfacing with a Nurse Call System ............30 Nurse Call (NC) Alarms ....................31 Compatibility ........................31 Audible Alarms and Tones...............32 System Specifications ................33 Regulatory Compliance ................34 Warranty Information ................35 M200 Fall Monitor – Setup & User Guide...
- Page 6 M200 Fall Monitor Package Contents M200 Fall Monitor – Setup & User Guide...
-
Page 7: Introduction
Introduction Introduction The STANLEY Healthcare M200 Fall Management System uses a pressure-sensitive pad to detect the presence of a patient/resident, and a monitor to notify facility staff in the event of premature departure from a bed, chair, or toilet seat. -
Page 8: Overview
Overview Overview The M200 Fall Management System consists of pressure-sensitive Sensormat pads which detect the presence of a patient/resident, and a monitor which provides staff with alarm information. The monitor provides Pad Exit alarms and Confirmation tones. If the patient/resident exits the bed or chair pad for longer than a... -
Page 9: Hardware Features
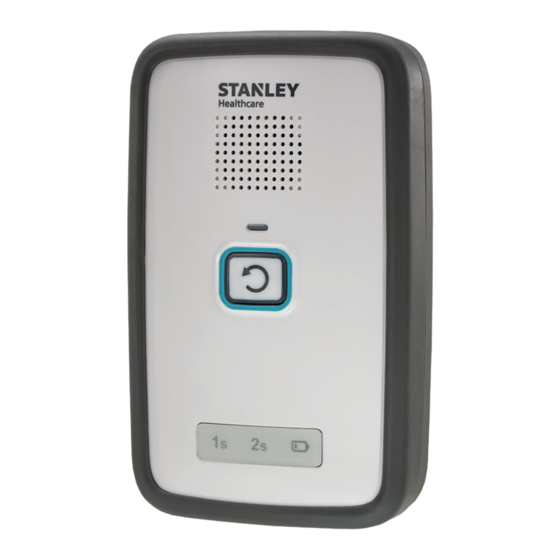
Reset Button/ Monitor State Indicator Alert Delay and Low Battery Indicators Wheelchair Clip Guide Rails for Wall Mounting Battery Cover Bracket & Bed and Chair Wire (Open-Window Clip Version) Battery Cover Screw Microphone M200 Fall Monitor – Setup & User Guide... -
Page 10: Speaker
2 minutes (120 seconds). See “Suspend Mode (2 Minutes)” on page Front Panel Status Indicators The front panel Status Indicators include the following 3 icons: • Alert Delay 1s • Alert Delay 2s • Low Battery M200 Fall Monitor – Setup & User Guide... - Page 11 0 seconds.” No icon will be lit. Note: In the two presses required for changing the Delay settings, a short pause is required between the two presses (i.e., do not perform a “double-click.”) M200 Fall Monitor – Setup & User Guide...
- Page 12 For information about expected battery life, see “Batteries” on page Low Battery Audible Indications In low battery, a Low Battery Beep is repeated once every minute. After each alarm clearance, a “Low battery” message is announced within 3 seconds. M200 Fall Monitor – Setup & User Guide...
-
Page 13: Battery Covers
The open-window version is attached by default. The fully-closed cover can be purchased separately. Included Optional Tighten the retention screw on the lower corner of the door to secure the battery cover in place. M200 Fall Monitor – Setup & User Guide... -
Page 14: Control Settings
Tone sounds. For instructions on recording a custom message for an Exit Alarm, see “Recording Custom Pad Alarms” on page 14. C. The DIP Switches are used to configure features for the M200 monitor. See “DIP Switch Settings” on page 15 for a description of the DIP Switch settings. -
Page 15: Ports
The following ports are located on the bottom side of the monitor. • Power Supply - This is used to connect a 5V/2A power supply. NOTE: Use only the power supply provided by STANLEY Healthcare (ADP-080). • Nurse Call Cable - This is used to connect a Nurse Call cable (0707- 569 sold separately). -
Page 16: Alarm And Status Indicators
• Delay is set to ‘2s’ – the ‘2s’ icon is illuminated When connected to external power, the corresponding LED illuminates constantly. When powered by batteries only, the corresponding LED blinks once every 3 seconds. M200 Fall Monitor – Setup & User Guide... -
Page 17: Audible Alerts
• Voice playback or record buttons pressed when the feature is not enabled or no message has been recorded Low Battery Beep In low battery, a Low Battery Beep is repeated once every minute. M200 Fall Monitor – Setup & User Guide... -
Page 18: Monitor Setup
• Low-pitched series of 3 beeps followed by 2 beeps • High-pitched fast series of Low and High beeps • Low-pitched slow series of High and Low beeps • Low-pitched fast series of Low and High beeps M200 Fall Monitor – Setup & User Guide... -
Page 19: Illumination Intensity (Lightbulb Icon)
• Position 1 – LED blinks medium brightness • Position 2 – LED blinks full brightness Note: When operated by external power, and the switch is set to “1” or “2”, the LED remains constantly on. M200 Fall Monitor – Setup & User Guide... -
Page 20: Recording Custom Pad Alarms
Messages can be recorded at any time except during an alarm. Note: Recorded message length can be up to a maximum of 15 seconds at which time a Positive Confirmation Tone sounds indicating the recording time is over. M200 Fall Monitor – Setup & User Guide... -
Page 21: Dip Switch Settings
Monitor Setup DIP Switch Settings The M200 contains DIP switches on the back of the monitor allowing you to configure various features by manually toggling the switch from “A” to “B.” See the table below. See “Recording See “Latching and See”Suspend Mode... -
Page 22: Latching And Non-Latching
Non-Latching: Nurse Call output stays active until either weight has been reapplied to the pad or the Reset Button has been pressed on the monitor. Note: Floor Pads always follow Latching behavior. M200 Fall Monitor – Setup & User Guide... -
Page 23: Using Sensormat Pads
Only use Sensormat pads manufactured by STANLEY Healthcare for use with the M200 Monitor. See “Other Components Sold Separately” on page 1. Pad testing should be done either by sitting or lying on the pad, or by pressing down firmly with the palm of your hand. -
Page 24: Bed
Ensure the toilet seat is clean and dry. Place the adhesive towards the seat ring, positioning it between the seat and the bowl. Test the Toilet Sensormat pad before each use. See “Testing the Sensormat Pads” on page 20. M200 Fall Monitor – Setup & User Guide... -
Page 25: Seatbelt
Test the Floor Pad before each use. See “Testing the Sensormat Pads” on page 20. Note: Floor Pads always follow Latching behavior. See “Latching and Non- Latching” on page 16. M200 Fall Monitor – Setup & User Guide... -
Page 26: Testing The Sensormat Pads
Testing the Sensormat Pads Testing the Sensormat Pads Test the Sensormat Pad and M200 monitor before first use, each time the system is put into use, and daily thereafter. Bed, Chair, Toilet and Commode Connect the pad to the monitor. If two pads are required, connect both pads and test each pad individually. -
Page 27: Seatbelt
If the Monitor Pad Alarm cannot be verified as above, check all connections and repeat this est procedure. If the Pad Alarm still does not sound, DO NOT place the Seatbelt or Monitor into service and follow your facility’s procedures for product maintenance. M200 Fall Monitor – Setup & User Guide... -
Page 28: Floor Pad
The monitor and the Sensormat pad may be cleaned with a damp cloth or sponge using mild disinfectants. Never use alcohol, acidic or harsh petroleum-based cleaners. Note: The Sensormat Pad is for single patient/resident use only. M200 Fall Monitor – Setup & User Guide... -
Page 29: Using The Monitor
Positive Confirmation Tone is heard instead of the voice announcement. If you continue to press for an additional 2 seconds, the Monitor moves into Suspend mode with an audible indication “Suspend Mode, 2 minutes.” M200 Fall Monitor – Setup & User Guide... -
Page 30: Suspend Mode (2 Minutes)
To move out of Suspend mode before the 2 minutes has passed, press and hold the Reset Button for 2 seconds. The Reset Button stops blinking. When the timer runs out, the monitor resumes normal operation. M200 Fall Monitor – Setup & User Guide... -
Page 31: Batteries
(+) end into the contact. The monitor immediately performs a self-test. The LED flashes green and the speaker sounds a Positive Confirmation Tone. Close the battery cover, and tighten the cover screw. M200 Fall Monitor – Setup & User Guide... -
Page 32: Power Supply
The Power Supply used must supply 5V/2A only. Currently, model ADP- 080, (sold by STANLEY Healthcare) is the only approved Power Supply for the M200 in North America. For Power Supplies approved for other countries, please contact STANLEY Healthcare. M200 Fall Monitor – Setup & User Guide... -
Page 33: Monitor Mounting/Installation Options
Slide the monitor down into the bracket from the top until the release button clicks. Insert the Nurse Call cable plug into the Nurse Call port in the monitor. Plug the other end into the facility’s Nurse Call system receptacle. M200 Fall Monitor – Setup & User Guide... - Page 34 ” thick (e.g., the back of a wheelchair). If not required, the clip may be removed by using a small flat-head screwdriver to lift the retention tab located in the center of the clip. M200 Fall Monitor – Setup & User Guide...
-
Page 35: Chair Or Bed Footboard/Headboard Mounting (Optional)
By pulling on the top end of the bracket, it will clip over the top of the rail. Do the same on the other side of the monitor. You can then install the monitor as required. M200 Fall Monitor – Setup & User Guide... -
Page 36: Interfacing With A Nurse Call System
Test the connection before use to verify that the 1/4” plug on the installed Nurse Call equipment is fully compatible with the 1/4” port on the M200 Monitor and that the equipment’s test call is successfully received by the facility’s Nurse Call system. -
Page 37: Nurse Call (Nc) Alarms
Refer to the Nurse Call system documentation for details on cancelling alarms at the Nurse Call station. Compatibility The M200 system is compatible with STANLEY Healthcare’s Arial® system. An adapter (Part# 54031) can be purchased from STANLEY Healthcare. M200 Fall Monitor – Setup & User Guide... -
Page 38: Audible Alarms And Tones
Audible message: Alarm Delay is x Second(s) Delay State Change Audible message: Alarm delay is set to x Second(s) Acknowledgement The following website has been used to furnish various audible tones for the M200 monitor: http://www.freesfx.co.uk M200 Fall Monitor – Setup & User Guide... -
Page 39: System Specifications
“Medium” Medium Level ≈ 85 dBA - at 1 foot from monitor “High” Maximum Level ≈ 96 dBA - at 1 foot from monitor LED Indicators Reset Button: • Green - Start-up, Arming/Armed, Button Press • Red - Pad Alarm • Amber - Hold/Suspend Mode Status Indicator Icon • Green - Delay Settings • Yellow- Low Battery M200 Fall Monitor – Setup & User Guide... -
Page 40: Regulatory Compliance
RoHS RoHS Directive – 2011/65/EU UL Certification Conforms to UL1069 Certified to CAN/CSA C22.2 No. 205-R Listing #: 3064149 M200 Fall Monitor – Setup & User Guide... -
Page 41: Warranty Information
Warranty Information LIMITED WARRANTY: STANLEY® HEALTHCARE CONTROL UNITS 1. WARRANTOR: This Limited Warranty is given by Stanley Security Solutions, Inc., 4600 Vine Street, Lincoln, NE 68506 (d/b/a STANLEY Healthcare). 2. DURATION: This Limited Warranty begins on the date the product is delivered to the purchaser and continues for a period of two years (new units) or one year (refurbished units). - Page 42 Warranty Information LIMITED WARRANTY: STANLEY® HEALTHCARE SENSORMAT® PADS 1. WARRANTOR: This Limited Warranty is given by Stanley Security Solutions, Inc., 4600 Vine Street, Lincoln, NE 68506 (d/b/a STANLEY Healthcare). 2. DURATION: This Limited Warranty begins on the date the product is delivered to the purchaser and continues for a period of one year or for the duration of the warranty stated on the Sensormat label from the date first installed, whichever comes first.
- Page 43 Notes Notes: M200 Fall Monitor – Setup & User Guide...
- Page 44 STANLEY InnerSpace STANLEY Healthcare +1-800-824-2996 Lincoln, NE 68503 800-467-7224 SIS-Info@sbdinc.com ©2016 Stanley Security Solutions, Inc. All rights reserved. Doc 0980-165-000 Rev C. 04/2016 0980-165-000 Rev C 04/2016 KB# 9520 ©2013 STANLEY Healthcare...
Need help?
Do you have a question about the M200 and is the answer not in the manual?
Questions and answers