Table of Contents
Advertisement
Quick Links
Advertisement
Table of Contents

Related Manuals for Botex DMX DC-192


Summary of Contents for Botex DMX DC-192
- Page 1 DMX DC-192 DMX controller...
- Page 2 Musikhaus Thomann Thomann GmbH Hans-Thomann-Straße 1 96138 Burgebrach Germany Telephone: +49 (0) 9546 9223-0 E-mail: info@thomann.de Internet: www.thomann.de 18.02.2019, ID: 391103 (V2)
-
Page 3: Table Of Contents
1.3 Symbols and signal words....................... 9 Safety instructions..........................11 Features............................... 15 Installation..............................16 Starting up..............................18 Connections and controls........................19 Basics................................25 Operating..............................28 8.1 Manual operation..........................28 8.2 Joystick settings..........................28 8.3 Scenes..............................33 8.4 Chases..............................39 DMX DC-192 DMX controller... - Page 4 Table of contents 8.5 Copying scene bank and fixtures....................46 8.6 Fade time............................47 8.7 MIDI functions........................... 48 Technical specifications........................50 Plug and connection assignment....................52 Protecting the environment......................53 DMX DC-192 DMX controller...
- Page 5 DMX DC-192 DMX controller...
-
Page 6: General Information
Our products and user manuals are subject to a process of continuous development. We there‐ fore reserve the right to make changes without notice. Please refer to the latest version of the user manual which is ready for download under www.thomann.de. DMX DC-192 DMX controller... -
Page 7: Further Information
Our online guides provide detailed information on technical basics Online guides and terms. Personal consultation For personal consultation please contact our technical hotline. If you have any problems with the device the customer service will Service gladly assist you. DMX DC-192 DMX controller... -
Page 8: Notational Conventions
The letterings for connectors and controls are marked by square brackets and italics. Examples: [VOLUME] control, [Mono] button. Displays Texts and values displayed on the device are marked by quotation marks and italics. Examples: ‘24ch’ , ‘OFF’ . DMX DC-192 DMX controller... -
Page 9: Symbols And Signal Words
ð Automatic operation is started. Switch off the device. 1.3 Symbols and signal words In this section you will find an overview of the meaning of symbols and signal words that are used in this manual. DMX DC-192 DMX controller... - Page 10 NOTICE! This combination of symbol and signal word indicates a pos‐ sible dangerous situation that can result in material and environmental damage if it is not avoided. Warning signs Type of danger Warning – danger zone. DMX DC-192 DMX controller...
-
Page 11: Safety Instructions
This device may be used only by persons with sufficient physical, sensorial, and intellectual abilities and having corresponding knowledge and experience. Other persons may use this device only if they are supervised or instructed by a person who is responsible for their safety. DMX DC-192 DMX controller... - Page 12 Choking hazard! Ensure that children do not detach any small parts (e.g. knobs or the like) from the unit. They could swallow the pieces and choke! Never let children unattended use electrical devices. DMX DC-192 DMX controller...
- Page 13 NOTICE! Risk of fire Do not cover the device nor any ventilation slots. Do not place the device near any direct heat source. Keep the device away from naked flames. DMX DC-192 DMX controller...
- Page 14 PVC floor and after some time cause permanent dark stains. In case of doubt, do not put the rubber feet directly on the floor, but use felt-pad floor protectors or a carpet. DMX DC-192 DMX controller...
-
Page 15: Features
Joystick to control the PAN and TILT movement Reverse Joystick function Fine tuning for PAN and TILT Assigned or reversed DMX channel preview Blackout master Stand-alone mode Manual overriding of scenes in chases MIDI control for banks, chases and blackout DMX DC-192 DMX controller... -
Page 16: Installation
Unpack and check carefully there is no transportation damage before using the unit. Keep the equipment packaging. To fully protect the product against vibration, dust and moisture during transportation or storage use the original packaging or your own packaging material suitable for transport or storage, respectively. DMX DC-192 DMX controller... - Page 17 Installation Wiring diagram for fog machines DMX DC-192 DMX controller...
-
Page 18: Starting Up
Turn on the device using the main switch on the rear panel. After turning the device on the displays shows the software version and the operation mode for a short time. The related dis‐ play LEDs light up. DMX DC-192 DMX controller... -
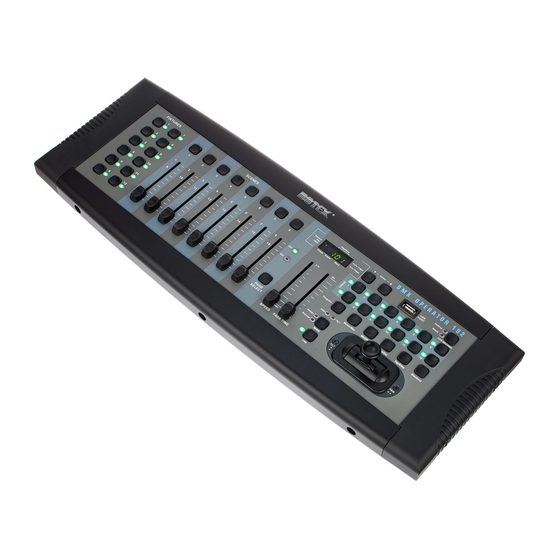
Page 19: Connections And Controls
Connections and controls Connections and controls DMX DC-192 DMX controller... - Page 20 7 Chase buttons 1 … 12. For storing and playing chases. 8 Function buttons [Program] To activate and exit the recording mode when programming. [Music/Bkc] To activate the audio mode for chase synchronization and to copy scene banks. DMX DC-192 DMX controller...
- Page 21 Multifunction button for assigning fader and joystick settings. 11 [FINE] Used in conjunction with the joystick. When the button is pressed, a certain area can be controlled much more pre‐ cisely with the scanner or the moving light. DMX DC-192 DMX controller...
- Page 22 Fader to adjust the chase speed (0.1 seconds … 10 minutes per step) 14 [PAGE SELECT] Button to switch between channels 1 … 8 or 9 … 16. 15 Channel fader to control the connected and assigned device. DMX DC-192 DMX controller...
- Page 23 Connections and controls 16 [USB] USB connection socket 17 MIDI / DMX operation switch. 18 [AUDIO In] RCA input socket to connect audio equipment for sound control. 19 [DB-9] To connect an optional chase step controller. DMX DC-192 DMX controller...
- Page 24 23 [DMX Out] DMX output socket to connect a dimmer or other DMX-controlled devices. 24 [DC In] Connection socket for the 9 V power supply unit. 25 [POWER] Main switch to turn the device on and off. DMX DC-192 DMX controller...
-
Page 25: Basics
DMX master. The output of the first receiver is connected to the input of the second one, and so on. The output of the last receiver in the DMX chain must be termi‐ nated using a resistor (110 Ω, ¼ W). DMX DC-192 DMX controller... - Page 26 Basics If the cable length exceeds 300 m (328 yds.) or the number of devices is greater than 32, the signal must be amplified using a DMX booster. DMX DC-192 DMX controller...
- Page 27 When setting the DMX address, the counting method of the device determines the first channel. Depending on the device, the channel numbers may start from 0 or from 1. The address range may therefore reach from 0 to 511 or from 1 to 512. DMX DC-192 DMX controller...
-
Page 28: Operating
Hold down [Program] for about two seconds or until the PROG indicator flashes on the display. When the indicator flashes, the recording mode is active and you can release the button. Hold down [MODE] and press [FINE]. The LEDs for [ASSIGN] and [PAN] should now light DMX DC-192 DMX controller... - Page 29 DMX table. If your device has a Tilt-Fine channel, press [Tap/Disp] until the dis‐ play shows ‘TL.XX’ . Hold down [MODE] and press then the [SCENE] button corresponding to the device's tilt channel. For example, if the device's tilt channel is 4, you should press the [SCENE] button 4. DMX DC-192 DMX controller...
- Page 30 Fixtures 2, 4, 6 etc. should be set up in the reverse direction, so the units will react in the opposite direction when you turn the joystick around. The movement of opposing devices should be in opposite direction. DMX DC-192 DMX controller...
- Page 31 4, you should press the [SCENE] button 4. Hold down [Program] for about two seconds or until the PROG indicator stops flashing on the display. As soon as the blackout indicator flashes, the programme mode is deacti‐ vated. DMX DC-192 DMX controller...
- Page 32 Deletion Pan / Tilt joystick set‐ Turn off the controller using the mains switch. tings on all devices Press [Auto/Del] and [MODE] simultaneously and switch the controller on again. All LEDs flash three times, the settings have been cleared. DMX DC-192 DMX controller...
-
Page 33: Scenes
Press a [SCENE] button (1 to 8) to save. As soon as all the LEDs flash, the scene is saved. Make sure you use a different button each time you save a scene so you do not over‐ write what you want to keep. To record additional scenes, repeat steps 2 to 6. DMX DC-192 DMX controller... - Page 34 Use the faders or the joystick to adjust the settings. Press [Midi/Rec] and then the [SCENE] button the scene you wand to edit. All LEDs flash three times when the new settings are saved. DMX DC-192 DMX controller...
- Page 35 Hold down [Program] for about two seconds or until the PROG indicator stops flashing on the display. As soon as the blackout indicator flashes, the programme mode is deacti‐ vated. DMX DC-192 DMX controller...
- Page 36 Repeat steps 2 and 3 to delete further scenes. Hold down [Program] for about two seconds or until the PROG indicator stops flashing on the display. As soon as the blackout indicator flashes, the programme mode is deacti‐ vated. DMX DC-192 DMX controller...
- Page 37 Press the [SCENE] button (1 to 8) of the scene you want to play. The selected scene is started. Press the same button again to end the scene, or [Blackout] to end any output. Repeat steps 2 and 3 to play additional scenes. DMX DC-192 DMX controller...
- Page 38 [CHASE] button (1 to 12). The selected scene bank or chase will start synchronously with the audio playback of the internal microphone or the connected line level input. Press [Music/Bkc] again to exit the audio mode. DMX DC-192 DMX controller...
-
Page 39: Chases
[PAGE SELECT]. Use [PAGE SELECT] to switch between channels 1 to 8 and 9 to 16. Press [Midi/Rec] to record the chase step. When the chase step is recorded, all LEDs flash three times. Repeat steps 3 and 4 to record further steps. DMX DC-192 DMX controller... - Page 40 LEDs flash three times. Scenes are included in the same order in which they are stored in the scene bank. Repeat steps 3 and 4 to include further scene banks. DMX DC-192 DMX controller...
- Page 41 Press the scene bank UP / DOWN buttons to move manually through each section of the chase step. Locate the chase step to which you want to add another step. Press [Tap/Disp] to exit the Step mode again. The step display in the display should then be set off. DMX DC-192 DMX controller...
- Page 42 To select a chase press the corresponding [CHASE] button (1 to 12). The corresponding LED lights up. Press [Tap/Disp], step indicator lights up on the display. Press the scene bank UP / DOWN buttons to move manually through the chase steps. Locate the chase step you want to delete. DMX DC-192 DMX controller...
- Page 43 Repeat steps 2 and 3 to delete further chases. Hold down [Program] for about two seconds or until the PROG indicator stops flashing on the display. As soon as the blackout indicator flashes, the programme mode is deacti‐ vated. DMX DC-192 DMX controller...
- Page 44 Press the scene bank UP / DOWN buttons to move manually through the chase steps. You can also use the fader [FADE TIME] if you want to have a cross fade between the steps. Repeat steps 2 and 3 to manually play additional scenes. DMX DC-192 DMX controller...
- Page 45 Press the [CHASE] button (1 to 12) of the chases you want to play. The corresponding LED lights up and playback is started. The selected chase will start synchronously with the audio playback of the internal microphone or the connected line level input. Press [Music/Bkc] again to exit the audio mode. DMX DC-192 DMX controller...
-
Page 46: Copying Scene Bank And Fixtures
Press [Music/Bkc]. All LEDs light up three times after copying. 8.5.2 Copying fixtures Start programme mode. Press the [FIXTURE] button you want to copy. Use the channel faders (1 to 8) or the joystick to set your unit as desired. DMX DC-192 DMX controller... -
Page 47: Fade Time
‘ONLY’ indicates that only the pan / tilt channels are controlled by the fader [FADE TIME]. ‘ALL’ indicates that all channels are changed by the fader. For switching between ‘ONLY’ and ‘ALL’ hold down [MODE] and press [Tap/Disp]. DMX DC-192 DMX controller... -
Page 48: Midi Functions
Use the scene UP / DOWN buttons to select a DMX channel 01 - 16 that you assign as MIDI channel. Hold down [Midi/Rec] for two seconds or until all LEDs light up three times to save the setting. DMX DC-192 DMX controller... - Page 49 Turning chases 1 … 12 on / off 12 to 19 Turning scenes 1 … 8 on / off 20 to 49 Selecting scene banks 1 … 30 Turning audio on / off Turning auto on / off Turning blackout on / off DMX DC-192 DMX controller...
-
Page 50: Technical Specifications
Chase step controller Sub-D chassis socket, 9-pin Output connections DMX control XLR chassis socket, 3-pin MIDI DIN socket, 5-pin Fog machine DIN socket, 5-pin Power supply Power adapter (9 V…15 V / 500 mA min., centre positive) DMX DC-192 DMX controller... - Page 51 Technical specifications Dimensions (W × H × D) 530 mm × 120 mm × 170 mm Weight 2.8 kg Ambient conditions Temperature range 0 °C…40 °C Relative humidity 50 %, non-condensing DMX DC-192 DMX controller...
-
Page 52: Plug And Connection Assignment
‘just’ a not working light show! DMX socket A female 3-pin XLR socket is used for the DMX output. The figure and the table below show the pin assignment. Assignment Ground (shielding) Signal inverted (DMX–, ‘cold’) Signal (DMX+, ‘hot’) DMX DC-192 DMX controller... -
Page 53: Protecting The Environment
Dispose of this device through an approved waste disposal firm or through your local waste facility. When discarding the device, comply with the rules and regulations that apply in your country. If in doubt, consult your local waste disposal facility. DMX DC-192 DMX controller... - Page 54 Notes DMX DC-192 DMX controller...
- Page 56 Musikhaus Thomann · Hans-Thomann-Straße 1 · 96138 Burgebrach · Germany · www.thomann.de...
Need help?
Do you have a question about the DMX DC-192 and is the answer not in the manual?
Questions and answers