Table of Contents
Advertisement
Quick Links
Advertisement
Table of Contents

Subscribe to Our Youtube Channel
Related Manuals for Botex Lemon Series


Summary of Contents for Botex Lemon Series
- Page 1 User manual ADT-48...
-
Page 2: Table Of Contents
Table of contents Safety instructions ..........................3 1.1. FOR SAFE AND EFFICIENT OPERATION ................3 Introduction ............................4 Key Features ............................ 4 Control Panel and Functions ......................5 Connector Configuration ........................6 Operation ............................7 6.1. On/Off ............................7 6.2. Scene ............................ -
Page 3: Safety Instructions
1. Safety instructions • This device is suitable for indoor use only. • All modifications to the device will void the warranty. • Repairs are to carry out by skilled personnel only. • Use only fuses of the same type and original parts as spare parts. •... -
Page 4: Introduction
European safety standards. 2. Introduction Congratulations and thank you for purchasing the ADT-48 of the Lemon series. The ADT-48 is a hybrid LED controller with a touch interface. It is multifunctional, compact and easy to operate. -
Page 5: Control Panel And Functions
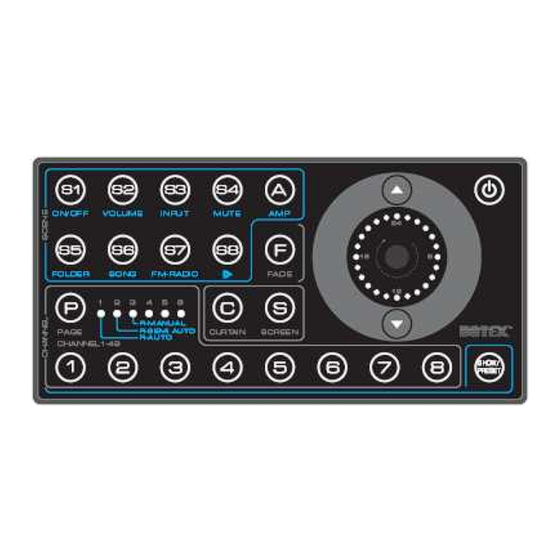
4. Control Panel and Functions 1. Power button Used to power on/off your ADT-48 2. Touch Toggle Master controller: controls Speed, Volume, alternates channels, etc. 3. Show/Preset button Activates and alternates the function of CHANNEL, SHOW and PRESET 4. Button S1~S8 Lighting with white, these buttons mean the Scene 1~8. -
Page 6: Connector Configuration
9. Button C (CURTAIN) Used to open/close curtain 10. Button S (SCREEN) Used to open/close screen 11. Button (BACKWARD) Used to select the previous item 12. Button (FORWARD) Used to select the next item 5. Connector Configuration The ADT-48 features one group of DMX input and two groups of DMX output, each one with 4 PIN connectors. -
Page 7: Operation
Alternatively the ADT-48 can be connected to the junction box ADT-48P (sold separately) via RJ45 Ethernet LAN cable. 6. Operation 6.1. ON/OFF Make sure your ADT-48 is connected with a suitable power source before operating the device. The indicator of the POWER button lights up and the device is powered on while it is connected with an available power source. -
Page 8: Scene
6.2. SCENE 6.2.1. Playing a SCENE Press the button S1~S8 to load the corresponding scene which has been stored there, including the controlling data of curtain and amplifier. The LED indicators inside the touch toggle show the fadetime of the current scene. 6.2.2. -
Page 9: Show
6.3. SHOW Press the SHOW/PRESET button, the LED indicators of the channel buttons 1~8 light up with blue (which is the same as the color of the SHOW/PRESET button). This means the channel buttons 1~8 switch to the function of SHOW 1~8. 6.3.1. -
Page 10: Clearing A Show
6.3.3. Clearing a SHOW To clear the undesired show, e.g. SHOW1, press the PAGE button and the S1 button simultaneously and hold on for about 10 seconds, the SHOW1 is cleared. 6.4. PRESET Press the SHOW/PRESET button, the LED indicators of the channel buttons 1~8 light up with blue- white (which is the same as the color of the SHOW/PRESET button). -
Page 11: Curtain And Screen
6.5. CURTAIN and SCREEN The indicators of the CURTAIN and SCREEN directly indicate the working state of the curtain and screen. In this mode, ADT-48 can be connected to a DR-1 as its curtain & screen driver (for further information, please refer to the user instructions of the DR-1). 1. -
Page 12: Timing
S5 switches to FOLDER Press the S5 button and then rotate the touch toggle to select a folder. Number 1~8 correspond to Music1~Music8 in local memory and number 9~16 correspond to Music1~Music8 in SD card. In Music1~Music7, the default playing mode is to repeat playing of all the songs of the current folder in sequence. -
Page 13: Preset Off Time
STEP2: Press the corresponding button of Preset 1~8, e.g. Preset1, the LED indicators inside the touch toggle show the ON Time of Preset1. Rotate the touch toggle to change the Preset ON Time. When you are satisfied with the setting, press and hold on button Preset1 for 2 seconds, all the LED indicators flash once which means the time setting is complete. -
Page 14: Setup
STEP3: Repeat STEP1~STEP2 to set OFF time for the other Presets. Enable/Disable Preset OFF Time In STEP2 of Setting Preset OFF Time, press the corresponding button of Preset1~8. If the DOWN button flashes repeatedly, it means the Preset OFF Time is disabled. To enable the setting, press and hold on UP button and the corresponding PRESET button for about 2 seconds until all the LED indicators flash once then release the buttons. -
Page 15: Button Lock/Unlock
6.8.3. Button Lock/Unlock The button will be locked if you press the POWER button twice rapidly. At this time, all the buttons, except POWER button, are not valid. Then quickly press the POWER button twice to unlock the buttons. If there is no operation on the panel in 5 minutes, the buttons will be locked automatically. 6.8.4. -
Page 16: Technical Data
7. Technical data Power Supply DC 12-24 (4W min.) Housing Polycarbonate DMX In 4 PIN Socket DMX Out 4 PIN Socket (2 pcs.) To Panel RJ45 Port Amplifier DA MP3-20 (sold separately) Curtain & Screen Driver DR-1 (sold separately) Operation Temperature 0°... - Page 17 9. Appendix I The ADT-48 is controlled by DMX 512 Protocol. Table 1 describes the DMX channel mappings. 17 / 19...
- Page 18 Appendix II The ADT-48 can also be controlled by IR controller. Table 2 details the function of ADT-48 RC. NOTE: 1. Before operation, make sure the batteries (3V, Cr2025) have been installed properly. 2. The FREQ button and the SCAN button on the controller are not valid. 3.
- Page 19 Importer: B & K Braun GmbH Industriestraße 1 D-76307 Karlsbad www.bkbraun.com info@bkbraun.com 19 / 19...
Need help?
Do you have a question about the Lemon Series and is the answer not in the manual?
Questions and answers