Bradley Aerada 1200 Series Installation Manual
Battery-operated capacitive sensing gooseneck faucet
Hide thumbs
Also See for Aerada 1200 Series:
- Installation manual (7 pages) ,
- Installation manual (7 pages)
Table of Contents
Advertisement
Quick Links
Read this entire installation manual to ensure proper installation. When finished with the installation, file
this manual with the owner or maintenance department. Compliance and conformity to local codes and
ordinances is the responsibility of the installer.
Pressurized plumbing fixtures shall be installed in accordance with manufacturer´s recommendations. The
supply piping to these devices shall be securely anchored to the building structure to prevent installed
device from unnecessary movement when operated by the user. Care shall be exercised when installing the
device to prevent marring the exposed significant surface.
Separate parts from packaging and make sure all parts are accounted for before discarding packaging
material. If any parts are missing, do not begin installation until you obtain the missing parts.
Make sure that all water supply lines have been flushed and then completely turned off before beginning
installation. Do not use pipe dope. Debris in supply lines can cause valves to malfunction. Possible valve
contamination could occur which will void any warranty. Teflon tape is the recommended sealant.
Product warranties may be found under "Products" on our web site at www.bradleycorp.com.
215-1641 Rev. E; ECN 16-02-002
© 2016 Bradley
Page 1 of 13
9/7/2016
Installation
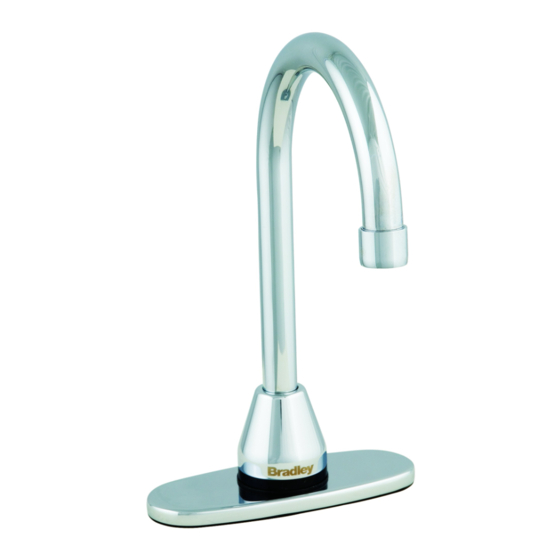
Aerada™ 1200 Series
CS Faucet
S53-325 Battery-Operated Capacitive
Sensing Gooseneck Faucet
Centershank with 4-inch Trim Plate
(Optional: 8-inch or No Trim Plate)
Table of Contents
Supplies Required . . . . . . . . . . . . . . . . . . 2
Installation . . . . . . . . . . . . . . . . . . . . . 4
Manual Settings . . . . . . . . . . . . . . . . . . . 6
Adjustments . . . . . . . . . . . . . . . . . . . . . . . . . . . . . . . . . . . . 9
Troubleshooting . . . . . . . . . . . . . . . . . . . . . . . . . . . . . . . . 10
Care and Maintenance . . . . . . . . . . . . . . . . . . . . . . . . . . 12
Multi-Faucet Transformer Wiring . . . . . . . . . . . . . . . . . . . 14
IMPORTANT
P.O. Box 309
Menomonee Falls, WI 53052 USA
800 BRADLEY (800 272 3539)
+1 262 251 6000
bradleycorp.com
Advertisement
Table of Contents
Troubleshooting

Related Manuals for Bradley Aerada 1200 Series


Summary of Contents for Bradley Aerada 1200 Series
- Page 1 Product warranties may be found under “Products” on our web site at www.bradleycorp.com. P.O. Box 309 Menomonee Falls, WI 53052 USA 215-1641 Rev. E; ECN 16-02-002 800 BRADLEY (800 272 3539) © 2016 Bradley +1 262 251 6000 Page 1 of 13 9/7/2016 bradleycorp.com...
- Page 2 • Control Module Sensor Wire • Grounding Kit Drain • Dirt Filter Grounding Wire Valve Control • 1/2" NPS x 1/2" NPS x 12" hose included Module • (4) Alkaline Batteries included 9/7/2016 Bradley • 215-1641 Rev. E; ECN 16-02-002...
- Page 3 Red Plastic Screw Spacers plate, re-attach gaskets and faucet spacer using shorter M4 x 12mm screws Long Trim Plate Screws (supplied) . Do not re-install screw spacers . Short Trim Plate Screws Bradley • 215-1641 Rev. E; ECN 16-02-002 9/7/2016...
- Page 4 Sensor Wire Connection Washer the order shown . Brass Mounting Nut Connect the Valve Control Module Place rubber washer into white top nut fitting . Hand tighten valve control module to faucet shank . 9/7/2016 Bradley • 215-1641 Rev. E; ECN 16-02-002...
- Page 5 . Sink Ground Wire Connect this end of sink Attach drain wire clamp ground wire to one tab to sink drain . on U-tab connection . U-Tab Connection Bradley • 215-1641 Rev. E; ECN 16-02-002 9/7/2016...
- Page 6 Secure battery Power connector) compartment to wall using wall anchors or double-sided tape . Insert (4) d-cell alkaline batteries and replace Remove battery box cover . cover by unscrewing (2) phillips screws . 9/7/2016 Bradley • 215-1641 Rev. E; ECN 16-02-002...
-
Page 7: Troubleshooting Guide
If the connector has broken off of the black sensor wire or the valve box appears to defective valve box electronics . be defective please contact Bradley Technical Service . Do not attempt to repair the valve box or sensor wire . -
Page 8: Operating Modes
Function Diagram of Operating Modes Modes Water Pulses in Second(s) Water is Off Cleaning Mode Water is On Normal Mode Metering Mode (10 seconds) Scrub Mode (60 seconds) Scrub Mode (180 seconds) Sensor Range Adjustment 9/7/2016 Bradley • 215-1641 Rev. E; ECN 16-02-002... -
Page 9: Troubleshooting
Replace solenoid valve (See "Replacement Parts") Faucet is in cleaning mode Wait for cleaning mode to end (appr . 90 seconds) Electronics module Contact Bradley technical service or replace power adapter (See inoperable “Replacement Parts”) Power adapter defective (AC Contact Bradley technical service or replace power adapter (See faucets only) “Replacement Parts”) - Page 10 Hot water temperature not Reverse hot water limiter (See “Care and Maintenance”) sufficient Braided hoses are connected Correct the connections improperly (cold to hot and hot to cold) 9/7/2016 Bradley • 215-1641 Rev. E; ECN 16-02-002...
-
Page 11: Replacing Battery
• Battery is low (LED is lit) • New 6 V Lithium battery (CR-P2) is required Mount housing vertically . Remove shut-off screw . Remove mixer handle (for faucets with external mixer only) . Bradley • 215-1641 Rev. E; ECN 16-02-002 9/7/2016... - Page 12 Mount mixer handle . The proportion of hot water is now changed . Connect braided hose with filter to supply valve . Cold water = White Label Hot Water = No Label 9/7/2016 Bradley • 215-1641 Rev. E; ECN 16-02-002...
- Page 13 Additional Wiring, if needed, To be Supplied by Customer (22 GA min; 50 ft . max . length) Transformer can be used to connect up to 8 faucets. All units must be connected in parallel. Bradley • 215-1641 Rev. E; ECN 16-02-002 9/7/2016...
Need help?
Do you have a question about the Aerada 1200 Series and is the answer not in the manual?
Questions and answers