Table of Contents
Advertisement
Quick Links
Installation and User Manual
TILT® Toilet Incline Lift
2-YEAR WARRANTY. Please register at www.ezaccess.com/warranty-satisfaction.
© Homecare Products, Inc. All rights reserved. All text and images contained in this document
are proprietary and may not be shared, modified, distributed, reproduced, or reused without the
express written permission of EZ-ACCESS®, a division of Homecare Products, Inc.
Manufactured in the USA
16398 REV 8-21-17
Advertisement
Table of Contents

Related Manuals for EZ-ACCESS TiLT Toilet Incline Lift


Summary of Contents for EZ-ACCESS TiLT Toilet Incline Lift
- Page 1 © Homecare Products, Inc. All rights reserved. All text and images contained in this document are proprietary and may not be shared, modified, distributed, reproduced, or reused without the express written permission of EZ-ACCESS®, a division of Homecare Products, Inc. Manufactured in the USA...
-
Page 2: Symbol Meanings
INTRODUCTION Thank you for purchasing the EZ-ACCESS TILT® Toilet Incline Lift (TILT). Please read these instructions entirely before installing or using your new TILT. After installation, it’s important that you raise and lower the TILT 3-4 times, without sitting on the seat, to learn its functionality. -
Page 3: Box Contents
WARNING! Rated load: 325 lbs. NEVER EXCEED RATED LOAD. Use the TILT only with a qualified helper. Manufacturer recommends professional installation and maintenance. Read this manual in its entirety before installation. Understand and learn the location and function of all the features, safety devices, and labels before operating. -
Page 4: Hardware Contents
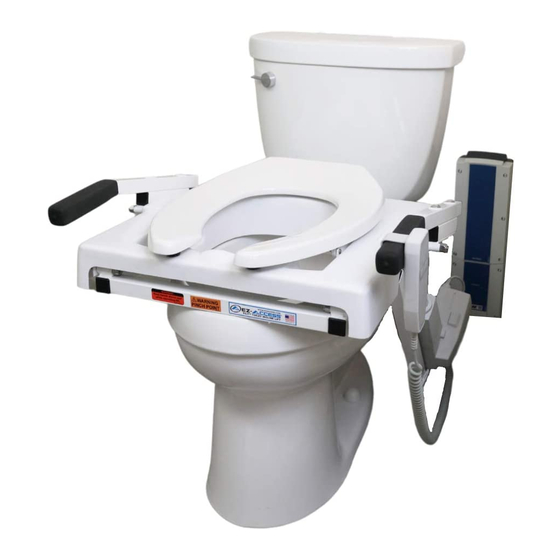
HARDWARE CONTENTS DESCRIPTION VISUAL PLASTIC TOWER NUT WASHER FLAT .375 X .875 X .06 TEFLON BOLT HEX .375-16 X 1.75 GRADE 18-8, PARTIAL THREAD OVERVIEW REFERENCE DESCRIPTION PLASTIC SHIELD - REMOVABLE TOILET SEAT – STANDARD SEAT SHOWN HANDLES WITH FOAM GRIP LINEAR ACTUATOR –... -
Page 5: Getting Started
GETTING STARTED Before installation, ensure that there is enough space for proper TILT operation. Six inches is needed on either side of the toilet bowl, and 7-1/2 inches is needed in front of the bowl. INSTALLATION 1. FRAME INSTALLATION Remove the existing seat and lid from the toilet bowl, and then set aside. - Page 6 CONTROL MOUNT With the TILT frame bolted to the toilet, pull the two handles ① forward until the seat is fully raised and slightly overextend (this will allow the seat to stay in the “up” position while the motor is being placed and mounted). For clarity, image is shown without Linear Actuator attached.
- Page 7 LINEAR ACTUATOR Using the blue dots on upper actuator bracket ③ and linear actuator ④ as guides, hold linear actuator ① and lower the seat to align the control mount slot with the top of the actuator bracket ②. Once aligned, fully insert the pin into actuator arm until it stops.
- Page 8 TEST TILT ACTION Plug the 120VAC TILT cord into a properly grounded GFCI protected outlet. If you are unsure if you have a properly grounded GFCI outlet, contact an electrician for assistance. Do not remove the round grounding prong from any plug. 4.
- Page 9 6. CLEANING For hygiene and safety, proper cleaning and inspection of the TILT is essential. Do NOT use toilet bowl cleaner to clean the TILT or any of its components. Carefully remove 120V plug from the wall. To access the removable plastic shield, use the push button control to raise the TILT into its “up” position. 6.4.1 Remove the plastic shield by grabbing it from the front and pulling upward then forward until the shield slides off from the support rollers.
Need help?
Do you have a question about the TiLT Toilet Incline Lift and is the answer not in the manual?
Questions and answers