WEG MVW3000 Series User Manual
Medium voltage frequency inverter
Hide thumbs
Also See for MVW3000 Series:
- Programming manual (264 pages) ,
- Programming manual (218 pages)

Subscribe to Our Youtube Channel
Related Manuals for WEG MVW3000 Series


Summary of Contents for WEG MVW3000 Series
- Page 1 User's Manual Series: MVW3000 Language: English Document: 10004823674 / 00 Please take this page out when unpacking the product 13941741...
- Page 3 Motors I Automation I Energy I Transmission & Distribution I Coatings Medium Voltage Frequency Inverter MVW3000 User's Manual...
- Page 5 User’s Manual Series: MVW3000 Language: English Document: 10004823674 / 00 Publication Date: 03/2017...
- Page 6 Summary of Reviews Version Review Description First edition...
-
Page 7: Table Of Contents
Contents 1 SAFETY NOTICES ................1-1 1.1 SAFETY NOTICES IN THE MANUAL ..................1-1 1.2 SAFETY NOTICES ON THE PRODUCT ..................1-1 1.3 PRELIMINARY RECOMMENDATIONS ..................1-2 2 GENERAL INFORMATION ..............2-1 2.1 ABOUT THIS MANUAL .......................2-1 2.2 MVW3000 IDENTIFICATION LABEL ..................2-2 2.3 RECEIVING AND STORAGE.......................2-2 2.4 HOW TO SPECIFY THE MVW3000 MODEL ................2-3 2.4.1 Available Models .......................2-5 3 PRODUCT CHARACTERISTICS ............3-1... - Page 8 Contents 7 OPTIONAL ACCESSORIES AND BOARDS ........7-1 7.1 MVC4 SIGNAL AND CONTROL CONNECTIONS ..............7-1 7.2 FUNCTION EXPANSION BOARDS ....................7-5 7.2.1 EBA (I/O Expansion Board A) ...................7-5 7.2.2 EBB (I/O Expansion Board B) ...................7-9 7.2.3 PLC2 ...........................7-12 7.3 INCREMENTAL ENCODER ......................7-14 7.3.1 EBA/EBB Boards .......................7-14 7.3.2 EBC1 Board ........................7-16 7.4 SHORT UPS MODULE ........................7-19...
-
Page 9: Safety Notices
This manual presents all the functions and parameters of the MVW3000. However, it is not intended to present all the possible applications of the MVW3000. WEG will not take any liabilities for applications not described in this manual. 1.1 SAFETY NOTICES IN THE MANUAL... -
Page 10: Preliminary Recommendations
If necessary, touch the grounded metallic frame before or use an adequate grounded wrist strap. Do not perform any high pot tests with the inverter! If it is necessary consult WEG. NOTE! Frequency inverter may interfere with other electronic equipment. In order to reduce these effects, take the precautions recommended. - Page 11 Safety Notices DANGER! This product was not designed to be used as a safety element. Additional measures must be taken so as to avoid material and personal damages. The product was manufactured under strict quality control, however, if installed in systems where its failure causes risks of material or personal damages, additional external safety devices must ensure a safety condition in case of a product failure, preventing accidents.
- Page 12 Safety Notices 1-4 | MVW3000...
-
Page 13: General Information
MVW3000 supplied. The MVW3000, as well as other WEG products, is in constant evolution in relation to both its internal parts (hardware) and its programming (software/firmware). Any question about the equipment and its documentation can be answered by means of WEG communication channels. -
Page 14: Mvw3000 Identification Label
General Information 2.2 MVW3000 IDENTIFICATION LABEL The MVW3000 identification label is positioned in the inner part of the Control Panel of the product. This label describes important information about the inverter. Figure 2.1: MVW3000 identification label (example) 2.3 RECEIVING AND STORAGE The MVW3000 is supplied with the power cells separate from the panel and packed in sets of three cells per package. -
Page 15: How To Specify The Mvw3000 Model
General Information 2.4 HOW TO SPECIFY THE MVW3000 MODEL Table 2.1: MVW3000 Code Lettering Line Code Example MVW3000 A0140 V063 (¹) MVW3000 | 2-3 MVW3000 | 2-3... - Page 16 Modbus RTU (incorporated software) via RS-485 serial interface Fieldbus Networks Profibus DP or DeviceNet via additional kits Ethernet and Profinet Protections (memory See fault in the programming manual available for download on: www.weg. net of the last 100 faults/ SAFETY alarms with date and time)
-
Page 17: Available Models
TECHNICAL DATA on page 4-1, Figure 4.3 on page 4-3 Table 4.2 on page 4-3 Table 4.8 on page 4-4. For models with rated voltage above 8000 V, contact WEG. Table 2.3: MVW3000 2300 V models Rated Dissipated Dissipated Motor Rated Power... - Page 18 General Information Table 2.4: MVW3000 3300 V models Nominal Rated Dissipated Dissipated Motor Rated Power Frame Models Voltage Current Power Power Flow Size [kW] [kW] [HP] [kW] MVW3000 A0040 V033 7.21 6.15 MVW3000 A0050 V033 9.02 7.69 MVW3000 A0060 V033 10.82 9.23 MVW3000 A0070 V033...
- Page 19 General Information Table 2.7: MVW3000 6300 V models Nominal Rated Dissipated Dissipated Motor Rated Power Frame Models Voltage Current Power Power Flow Size [kW] [kW] [HP] [kW] MVW3000 A0040 V063 13.77 11.74 MVW3000 A0050 V063 17.22 14.68 MVW3000 A0060 V063 20.66 17.62 MVW3000 A0070 V063...
- Page 20 General Information Table 2.10: MVW3000 8000 V models Nominal Rated Dissipated Dissipated Motor Rated Power Frame Models Voltage Current Power Power Flow Size [kW] [kW] [HP] [kW] MVW3000 A0040 V080 17.49 14.91 MVW3000 A0050 V080 21.86 18.64 MVW3000 A0060 V080 26.23 22.37 MVW3000 A0070 V080...
-
Page 21: Product Characteristics
Product Characteristics 3 PRODUCT CHARACTERISTICS A brief theoretical explanation about the operation and a simplified electrical scheme of the power cells and their connections are presented below. The basic operation of the control system is presented at the end of this chapter. - Page 22 Product Characteristics The transformer configuration is made in star – extended delta, with phase-shifting angles j° between the secondary windings of one same phase. The main primary windings (star connection) and the auxiliary input windings (also star) do not present phase shifting between each other. The transformer is designed according to the number of cells used on the inverter.
-
Page 23: Power Cells
Product Characteristics Figure 3.2: Input transformer of the 18-cell MVW3000 (Frame B6) Physically, the cells that form phases U, V and W are connected to the main transformer according to Figure 3.3 on page 3-3. U phase cells V phase cells W phase cells Figure 3.3: Cell connection area of each phase The transformer has its own panel, being thus totally integrated to the MVW3000. - Page 24 Product Characteristics 24 V 15 V Local control Measurement Supply Fiber optic Figure 3.4: Basic diagram of a power cell IGBT (Insulated Bipolar Gate Transistor) controlled semiconductor devices are used to implant the inverter bridge in H; thus, each power cell has four IGBTs in the configuration shown above. During operation, the voltage between FA and NE output terminals has three possible voltage levels.
-
Page 25: Connection Of The Cells
Product Characteristics 3.3 CONNECTION OF THE CELLS To form a three-phase output, a number “n” of power cells that operate with 690 “V ” of output are rms grouped in series per phase. The cell sets that represent phases U, V and W are connected in star configuration, with a floating neutral in common with the phases, as indicated in Figure 3.5 on page 3-5. - Page 26 Product Characteristics Input switchgear command Fiber optic xº xº Input MT 3~ xº yº yº Currents (S andT) yº Voltages (R, S and T) zº zº Pre-load 220 V zº 380 V 400 V 415 V Line BT 3~ 440 V 220 V...480 V 440 V 220 V...
- Page 27 Product Characteristics +3 V +2 V -2 V -3 V Figure 3.7: Wave form of the phase voltage for a CHB of 3 cells per phase The diagram also shows the medium voltage input switchgear, the low voltage auxiliary winding to perform the pre-charge of the cell capacitors, as well as the fiber optic interface between the main control and the local control of the power cells.
-
Page 28: Control
Product Characteristics 3.4 CONTROL The MVW3000 has protections against overload, short circuit, current limit, under and overvoltage, overtemperature, ground fault and monitoring of the individual faults of each power cell. The control type can be selected by the user between: scalar control (constant V/f ratio) or vector control (sensorless or with feedback by speed sensor). -
Page 29: Technical Data
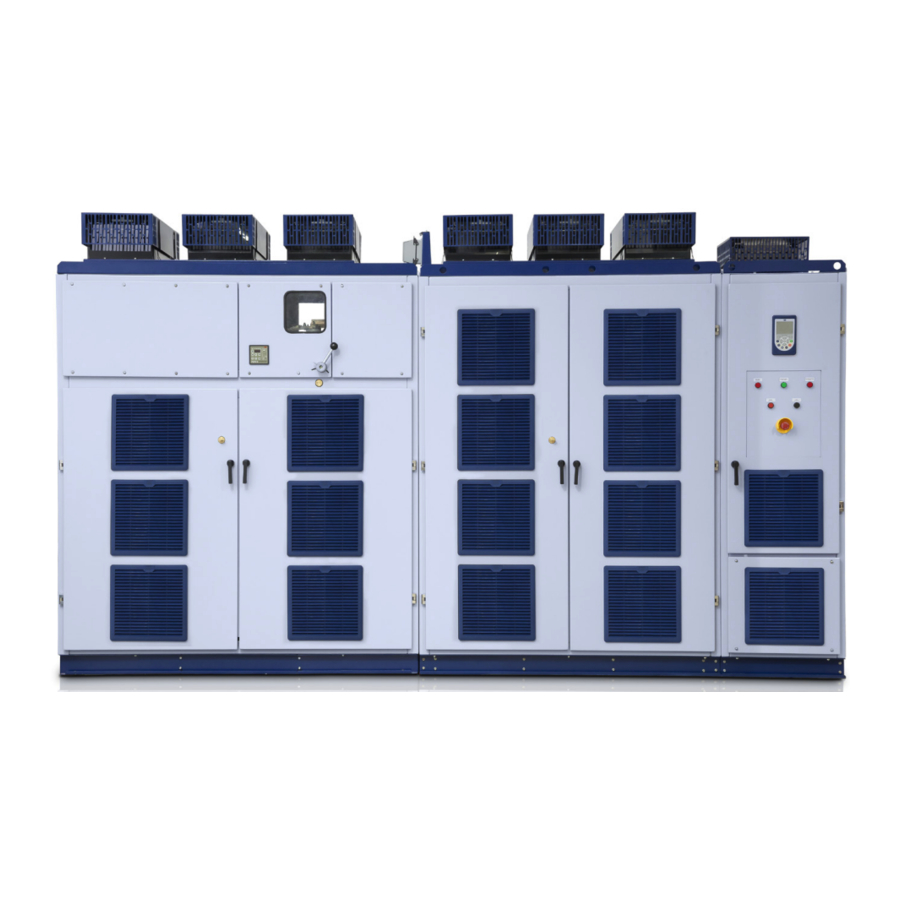
Technical Data 4 TECHNICAL DATA This chapter contains technical information on the MVW3000, cabinet details, input transformer, power cell and control rack. It also provides information about the available output filters for the MVW3000. 4.1 MVW3000 PANEL The MVW3000 is assembled as coupled panels forming four distinct compartments. In the first column of the panel, to the left, are the input safety devices, such as fuses and the input circuit breaker/contactor (if installed). -
Page 30: Panel Constructive Aspects
The panel is made with steel sheets painted and processed (cutting, holes, folding, chemical treatment, painting and finishing) by WEG, ensuring the quality in all the levels of the manufacture process. The inverter parts that are not painted are zinc plated or have another suitable treatment in order to assure their resistance against corrosion. - Page 31 Technical Data Filter cleaning or replacement can be done by removing the external grid with no need to open the doors and to interrupt the inverter operation. The internal grid with openings smaller than 10 m prevents the access to the medium voltage compartment.
-
Page 32: Power Cells
Technical Data Table 4.4: Frame sizes available for 4160 V MVW3000 Weight Frame size [mm] [mm] [mm] L [mm] H [mm] [mm] P [mm] kg (lb)a [kg] 3550 (7826) 1800 1500 3900 2063 2405 1100 4500 (9920) Table 4.5: Frame sizes available for 5500 V MVW3000 Weight Frame size [mm]... - Page 33 Technical Data Table 4.9: Dimensions of the different frames available Weight Frame Size H = Height (mm) W = Width (mm) L = Length (mm) kg (lb) 35 (77.16) 40 (88.18) The power cells may also contain a bypass system, at the costumer’s discretion, which provides greater safety and robustness for the applications.
-
Page 34: Power Cell Boards And Connections
Technical Data 4.2.2 Power Cell Boards and Connections The electrical connection inside the cell is done by means of laminated busbars, insulated between each other by means of insulating material compatible with the applied voltage level. RX/TX fiber optic Local controll Supply Gate driver Gate driver... -
Page 35: Output Filters
200 and 500 m, it is recommended to use output filter on the motor phases. For drives with long cables, above 500 m, or for motors not able to operate with PWM modulation (retrofitting applications), it is recommended to use filter type 2 (contact WEG). The available filter models follow the voltage and current informed in Table 2.3 on page 2-5... - Page 36 Technical Data Inverter Shield cables Motor Ground loop (a) Filter type 1, for applications with cable length between 200 and 500 m. Inverter Shield cables Motor Ground loop (b) Filter type 2, for applications with cable length above 500 m and retrofitting. Figure 4.8 (a) and (b): Output filters for MVW3000 inverters 4-8 | MVW3000...
-
Page 37: Synchronous Motor Line
Synchronous Motor Line 5 SYNCHRONOUS MOTOR LINE In order to allow driving synchronous motors, the MVW3000 introduces a number of software functions and new hardware elements for commanding and controlling these motors. Figure 5.1 on page 5-1 presents the general diagram for driving the synchronous motor using the MVW3000. For more details on the excitation control system and the direct connection of the motor to the line, refer to the electrical project of the inverter. -
Page 38: Rssi Board
Synchronous Motor Line Clock Data BIT 13 BIT 12 BIT 11 BIT 0 Zero Par. Zero Parity Figure 5.2: Clock specification and data transfer for the absolute encoder Supply voltage of 15 V, with consumption lower than 300 mA. Resolution of 14 bits per turn, which ensures a dynamic equivalent to the conventional incremental encoder; When mounting the encoder next to the motor, it is recommended: Coupling the encoder directly to the motor shaft (using a flexible coupling, however without torsional flexibility). - Page 39 Synchronous Motor Line Encoder Connector RSSI-XC2 Connector Description CLK + CLK + Signals MVW3000 RSSI Blue CLK - CLK - board Encoder Gray DATA + DATA + Pink Absolute DATA - DATA - White Power supply XC2 connector Brown DGND DGND Reference (DB0 - Male)
-
Page 40: Field Excitation Set (Dc With Brushes)
Chapter 5 SYNCHRONOUS MOTOR LINE on page 5-1 of this manual refers to the operation of synchronous machines with DC excitation and with brushes. In order to drive synchronous machines with other types of excitation, consult WEG. 5-4 | MVW3000... -
Page 41: Installation, Connection And Energization
The handling of the MVW3000 and its mechanical and electrical installation must be carried out „ by persons trained and qualified by WEG. STORAGE OF THE MVW3000 PANEL AND CELLS: After receiving the equipment, remove the plastic film in order to prevent moisture condensation. -
Page 42: Handling Recommendations
Installation, Connection and Energization Allowed environmental conditions: Temperature: from 0 ºC to 40 ºC (32 ºF to 140 ºF) - nominal conditions (no derating required). „ From 40 ºC to 50 ºC (140 ºF to 122 ºF): current reduction of 2.5 % for each Celsius degree above 40 ºC (140 ºF). „... -
Page 43: Moving
Contact your local WEG representative in case of any irregularity. Removes the package of the cells carefully, because they have fragile components (electronic boards, fiber optic connectors, busbars, wiring, etc.). -
Page 44: Positioning/Mounting
Contact the carrier and formally fill in a complaint with the problem found. „ Take pictures of the damaged parts. „ Contact your WEG representative or service. „ Figure 6.2: Standard power cell with package 6.1.6 Positioning/Mounting The MVW3000 panel must be placed on a flat leveled surface, thus avoiding mechanical instability, door misalignment, among other problems. - Page 45 It is necessary to allow space behind the panel for back access to the internal components during the product installation. Detail Y Notes: (1) Extracted from the WEG TBG-269a standard. Panel 3/8"x3,3/4" expansion bolt (2) Orientative instructions. Refer to the customer’s base specific project.
-
Page 46: Insertion Of The Power Cells
Installation, Connection and Energization 6.1.7 Insertion of the Power Cells Figure 6.4: Inserted power cell Figure 6.5: Power arm insertion/extraction/movement trolley ATTENTION! During the power arm transport, they must have the locking mechanism active and be transported close to the floor. (Figure 6.6 on page 6-8 - picture 1). - Page 47 Installation, Connection and Energization The power arm insertion must be performed with the help of the transport trolley as shown in Figure 6.5 on page and according to the following procedure. 1. Rotate the crank handle until the trolley reaches the floor level. 2.
-
Page 48: Electrical And Fiber Optic Connections On The Power Cells
Installation, Connection and Energization Figure 6.6: Details of the cell insertion step 6.1.8 Electrical and Fiber Optic Connections on the Power Cells After the power cells are inserted (phases U, V and W), connect them to the fiber optic cables, according to the labels located on the cells and cables. - Page 49 Installation, Connection and Energization Table 6.2: Fiber optic cables identification Power Cell Main Control Function Connection Connection N5_UA1 N1_UA1 N6_UA1 N2_UA1 N7_UA1 N3_UA1 N8_UA1 N4_UA1 N5_UB1 N1_UB1 N6_UB1 N2_UB1 N7_UB1 N3_UB1 N8_UB1 N4_UB1 N5_VA1 N1_VA1 N6_VA1 N2_VA1 N7_VA1 N3_VA1 N8_VA1 N4_VA1 N5_VB1 N1_VB1...
-
Page 50: Electrical Installation
Installation, Connection and Energization Figure 6.7: Details of the power arm supply and fiber optic cables installation stages ATTENTION! The fiber optic cables must be handled with care so as the material is not crushed, bent or cut. In order to insert or remove the cables, exert force on the connectors only, never on the fiber. NOTE! In order to extract the power cells, follow the procedures described in the previous sections in the reverse order. - Page 51 Installation, Connection and Energization MVW3000 Inverter MV Input Shield Figure 6.8: Power and ground connections Table 6.5 on page 6-11 contains the minimum insulation voltages of the inverter power cables. Table 6.5: Minimum insulation voltage of the power cables Rated Voltage [kV] Minimum Insulation Voltage [kV] 3.6/6 3.3, 4.16 and 5.5...
-
Page 52: Input Cubicle
Installation, Connection and Energization DANGER! Il est obligatoire de connecter l’onduleur à un connecteur de mise à la terre (PE). La connexion de mise à la terre doit suivre les règlementations locales. Utilisez au moins des conducteurs avec le calibre de fil indiqué dans le Table 6.4 on page 6-10. -
Page 53: Low Voltage Auxiliary Supply
Installation, Connection and Energization Line INPUT CONTACTOR PANEL Contactor Minimum voltage coil Command (U<) power supply MVW3000 X10: X12: 220 Vac Inverter +24 V ready Transformer PS24 Fault Inverter Emergency Ready 220 Vac Feedback Commands Notes: (1) 24 Vdc wiring: use shielded cables and keep them distant from power and command wiring. (2) 220 Vac wiring: keep it distant from the power wiring. -
Page 54: Energization, Start-Up And Safe De-Energization
Installation, Connection and Energization 3~380 V Primary Taps Voltage 220 V H1-H2-H3 H4-H5-H6 380 V 3~220 V 400 V H7-H8-H9 H10-H11-H12 415 V H13-H14-H15 440 V H16-H17-H18 460 V 480 V H19-H20-H21 480/460/440/415/400/380/220-220 V 3000 VA Figure 6.11: Auxiliary power supply 6.3 ENERGIZATION, START-UP AND SAFE DE-ENERGIZATION This section provides the following information: How to check and prepare the inverter before powering-up. -
Page 55: Initial Power-Up (Parameter Settings)
Installation, Connection and Energization 1. Check if all the power, grounding and control connections are correct and tightened. 2. Clean the inverter internally, remove all packing material and installation residues from within the MVW3000 cabinets. 3. Check all motor connections and verify whether its voltage, current and frequency match the inverter specifications. - Page 56 In the case above, see the description of the parameters in the programming manual available for download on: www.weg.net. 3. In case some DC link overvoltage fault occurs during the deceleration, it will be necessary to increase the deceleration time through P0101/P0103 and check P0151.
-
Page 57: Safe De-Energization Instructions
Installation, Connection and Energization ATTENTION! If the inverter receives a general enabling or a start command before the pre-charge has been finished (inverter still in undervoltage state), the command will be ignored and a warning message “inverter undervoltage” will be displayed on the HMI. 6.3.4 Safe De-energization Instructions DANGER! Although the inverter commands the opening of the input cubicle, there is no guarantee of its opening... - Page 58 Installation, Connection and Energization 6-18 | MVW3000...
-
Page 59: Optional Accessories And Boards
Optional Accessories and Boards 7 OPTIONAL ACCESSORIES AND BOARDS 7.1 MVC4 SIGNAL AND CONTROL CONNECTIONS The signal (analog inputs/outputs) and control (digital inputs/outputs and relay outputs) connections are made at the following terminal strips on the MVC4 control board (refer to the Figure 7.1 on page 7-1). - Page 60 Optional Accessories and Boards Terminal Strip Factory Standard Function Specifications XC1A 24 Vdc Supply for the digital inputs Isolated 24 Vdc ±8 %, capacity: 90 mA Start / Stop 6 isolated digital inputs Direction of rotation (remote) Minimum high level: 18 Vdc No function Maximum low level: 3 Vdc Maximum voltage: 30 Vdc...
- Page 61 Optional Accessories and Boards Terminal Strip Factory Default Function Specifications XC1B + REF Positive reference for potentiometer +5.4 V ±5 %, capacity: 2 mA AI1+ Analog input 1: speed reference Differential, resolution: 10 bits, (remote mode) Impedance: 400 kΩ [0 to 10 V] AI1- 500 Ω...
- Page 62 6. When an external keypad (HMI) is used (for further information, refer to the programming manual available for download on: www.weg.net), separate the cable that connects the keypad to the inverter from other cables of the installation, keeping a minimum distance of 10 cm (4 in) between them.
-
Page 63: Function Expansion Boards
Optional Accessories and Boards 7.2 FUNCTION EXPANSION BOARDS The function expansion boards increase the MVC4 control board functions. There are 3 expansion boards available and their selection depends on the application and the desired functions. The three boards cannot be used simultaneously. - Page 64 Analog output 3: Speed programming manual available for download AGND 0 V reference for analog output on: www.weg.net (internally grounded) Resolution: 14 bits (0.006 % of ±10 V range) Required load (Rc) ≥ 2 kΩ Analog output 4: Motor current...
- Page 65 Optional Accessories and Boards 4. Press on the EBA board (near to XC3) and on the left top edge until the complete insertion of the connector and the plastic spacer. 5. Secure the board to the 2 metallic spacers with the 2 provided bolts. 6.
- Page 66 Optional Accessories and Boards EBA board MVC4 board XC11 XC11 M3 x 8 mm bolt Torque 1 Nm Figure 7.8: EBA board installation procedure Table 7.4: EBA board configuration of setting elements Switch Signal – Factory Default OFF (Standard) ( 0 to 10) V (0 to 20) mA or (4 to 20) mA S2.1 Al4 - Speed Reference...
-
Page 67: Ebb (I/O Expansion Board B)
Optional Accessories and Boards 7.2.2 EBB (I/O Expansion Board B) The EBB board can be supplied in different configurations, created from the combination of specific functions. The available functions are presented in the Table 7.6 on page 7-9. Table 7.6: EBB board versions and available features EBB Board Models - Code Available Features EBB.01... - Page 68 Scales: see the description of parameters Analog output 1: speed P0251 and P0253 in the programming manual AGND available for download on: www.weg.net 0 V reference for analog output (P0251 and P0253) (internally grounded) Resolution: 11 bits (0.5 % of full scale range) Required load ≥...
- Page 69 Optional Accessories and Boards 2. Configure the board via S4, S5, S6 and S7 DIP switches (refer to the Table 7.7 on page 7-12). 3. Carefully insert XC3 connector (EBB) into the female connector XC3 on the MVC4 control board. Make sure that all pins fit in the XC3 connector.
-
Page 70: Plc2
Optional Accessories and Boards XC11 XC11 Figure 7.12: EBB board installation procedure Table 7.7: EBB board DIP switch configurations Switch Signal – Factory Default ( 0 to 10) V (0 to 20) mA or (4 to 20) mA S4.1 Al3 - Speed reference S5.1 and S5.2 AO1 - Speed (0 to 20) mA... - Page 71 Optional Accessories and Boards XC82 S1 NO XC81 XC11 XC10 Figure 7.13: PLC2 connectors The connectors and their terminals function are described below. XC21 Connector: Relay Outputs and Digital Inputs XC21 Connector Function Specification Contact capacity: Digital relay outputs 250 Vac COM DO Reference for digital outputs DO4, DO5, DO6 Load...
-
Page 72: Incremental Encoder
Optional Accessories and Boards XC22 Connector: Transistor Outputs and Digital Inputs XC22 Connector Function Specificationss PTC1 Motor thermistor input Actuation: 3.9 k Release: 1.6 k PTC2 Minimum resistance: 100 Ω Reference for the power supply of the GND ENC encoder input Controlled 5 Vdc or (8 to 24) Vdc Encoder input + ENC... - Page 73 During the commissioning, it is necessary to program the control type, P0202 = 4 (Vector with Encoder), in order to operate with speed feedback via incremental encoder. For further details on vector control, see the programming manual available for download on: www.weg.net. The function expansion boards EBA and EBB have an encoder signal repeater, isolated and externally powered.
-
Page 74: Ebc1 Board
Optional Accessories and Boards MVW3000 EBA or EBB board XC8 connector Description Encoder signals Line driver differential (88C30) Average current: 50 mA high level Supply XC8 connector (female DB9) COM 1 0 V reference Ground (*) Connection of the external power supply: 5 V to 15 V, consumption: 100 mA @ 5 V not including the outputs. - Page 75 Optional Accessories and Boards GND * CH.A CH.B XC10 Figure 7.19: EBC1 board layout NOTE! The terminals XC10:22 and XC10:23 (see Figure 7.19 on page 7-17), should only be used for encoder supply, when the encoder power supply is not coming from the DB9 connector. EBC1 board MVC4 board Figure 7.20: EBC1 board installation procedure...
- Page 76 During the commissioning, it is necessary to program the control type, P0202 = 4 (Vector with Encoder), in order to operate with speed feedback via incremental encoder. For further details on vector control, see the programming manual available for download on: www.weg. net.
-
Page 77: Short Ups Module
Optional Accessories and Boards NOTE! The maximum allowed encoder signal frequency is 100 kHz. Sequence of the encoder signals: Motor running in forward direction Figure 7.23: Encoder signals 7.4 SHORT UPS MODULE The Short UPS module is an accessory that provides autonomy of approximately 500 ms in case of failure of the MVW3000 inverter auxiliary power supply. -
Page 78: Mvc3 Control Board Connections
Optional Accessories and Boards 7.5 MVC3 CONTROL BOARD CONNECTIONS XCP1 XCP2 Figure 7.24: MVC3 board connections Table 7.10: XC9 terminal strip connections XC9 Terminal Strip Factory Standard Function Specifications +5V4 Positive reference for potentiometer +5.4 V ±5 % capacity: 2 mA AI1- Differential, resolution 11 bits Analog input 1: 0 - no function (P0740) -
Page 79: Special Functions
Special Functions 8 SPECIAL FUNCTIONS 8.1 LOAD SHARE FUNCTION “MASTER/SLAVE” Conveyors belts and overhead cranes are classic examples of applications where the torque or position control is used to maintain the conveyor belt voltage within the limits during the operation, start and stop procedures or even in the transportation of materials in a rising of falling slope. - Page 80 Special Functions Slave(s): On the slave inverter(s), it is necessary to parameterize an analog input of MVC3 board to receive the torque reference sent by the master inverter. P0740 (Analog Input 1 Function) = 1 (Torque reference). NOTE! Observe the polarity of the analog ones at the moment of the connection between the inverters. Limitation of the Torque Current - Operation in Vector Mode As in the previous mode, the master inverter operates in speed control mode, while the slave inverter operates in torque current regulation mode.
-
Page 81: Synchronous Transfer Function
The description given of the ways to implement the load sharing function intends neither to approach all possibilities of implementation, nor to detail all the aspects involved. The definition of the best implementation mode for a certain application, as well as the optimal adjustment of each mode must be defined by WEG engineering and application teams. - Page 82 Special Functions Line contactor (Bypass) MVW3000 Line AC Input Transformer Bypass Inverter Inverter cubicle reactor contactor Figure 8.4: General scheme of synchronous transfer Basic Settings The synchronous transfer process involves accelerating the motor up to the rated speed, synchronizing the voltage imposed to the motor with the line voltage, and making the transfer to the line.
-
Page 83: Cell Bypass
Special Functions P0636 = adjusted in the application - Parameter used to compensate the phase error between the voltage „ that the inverter uses as reference for the synchronism and the actual voltage in the point where the motor will be connected to the line. -
Page 84: Angle Adjustment
Special Functions Figure 8.6: Power cell with bypass system active Figure 8.6 on page 8-6 exemplifies the power cell operation with the bypass system active. The current of the respective phase passes through the bypass system, and the cell no longer processes any energy. Therefore, the inverter current capacity, when in bypass mode, is not reduced. - Page 85 Special Functions 120º 120º 135,5º 89º 120º 120º 120º 3 cells of phase W in bypass (b) Angle adjustment (c) Under normal operation -0.5 √3 √3/2 -√3/2 -√3 Figure 8.7: Phase (center) and line (below) voltage diagrams during a bypass The graph of Figure 8.8 on page 8-7 shows the line voltage obtained (in p.u) after the bypass of only one cell,...
- Page 86 Special Functions Table 8.1 on page 8-8 Table 8.7 on page 8-9 exemplify the number of cells in operation at each phase and the reduction in the line voltage available for the indicated situation. Only the cases where the line voltage reduction is smaller than or equal to 20 % the rated one are indicated.
- Page 87 U, V or W. NOTE! For other possible configurations in bypass, contact WEG technical assistance. MVW3000 | 8-9 MVW3000 | 8-9...
- Page 88 Special Functions 8-10 | MVW3000...
-
Page 89: Communication Networks
Communication Networks 9 COMMUNICATION NETWORKS The MVW3000 can be connected to communication networks allowing its control and parameterization. Therefore, it is necessary to install an optional electronic board according to the desired Fieldbus standard. NOTE! The chosen Fieldbus option can be specified in the suitable field of the MVW3000 model coding. In such case, the MVW3000 will be supplied with all the necessary components already installed in the product. -
Page 90: Profibus Dp
Communication Networks 4. Press the board close to XC140 and on the bottom right corner until the complete insertion of the connector and the plastic spacer. 5. Secure the board to the metallic spacers with the provided bolt. 6. Connect one end of the Fieldbus cable to the MVW3000 control rack, according to the Figure 9.3 on page 9-2. - Page 91 Communication Networks Personal computer with RS-232 configuration Profibus DP software master Profibus DP Profibus DP slave node slave node Profibus DP slave node Figure 9.4: Profibus DP network Fieldbus Type: Profibus DP EN 50170 (DIN 19245). Physical Interface Transmission medium: Profibus busbar line, type A or B as specified in EN50170. „...
- Page 92 Communication Networks Node Address The node address is established by means of two rotating switches on the electronic Profibus DP board, allowing the addressing from 1 to 99. Looking at the board with the inverter in normal position, the leftmost switch sets the ten of the address, while the rightmost switch sets the units of the address: Address = (leftmost rotary switch x 10) + (rightmost rotary switch x 1).
-
Page 93: Devicenet
Communication Networks Table 9.3: Profibus DP network status LEDs Function Color It indicates the following faults on the Fieldbus side: Flashing 1 Hz - Configuration error: the IN/OUT area size set at board initialization is different from the size set during the network configuration. Fieldbus Flashing 2 Hz - Error in the user parameter data: the size/content of the user parameter data diagnostics... - Page 94 Communication Networks Line Termination The initial and the end points of the network must present the characteristic impedance, in order to prevent reflections. Thus a 121 Ω/0.5 W resistor must be connected between the terminals 2 and 4 of the Fieldbus terminal block.
-
Page 95: Devicenet Drive Profile
Communication Networks Table 9.5: DeviceNet network status LEDs Description Color Module Network Status Without supply Module Network Status Nonrecoverable fault Module Network Status Green Operational board Module Network Status Flashing red Minor fault Network Status Without supply/off-line Network Status Green Operative link, connected Network Status Link critical fault... -
Page 96: Variables Read From The Inverter
It presents the parameter P0012 contents, where 1 indicates an active input and 0 indicates an inactive input. For further information on parameters, refer to the programming manual available for download on: www.weg.net. The digital inputs of this WORD are distributed as follows: Bit.7 - DI1 status. -
Page 97: Variables Written In Inverter
Indication on the LCD : 130.0, Fieldbus reading is: 1300. The reading of parameter P0006 via Fieldbus has the meaning presented in the detailed description of the parameters, refer to the programming manual available for download on: www.weg.net. 5. Torque current: This position indicates P009 parameter contents, without the decimal point. - Page 98 Communication Networks NOTE! The inverter will only execute the command defined in the low-order bit if the correspondent high- „ order bit is set to 1 (one). If the high-order bit is set to 0 (zero), the inverter will disregard the value of the correspondent low-order bit.
-
Page 99: Error Indications
Communication Networks Bit.2 - RL1 status: idem. Bit.3 - RL2 status: idem. Bit.4 - RL3 status: idem. 4. Number of the parameters to be read: Through this position, the reading of any inverter parameter can be defined. The number of the parameter to be read must be programmed here, and its contents will be presented at the position 4 of the variables read from the inverter. -
Page 100: Mvw3000 Variable Addressing At The Fieldbus Devices
Communication Networks Example: Assuming that no digital output has been programmed for Fieldbus, then if the word 11h is written in the position 3, the inverter will respond indicating A127 in the Status Word. To remove this indication from the Status Word it is necessary: 1. - Page 101 Communication Networks The inverters have a software for the interface data transmission/reception control, to make it possible the receiving of data sent by the master as well as the transmission of data requested by it. The baudrate is 9600 bits/s, following an exchange protocol of the request/response type, using ASCII characters. The master will have the means to do the following operations regarding each inverter: IDENTIFICATION Network address.
- Page 102 Communication Networks PLC controlling the operation of an inverter in an industrial process. „ Description of the Interfaces The physical connection between the inverters and the network master is performed according to one of the standards below: 1. RS-232 (point-to-point, up to 10 m). 2.
-
Page 103: Protocol Definitions
Communication Networks Table 9.7: ASCII characters used in protocol ASCII CODE The connection between the network nodes is performed through a pair of wires. The signal levels are according to RS-485 EIA STANDARD, with differential receivers and transmitters. Expansion boards EBA.01, EBA.02 or EBB.01 (refer to Item 7.2.1 EBA (I/O Expansion Board A) on page 7-5 and the... - Page 104 Communication Networks Diagram: Inverter Serial connection Basic variables Master Variables Parameters Figure 9.11: Scheme of basic variables Parameter/Variable Resolutions During parameter reading/writing their decimal points are disregarded in the values received/sent via telegrams, whereas the basic variables V04 (Serial Reference) and V08 (Motor Speed) that are standardized as 13 bit (0 to 8191).
-
Page 105: Variable Code
Communication Networks 9.2.2 Variable Code V00 (code 00800): Inverter model indication (reading variable). The reading of this variable allows identifiying the inverter type. For the MVW3000, this value is 8, as follows: CODE Number of the basic variable or parameter Equipment number: "8"... - Page 106 Communication Networks C L 1 5 CL14 CL13 CL12 CL11 CL10 CL8: 1 = Enable ramp (run/stop). „ CL9: 1 = General Enable. „ CL10: 1 = Forward/Reverse. „ CL11: 1 = JOG. „ CL12: 1 = Local/Remote. „ CL13: Not used. „...
- Page 107 Communication Networks The inverter will enter this operation mode when it is powered-up for the first time or when the factory default „ parameters are loaded (P0204 = 5 or 6). In this mode only the parameters P0023, P0201, P0295, P0296, P0400, P0401, P0402, P0403 and P0406 will be accessible.
- Page 108 P0308 network (range from: 1 to 30) For further details on the parameters above, refer to the programming manual available for download on: www. weg.net. Errors Related to the Serial Communication They operate in the following way: The do not disable the inverter.
-
Page 109: Mvw3000 Special Parameters
Communication Networks Table 9.9: Incompatibility between parameters - F0083 Two or more parameters among P0264, P0265, P0266, P0267, P0268, P0296 and P0270 equal to (LOC/REM). Two or more parameters among P0265, P0266, P0267, P0268, P0269 and P0270 equal to 6 (ramp 2). P0265 equal to 8 and P0266 different from 8 or vice-versa (Forward Run / Reverse Run). - Page 110 Communication Networks Parameters of the Last Errors The registers with the information of the last ten errors (register 14, ..., 17, 60, ..., 65) have three words associated to each of them. The first read word brings the information of the occurred error number and of the inverter status at the moment it occurred.
-
Page 111: And Rs-485 Physical Connection
Communication Networks Tx: (data) MASTER TxD: (data) INVERTER RSND (request to send) proc Figure 9.12: Time of the telegrams exchanged between Master and Inverter Table 9.10: Reading and writing time Time Typical (ms) proc Reading Writing 9.2.4 RS-232 and RS-485 Physical Connection MVW3000 MVW3000 MVW3000... -
Page 112: Modbus-Rtu
Communication Networks The reference signal for the RS-485 interface (SREF) should be used if the master of the network is not referenced „ to the ground used in the installation. For instance, in case the master is fed by an isolated power supply, it is necessary to ground that power supply reference, or take this reference signal to the rest of the system. -
Page 113: Rtu Mode Message Structure
Communication Networks 9.3.1.2 RTU Mode Message Structure The Modbus-RTU network operates in the master-slave system, where up to 247 slaves may exist, but with just one master. Every communication begins with the master doing a request to a slave, and then the slave responds to the master what had been requested. -
Page 114: Operation Of The Mvw3000 In The Modbus-Rtu Network
Communication Networks result is returned to the CRC variable. 4. Repeat steps 2 and 3 until eight shifts have been done. 5. Repeat the steps 1 to 4, by using the next message byte until the whole message have been processed. The final content of the CRC variable is the CRC field value that is transmitted at the end of the message. - Page 115 Communication Networks Maximum distance: 10 meters. „ Signal levels according to EIA PADRÃO RS-232C. „ Three wires: transmission (TX), reception (RX) and return (0 V). „ RS-485: This interface is used for multipoint connection (several slaves and the master). „ Maximum distance: 1000 meters (using shielded cables).
- Page 116 Communication Networks Item 9.2.1 Protocol Definitions on page 9-15 defines the parameter and variable resolutions when transmitted via serial. Available functions and response times: In the Modbus-RTU protocol specification it is defined the functions used to access the type of registers described in the specification.
- Page 117 Communication Networks Table 9.12 on page 9-29 shows the bit, parameter and basic variable address: Table 9.12: Bit, parameter and basic variable address Parameters Modbus Address Parameter Number Decimal Hexadecimal P0000 P0001 P0100 Basic Variables Modbus Address Variable Number Decimal Hexadecimal 5000 1388h...
-
Page 118: Detailed Description Of The Functions
Communication Networks The command bits are available for reading and writing, and have the same function of the bits 0 to 7 of the Control Word (basic variable 3), without the necessity, however, of the mask use. Writing in the basic variable 3 has influence in the state of these bits. -
Page 119: Function 03 - Read Holding Register
Communication Networks Example: reading the status bits for general enable (bit 1) and Forward/Reverse (bit 2) of then MVW3000 at the address 1: Table 9.16: Example of telegram structure Request (Master) Response (Slave) Field Value Field Value Slave address Slave address Function Function Initial byte address (byte high) -
Page 120: Function 05 - Write Single Coil
Communication Networks 9.3.3.3 Function 05 - Write Single Coil This function is used to write a value to a single bit. The bit value is represented by using two bytes, where FF00h represents the bit that is equal to 1, and 0000h represents the bit that is equal to 0 (zero). It has the following structure (the values are always hexadecimal, and each field represents one byte): Table 9.19: Telegram structure Request (Master) -
Page 121: Function 15 - Write Multiple Coils
Communication Networks Table 9.22: Example of telegram structure Request (Master) Response (Slave) Field Value Field Value Slave address Slave address Function Function Register (byte high) Register (byte high) Register (byte low) Register (byte low) Value (byte high) Value (byte high) Value (byte low) Value (byte low) CRC-... -
Page 122: Function 16 - Write Multiple Registers
Communication Networks As only three bits are being written, the master needed only one byte to transmit the data. The transmitted values are in the three less significant bits of the byte that contains the value for the bits. The other bits of this byte remained with the value 0 (zero). - Page 123 Each object is formed by a sequence of ASCII characters. For the MVW3000 only basic information is available, composed by three objects: Object 00 - VendorName: Always ‘WEG’. „ Object 01 - ProductCode: Formed by the product code (MVW3000), plus the inverter rated current.
-
Page 124: Modbus Rtu Communication Error
In this example, the object values were not represented in hexadecimal, but using the corresponding ASCII characters. For the object 00, for instance, the value ‘WEG’ was transmitted as being three ASCII characters that in hexadecimal have the values 57h (W), 45h (E) and 47h (G). - Page 125 Communication Networks Table 9.30: Example of telegram structure Request (Master) Response (Slave) Field Value Field Value Slave address Slave address Function Function Register (high) Error code Register (low) CRC- Value (high) CRC+ Value (low) CRC- CRC+ MVW3000 | 9-37 MVW3000 | 9-37...
Need help?
Do you have a question about the MVW3000 Series and is the answer not in the manual?
Questions and answers