Table of Contents
Advertisement
Quick Links
Download this manual
See also:
Operating Manual
FROMM
SERVICE MANUAL FR3XX_FR4XX_EN01 Version 03_04 Robot_Rev02.doc
FROMM
SEMI – AUTOMATIC
SELF PROPELLING ROBOT Wrapping Machine
FR3xx/FR4xx Series
SERVICE MANUAL Robot Version 03/04
Rev.02
1
It is forbidden to duplicate this manual or parts of it in any way or any form without written permission of the author © 2017
www.fromm-stretch.com
Advertisement
Chapters
Table of Contents

Related Manuals for Fromm FR3 Series


Summary of Contents for Fromm FR3 Series
- Page 1 FROMM SERVICE MANUAL FR3XX_FR4XX_EN01 Version 03_04 Robot_Rev02.doc FROMM SEMI – AUTOMATIC SELF PROPELLING ROBOT Wrapping Machine FR3xx/FR4xx Series SERVICE MANUAL Robot Version 03/04 Rev.02 It is forbidden to duplicate this manual or parts of it in any way or any form without written permission of the author © 2017...
-
Page 2: Table Of Contents
FROMM SERVICE MANUAL FR3XX_FR4XX_EN01 Version 03_04 Robot_Rev02.doc INDEX Page Machine make - up General Safety instructions Safety devices Warnings Identification Sticker Technical Data Dimensions / Layout Explanation of pictograms Main Components Handeling & Transport Installation Instruction Assembly Sequence First switch on Robot... - Page 3 FROMM SERVICE MANUAL FR3XX_FR4XX_EN01 Version 03_04 Robot_Rev02.doc Opgelet! Leest U in elk geval de gebruiksaanwijzing, vooraleer de machine wordt opgesteld, geïnstalleerd en in gebruik genomen wordt. Daardoor zorgt U voor Uw eigen veiligheid en vermijdt U schade aan Uw machine.
-
Page 4: General
This manual is only intended for a semi-automatic pallet stretch wrapping machine, mentioned at page one, as delivered by FROMM Stretch Wrapping Division. FOR EVERYTHING IN THIS MANUAL IS VALID, IF APPLIED! ... -
Page 5: Safety Instructions
The following conditions have always to be satisfied, unless otherwise indicated in other instructions in this manual. This wrapping machine has been delivered by FROMM Stretch Wrapping Division and may only be applied for wrapping of pallets / products which meet the requirements as mentioned in the description of the machine in chapter TECHNICAL DATA. -
Page 6: Safety Devices
FROMM SERVICE MANUAL FR3XX_FR4XX_EN01 Version 03_04 Robot_Rev02.doc Examine the data-plates. lf they are in poor condition, replace them with utmost urgency, strictly and directly contacting the authorized technical service or the Manufacturer The requirements, as mentioned in chapter MAINTENANCE INSTRUCTIONS should be satisfied during adjustment and maintenance activities ... - Page 7 IN OBSERVANCE OF Machine Directive 2006/42/EC AND SUBSEQUENT AMENDMENTS AND EN23741, FROMM STRETCH DECLARES THAT THE NOISE EMITTED BY THE MACHINE IN QUESTION FALLS WITHIN THE LIMITS ESTABLISHED BY THE ABOVE MENTIONED REGULATIONS. ...
-
Page 8: Warnings
FROMM SERVICE MANUAL FR3XX_FR4XX_EN01 Version 03_04 Robot_Rev02.doc SAFETY DEVICES We urge on you again that all safety devices are installed for the safety of the operator etc. and should not be bridged and put out of operation. Refer to the drawing below for the applied references. - Page 9 FROMM SERVICE MANUAL FR3XX_FR4XX_EN01 Version 03_04 Robot_Rev02.doc WARNINGS The mean weighed noise level of the machine is less than 80 dBa. It is possible that, depending on the applied film, during wrapping of the pallets / products incidentally a noise level with a maximum of 80 dBa will be measured.
-
Page 10: Identification Sticker
SERVICE MANUAL FR3XX_FR4XX_EN01 Version 03_04 Robot_Rev02.doc EXPLANATION IDENTIFICATION STICKER An identification sticker with the following information has been mounted at the backside of the base-unit. Name of the manufacturer : FROMM Wrapping Systems s.r.l. Type : Machine type. Serialnr. : Production number of manufacturer. -
Page 11: Technical Data
FROMM SERVICE MANUAL FR3XX_FR4XX_EN01 Version 03_04 Robot_Rev02.doc TECHNICAL DATA Machine - Maximum speed machine 95 M/Min - Maximum speed carriage 3,4 M/Min - Capacity max. 20 pallets/hr. - Operational hours 8 hrs/day, 5 days/week - Sealing height FR3xx minimum of 2000mm / 78.74”... - Page 12 FROMM SERVICE MANUAL FR3XX_FR4XX_EN01 Version 03_04 Robot_Rev02.doc DIMENSIONS FR3xx/FR4xx Refer to the LAYOUT on this page for the dimensions. DIMENSIONS DURING WRAPPING It is forbidden to duplicate this manual or parts of it in any way or any form without written permission of the author © 2017...
-
Page 13: Explanation Of Pictograms
FROMM SERVICE MANUAL FR3XX_FR4XX_EN01 Version 03_04 Robot_Rev02.doc EXPLANATION OF PICTOGRAMS ATTENTION!! (FOR EVERYTHING IS VALID, IF APPLIED!) WARNINGS Figure 1: DANGER High voltage present. Fig 1 Figure 2: Danger Sign Fig 2 Figure 3: Risk of crushing one’s hands Fig 3... - Page 14 FROMM SERVICE MANUAL FR3XX_FR4XX_EN01 Version 03_04 Robot_Rev02.doc EXPLANATION OF PICTOGRAMS Figure 8: Do not use bare flames and do not smoke Fig 8 Figure 9: Don’t access the area while the machine is working Fig 9 Figure 10: Don’t remove the SAFETY DEVICES...
-
Page 15: Fig 15
Fig 15 Very important guidelines that must strictly be complied with. Otherwise machine operators could be at risk, the consequence of which would be the voiding of any form of warranty and liability on behalf of FROMM PACKAGING SYSTEMS. Figure 16: Operations that must never be performed. -
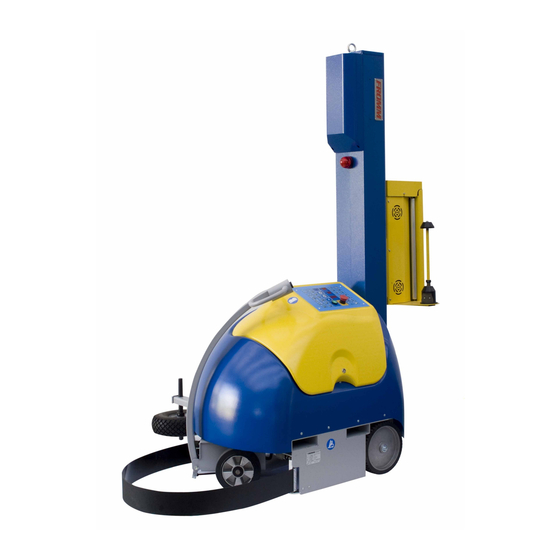
Page 16: Main Components
FROMM SERVICE MANUAL FR3XX_FR4XX_EN01 Version 03_04 Robot_Rev02.doc MAIN COMPONENTS The installation as delivered consists of the following parts: 1- Mast 2- Flash Light 3- Control cabinet with control panel 4- Film carriage 5- Robot cover incl. battery compartment and electronic switch board. - Page 17 FROMM SERVICE MANUAL FR3XX_FR4XX_EN01 Version 03_04 Robot_Rev02.doc HANDLING & TRANSPORT ATTENTION! All mentioned activities may only be executed under supervision of qualified personnel from the manufacturer or his representatives! Pay attention that proper hoisting and lifting tools are used for handling of the machine.
- Page 18 FROMM SERVICE MANUAL FR3XX_FR4XX_EN01 Version 03_04 Robot_Rev02.doc HANDLING & TRANSPORT Lifting and handling of packing in a wooden crate by fork-lift truck Lifting and transport must be affected by a fork-lift truck suitable to bear the weight of the machine, its accessories and packing.
-
Page 19: Installation Instruction
FROMM SERVICE MANUAL FR3XX_FR4XX_EN01 Version 03_04 Robot_Rev02.doc INSTALLATION INSTRUCTION ATTENTION! All mentioned activities may only be executed under supervision of qualified personnel from the manufacturer or his representatives! FOR EVERYTHING IS VALID: IF APPLIED! Refer to layout in SAFETY DEVICES for mentioned position numbers. - Page 20 FROMM SERVICE MANUAL FR3XX_FR4XX_EN01 Version 03_04 Robot_Rev02.doc INSTALLATION INSTRUCTION ATTENTION! All mentioned activities may only be executed under supervision of qualified personnel from the manufacturer or his representatives! During maintenance, repair or adjustment operations, the emergency buttons on the control panel must always be activated and the battery disconnected.
-
Page 21: Fig 1
FROMM SERVICE MANUAL FR3XX_FR4XX_EN01 Version 03_04 Robot_Rev02.doc ASSEMBLY SEQUENCE 1. Check the functionality of the EMERGENCY SWITCH (Fig 1) The machine is equipped with a safety device consisting of a series of electromechanical contacts that deactivate the motor when the emergency button is pressed. -
Page 22: Fig 1
FROMM SERVICE MANUAL FR3XX_FR4XX_EN01 Version 03_04 Robot_Rev02.doc ASSEMBLY SEQUENCE C4 Carriage: delivers film during wrapping adjusting the film application tension. The tension is adjusted by a roller fitted with an electromagnetic brake. The tension can be adjusted via the machine operating panel. -
Page 23: Fig 1
FROMM SERVICE MANUAL FR3XX_FR4XX_EN01 Version 03_04 Robot_Rev02.doc ASSEMBLY SEQUENCE C6 Carriage: Carriage with one motor pre-stretch system. The film can be pre-stretched by means of a mechanical control generated by a pair of gears (fixed mechanical ratio). The application tension is manually adjusted and controlled by a sensor which measures its value. - Page 24 FROMM SERVICE MANUAL FR3XX_FR4XX_EN01 Version 03_04 Robot_Rev02.doc ASSEMBLY SEQUENCE C7 Carriage: Film carriage with a two motor pre stretch system. Pre-Stretch can be changed by adjusting the settings on the operating panel The application tension is manually adjusted and controlled by a sensor which measures its value.
- Page 25 FROMM SERVICE MANUAL FR3XX_FR4XX_EN01 Version 03_04 Robot_Rev02.doc ASSEMBLY SEQUENCE 6. Adjustment reading arm The reading arm, on which the wheel that follows the outline of the product to be wrapped is mounted, is subject to two adjustments: Wheel height Undo the screw (1), raise or lower the wheel pin (2) as shown in the drawing, position the wheel so that it runs around the pallet without depressions and/or protrusions, then tighten the screw (1).
- Page 26 FROMM SERVICE MANUAL FR3XX_FR4XX_EN01 Version 03_04 Robot_Rev02.doc ASSEMBLY SEQUENCE 7. Steering force The arm steering or closure is controlled by a spring (3) coupled to a bracket (4) secured to the steering arm. The bracket (4) can be set in different positions (5) to adjust the spring tension.
- Page 27 FROMM SERVICE MANUAL FR3XX_FR4XX_EN01 Version 03_04 Robot_Rev02.doc ASSEMBLY SEQUENCE 8. Mast H.2500 – H.2800 (Fig 1) Lift the mast (1) coupling it with a rope. Put the mast in the support (2) of the base, screw the bolts inside the carter. Remove the rope. Connect the plug.
-
Page 28: First Switch On Robot
FROMM SERVICE MANUAL FR3XX_FR4XX_EN01 Version 03_04 Robot_Rev02.doc FIRST SWITCH ON ROBOT Connect batteries plug; Release the emergency button; Press “Reset”; Robot Version 04 will show you: A4 software for Robot 34 version of the software V3.4 567 rev b567 This happen when you switch on the program (the microprocessor show you the image up). - Page 29 FROMM SERVICE MANUAL FR3XX_FR4XX_EN01 Version 03_04 Robot_Rev02.doc BASIC OPERATING INSTRUCTIONS (Robot Version 03/04 until 31 November 2014) Keyboard block: Prevents modification of parameters by blocking the keys V+ e V- Hold down RESET and at the same time press F+ and F- The right-hand LED of the display V lights up and stays lit.
- Page 30 FROMM SERVICE MANUAL FR3XX_FR4XX_EN01 Version 03_04 Robot_Rev02.doc BASIC OPERATING INSTRUCTIONS (Robot Version 04 from 01 December 2014) Keyboard block: Blocking panel Software Version 3.6 In this sequence (3 step): F + “keep pressed” F - “keep pressed” Reset Keyboard release: Blocking panel Software Version 3.6...
-
Page 31: Errors During Operation
FROMM SERVICE MANUAL FR3XX_FR4XX_EN01 Version 03_04 Robot_Rev02.doc ERRORS DURING OPERATION THE ROBOT DOESN’T SWITCH ON Problem suggestion Possible solution Is hold the mushroom-head button Turn it off. Press the switch on ((Look the “CONTROL PANEL”, letter “A”) Batteries disconnected Connect the battery... - Page 32 FROMM SERVICE MANUAL FR3XX_FR4XX_EN01 Version 03_04 Robot_Rev02.doc THE ROBOT START TO WORK BUT THE CARRIAGE GO UP ONLY FOR A FEW CENTIMETER AND COMPLET THE CYCLE Problem suggestion Possible solution The photocell don’t read the pallet The pallet is low...
- Page 33 FROMM SERVICE MANUAL FR3XX_FR4XX_EN01 Version 03_04 Robot_Rev02.doc THE FILM TENSION DOES NOT CHANGE WITH CARRIAGE 2 Problem suggestion Possible solution Film feed in the wrong way Guide the film through the brake system according to the drawing on top of the carriage (Fig 1)
- Page 34 FROMM SERVICE MANUAL FR3XX_FR4XX_EN01 Version 03_04 Robot_Rev02.doc THE FILM TENSION DOES NOT CHANGE WITH CARRIAGE 6 Problem suggestion Possible solution Film feed in the wrong way Guide the film through the brake system according to the drawing on top of the carriage (Fig 1) Tension on the film doesn’t work properly...
- Page 35 FROMM SERVICE MANUAL FR3XX_FR4XX_EN01 Version 03_04 Robot_Rev02.doc THE FILM TENSION DOES NOT CHANGE WITH CARRIAGE 7 Problem suggestion Possible solution Film feed in the wrong way Guide the film through the brake system according to the drawing on top of the carriage (Fig 1 C6) Pre-stretch on the film doesn’t work properly...
-
Page 36: Alarms
FROMM SERVICE MANUAL FR3XX_FR4XX_EN01 Version 03_04 Robot_Rev02.doc ALARMS The V display is used for showing the alarms, noted at the same time by the flashing LED next to the key RESET: The right side LED will ONLY flash if there is a fault in the non-volatile parameters memory;... - Page 37 FROMM SERVICE MANUAL FR3XX_FR4XX_EN01 Version 03_04 Robot_Rev02.doc E04- FOOT CRUSHING EMERGENCY (Function not available with the robot) Problem suggestion Possible solution Foot crushing emergency doesn’t work properly Check the bridge between JP8 and E08- ENCODER BLOCK (The carriage is not moving)
- Page 38 FROMM SERVICE MANUAL FR3XX_FR4XX_EN01 Version 03_04 Robot_Rev02.doc E16- CARRIAGE DOOR OPEN Problem suggestion Possible solution The Carriage 2 and 4 are without door Check the bridge on the connection XC13 (for C2), XC12 (for C4), poles 5 and 7 The door in the Carriage 6 and 7 is open...
- Page 39 FROMM SERVICE MANUAL FR3XX_FR4XX_EN01 Version 03_04 Robot_Rev02.doc E33- DEAD BATTERY IN TRACTION Problem suggestion Possible solution The battery is discharge and the robot is in Recharge the battery, if the problem traction persist replace the battery THE BATTERY CHARGER SHOWS THE WORD “bat” (Version S.P.E. Robot)
-
Page 40: Diagnostic Inverter
FROMM SERVICE MANUAL FR3XX_FR4XX_EN01 Version 03_04 Robot_Rev02.doc DIAGNOSTIC INVERTER (From supplier of Inverter 4Q60A) The inverter is equipped with a diagnostic system capable of detecting the following operating anomalies visible through the flashing flash. N° Flash Problem suggestion Possible solution... - Page 41 FROMM SERVICE MANUAL FR3XX_FR4XX_EN01 Version 03_04 Robot_Rev02.doc Replacing EEPROM Remove the old EEPROM For this job you need: A chip extractor as show in this picture: In alternative a flat screwdriver 3mm Removing the old processor: You must turn off the machine and disconnect it from the power: doesn’t turn on the machine during this procedure.
- Page 42 FROMM SERVICE MANUAL FR3XX_FR4XX_EN01 Version 03_04 Robot_Rev02.doc Install new EEPROM Follow with more attention these steps: Preliminary check before insert the processor in the socket check the pins are all straight and aligned: failure to do so may bend or break creating false contacts and malfunction of the machine.
- Page 43 FROMM SERVICE MANUAL FR3XX_FR4XX_EN01 Version 03_04 Robot_Rev02.doc Selection microcontroller The board support two different model of microcontroller and the jumper setting depend of the model and the model is wrote on the component, for example PIC16xxxxx or PIC18xxxxxx. furthermore on the component there is a label with wrote the version of firmware inserted, for example V35b490: Vxx is the software version and bxx is the program build.
- Page 44 FROMM SERVICE MANUAL FR3XX_FR4XX_EN01 Version 03_04 Robot_Rev02.doc Original Parameters 20,0 It is forbidden to duplicate this manual or parts of it in any way or any form without written permission of the author © 2017 www.fromm-stretch.com...
-
Page 45: Connector On Control Panel
FROMM SERVICE MANUAL FR3XX_FR4XX_EN01 Version 03_04 Robot_Rev02.doc Connector on control panel It is forbidden to duplicate this manual or parts of it in any way or any form without written permission of the author © 2017 www.fromm-stretch.com... -
Page 46: Diagnostic Leds
FROMM SERVICE MANUAL FR3XX_FR4XX_EN01 Version 03_04 Robot_Rev02.doc Diagnostic LEDs for robot machine Diagnostic The machine generates a series of messages useful in diagnostics and more support. Check the machine version during the reboot the panel show, this not depend from version machine, will be displayed for few second the information about the machine version: in the “P”... - Page 47 FROMM SERVICE MANUAL FR3XX_FR4XX_EN01 Version 03_04 Robot_Rev02.doc MACHINE CONFIGURATOR The machine configurator is a menu that simplifies configuration of machine and through this it is possible easier add the optional as cut device, carriage, ect. Turn off the machine and keep pressing hold up arrow and switch on the robot and after release the buttons.
- Page 48 FROMM SERVICE MANUAL FR3XX_FR4XX_EN01 Version 03_04 Robot_Rev02.doc BATTERY CHARGER BLACK “CBHF1 S.P.E.” / BATTERY GENERAL INFORMATION AND WARNINGS Electronic automatic battery charger with microprocessor suitable for any battery type; Fully automatic charging cycle with electronic setting: protected against overload, short-circuit at clamps and reversed polarity;...
- Page 49 FROMM SERVICE MANUAL FR3XX_FR4XX_EN01 Version 03_04 Robot_Rev02.doc OPERATING PRINCIPLE On switching on a new battery charger of the CBHF1-SM series, programmation data are displayed (these parameters depend on internal dipswitch configuration). After the “SPE” logo you can see on display the version of software installed on the machine. At this time the following programmed parameters are displayed on sequence according to internal dipswitch configuration (see tables on page n.
- Page 50 FROMM SERVICE MANUAL FR3XX_FR4XX_EN01 Version 03_04 Robot_Rev02.doc BATTERY CHARGER CBHF1-V2 By setting up 8 dipswitches it is possible to change the charging curve and it is possible to customize the charging profile with the specifications of battery manufacturers. The battery voltage (12V or 24V) and the charging current (4A or 8A or 10A or 14A) can be setup.
- Page 51 FROMM SERVICE MANUAL FR3XX_FR4XX_EN01 Version 03_04 Robot_Rev02.doc KIT EXTERNAL ELECTRONIC BATTERY CHARGER V02 (optional, FROMM code 16.8288) This kit can be used for AGM / GELL and TRAXION batteries of all brands. It is important to check the charger settings “dipswitches”. The settings need to be correct, in order to guarantee a correct charging curve.
- Page 52 FROMM SERVICE MANUAL FR3XX_FR4XX_EN01 Version 03_04 Robot_Rev02.doc BATTERY CHARGER Blue “POLAR MARS” / BATTERY GENERAL INFORMATION AND WARNINGS Electronic automatic battery charger with microprocessor suitable for any battery type; Fully automatic charging cycle with electronic setting: protected against overload, short-circuit at clamps and reversed polarity;...
- Page 53 FROMM SERVICE MANUAL FR3XX_FR4XX_EN01 Version 03_04 Robot_Rev02.doc Operation, commands, and views. The chargers MARS-SERIES come with a backlit LCD display and three touch-sensitive buttons (touch) that enable the data exchange between the device and the user. At power on, the display lights up and gives information on the model and software release housed on the microprocessor inside the charger.
- Page 54 FROMM SERVICE MANUAL FR3XX_FR4XX_EN01 Version 03_04 Robot_Rev02.doc CHARGING CURVES The charging process is divided into 5 phases: 1 - Analysis. At battery connection, there is the analysis of the battery. 2 - Bulk. Phase of initial charge at constant current.
- Page 55 So, in the robot you have only 2 cables (+ and -) and the clamps are ok also for the traction battery. When change type of battery you have to change also the charging curve. FOR THIS OPERATION PLEASE CONTACT FROMM DISTRIBUTOR (YOU NEED AN USB KEY): BATTERY CHARGER POLAR (to know if you want change from AGM Batteries to...
-
Page 56: Maintenance Instructions
FROMM SERVICE MANUAL FR3XX_FR4XX_EN01 Version 03_04 Robot_Rev02.doc MAINTENANCE INSTRUCTIONS FOR OPERATORS SAFETY! First switch off the main switch and lock it before carrying out maintenance on the installation. Take care, that other persons cannot put the installation in action. Take care, that the protection covers, etc. are remounted when putting the installation in action again. - Page 57 FROMM SERVICE MANUAL FR3XX_FR4XX_EN01 Version 03_04 Robot_Rev02.doc MAINTENANCE INSTRUCTIONS FOR OPERATORS DAILY Particular attention must be given to the charging of the Robot battery in order to ensure a long lifetime. The electronic control unit also incorporates the battery charger which operates under a tight control of the main electronic control unit.
- Page 58 FROMM SERVICE MANUAL FR3XX_FR4XX_EN01 Version 03_04 Robot_Rev02.doc MAINTENANCE INSTRUCTIONS FOR OPERATORS HALF YEARLY Fig. 1 Fig. 2 Check that the feeder wheel arm (1) always returns in HOME position. If not replace the spring. Check the status for wear and tear of drive and guide wheels and the rubber coated roller of the roll- holder carriage;...
- Page 59 FROMM SERVICE MANUAL FR3XX_FR4XX_EN01 Version 03_04 Robot_Rev02.doc MAINTENANCE INSTRUCTIONS FOR DISTRIBUTORS Turn off the machine and check the play of the roll-holder carriage. (Fig 3) If the carriage (1) can be freely lifted with a few centimetres, the chain (2) must be tensioned in the following way.
- Page 60 FROMM SERVICE MANUAL FR3XX_FR4XX_EN01 Version 03_04 Robot_Rev02.doc MAINTENANCE SCHEME MAINTENANCE FREQUENCY 8 hr 40 hr 100 hr 200 hr 500 hr 1000 hr 2000 hr Daily cleaning Cleaning eye of photocell Shaft chain Bearings Friction discs Proximity and limit switches...
Need help?
Do you have a question about the FR3 Series and is the answer not in the manual?
Questions and answers