
Related Manuals for Softing Echochange


Summary of Contents for Softing Echochange
- Page 1 Echochange Ethernet gateway for the connection of different controllers Version: E-21.03.2018 © Softing Industrial Automation GmbH 2018...
- Page 2 Read the manual before the start. For damages due to improper connection, implementation or operation Softing refuses any liability according to our existing guarantee obligations. The recent version of this manual is available in the Download Area of the Softing at: http://industrial.softing.com.
-
Page 3: Table Of Contents
........................... 31 Licensing ........................... 32 Chapter 7 Windows Softing NetCon Configuration ........................... 34 7.1.1 Select a Station in Your Network ................................35 7.1.2 Edit Access to a Station in Your List ................................36 Echochange - Manual / Table of Contents... - Page 4 Station Password 9.4.2 Station Parameters ................................67 9.4.3 ................................68 Device SSH Settings Settings ........................... 68 9.5.1 H1 System Settings ................................69 9.5.2 ................................70 TCP/IP System Settings 9.5.3 Device System Settings ................................72 Echochange - Manual / Table of Contents...
-
Page 5: Table Of Contents
................................74 9.5.8 Reboot ................................74 Help ........................... 74 9.6.1 Versions ................................75 9.6.1.1 Hardw are Versions ................................. 75 9.6.2 ................................75 About 9.6.3 License Overview ................................75 9.6.4 ................................75 Licenses Index Echochange - Manual / Table of Contents... - Page 6 Chapter 1 Help Overview...
-
Page 7: Chapter 1 Help Overview
Help Overview Help Overview NetCon echo for echochange echochange NetCon - General Basics PLC Connections Operation and Configuration Windows Connection Main Menu Echochange - Manual / Help Overview... - Page 8 Chapter 2 echochange...
-
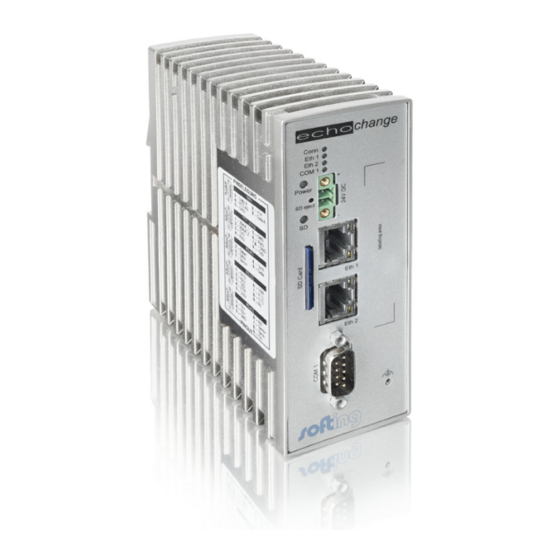
Page 9: Chapter 2 Echochange
Please also indicate the required plug type (Euro, UK, US) in your order. If you want to use your own AC adapter, please observe the polarity of the 24V connector (positive pole at the top, negative pole at the bottom). Echochange - Manual / echochange... -
Page 10: Features
Features echochange connects PLCs from different manufacturers by converting the Ethernet protocols in such a way that packets can be exchanged between previously incompatible protocols. Converts data from different Ethernet protocols Bridges two separate networks using different protocols Connects computers with standard TCP/IP to Industrial Ethernet... -
Page 11: Hardware
Memory card To eject the memory card, simply take the card out of the slot. Please do not insert any objects in the “SD eject” hole. echochange device Echochange - Manual / echochange... -
Page 12: Getting Started
The device has no ON/OFF switch. It switches on automatically when the AC adapter is plugged into the mains power supply. Wait until only the green Power LED is on. This means that the device is ready for operation. Echochange - Manual / echochange... - Page 13 The device has two RJ45 sockets for Ethernet connection. Use of 1 x RJ45 If you are using echochange in a heterogeneous network (i.e. the Ethernet protocols are running on one medium), you will only need one Ethernet connector. Echochange - Manual / echochange...
- Page 14 Use of 2 x RJ45 If you are using the echochange as a bridge between two separate networks (i.e. the protocols are running on different media), you will need both Ethernet connectors. Connect one end of a TP cable with the TP socket (RJ45 socket) on the front panel of the device.
- Page 15 The device has the specified parameters; all the connections have been removed. You can use any configuration file you have created. Remove the card from the device. If you leave it inserted, all the parameter settings will be reset every time you switch on the device. Echochange - Manual / echochange...
-
Page 16: Constraints Of Protocol Conversion
Rockwell CLX returns a general protocol error for non- existent symbols or deviating data types. If both protocol sides support multiple requests in one frame, the multiple requests are not always used on the destination side. Echochange - Manual / echochange... - Page 17 Chapter 3 NetCon – General...
-
Page 18: Chapter 3 Netcon - General
Every device comes with a manual in PDF format. It includes the chapters describing the hardware and commissioning, and the online help of the NetCon software. Free PDF readers are available on the Internet from http://www.adobe.com or http://www.foxitsoftware.com. Echochange - Manual / NetCon – General... -
Page 19: System Requirements
LICENSEE him/herself. 2. The SOFTWARE PRODUCT may only be used on a single computer. The LICENSEE is obligated to purchase a separate license for every computer on which the SOFTWARE PRODUCT is used. Echochange - Manual / NetCon – General... - Page 20 1. The license given to the LICENSEE is valid until it is terminated by the licensee or the LICENSER. 2. The LICENSEE can terminate the license at all times by returning the SOFTWARE PRODUCT including the archivation copy and all related documentation to the LICENSER. Echochange - Manual / NetCon – General...
- Page 21 Nuremberg. However, the LICENSER has the right to take the LICENSEE to court at his location. 3. Place of execution for all obligations from this contractual relationship is Nuremberg. Echochange - Manual / NetCon – General...
- Page 22 Chapter 4 Basics...
-
Page 23: Chapter 4 Basics
Starting the program To start the program, proceed as follows: Select Start - (All) Programs - Softing - NetCon echo - NetCon echo. The start window opens, allowing you to configure your echo device via TCP/IP or via H1 (provided the H1 protocol driver has been installed). Then, the... -
Page 24: Arp
NetCon. If the PC has multiple network adapters installed, the H1 driver should only be bound to the network adapter used for configuration. A detailed description is included in the PC-H1 program folder. Echochange - Manual / Basics... - Page 25 Chapter 5 PLC Connections...
-
Page 26: Chapter 5 Plc Connections
To read data actively from an S5 PLC, you need to establish a read connection in the echo device. Besides the S5 PLC address (IP address or MAC address), a read port or a read TSAP must be specified. Echochange - Manual / PLC Connections... -
Page 27: Modbus - General Information
In such cases a firmware update of the SLC is recommended. Read (Fetch active) and Write (Write active): When communicating with SLC or PLC-5 PLCs, it is generally possible to both read and write over a single connection. Echochange - Manual / PLC Connections... -
Page 28: Melsec-Q - General Information
It is generally possible to both send and receive over a single connection. Besides the address of the Send / Receive PLC (IP address or MAC address), you need to specify a port or TSAP.. Echochange - Manual / PLC Connections... -
Page 29: Opcpipe - General Information
(computer where the OPC client is running). For this purpose, the OPC server with OPCpipe functionality must be installed on both sides of the communication. Usually, the OPCpipe client initiates the active connection. The default port number is 4444. Echochange - Manual / PLC Connections... - Page 30 Chapter 6 Operation and Configuration...
-
Page 31: Chapter 6 Operation And Configuration
From the MAC address, you can determine the station to be configured. Double-click the station or select it and then click OK. Station Parameters dialog box appears. Edit the settings and confirm your entries with Echochange - Manual / Operation and Configuration... -
Page 32: Licensing
The NetCon displays a License Request Code that you can send to Softing Industrial Networks GmbH. You will then receive an activation code that enables the desired functionality. How this is... - Page 33 Chapter 7 Windows...
-
Page 34: Chapter 7 Windows
Softing NetCon Configuration The configuration window opens when you start NetCon by selecting Start - (All) Programs - Softing - NetCon echo - NetCon echo. NetCon is required to configure the echo devices. The software is used to make basic settings, create and diagnose connections and display data recorded by the Logger feature. -
Page 35: Select A Station In Your Network
This is useful e.g. for Internet connections for which heartbeat monitoring (sending of life time acks) has been disabled. This also increases the response time in case of connection problems (such as a broken cable). Echochange - Manual / Window s... -
Page 36: Edit Access To A Station In Your List
If you want to configure and diagnose the station using RFC 1006, you need to enter the TSAP. Standard Reduces the dialog box showing only a few parameters. Optional Product Select These entries will be ignored. Echochange - Manual / Window s... -
Page 37: Station Not Found
After you have entered a new file name, the following dialog box opens: Choose a Product. Here, select the device to be configured. Selecting the device closes the dialog and enables you to make further entries. Echochange - Manual / Window s... -
Page 38: Netcon Main Window
The menu bar provides all functions required to parameterize the echo devices. The menus are described in the Main Menu chapters. Frequently used functions are available on a toolbar where they can be accessed by a single click. Press the ESC key to exit the window. Echochange - Manual / Window s... -
Page 39: Connections List
- Transport protocol TCP or UDP - Local TSAP, Dest TSAP for RFC 1006 and H1 connections Parameter Shows additional connection parameters and details, Details including: - OPCpipe access: Read and write: RW, read only: RO Echochange - Manual / Window s... -
Page 40: Logger
To specify whether to create the log in the RAM only or to also save it to a file, click the Settings button in the Logger window. For more information on the logging function in the device, see the Logger section. Echochange - Manual / Window s... - Page 41 Chapter 8 Connection...
-
Page 42: Chapter 8 Connection
This dialog enables you to establish a new connection. Each echochange connection actually consists of 2 individual connections that are coupled. One is displayed on the left side, the other on the right side. To facilitate the view on this connection pair with the expert mode disabled, the left side is considered to be the passive side, the right side the active side. -
Page 43: Echochange Connection Network
8.1.2 echochange Connection Network The editing window for echochange connections has a left and a right panel. Due to the 4 possible assignments of TCP/IP and H1, there are 4 different variants of this window. On the left and right, enter the TCP/IP or H1 parameters. - Page 44 The station will actively initiate the connection attempt. Server (Passive) The station will wait for the destination station to establish the connection. For the side of the echochange connection which was parameterized as active, enable the Slave button. TCP / UDP Protocol The TCP (Transmission Control Protocol) is a secured protocol that uses checksums and acknowledgments.
- Page 45 The station will actively initiate the connection attempt. Server (Passive) The station will wait for the destination station to establish the connection. For the side of the echochange connection which was parameterized as active, enable the Slave button. Line In this option group, you can specify whether frames on this connection will go to all devices...
-
Page 46: Connection Settings
TCP protocol, such as Wago, Beckhoff, Groupe Schneider, Modicon ... CLX - Ethernet/IP Communication with Allen-Bradley ControlLogiX, CompactLogiX, SoftLogiX Rockwell Slc / Plc5 Communication with Allen-Bradley PLC-5 and SLC Melsec-Q Communication with Mitsubishi Melsec-Q Click OK to apply your selection. Echochange - Manual / Connection... -
Page 47: Network Plc Protocol
More detailed information on ports Type: Here, you can specify whether your own station will actively initiate the connection attempt or will wait passively for the destination station to establish the connection. Please make sure that different Echochange - Manual / Connection... -
Page 48: Tcp/Ip Special Settings
More detailed information on TSAPs TSAPs for S7 Connections 8.2.3.1 TCP/IP Special Settings Use PLC Header The PLC header can be used for communication with other Softing devices where the PLC header can also be enabled. See also Header. Life Data Acks If you enable this option, payload frames without content are transmitted to keep a connection alive that is not used cyclically (heartbeat monitoring). - Page 49 Big Endian Format in the PLC Header In the PLC header, the sequence number will be transmitted in the MOTOROLA format (big-endian). Usually (flag not set) the INTEL format (little-endian) is used to transmit the sequence number in the PLC header. Echochange - Manual / Connection...
-
Page 50: Ip Address
Since a decimal representation with ddd.ddd.ddd.ddd.ddd.ddd.ddd.ddd.ddd.ddd.ddd.ddd.ddd.ddd.ddd.ddd would neither be very transparent nor handy, IPv6 addresses are usually represented in hexadecimal format. To further simply this representation, every two address octets are grouped and separated by colons. Echochange - Manual / Connection... -
Page 51: Port
If multiple connections are to be established between 2 stations, the TSAPs for the individual connections be must different. To exactly specify a connection, the combination of TSAP + MAC address (or IP address) must be unique. Rules for entering TSAPs for S7 connections Echochange - Manual / Connection... -
Page 52: Tsap For S7 Connections
To enter the binary standard TSAPs, use the HEX field (left field). S7-200 The S7-200 is usually addressed with the TSAP 10 00 (binary). The own TSAP is set to 10 00 by default. S7-300, S7-400 Echochange - Manual / Connection... -
Page 53: Plc Header
Fetch and Write Connections For Fetch and Write jobs, the first 16 data bytes at the start of a job correspond to the SINEC AP header. The SINEC AP header is also used for H1 communication. Echochange - Manual / Connection... -
Page 54: H1 Connect Parameters
TPDU size, the TPDU format, and others. Since there is no standard CR parameter definition, please refer to the operating instructions of the destination system to find out which parameters you need to specify here, if any. If no information is available, do not enter any CR parameters. Echochange - Manual / Connection... -
Page 55: S7 Protocol Settings
For writes, the Modbus opcode “Write Single Register 06” Register (06) is used instead of “Write Multiple Registers 16”. User Item Unit ID The slave address will be indicated in the item syntax. Example: Id2.R2 For more details, see Modbus Item Syntax Echochange - Manual / Connection... -
Page 56: Echochange Connection: Clx Protocol
CPU Slot Here, you can specify the ControlLogiX CPU slot. 8.2.8 echochange Connection: SLC / PLC-5 Protocol In this dialog box, you can edit the specific parameters for a connection to Allen-Bradley PLC-5 and SLC PLCs. Name of the Connection Here, you can edit the connection name. -
Page 57: Melsec-Q Protocol
Authentication Depending on the mail server, login may be required. Username and Password These are the login data. Login type Select Auto Select or, if known, please specify. The following protocols can be selected: PLAIN Echochange - Manual / Connection... -
Page 58: Edit Connection
As an alternative to deleting, you can disable a connection using the Switch on/off option. Disable Connection To disable a connection, do one of the following: Menu: Connection > Switch on/off Highlight the connection, right-click and select Switch on/off Echochange - Manual / Connection... - Page 59 (off) is displayed after the type. You can disable a connection without losing the connection parameters. Later, you can re-enable the connection using the same parameters as before. By default, connections are enabled. Echochange - Manual / Connection...
- Page 60 Chapter 9 Main Menu...
-
Page 61: Chapter 9 Main Menu
Main Menu Main Menu The menu provides the following options: File Connection Diagnostics Station Settings Help Echochange - Manual / Main Menu... -
Page 62: File
To use this function, master access is required. Edit Connection Here you can edit the parameters of the selected connection. The Edit Connection dialog box appears. To use this function, master access is required. Echochange - Manual / Main Menu... -
Page 63: Diagnostics
(version 7.0 and higher). 9.3.1 echochange Connection Diagnostics The dialog box shows the online diagnostics for an echochange connection. The diagnostics window is divided into two parts: the left side or passive side the right side or active side... -
Page 64: Tcp/Ip Stati
Content of the frames in read direction. The area that is read is logged. Receive Data The data content of the frames in read direction is logged. SQL Data The requests and data of the Collect destination connection are recorded by the Logger. This can be Echochange - Manual / Main Menu... -
Page 65: Logger Settings
Specifies when a new file will be started. This facilitates the evaluation. File Name Example The display field shows an example of a file. Here you can see where the log files are located and what the file names look like. Echochange - Manual / Main Menu... -
Page 66: Using The Diagnostic Text Output System
To do this, open the dialog box by selecting the Station menu and clicking Station Password. Enter the password and repeat it in the Retype Password field. NetCon is now logged on and you can Echochange - Manual / Main Menu... -
Page 67: Station Parameters
Dedicated route at the 2nd interface: Address of the router: 192.168.1.1, net: 192.168.0.0, subnet mask: 255.255.0.0 And the device should reach the following destination addresses over IPv4: ntp.pool.org within the internet, 10.0.0.2, 192.168.1.3 und 192.168.47.11. These destination could be reached as follows: Echochange - Manual / Main Menu... -
Page 68: Device Ssh Settings
Delete Connections and Tables Deletes all user entries and settings except for the station parameters in the Station Parameters dialog box for the existing network adapters. The device is reset but remains accessible via NetCon. Echochange - Manual / Main Menu... -
Page 69: H1 System Settings
PLC Convert Table Opens the PLC Conversion Table dialog box where you can display and modify the echochange data allocation table. This table describes how the protocol requests from one side are forwarded on the other side. Service Settings... -
Page 70: Tcp/Ip System Settings
Time Until Connection Is Lost Time without data communication after which the connection is considered broken. Since TCP/IP as a WAN protocol normally does not use life acks, the connection is also broken if no data has been Echochange - Manual / Main Menu... - Page 71 If ICMP broadcast frames are to be used in the LAN of a plant, you can select this check box to cause the echo module to reply. Default Resets all the input fields to the defaults. Echochange - Manual / Main Menu...
-
Page 72: Device System Settings
In this case, the clock will also be adjusted to daylight saving time and take into account the leap seconds that occur occasionally at the end of a year. Echochange - Manual / Main Menu... -
Page 73: Plc Conversion Table
For CLX connections, a symbolic destination address must be entered. Symbol The -> Browse button allows browsing the online PLC -> Browse Browses a CLX PLC online Only one DBx per Connection is allowed in the PLC conversion table. Echochange - Manual / Main Menu... -
Page 74: Device Service Settings
Device Licenses Opens the License Overview dialog box where you can view and edit the device licenses. About Opens the About dialog box displaying the manufacturer and the versions of the NetCon software. Echochange - Manual / Main Menu... -
Page 75: Versions
Then click the -> Clipboard button. The data needed for requesting the license is copied to the clipboard and can be pasted into an e-mail or word processing application. For example: Echochange - Manual / Main Menu... - Page 76 The License Request Code is unique for the device! Please send this data by fax to +49 911 54427-27 or e-mail it to info-in@softing.com. Softing Industrial Networks GmbH will send you a License Confirm Code for product activation. Enter the received code in the License Confirm Code field.
-
Page 77: Index
- E - Melsec-Q Protocol Menu 61, 62, 63, 66, 68, 74 Mitsubishi 28, 57 echochange connection diagnostics Modbus 27, 46, 55 echochange Connection Network Multicast echochange connection to SLC / PLC-5 echochange Connection: Clx Protocol Echochange - Manual / Index... - Page 78 Protocol selection Protocol settings 55, 56, 57 - R - Reboot Reboot password Restart Rockwell 27, 56 - S - 26, 46 26, 46, 52 Select a connection Select a Station in Your Network Select station Echochange - Manual / Index...
Need help?
Do you have a question about the Echochange and is the answer not in the manual?
Questions and answers