
Related Manuals for BK Medical bkSpecto


Summary of Contents for BK Medical bkSpecto
- Page 1 Advanced User Guide bkSpecto Ultrasound System 16-01642-01 August 2018 For Professional Users Only...
- Page 2 Any modification of or installation of software without written permission fromBK Medical will immediately void any warranty supplied by BK Medical. Such changes will also void any service contract and result in charges to the customer for restoration of the original bkSpecto Ultrasound System.
-
Page 3: Table Of Contents
The bkSpecto System ........ - Page 4 Making a Measurement – General Procedure ..... . . 46 2D and Color Mode Measuring Tools ......47 Doppler Mode Measuring Tools.
- Page 5 Color Submodes ..........72 Color Coding of Flow.
- Page 6 Annotations – Labels, Bodymarks and Arrows......96 Labels ............96 Bodymarks .
- Page 7 Exporting to a PACS ......... 118 Reports .
-
Page 9: Before You Begin
Ultrasound System. The bkSpecto User Guide includes an overview of all the documentation available for the system, including different user guides. You must read the Safety chapter in the bkSpecto User Guide before working NOTE: with the system. This guide takes you deeper into the functionality and potential of the bkSpecto Ultrasound Systems. - Page 10 10 Chapter 1 August 2018 bkSpecto Advanced User Guide (16-01642-01)
-
Page 11: Chapter 2 Getting Started
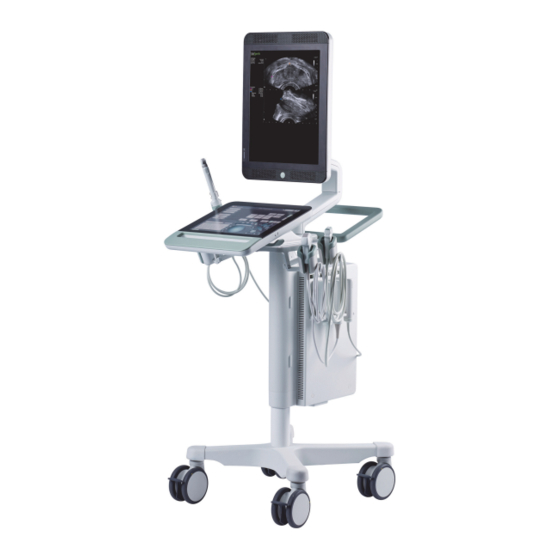
Chapter 2 Getting Started The bkSpecto System Monitor Connectors Touch screen Transducer Front handle with holders release paddles Transducer sockets Scanning engine Power connector Battery Preserve Switch Lockable wheels bkSpecto Advanced User Guide (16-01642-01) Getting Started... -
Page 12: Before You Start
To turn the system off: Make sure system is running. Press the power button once. Note that if you purchase the battery version of bkSpecto, it also has a Battery Preserve Switch located underneath the scanning engine: Figure 2-2. Battery Preserve Switch. See location at “The bkSpecto System” . -
Page 13: Connecting Transducers
Patient ID before exiting the exam. Whenever possible, BK recommends that you also enter a complete Patient Name. Creating a User Only system administrators can create new users. See “Security Window” on page 150. bkSpecto Advanced User Guide (16-01642-01) Getting Started... -
Page 14: Starting An Exam
Tap Next to select transducer. All connected transducers will be displayed in the Transducer window. Figure 2-5. Transducer window. Tap Next to select Exam Type and Preset in the Preset window. 14 Chapter 2 August 2018 bkSpecto Advanced User Guide (16-01642-01) - Page 15 Exam and select transducer using the transducer control button. The system will use the default exam type and preset. Figure 2-7. Start Exam The exam ends when you tap End Exam: Figure 2-8. End Exam. bkSpecto Advanced User Guide (16-01642-01) Getting Started...
-
Page 16: Monitor And Touch Screen Display
2 Hospital name (logo) 6 Battery indicator and Snowflake icon to show that image is frozen 3 Exam type/transducer 7 Document Browser 4 Image data 8 Wi i and Storage Indicators 16 Chapter 2 August 2018 bkSpecto Advanced User Guide (16-01642-01) - Page 17 Dynamic Range Buttons with drop-down menus to select from. These are marked by a number of dots related to the number of menu items, e.g. Res Enhance. bkSpecto Advanced User Guide (16-01642-01) Getting Started...
-
Page 18: Basic Touchscreen Buttons
Basic Touchscreen Buttons Figure 2-11. The basic touchscreen buttons 18 Chapter 2 August 2018 bkSpecto Advanced User Guide (16-01642-01) - Page 19 Tap Clip to record a video clip. After recording, it will be displayed Clip as a thumbnail at the bottom of the monitor. Table 2-1. Basic Touchscreen Buttons explained. bkSpecto Advanced User Guide (16-01642-01) Getting Started...
-
Page 20: Mode Button Backlight
Table 2-2. Mode button backlight User Preferences When you tap your user name on the touchscreen, a drop-down menu is displayed: Figure 2-12. User preferences drop-down menu. User Profile Select User Profile. 20 Chapter 2 August 2018 bkSpecto Advanced User Guide (16-01642-01) - Page 21 Use the toggle buttons to select if you want to hear a sound when you • - tap the touchscreen, - capture an image, - capture a clip, - use a context button, or - slide a bar. Set the touchscreen Brightness. • Select Trackpad Speed. • bkSpecto Advanced User Guide (16-01642-01) Getting Started...
- Page 22 On the Measure tab, you can: Decide how the measurement calipers should behave when setting a • measurement. Select which buttons to disable when Calc is in progress. • Figure 2-17. User Preferences, Label tab. 22 Chapter 2 August 2018 bkSpecto Advanced User Guide (16-01642-01)
-
Page 23: Documents
For information about using the Documents, see Chapter 6, “Documentation” on page 55. Measurements and Image Data For information about making and using measurements on the system, see Chapter 5, “Making Measurements” on page 45. bkSpecto Advanced User Guide (16-01642-01) Getting Started... - Page 24 For information about working with the image, see Chapter 4, “Working with the Image” on page 37. Review After acquiring the image and making measurements, tap Review for archiving, copying, reviewing or deleting the images and reports you made. 24 Chapter 2 August 2018 bkSpecto Advanced User Guide (16-01642-01)
-
Page 25: Chapter 3 Controls On The Touchscreen
Edge Edge enhancement. Emphasize contours in image so that edges stand out more clearly. Focal Length Sets the length of the focal zone. A shorter focal length gives you finer focusing. bkSpecto Advanced User Guide (16-01642-01) Controls on the Touchscreen... -
Page 26: Color Controls
Function Control 0/60 Degree Angle correction line in Doppler mode, fixed intervals -60, 0, 60. Angle Correct Angle correction line in Doppler mode, 1 degree increments from -89 to 89. 26 Chapter 3 August 2018 bkSpecto Advanced User Guide (16-01642-01) - Page 27 (frequencies) that are displayed in the spectrum and/or color-coded. Smoothing Softens the colors. Steer Change the angle of the Doppler line. SV Size Resize the Doppler gate. Sets the Tissue Index. The current value is displayed on the button. bkSpecto Advanced User Guide (16-01642-01) Controls on the Touchscreen...
-
Page 28: Pw Doppler Controls
Set the Mechanical Index. The current value is displayed on the button. Motion Comp Algorithm to compensate for movement. Needle Guide Displays the needle guide(s) available for the selected transducer. 28 Chapter 3 August 2018 bkSpecto Advanced User Guide (16-01642-01) -
Page 29: M-Mode Controls
Shows the Cine sequence, that you have selected using the trim buttons. Cine Trim End Places the end marker on the Cine sequence. Cine Trim Start Places the start marker on the Cine sequence. D Cursor Doppler cursor. Dual Activates/deactivates split screen. bkSpecto Advanced User Guide (16-01642-01) Controls on the Touchscreen... -
Page 30: Elastography Controls
Cine Trim End Places the end marker on the Cine sequence. Cine Trim Start Places the start marker on the Cine sequence. D Cursor Doppler cursor. Dual Activates/deactivates split screen. 30 Chapter 3 August 2018 bkSpecto Advanced User Guide (16-01642-01) -
Page 31: Power Mode Controls
Angle correction line in Doppler mode, fixed intervals -60, 0, 60. Angle Correct Angle correction line in Doppler mode, 1 degree increments from -89 to 89. Biopsy Displays a puncture line or brachy matrix. bkSpecto Advanced User Guide (16-01642-01) Controls on the Touchscreen... - Page 32 Select Tissue index type. The current value is displayed on the button. U/D Invert Inverts the image up/down. Wall Filter Turn the wall filter on and set the cut-off frequency. 32 Chapter 3 August 2018 bkSpecto Advanced User Guide (16-01642-01)
-
Page 33: 3D Controls
Select Tissue index type. The current value is displayed on the button. Time Set duration of a 3D data acquisition. The current value is displayed on the button. U/D Invert Inverts the image up/down. bkSpecto Advanced User Guide (16-01642-01) Controls on the Touchscreen... -
Page 34: 3D Rev. Mode
Measure Dist. Measure distance in 3D. New Volume Returns to the Review window. Next Steps forward through images in the volume Orientation Displays or hides orientation markers in 3D volumes. 34 Chapter 3 August 2018 bkSpecto Advanced User Guide (16-01642-01) - Page 35 Undo Sculpture Remove the most recent sculpture of the 3D volume. Volume Draw planimetry on each image to create a volume. Wireframe Turns the wireframe around the 3D volume on or off. bkSpecto Advanced User Guide (16-01642-01) Controls on the Touchscreen...
- Page 36 36 Chapter 3 August 2018 bkSpecto Advanced User Guide (16-01642-01)
-
Page 37: Working With The Image
While the partial freeze is active, tap the dual view button to toggle the display between the 2 states, which are Doppler mode frozen; 2D-modes imaging. • 2D-modes frozen; Doppler mode imaging. • bkSpecto Advanced User Guide (16-01642-01) Working with the Image... -
Page 38: Split Screen
Adjust the image parameters in screen A, then tap Linked Dual and the button to transfer the parameters to screen B. Use the same method to transfer the parameters from screen B to screen A. 38 Chapter 4 August 2018 bkSpecto Advanced User Guide (16-01642-01) -
Page 39: Labels, Bodymarks And Arrows
Add an arrow to denote a specific area of interest. • Figure 4-1. Label selector. To select a label: Tap the Label button. bkSpecto Advanced User Guide (16-01642-01) Working with the Image... -
Page 40: Bodymarks
• Note that you can only edit your own labels. Bodymarks Bodymarks are small bitmaps depicting parts of the body. You can place a bodymark anywhere on the ultrasound image. 40 Chapter 4 August 2018 bkSpecto Advanced User Guide (16-01642-01) - Page 41 Tap the Move button. A green frame appears around the bodymark. Drag it to the position you want, and tap again. To replace a bodymark: To replace an existing bodymark with a different one, tap the new bodymark. bkSpecto Advanced User Guide (16-01642-01) Working with the Image...
-
Page 42: Arrows
To delete an arrow, tap Delete. To delete all arrows from the image, tap Clear all. Cine Cine (image review) lets you review a series of the most recently recorded 2D, 2D+Color mode, or 2D+Doppler mode images. 42 Chapter 4 August 2018 bkSpecto Advanced User Guide (16-01642-01) -
Page 43: Using Cine
Figure 4-7. Touchscreen buttons for trimming cine. Using Cine in Doppler Mode When cine is activated while imaging in Doppler mode, a vertical cine cursor is displayed overlaying the Doppler image. bkSpecto Advanced User Guide (16-01642-01) Working with the Image... -
Page 44: Video Display
The image can be displayed on an auxiliary video monitor. You can select the video output mode (including OFF). See more about video setup in the System window “Misc Tab” on page 134. 44 Chapter 4 August 2018 bkSpecto Advanced User Guide (16-01642-01) -
Page 45: Making Measurements
You cannot make measurements on video clips. For calculation formulas and information about the accuracy of different types of measurements, see “Clinical Measurements: Ranges and Accuracies” in the bkSpecto User Guide and the Technical Data (BZ2100). To view the list of measurements: Tap Measure. -
Page 46: Making A Measurement - General Procedure
2D or Color mode image, the displayed measurement is the depth of the caliper (distance from the caliper to the transducer surface along the scan line). When a second caliper is positioned, the depth is replaced by the appropriate measurement result. 46 Chapter 5 August 2018 bkSpecto Advanced User Guide (16-01642-01) -
Page 47: 2D And Color Mode Measuring Tools
To move the entire measurement after positioning: Tap the line and drag it to the new position Tap again to set the measurement. Angle Measuring Tool On a 2D or Color mode image, you can measure angles. bkSpecto Advanced User Guide (16-01642-01) Making Measurements... - Page 48 Fifth caliper positioned; Position fourth caliper and tap. position fifth caliper and tap. position sitxth caliper and tap to set the measurement. Figure 5-3. Using the Hip Tool to measure two angles. 48 Chapter 5 August 2018 bkSpecto Advanced User Guide (16-01642-01)
- Page 49 Tap inside or on the circle. The circle turns green and a symbol (a plus sign with arrows) appears as shown in the center image of Fig 5-5. This symbol means you can move the circle. bkSpecto Advanced User Guide (16-01642-01) Making Measurements...
- Page 50 The axis of rotation critically affects the calculated volume. Consider the NOTE: basic shape of the structure of interest and make sure to place the 2 calipers so that they define the correct axis of rotation. See Fig 5-7. 50 Chapter 5 August 2018 bkSpecto Advanced User Guide (16-01642-01)
- Page 51 On a 2D or Color mode image, you can draw a closed shape freehand. To draw freehand: Tap 2D Trace. A caliper appears. Drag it to where you want to start drawing. Tap. The caliper changes into a drawing cursor. bkSpecto Advanced User Guide (16-01642-01) Making Measurements...
-
Page 52: Doppler Mode Measuring Tools
To avoid getting a negative result, successive calipers must be positioned to the right, not the left, of any already-positioned calipers. Note that the Angle Correct button is available when you tap Measure or Calc in Doppler mode. 52 Chapter 5 August 2018 bkSpecto Advanced User Guide (16-01642-01) - Page 53 Tap the HR measure button. A line caliper appears on the image. Drag this to the position you want. Tap. Another line caliper appears. Drag it to the correct position. The measurement is set. bkSpecto Advanced User Guide (16-01642-01) Making Measurements...
- Page 54 When you have finished drawing, tap to set the doppler trace. Position starting point. Starting point positioned; draw Trace is drawn. Tap to set. trace. Figure 5-15. Drawing a freehand curve on a Doppler image. 54 Chapter 5 August 2018 bkSpecto Advanced User Guide (16-01642-01)
-
Page 55: Documentation
While a clip is being captured, a progress wheel is displayed in the document browser. If you tap Store or Clip and an exam is not running, the system returns you to the Patient Details where you can start the exam by tapping Start Exam. bkSpecto Advanced User Guide (16-01642-01) Documentation... -
Page 56: Local Patient Archiving System
You can view the documents on the monitor or you can export or delete them. Select a document to view or one or more documents to export or delete. In the same way, you can also review examinations from a CD/DVD or a USB. 56 Chapter 6 August 2018 bkSpecto Advanced User Guide (16-01642-01) -
Page 57: Viewing And Editing Video Clips
In the Review window, tap the CD/DVD or USB tab. A list of the folders on the external storage device appears. Tap the folder you want to view. The Review window displays the documents in the selected folder. bkSpecto Advanced User Guide (16-01642-01) Documentation... -
Page 58: Viewing Exported Documents On An External Computer
De-identify Patient Data. If you archive to a CD/DVD or network drive, the archive is password-protected, but you must still be aware that you are exporting confidential data from the system. 58 Chapter 6 August 2018 bkSpecto Advanced User Guide (16-01642-01) -
Page 59: Exporting Documents
Tap Export. Select the destination, format and patient data identification and tap Export again. De-identify Patient Data is recommended for patient security. The data is copied to the selected destination. Figure 6-3. Export options bkSpecto Advanced User Guide (16-01642-01) Documentation... -
Page 60: Patient List
To delete an exam with no externally archived documents: Tap the exam on the Patient List. Tap Delete. You are asked to confirm that you want to delete the exam. 60 Chapter 6 August 2018 bkSpecto Advanced User Guide (16-01642-01) -
Page 61: Pausing And Later Resuming An Examination
If the database on the system is password-protected, when you turn on the system, a login window appears: Figure 6-4. The Select User and Login window. Select user, enter password and click OK. Hard Disk Quota The system hard disk does not have unlimited storage capacity. bkSpecto Advanced User Guide (16-01642-01) Documentation... -
Page 62: Reports
Assessment Tap Assessment and use the toggle buttons to note your assessments. You have • the possibility to Check All, and then un-check the toggle buttons for non- relevant assessments. 62 Chapter 6 August 2018 bkSpecto Advanced User Guide (16-01642-01) -
Page 63: Editing A Report
In the Report window, tap Preview. The first page is displayed on the monitor and the touchscreen. Swipe upwards on the touchscreen report to see additional pages. Tap Close when you are done. Printing a Report To print a report: Tap Preview. Tap Print. bkSpecto Advanced User Guide (16-01642-01) Documentation... -
Page 64: Saving A Report To The Local Patient Archiving System
You cannot use an office printer directly with the USB connector on the system. The only printers you can connect directly to the system are ones listed as approved in the Product Data information. See also the Safety chapter in the bkSpecto User Guide. Caution Print-c1 The quality of a printed ultrasound image may vary, depending on the printer. -
Page 65: Imaging Modes
The absolute TI limit for each tissue type is set by the factory to conform to FDA guidelines and international standards (AIUM/NEMA and IEC) (see the acoustic output section in the bkSpecto User Guide), but you may want to set a lower TI limit for some purposes. There are 2 types of settings you can vary: Tissue type (TIS –... -
Page 66: B-Mode)
Gain You can control the overall gain of an imaging mode by sliding the Gain bar. Figure 7-3. The Gain bar is located beneath the mode buttons. 66 Chapter 7 August 2018 bkSpecto Advanced User Guide (16-01642-01) -
Page 67: Auto Gain
Tap the Auto Gain parameter button to toggle between on and off: • Figure 7-4. The Auto Gain parameter button. When you activate or deactivate Auto Gain, a message pops up bottom center of the monitor informing you of the setting. bkSpecto Advanced User Guide (16-01642-01) Imaging Modes... -
Page 68: Zoom
Several gray scales can be used to display a 2D image. Different gray scales may make various aspects of the image clearer. To adjust the gray scale: Touch and slide the Map scale button: • 68 Chapter 7 August 2018 bkSpecto Advanced User Guide (16-01642-01) -
Page 69: Combination Modes
In harmonic imaging, the image is created by receiving higher frequencies (harmonics) that are multiples of the transmitted frequency (f). Tissue harmonic imaging in the bkSpecto is based on the 2nd harmonic (2f) spectrum and pulse inversion. -
Page 70: Needle Enhancement
WARNING GS-w1 Before you attempt to use BK Medical equipment, you should be trained in ultrasonography or be under the supervision of someone who is trained in ultrasonography. You should also be thoroughly familiar with the safe operation of your ultrasound system: read all the user documentation that accompanies it. -
Page 71: Activate Needle Enhancement
Left and Right switches sides on the image and Off returns you to default 2D image quality. Activate Needle Enhancement Do as follows: Ensure that 2D is active. Tap Needle Enhance to select from which side you enter the needle: Figure 7-7. Needle Enhance dropdown menu. bkSpecto Advanced User Guide (16-01642-01) Imaging Modes... -
Page 72: Color Mode And Power Mode
In a Color mode image, the frequencies of the reflected ultrasound waves are measured to show the velocity and direction of the blood flow. The result is displayed in color on the monitor. 72 Chapter 7 August 2018 bkSpecto Advanced User Guide (16-01642-01) -
Page 73: Independent D-Mode/C-Mode Steering
Touch and slide the Map scale button to select the color scale you want. • When you image in Color or Power mode, you cannot use the color bar to NOTE: change the B-mode gray scale because it is used to control the color mapping. bkSpecto Advanced User Guide (16-01642-01) Imaging Modes... -
Page 74: Elastography
You should also be thoroughly familiar with the safe operation of your ultrasound system: read all the user documentation that accompanies it. No further training is required, but BK Medical offers training in how to use the system. Consult your BK Medical representative for information. -
Page 75: Color Box
When the circle is the required diameter, tap again to set the measurement circle on the screen. Repeat the measurement process outside the ROI. The strain ratio appears in the measurement data to the left of the image. bkSpecto Advanced User Guide (16-01642-01) Imaging Modes... -
Page 76: Diameter Comparison Measurement
ROI. Tap again to place an E-diameter line. Repeat the measurement process in the 2D screen to place a B-diameter line. The E/B Ratio appears in the measurement data to the left of the image. 76 Chapter 7 August 2018 bkSpecto Advanced User Guide (16-01642-01) -
Page 77: Doppler Mode - Spectral Doppler
The Doppler indicator, including both the Doppler line and the Doppler gate, appears superimposed on the 2D image and the Doppler spectrum appears. To position the Doppler gate on a 2D image, use the trackpad. bkSpecto Advanced User Guide (16-01642-01) Imaging Modes... -
Page 78: Adjusting The Doppler Mode Image
You can adjust the position and size of the Doppler gate to get information from sample volumes in various parts of the B-mode image. The image must not be frozen when you do this. 78 Chapter 7 August 2018 bkSpecto Advanced User Guide (16-01642-01) -
Page 79: Independent D-Mode/C-Mode Steering
The available values range from 2 (slowest) to 12 (fastest). To select the sweep speed: Touch and slide Sweep Speed and select the required value. • The time axis is updated. M-Mode To turn M-mode on: Tap M. • bkSpecto Advanced User Guide (16-01642-01) Imaging Modes... -
Page 80: The M-Mode Image
When M-mode is selected, the monitor is divided into two windows (see Fig 7-14). You can adjust how the two windows are displayed. The window with the vertical M-mode line shows the 2D image. 80 Chapter 7 August 2018 bkSpecto Advanced User Guide (16-01642-01) -
Page 81: M-Mode Line
The M-mode image ruler scales the ruler range of the 2D image to the M-mode image. Any given value will represent the same position on both the M-mode and 2D images. It is not possible to change the ruler. bkSpecto Advanced User Guide (16-01642-01) Imaging Modes... -
Page 82: Saving A Preset
You can change the default Exam Type and preset for a transducer. When creating a new preset as in “Saving a Preset” above, tap the toggle button Make this Preset the default for this transducer. 82 Chapter 7 August 2018 bkSpecto Advanced User Guide (16-01642-01) -
Page 83: Exam Types
Before you perform any puncture procedure, including therapy, make sure you have read the warnings in the Puncture and Brachytherapy section of the Safety chapter in the bkSpecto User Guide. WARNING P-w1 Before you start imaging, verify that the type number or name of the transducer and the type number or description of the needle guide you are using match the number displayed on the monitor. -
Page 84: Presets
If the measurement requires 2 or more calipers, another one appears. Drag the second caliper to the position you want and tap. Repeat this until you have positioned all the calipers for the measurement. 84 Chapter 8 August 2018 bkSpecto Advanced User Guide (16-01642-01) -
Page 85: Doppler Measurements
You can fit a curve to the spectrum either automatically (see “Doppler Trace (Automatic Curve Tracing)” on page 79) or manually and then make measurements on the curve. Two curve types are generally used. bkSpecto Advanced User Guide (16-01642-01) Exam Types... - Page 86 Figure 8-3. Doppler spectrum including vascular calculation markers. The calculations and the way in which they are presented on the monitor depend on whether the Doppler angle is active or not. 86 Chapter 8 August 2018 bkSpecto Advanced User Guide (16-01642-01)
-
Page 87: Reduction
The A/B ratio (Stuart index) is calculated as the ratio between PS (V ) and ED (V The advantage of using indices rather than absolute velocities is that the indices are independent of the insonation angle. bkSpecto Advanced User Guide (16-01642-01) Exam Types... - Page 88 Tap. The Ps, Ed, PI, RI and S/D measurements are displayed. If the traced curve covers more than one cycle, the PI is calculated as the average of each cycle. 88 Chapter 8 August 2018 bkSpecto Advanced User Guide (16-01642-01)
-
Page 89: Real-Time Measurements
Before you perform any puncture procedure, including brachytherapy, make NOTE: sure you have read the warnings in the Puncture and Brachytherapy section of the Safety chapter in the bkSpecto User Guide. For information about calculating PSAD see Chapter 9, “Urology Prostate Exam Type”. -
Page 90: Patient Setup
Figure 8-4. Longitudinal outline of organ showing the start position for planimetry. Different stepping units to control the spacing between the sections are available for use with different transducers. 90 Chapter 8 August 2018 bkSpecto Advanced User Guide (16-01642-01) -
Page 91: Performing A Biopsy Or Puncture Procedure (Including Brachytherapy)
To remove the brachy matrix from the monitor: Tap Biopsy. • Programmable Needle Guide If you are using a programmable needle guide, you can change the setup to move it to the left or right or in or out. bkSpecto Advanced User Guide (16-01642-01) Exam Types... - Page 92 0 line is always visible, along with the markers as shown in Fig 8-5. User-Definable Brachy Matrix and Ruler You can also define your own brachy matrix and ruler. See “Needle Guide Tab” on page 140 in the Setup and Customizing chapter. 92 Chapter 8 August 2018 bkSpecto Advanced User Guide (16-01642-01)
-
Page 93: Urology Prostate Exam Type
Please see Chapter 2, “Getting Started” for basic controls. • Read transducer user guides for more information before doing biopsies. • Read Care and Cleaning for sterilization instructions. • Read bkSpecto User Guide before system use. • Contents Diagnostic Presets • Setting up the Patient – Patient ID •... -
Page 94: Setting Up The Patient - Patient Id
Tap TGC and move the TGC sliders on the touchscreen to the right or left to • adjust the TGC curve (differential gain). The shape of the TGC curve is temporarily displayed to the right of the image as a curved vertical line. 94 Chapter 9 August 2018 bkSpecto Advanced User Guide (16-01642-01) -
Page 95: To Change Transducer Planes
In case of any inconsistency, stop imaging, turn off the system, and contact your BK service representative. bkSpecto Advanced User Guide (16-01642-01) Urology Prostate Exam Type... -
Page 96: Annotations - Labels, Bodymarks And Arrows
Annotations – Labels, Bodymarks and Arrows Labels, bodymarks and arrows are activated when you tap Label. Labels Figure 9-2. Label selector. 96 Chapter 9 August 2018 bkSpecto Advanced User Guide (16-01642-01) - Page 97 Tap Clear All in the input area. • To edit a label on the image: Tap the label on the image and type the changes you want. • Note that you can only edit your own labels. bkSpecto Advanced User Guide (16-01642-01) Urology Prostate Exam Type...
-
Page 98: Bodymarks
Rotate left or right by pressing buttons. Tap again when the imaging plane indicator is the way you want it. The imaging plane indicator turns orange and can no longer be adjusted. 98 Chapter 9 August 2018 bkSpecto Advanced User Guide (16-01642-01) -
Page 99: Arrows
Drag the arrow to the position you want, and tap again. You can add another arrow by selecting it. To delete an arrow, tap Delete. To delete all arrows from the image, tap Clear all. bkSpecto Advanced User Guide (16-01642-01) Urology Prostate Exam Type... -
Page 100: Measurements And Calculations
Repeat measurement. Length (L), the last set of measurements, appears automatically. Repeat measurement. When you have finished measuring, the volume calculation appears automatically. Figure 9-6. Prostate volume in split screen view. 100Chapter 9 August 2018 bkSpecto Advanced User Guide (16-01642-01) -
Page 101: User Reports
Thumbnail of saved image appears in the document browser at the bottom of the monitor. Capturing Clips (Unfrozen Images) To capture clips: Tap Clip to start recording. The Clip button is highlighted during recording. Tap Clip again to stop recording. bkSpecto Advanced User Guide (16-01642-01) Urology Prostate Exam Type... -
Page 102: Copying And Archiving
When you have changed the setup, you can save it as a new preset. To save a preset: Tap the Preset button in the Exam Management area. Tap Save Preset. The Save Preset window appears. 102Chapter 9 August 2018 bkSpecto Advanced User Guide (16-01642-01) -
Page 103: Default Exam Types And Presets
Setting up and Customizing the System (including creating custom keys on the • keyboard) (Appendix C, “Setting Up and Customizing Your System”). The tables and formulas that the system uses for calculations are in the Technical Data (BZ2100). bkSpecto Advanced User Guide (16-01642-01) Urology Prostate Exam Type... - Page 104 104Chapter 9 August 2018 bkSpecto Advanced User Guide (16-01642-01)
-
Page 105: 3D Imaging
Imaging Modes On bkSpecto, you can use 3D with 2D, Color mode, or Power mode imaging. However, you cannot use 3D with the following modes and functions: Doppler mode (spectral PW Doppler) •... -
Page 106: System-Controlled Positioning
If you start to make a measurement on a 3D data set acquired using the untracked freehand method, a warning appears in red on the monitor to remind you that the measurement will not be accurate. 106Chapter 10 August 2018 bkSpecto Advanced User Guide (16-01642-01) -
Page 107: 3D Imaging Overview
ID, you will be prompted to do so. The default patient ID is the current time and date. Adjusting the Image Capture Settings ROI (3D Region of Interest) Figure 10-1. The 3D Region of Interest. bkSpecto Advanced User Guide (16-01642-01) 3D Imaging... -
Page 108: 3D Capture Settings
• A progress circle appears during acquisition, and a pop-up on the touchscreen allows you to stop the progressing acquisition. 3D review buttons appear when you have acquired the 3D volume. 108Chapter 10 August 2018 bkSpecto Advanced User Guide (16-01642-01) -
Page 109: Viewing A 3D Data Set
Measure Dist. (only in Cube view) – Shows or hides the measurement lines or • boundaries on the volume, the Measurement menu (on the right side of the monitor), and Measurement results (on the left side of the monitor). bkSpecto Advanced User Guide (16-01642-01) 3D Imaging... -
Page 110: Working With The 3D Image
Use the trackpad to drag the cursor to tilt the cut plane. You can then move the tilted cut plane in and out (slice) as described before. Tap to end tilting. 110Chapter 10 August 2018 bkSpecto Advanced User Guide (16-01642-01) -
Page 111: Annotating A 3D View
You can only delete it. To delete an annotation, tap Undo Label. The most recent annotation is deleted. You can tap Undo Label several times to remove more than one annotation. You can also click Clear Labels to remove them all. bkSpecto Advanced User Guide (16-01642-01) 3D Imaging... -
Page 112: The 6 3D Views
Tap HWL again and measure the length of the pathology. The measurement is displayed underneath the 3D volume with the number of the measurement and L, along with the volume of the pathology displayed with HWL. 112Chapter 10 August 2018 bkSpecto Advanced User Guide (16-01642-01) -
Page 113: Render View
• For information about accuracy of measurements on acquired and NOTE: reconstructed planes, see the bkSpecto User Guide. WARNING 3D-w1 Measurements obtained with the 3D system and used in diagnosis must be carefully and thoughtfully performed to ensure accurate quantitative assessment. Before you perform a calculation, make sure that all necessary calibrations and measurements are made. - Page 114 Tap on one plane of the volume. Move the cursor over the area to be shaved. The more you move the cursor over the surface, the more surface is removed. Tap again when you are done. 114Chapter 10 August 2018 bkSpecto Advanced User Guide (16-01642-01)
-
Page 115: Mip View
This can allow hidden features to become visible. Render Settings You can change the way a Transparency view looks by adjusting the render settings using the 3D buttons. See “Render Settings” on page 114. bkSpecto Advanced User Guide (16-01642-01) 3D Imaging... -
Page 116: 4-Up View
In addition to the views in the 4-Up view, this view contains a Cube view and a sixth view, which is the view most recently displayed (MIP, Render, Transparency, or Cube). 116Chapter 10 August 2018 bkSpecto Advanced User Guide (16-01642-01) -
Page 117: Dicom
The filename of an exported document specifies the date and time the image was captured. For example, 2D_20181022_135426_FV12345.dcm would be the label on an 2D image of patient FV12345 that was captured on October 22, 2018 at 1:54:26 P.M. (13:54:26). bkSpecto Advanced User Guide (16-01642-01) DICOM... -
Page 118: Exporting To A Pacs
Table 11-1. If a device has a red or yellow indicator, you can tap the device name to see a list of unsent documents displayed in the Document List. 118Chapter 11 August 2018 bkSpecto Advanced User Guide (16-01642-01) -
Page 119: Deleting A Document
You can also open the DICOM Status window from the DICOM Setup NOTE: window. See “DICOM/PACS Tab” on page 149. Deleting a Document You cannot delete a document from the system that is in a queue to be sent to NOTE: a DICOM device. bkSpecto Advanced User Guide (16-01642-01) DICOM... - Page 120 120Chapter 11 August 2018 bkSpecto Advanced User Guide (16-01642-01)
-
Page 121: Appendix A Glossary
When Color mode or Power mode imaging is turned on, the color box is superimposed on the 2D image. The color box outlines the area of the tissue in which flow information is available. color Doppler See Color mode. bkSpecto Advanced User Guide (16-01642-01) - Page 122 (from e.g. kidney stones or cyst edges), which may be used to identify certain characteristics of the imaged anatomy. DecT Flow Deceleration Time. 122Appendix A August 2018 bkSpecto Advanced User Guide (16-01642-01)
- Page 123 American law that sets rules for how patient accounts, billing and medical records must be handled. International Electrotechnical Commission. image review See cine. label Text positioned on the image to label it. See page 39. Length of cycle. bkSpecto Advanced User Guide (16-01642-01)
- Page 124 Pulse repetition frequency. Prostate-specific antigen. PSAD PSA density: PSA divided by prostate volume. pulse repetition frequency The rate at which pulses of ultrasound waves are transmitted and received in PW (pulsed-wave) Doppler imaging. 124Appendix A August 2018 bkSpecto Advanced User Guide (16-01642-01)
- Page 125 TAMX Time Average Max. T-area Transverse Area. True echo harmonics. BK Medical’s trademarked term for its pulse inversion tissue harmonic imaging system. Time gain control. The TGC curve determines variable amplification applied to echoes from different depths in the tissue.
- Page 126 For some transducers, you can increase the width of the image area beyond normal full width. With linear transducer arrays, this is sometimes referred to as Trapezoidal View. You can also narrow the image width to increase frame rate. 126Appendix A August 2018 bkSpecto Advanced User Guide (16-01642-01)
-
Page 127: Appendix B Measurement And Calculation Abbreviations
Left Cavernosal Artery Flaccid/Post Injection Auto Lt CAV Manual Left Cavernosal Artery Flaccid/Post Injection Manual Lt Epid H Left Epid Height Lt Epid L Left Epid Length Lt Epid V Left Epid Volume Lt Epid W Left Epid Width bkSpecto Advanced User Guide (16-01642-01) - Page 128 Prostate Volume Width*Height*Length Prostate W Prostate Width Prox LRA Left Kidney Proximal LRA Prox RRA Right Kidney Proximal RRA Rectum Rectum Outline Rt CAV Auto Right Cavernosal Artery Flaccid/Post Injection Auto 128Appendix B August 2018 bkSpecto Advanced User Guide (16-01642-01)
- Page 129 Right Testicle Volume Rt Testicle W Right Testicle Width Seminal Vesicles Seminal Vesicles Outline Strain Ratio General Strain Ratio Tool Urethra Urethra Outline Volume General Volume Tool using Ellipse/3 distances Volume Flow General Volume Flow Tool bkSpecto Advanced User Guide (16-01642-01)
- Page 130 130Appendix B August 2018 bkSpecto Advanced User Guide (16-01642-01)
-
Page 131: Appendix C Setting Up And Customizing Your System
Appendix C Setting Up and Customizing Your System The bkSpecto includes default setups that were created to optimize the ultrasound images and make it easy for you to use the different transducers, Exam Types, and presets. You can customize the system so that it is easy to enter and select exactly the information you need. -
Page 132: System Window
You can navigate the windows using a scroll bar and swiping. When you can swipe, dots will appear at the bottom center of the window to indicate this. System Window Header Tab Figure C-2. System Header tab. 132Appendix C August 2018 bkSpecto Advanced User Guide (16-01642-01) -
Page 133: Display Tab
Figure C-4. System Display tab - swiped forward. On the Display tab, there are several options for customizing your touchscreen and monitor. Use the radio buttons, slide buttons and drop-down menus to adjust the system to your preferences. bkSpecto Advanced User Guide (16-01642-01) -
Page 134: Patient Data Tab
On the Misc tab, you can adjust language and location settings and set up video output. Note that changes to these settings requires a restart of the system to take effect. 134Appendix C August 2018 bkSpecto Advanced User Guide (16-01642-01) -
Page 135: Preset Window
Default Tab Figure C-8. Default presets. The Default tab shows the default presets for the individual transducers. Manage Tab Figure C-9. Manage presets. On this tab you can import and export, rename, and delete presets. bkSpecto Advanced User Guide (16-01642-01) -
Page 136: Measure & Calc Window
%Reduction Tool and how the Report should be displayed. Set Default Heart Cycles on the dropdown menu. • Use the radio buttons to adjust Distance Units and (swipe) Height/Weight • Units. Calc List Tab Figure C-11. Calc list tab. 136Appendix C August 2018 bkSpecto Advanced User Guide (16-01642-01) -
Page 137: Results Tab
On the Results tab, you can select which results will be displayed when you do the different measurements. Note that you can only change the results when the toggle buttons are highlighted. Use the dropdown to select Exam Type and swipe the tab to see all results. bkSpecto Advanced User Guide (16-01642-01) -
Page 138: Preferences Tab
On the Preferences tab, you can use the dropdowns to select the ICA/CCA Ratio, Renal/Aortic Ratio and decide if you want to see all Doppler results on the monitor in absolute values. Labeling Window Labels Tab Figure C-14. The Labels tab. 138Appendix C August 2018 bkSpecto Advanced User Guide (16-01642-01) -
Page 139: Bodymarks Tab
• to each Exam Type. Tap Restore Factory Defaults to replace the presets for this Exam Type with • the factory defaults. Remove labels you don’t need. • Bodymarks Tab Figure C-15. Labeling Bodymarks tab. bkSpecto Advanced User Guide (16-01642-01) -
Page 140: Needle Guide Tab
Package with the factory defaults. Needle Guide Tab Tapping the Open Needle Guide button opens the Needle Guide window on the monitor. Figure C-16. Needle Guide window on monitor with Brachy Matrix setup. 140Appendix C August 2018 bkSpecto Advanced User Guide (16-01642-01) - Page 141 User-defined matrices are listed in the lower part of the Brachy Matrix Setup window (Fig C-16). You have the following options for user-defined matrices: bkSpecto Advanced User Guide (16-01642-01)
- Page 142 In the Brachy Matrix Setup window, tap New, or select an existing measurement and tap Edit. The following window appears: Select the transducer that the matrix will be used with, and name the matrix. Tap Next. 142Appendix C August 2018 bkSpecto Advanced User Guide (16-01642-01)
- Page 143 When the both offsets are 0, the matrix looks like this: Assuming that the transducer is at the bottom of the image, positive offsets move the matrix to the right or up, negative offsets move it to the left or down. Tap Next. bkSpecto Advanced User Guide (16-01642-01)
- Page 144 (holes/cm) and the horizontal and vertical offset of the ruler. The system calculates the number of rows and columns and the hole spacing in each direction. When the both offsets are 0, the matrix looks like this: 144Appendix C August 2018 bkSpecto Advanced User Guide (16-01642-01)
- Page 145 Assemble the needle guide (or brachy stepper and grid) and attach it to the transducer. Turn on the system and connect the transducer. Immerse the transducer tip in the saline. Start imaging to produce an image on the monitor. bkSpecto Advanced User Guide (16-01642-01)
- Page 146 15 It may be necessary to adjust the stepper as well. Consult the stepper user guide for instructions. After you adjust the stepper, use the earlier steps in this procedure to verify that the matrix is calibrated properly. 146Appendix C August 2018 bkSpecto Advanced User Guide (16-01642-01)
-
Page 147: Configure Layout Window
WARNING Check-w1 To ensure safe operation, do not use the equipment if you find any signs of damage. Con- Do not use tact your BK Medical service representative. damaged equipment Configure Layout Window Figure C-17. Configure Layout window. The Configure Layout window lets you configure the buttons for each Exam Type and mode according to your needs and preferences. -
Page 148: Store/Network Window
Printers Tab Figure C-19. Printers tab. On the Printers tab, you can select and set up default printers. Use the dropdowns and the Setup and Test buttons to set up your printer. 148Appendix C August 2018 bkSpecto Advanced User Guide (16-01642-01) -
Page 149: Dicom/Pacs Tab
DICOM/PACS Tab DICOM is not installed on the bkSpecto as a default. You must purchase a DICOM license from BK before a qualified service technician can install DICOM on your system. The bkSpecto Service Manual contains instructions for service personnel to use when setting up your DICOM system. -
Page 150: Security Window
Figure C-21. Wi-Fi Connection window on monitor. See also the section on Wireless Networks in the bkSpecto User Guide. Security Window This window is only available to system administrators. General Tab Figure C-22. Security - General tab. On the General tab, you can select if the system must be password-protected, if the system should remember the last logged-in user when starting up, and if the user should be logged out automatically after a specified period. -
Page 151: User Manager Tab
Tap the toggle button to select if the user should be able to modify the profile. This does not allow the user to change a regular profile into a system administrator. To edit User Preferences: In the View Profile window, tap Preferences. • bkSpecto Advanced User Guide (16-01642-01) - Page 152 • Decide if the Clip Button should record a prospective or retrospective video • clip. Select if all images from the current exam should automatically be added to the • Report. 152Appendix C August 2018 bkSpecto Advanced User Guide (16-01642-01)
- Page 153 Figure C-27. User Preferences, Label tab. On the Label tab, you can: Decide how the user should enter labels. • Select if labels or bodymarks should be cleared at Unfreeze. • Figure C-28. User Preferences, Actions tab. bkSpecto Advanced User Guide (16-01642-01)
-
Page 154: Service Window
Presets, User Profiles and System Settings, and export Logs. And you can restore the Default User, System Settings and Clear the Patient Archive. License Tab Figure C-30. The Service License tab. On the License tab, you add, delete and import licenses. 154Appendix C August 2018 bkSpecto Advanced User Guide (16-01642-01) -
Page 155: About Tab
TP Licenses Tab Figure C-32. Service - TP Licenses tab. On the TP Licenses tab, you can see which third party licenses are used for the system installation. bkSpecto Advanced User Guide (16-01642-01) - Page 156 156Appendix C August 2018 bkSpecto Advanced User Guide (16-01642-01)
-
Page 157: Index
Index Archive window Numerics sorting and rearranging columns 60 2D filter 121 archiving 2D images, saving 55 clearing space on hard disk 62 description of system 56 4-Up view 116 password protection 56 6-Up view 116 to a PACS 62 accuracy 113 to CD, wait to delete from hard disk 62 animating the volume 111... - Page 158 about 42 copying to a CD or USB storage device 59 definition 121 deleting 60 effect of changing some parameters 43 Doppler gate image storage 43 moving 79 in D-mode 43 picture 78 measurement markers 44 resizing 79 measurements 44 Doppler indicator turning on and off 43 on B-mode image 77...
- Page 159 correct placement of marker 86 in pulsatility index 88 F1, F2 (measurement) 123 measuring PI manually 88 FFT spectrum. See Doppler spectrum. measurements Filter (3D Render setting) 114 clearing 47 focus depth 46 B-mode 77 D-mode 52 Focus indicator (picture) 66 making 46 focus position, adjusting (B-mode) 66 on a cine image 44...
- Page 160 warning to verify transducer type number 95 puncture guide PACS verify that number is correct on monitor 91 archiving to 118 PW Doppler 125 definition 124 saving to 118 partial freeze 37 real-time measurements password protection PI 88 patient archive database 61 Render view (3D) 113 Patient Archiving and Communications System.
- Page 161 T-area (measurement) 125 True Echo Harmonics. See tissue harmonic imaging. TEH (True Echo Harmonics). See tissue harmonic im- Tru-Focus 66 aging. TEH, definition 125 vascular calculations adjusting 67 correct placement of markers 86 definition 125 Vector Flow Imaging. See VFI. description 67 video clips Thickness (3D Render setting) 114...
Need help?
Do you have a question about the bkSpecto and is the answer not in the manual?
Questions and answers