
Related Manuals for Ferno 24


Summary of Contents for Ferno 24
- Page 1 Model 24, 24H Mortuary Cots Users’ Manual February 2018 Pub. No. 234-0008-09 Read this Manual and Retain for Future Reference...
-
Page 2: Ferno Customer Relations
Limited Warranty Statement 1.937.382.1451 The products sold by Ferno are covered by a limited warranty, which is printed on all Ferno invoices. The complete terms and conditions of the limited warranty, and the limitations of liability and disclaimers, are also available upon request by calling Ferno at 1.800.733.3766 or... -
Page 3: Table Of Contents
Description _______________________________________ 8 Waxing the Cot ___________________________________ 17 General Specifications ______________________________ 8 Inspecting the Cot ________________________________ 18 Components (Models 24 and 24H) ____________________ 9 Lubricating the Cot ________________________________ 19 4 - Setup ________________________________________________ 10 7 - Parts and Service ______________________________________ 20 Vehicle Information _______________________________ 10 U.S.A. -
Page 4: Safety Information
Ferno-Washington, Inc. products are designed for use only with Ferno- manufactured fastening systems. Use of a Ferno cot/transport system with a non-Ferno fastening system is misuse of the Ferno product. The user assumes responsibility for the outcome of known, intentional misuse. -
Page 5: Symbol Glossary
Safety Information 1.6 Symbol Glossary The symbols defined at right are used on the cot and/or in this’ manual. Ferno uses symbols recognized by the International Standards Organization (ISO), American National Standards Institute (ANSI) and General Warning of Pinch Point: the mortuary services industry. -
Page 6: Operator Focus
Visually inspect the cot for readiness. See “Inspecting the Cot” on ● page 18. Rotate the cot in a circle to verify it rolls easily. ● Load the cot into vehicle and secure it in the fastening system, if ● present. © Ferno-Washington, Inc. / 234-0008-09 / February 2018... -
Page 7: Using Additional Help
The operator should remain at the Operator end of the cot, operate the controls, and direct all helpers. NOTICE Ferno recommends that helpers work in pairs to help maintain cot balance. Side helpers may need to walk sideways under some The trained operator position stay at the Operator end of the circumstances. -
Page 8: About The Cot
A mattress and a set of chest and leg restraints are included with each Load Capacity cot. Both Model 24 and Model 24H are referred to as the “cot” in this 400 lb manual where features are identical. Where features differ, the model... -
Page 9: Components (Models 24 And 24H)
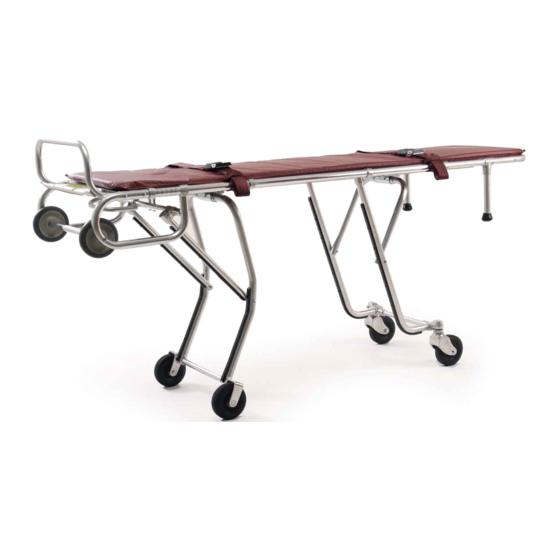
LOADING END OPERATOR END Mattress Foot Support Loading-End Leg Control handle (Not Visible) Operator-end Leg Control handle Loading Post (2) Loading Wheel (2) Main Frame Fixed Transport Wheel (2) Swivel Transport Wheel (2) © Ferno-Washington, Inc. / 234-0008-09 / February 2018... -
Page 10: Setup
Follow the instructions in the restraint users’ manuals (supplied). Keep restraint users’ manuals with this manual for future reference. For additional, free manuals, contact Ferno Customer Service (page 2). © Ferno-Washington, Inc. / 234-0008-09 / February 2018... -
Page 11: Using The Cot
(Model 24H) Always roll the cot using a rolling position. Use the ● loading position(s) only when loading the cot into, or unloading it from, an vehicle. © Ferno-Washington, Inc. / 234-0008-09 / February 2018... -
Page 12: Changing Cot Levels
Loading-end Operator: Squeeze the loading-end leg control handle and raise the cot until it nears the desired height. Release the handle and continues raising until the loading-end legs lock at the new position. © Ferno-Washington, Inc. / 234-0008-09 / February 2018... -
Page 13: Transferring The Body To The Cot
“Accessories” on page 21. Note: Ferno recommends that you position the body with the head at the operator end of the cot, if possible. This orientation will place the body in a “heads up” position if you need to tilt the cot in a confined area. -
Page 14: Maneuvering The Cot In A Confined Area
Roll the cot in this position (Figure 7). Use additional help as needed to lift, hold, and push the cot. See “Using Additional Help” on page 7. © Ferno-Washington, Inc. / 234-0008-09 / February 2018... -
Page 15: Loading The Cot
(Figure 8). Note: When in the loading position, the bed surface, the Model 24 cot is level, while the Model 24H cot is inclined. Grasp the corners of the main frame with an underhand grip and roll both loading wheels onto the vehicle floor (Figure 9). -
Page 16: Unloading The Cot
Lower the cot until all four transport wheels are on the ground. Roll the cot out of the vehicle. 10. Model 24H: After the cot has been unloaded from the vehicle, lower the loading end of the cot to a level rolling position. © Ferno-Washington, Inc. / 234-0008-09 / February 2018... -
Page 17: Maintenance
Remove the restraints from the cot. Disinfect and clean only as directed in the users’ manuals provided with the restraints. Additional, free users’ • • Inspecting (page 18) manuals can be obtained from Ferno. See “Ferno Customer Relations” on page 2. • Lubricating (page 18) 6.3 Disinfecting and Cleaning... -
Page 18: Inspecting The Cot
Are restraint buckles free of visible damage and do they ● operate properly? Is the vehicle properly prepared for the cot with an ● approved Ferno fastening system installed? Is the mattress in good condition? ● © Ferno-Washington, Inc. / 234-0008-09 / February 2018... -
Page 19: Lubricating The Cot
The I-beam runs the length of the cot. To lubricate, tip the stretcher drops). Lubricate identical points on each on end. side of the cot. After applying lubricant, wipe off excess. LUBRICATION-FREE ITEMS Wheel bearings (sealed) Do not lubricate Do Not Lubricate Lubricate © Ferno-Washington, Inc. / 234-0008-09 / February 2018... -
Page 20: Parts And Service
5” swivel caster with wheel lock assembly complete 090-0081 Wheel caster with wheel lock 190-1203 To order Ferno parts, and for professional repair, contact your Ferno 5/16” wheel bearing (pair) 090-4278 distributor. Your distributor is the only agent authorized by Ferno to #20 crutch tip (pr.)/inserts... -
Page 21: Accessories
Accessories 8 - ACCESSORIES Ferno offers a full line of accessories approved for use with the cot. WARNING Follow all instructions in accessory users’ manuals. Keep the instructions with this manual. Attaching improper items to the cot can cause injury. Use only Ferno-approved items on the cot. -
Page 22: Training Record
Training Record TRAINING RECORD Training Method Trainer Date Printed Name Signature Read Video/ Initials Hands-On Manual Online © Ferno-Washington, Inc. / 234-0008-09 / February 2018... -
Page 23: Maintenance Record
Maintenance Record MAINTENANCE RECORD Date Maintenance Performed © Ferno-Washington, Inc. / 234-0008-09 / February 2018... - Page 24 © Ferno-Washington, Inc. / 234-0008-09 / February 2018...
Need help?
Do you have a question about the 24 and is the answer not in the manual?
Questions and answers
When replacing the 5 inch load wheels on my Ferno 24 mortuary cot, I find that the bolts on the loading wheel axle will not budge. I suspect the axle end has been flattened out preventing the bolt from unscrewing from the axle. I guess I will have to cut the bolt off and replace the entire axle? Do you sell that part?
Yes, Ferno sells the loading axle for the 24 mortuary cot. The parts list includes "190-1509 Loading axle w/cover, inserts (burgundy) 1," which indicates that a replacement axle is available.
This answer is automatically generated