Table of Contents
Advertisement
Advertisement
Table of Contents

Related Manuals for Ferno Ultra Care 4000


Summary of Contents for Ferno Ultra Care 4000
- Page 1 Users’ Manual ™ Ultra Care 4000 May 2003 GLO Pub. No. 234-2117-01...
- Page 2 Additional free copies are available upon request from Customer Relations. Proprietary Notice The information disclosed in this manual is the property of Ferno- Washington, Inc., Wilmington, Ohio, USA. Ferno-Washington, Inc. reserves all patent rights, proprietary design rights, manufacturing...
-
Page 3: Table Of Contents
Parts List ............21 Before First Use........... 11 8 - Limited Warranty ........... 22 General Guidelines for Use ......11 9 - Ferno Customer Relations ........22 Wheel Locks ..........12 Training Record ............23 Attaching the Straps ......12, 13 Maintenance Record ............ -
Page 4: Safety Information
Improper maintenance can cause injury. Maintain the lift only as described in this manual. Improper parts and service can cause injury. Use only Ferno parts and Ferno-approved service on the lift. Attaching improper accessories to the lift can cause injury. Use only Ferno-approved items on the lift. -
Page 5: Operator Skills And Training
Instant boom stop if an obstruction is encountered Storage Height Minimum ....61 in (154 cm) • Handheld control Ferno reserves the right to change specifications without notice. • Rear caster wheel locks General specifications are rounded to the nearest whole •... -
Page 6: Components
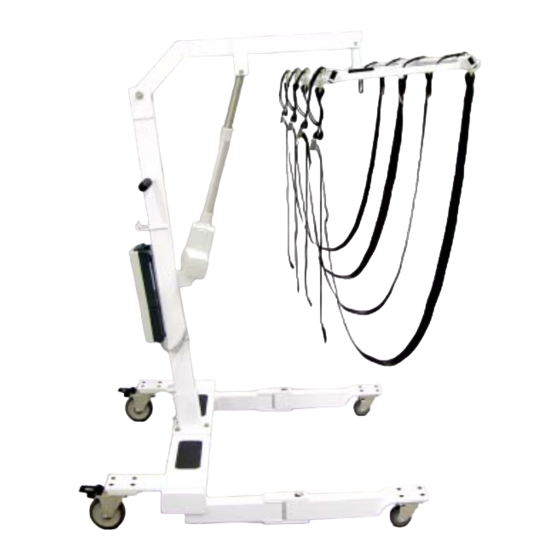
Control Hanger (2) Actuator Battery Mast 4" Wheel (2) Folding Leg (2) 6" Wheel with Wheel Lock (2) Base Handheld Control Lifting Strap (4) Plastic Extractor Wand Recharging Cord Components not shown to scale © Ferno-Washington, Inc. 234-2117-01 May 2003... -
Page 7: Lift Assembly And Disassembly
Use, assemble and disassemble the lift only with both legs locked in the extended position. Using the lift without extending and locking the legs could cause the lift to tip. Leg Folded Leg Extended Figure 2 - Extending the Legs © Ferno-Washington, Inc. 234-2117-01 May 2003... -
Page 8: Figure 3 - Attaching The Mast To The Base
Spreader-Bar 2. Position the spreader-bar assembly post in the end Assembly of the lift boom and secure with the quick-release pin (Figure 5). Figure 5 - Attaching the Spreader-Bar Assembly to the Lift Boom © Ferno-Washington, Inc. 234-2117-01 May 2003... -
Page 9: Disassembling The Lift
(Figure 8) and replace the quick-release pins. Note: If the legs are misaligned, the quick-release pins will be difficult to insert or remove. Move the leg slightly Figure 8 - Lift Disassembled to insert or remove the pin. © Ferno-Washington, Inc. 234-2117-01 May 2003... -
Page 10: Storing The Lift
Lift, page 9). Lift Boom and Mast, page 9. Hangers Figure 9B - Inserting the Tab Between the Hangers Figure 9A - Storing the Lift Post Mount Figure 9C - Inserting the Post © Ferno-Washington, Inc. 234-2117-01 May 2003... -
Page 11: Using The Lift
Keep the battery charged to extend battery Use, assemble and disassemble the lift only with life. Do not completely discharge the both legs extended and locked. battery. Charge the battery whenever the lift is not in use. © Ferno-Washington, Inc. 234-2117-01 May 2003... -
Page 12: Wheel Locks
D-rings of all four straps are on the same side of the spreader-bar. Pull Loops (1 each end) Important Always attach straps to the lift using the Figure 12 - A Lifting Strap keyhole tangs, never with the D-rings. © Ferno-Washington, Inc. 234-2117-01 May 2003... -
Page 13: Using The Extractor Wand
Figure 14 - Removing a Strap 4. Attach the strap to the spreader-bar post by the keyhole tang. Never attach a strap to the lift by the D-ring. Hook Figure 15 - Plastic Extractor Wand © Ferno-Washington, Inc. 234-2117-01 May 2003... -
Page 14: Handheld Control
The lift boom is designed with a stop-movement safety feature that automatically stops the travel of the lift boom when an obstruction is encountered. To restore normal function, remove the obstruction. Figure 17 - Storing the Handheld Control on the Pushbar © Ferno-Washington, Inc. 234-2117-01 May 2003... -
Page 15: Manually Lowering The Boom
Important Do not use the boom to move the lift. This can cause the lift to tip. Use the pushbar handles to move the lift. Figure 19 - Rolling the Lift © Ferno-Washington, Inc. 234-2117-01 May 2003... -
Page 16: Loading The Lift
11. Disengage the wheel locks and roll the lift to the destination (see Rolling the Lift, page 15). © Ferno-Washington, Inc. 234-2117-01 May 2003... -
Page 17: Using Additional Help
The operator should maintain control of the lift, operate the controls, and direct the helper or helpers. Ferno recommends using a helper when moving the loaded lift through a doorway or other narrow area. The assistant should help the operator guide the lift past obstructions and monitor the body or casket. -
Page 18: Charging The Battery
To attach the battery, squeeze the release handle, set the base of the battery in the top of the control box, press the battery against the mast and let go of the release handle. © Ferno-Washington, Inc. 234-2117-01 May 2003... -
Page 19: Maintaining The Lift
2. Spray metal slides with a disinfectant cleaner and material safety data sheets. wipe with a clean cloth, following disinfectant In the U.S.A., contact Ferno Customer Relations to manufacturer’s instructions. Do not immerse order Ferno disinfectants and cleaners (page 22). -
Page 20: Inspecting The Lift
If the lift does not operate smoothly, inspect it. If repairs Does the boom move up and down smoothly? are needed, contact EMSAR (page 21) or your Ferno distributor (page 22) for repairs. Is the lift free of excessive wear? -
Page 21: Repair Parts And Service
Part # Attaching improper items to the lift can cause injury. Use only Ferno-approved 1 ..Ultra Care 4000 Strap (1 ea) ....031-3872 items on the lift. 2 ..Extractor Wand (strap position aid) ..090-0541 3 ..Handheld Control ........ 066-3912 4 .. -
Page 22: Limited Warranty
Limited Warranty Obligation If a product or part is proven to be defective, Ferno will repair or replace it. At our option, we will refund the product’s purchase price. The purchaser accepts these terms in lieu of all damages. -
Page 23: Training Record
™ Ultra Care 4000 TRAINING RECORD Date Training Method Name MAINTENANCE RECORD Maintenance Performed Date © Ferno-Washington, Inc. 234-2117-01 May 2003...
Need help?
Do you have a question about the Ultra Care 4000 and is the answer not in the manual?
Questions and answers
how much is a 066-3912