Table of Contents
Advertisement
Available languages
Available languages
Quick Links
Advertisement
Chapters
Table of Contents

Subscribe to Our Youtube Channel
Related Manuals for Cylinda IBU 91 RFS


Summary of Contents for Cylinda IBU 91 RFS
- Page 1 IBU 91 RFS IBU 91 V...
- Page 2 SVENSKA . . . . . . . . . . . . . . . . . . . . . . . . . . . . . . . . . . . . . . . . . .3 ENGLISH .
-
Page 3: Table Of Contents
CYLINDA-KUNDSERVICE . . . . . . . . . . . . . . . . . . . . -
Page 4: Säkerhetsföreskrifter
. förstår vilka faror det innebär . Barn får inte leka med Kontakta din återförsäljare eller närmaste Cylinda- apparaten . Rengöring och användarunderhåll får kundservice om du upptäcker något problem . - Page 5 – risk för elstöt . eller butiken där apparaten inhandlades . Denna apparat är märkt Kontakta Cylinda-kundservice i enlighet med direktiv 2012/19/EU om avfall som utgörs av eller innehåller elektrisk och elektronisk utrustning (Waste Electrical strömkabel måste bytas .
-
Page 6: Användning Och Skötsel
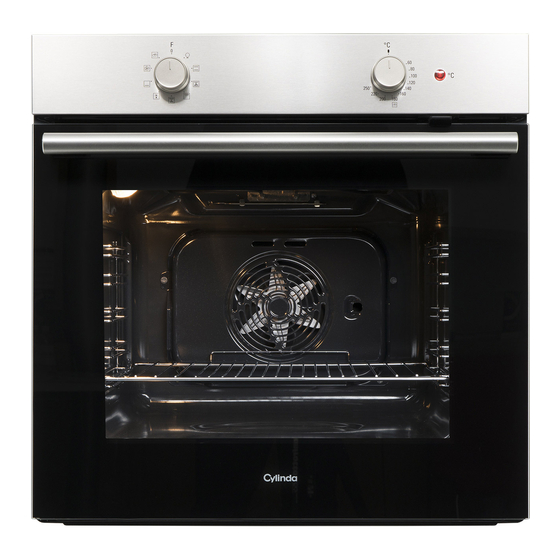
Användning och skötsel BESKRIVNING AV PRODUKTEN 1 . Kontrollpanel 2 . Fläkt 3 . Lampa 4 . Sidostegar (nivån anges på väggen i ugnsutrymmet) 5 . Lucka 6 . Övre värmeelement/ grillelement 7 . Runt värmeelement (dolt) 8 . Identifieringsskylt (ska inte tas bort) 9 . -
Page 7: Tillbehör
Perfekt för griljering av bröd, kött, fisk grönsaker. Antalet tillbehör kan variera beroende på modellen du köpt. Andra tillbehör kan köpas separat. Vänd dig till Cylinda-kundservice. SÄTTA IN GALLRET OCH ANDRA TILLBEHÖR • Sätt in gallret vågrätt genom att skjuta det över •... -
Page 8: Ta Bort Och Montera Sidostegarna
TA BORT OCH MONTERA SIDOSTEGARNA Så här tar du bort sidostegarna: Ta tag i stegens Så här sätter du tillbaka sidostegarna: Sätt dem • • ytterdel och dra den mot dig för att få ut stödet och nära hålet och börja med att föra in de två stiften i de två... -
Page 9: Funktioner
FUNKTIONER TINAR UPP För att tina frysta matvaror snabbare . För att stänga av ugnen . UNDERVÄRME BELYSNING Används för att bryna rättens undersida . För att tända belysningen i ugnsutrymmet . Denna funktion rekommenderas också för långkok, för att slutföra tillagning av saftiga rätter och för att ÖVER/UNDERVÄRME göra såser tjockare . -
Page 10: Första Användning
FÖRSTA ANVÄNDNING . V ÄRM UGNEN Ta bort eventuell skyddskartong eller plastfilm från En ny ugn kan frigöra lukter som har lämnats kvar ugnen och avlägsna eventuella tillbehör från dess insida . under tillverkningen: Detta är helt normalt . Värm ugnen till 250 °C i cirka en timme, helst med Innan du börjar laga mat rekommenderar vi därför att funktionen "Varmluft"... -
Page 11: Tillagningstabell
TILLAGNINGSTABELL FÖRVÄRM- TEMPERATUR NIVÅ RECEPT FUNKTION NING (°C) (MIN) OCH TILLBEHÖR 150–170 30–90 Tårtor 160–180 30–90 160–200 35–90 Tårtor med fyllning (cheese cake, äppelstrudel, fruktpaj) 160–200 40–90 160–180 15–35 Småkakor 150–170 20–45 150–170 20–45 180–200 40–60 Petit-chouer 170–190 35–50 150–200 Maränger 140–200 140–200... - Page 12 FÖRVÄRM- TEMPERATUR NIVÅ RECEPT FUNKTION NING (°C) (MIN) OCH TILLBEHÖR Lamm/kalv/nöt/fläsk 1 kg 190–200 80–110 Grillat fläskkött med knaprig svål 2 180–190 110–150 Kyckling/kanin/anka 1 kg 200–230 50–100 Kalkon/gås 3 kg 180–200 150–200 Ugnsbakad fisk/inbakad fisk 0,5 kg 170–190 30–45 (Filé, hel) Fyllda grönsaker 180–200...
-
Page 13: Goda Råd
GODA RÅD HUR DU SKA LÄSA TILLAGNINGSTABELLEN Det går även att använda formar och tillbehör i pyrex- Tabellen listar den bästa funktionen, tillbehören glas eller stengods, men tillagningstiderna blir en och nivån som ska användas för att laga olika aning längre . typer av mat . -
Page 14: Felsökning
BORTTAGNING OCH TILLBAKAMONTERING AV CLICK & CLEAN – RENGÖRING AV GLASET LUCKAN Efter att luckan har tagits bort och lagts ned på en För att ta bort luckan, öppna den helt och sänk mjuk yta med handtaget nedåt, tryck samtidigt på spärrarna tills de är i olåst läge . -
Page 15: Produktblad
PRODUKTBLAD Produktens fullständiga specifikationer, inklusive energieffektivitetskvoten för denna ugn, kan läsas och laddas ner från vår webbplats www .cylinda .se CYLINDA- KUNDSERVICE INNAN DU KONTAKTAR KUNDSERVICE: Kontrollera om problemet kan lösas på egen hand med de åtgärder som beskrivs i tabellen Felsökning . - Page 16 CYLINDA SERVICE . . . . . . . . . . . . . . . . . . .
-
Page 17: Safety Instructions
. Children must not play with the Cylinda Service . Once installed, packaging waste appliance . Cleaning and user maintenance must (plastic, styrofoam parts etc .) must be stored not be carried out by children without supervision . - Page 18 In case of replacement of power cable, contact and recycling of household electrical appliances, contact your local authority, the collection service for household waste or the store Cylinda Service . where you purchased the appliance . This appliance is marked in CLEANING AND MAINTENANCE compliance with European Directive 2012/19/EU, Waste Electrical and Electronic Equipment (WEEE) .
-
Page 19: Use And Care Guide
Use and Care guide PRODUCT DESCRIPTION 1 . Control panel 2 . Fan 3 . Lamp 4 . Shelf guides (the level is indicated on the wall of the cooking compartment) 5 . Door 6 . Upper heating element / grill 7 . -
Page 20: Accessories
The number of accessories may vary depending on which model is purchased. Other accessories can be purchased separately from the Cylinda Service. INSERTING THE WIRE SHELF AND OTHER ACCESSORIES • Insert the wire shelf horizontally by sliding it across •... -
Page 21: Removing And Refitting The Shelf Guides
REMOVING AND REFITTING THE SHELF GUIDES To remove the shelf guides, firmly grip the external To reposition the shelf guides, position them near • • part of the guide, and pull it towards you to extract the cavity and initially insert the two pins into their the support and the two internal pins from the lodgings . -
Page 22: Functions
FUNCTIONS DEFROSTING For defrosting food more quickly . For switching off the oven . LOWER HEATING LIGHT Useful for browning the base of the dish . This For switching on the light in the compartment . function is recommended also for slow-cooking, for finishing the cooking of juicy dishes, and making CONVENTIONAL sauce concentrates . -
Page 23: Using The Appliance For The First Time
USING THE APPLIANCE FOR THE FIRST TIME .HEAT THE OVEN Remove any protective cardboard or transparent film A new oven may release odours that have been left from the oven and remove any accessories from inside it . behind during manufacturing: this is completely Heat the oven to 250°... -
Page 24: Cooking Table
COOKING TABLE TEMPERATURE DURATION LEVEL RECIPE FUNCTION PREHEAT (°C) (MIN) AND ACCESSORIES 150 - 170 30 - 90 Leavened cakes 160 - 180 30 - 90 160 - 200 35 - 90 Filled cakes (cheese cake, strudel, fruit pie) 160 - 200 40 - 90 2 / 3 160 - 180... - Page 25 TEMPERATURE DURATION LEVEL RECIPE FUNCTION PREHEAT (°C) (MIN) AND ACCESSORIES Lamb / veal / beef / pork 1 kg 190 - 200 80 - 110 Roast pork with crackling 2 kg 180 - 190 110 - 150 Chicken / rabbit / duck 1 kg 200 - 230 50 - 100 Turkey / goose 3 kg...
-
Page 26: Useful Tips
USEFUL TIPS HOW TO READ THE COOKING TABLE You can also use Pyrex or stoneware pans and The table lists the best function, accessories and accessories, but bear in mind that cooking times will level to use to cook different types of food . Cooking be slightly longer . -
Page 27: Troubleshooting
REMOVING AND REFITTING THE DOOR CLICK & CLEAN - CLEANING THE GLASS To remove the door, open it fully and lower the After removing the door and resting it on a soft catches until they are in the unlock position . surface with the handle downwards, simultaneously press the two retaining clips and remove the upper edge of the door by pulling it towards you . -
Page 28: Product Fiche
XXXXXX XXX X X X X X XXX XXXX X X X Please note: If repairs are required, contact a Cylinda service centre that is guaranteed to use original spare parts and perform repairs correctly. Please refer to the enclosed warranty leaflet for more... - Page 29 90 °C 89° max min 560 min 560 583+2...
- Page 32 • Vi har service i hela landet / Nationwide service • Maskintyp / Model code • Problembeskrivning / Problem description • Gå in på www.cylinda.se / Visit www.cylinda.se • Serienummer / Serial number • Namn och adress / Name and address •...
Need help?
Do you have a question about the IBU 91 RFS and is the answer not in the manual?
Questions and answers
Ingen värme i ugnen och lampan lyser inte
The cause could be a power cut or the oven being disconnected from the electricity supply. Check if the oven is connected to mains power. Turn off the oven and restart it to see if the problem persists.
This answer is automatically generated