
Subscribe to Our Youtube Channel
Related Manuals for BRAND Liquid Handling Station


Summary of Contents for BRAND Liquid Handling Station
- Page 1 Simple, intuitive and compact. Liquid Handling Station Operators manual F I R S T C L A S S B R A N D English...
- Page 3 Diese Erklärung bescheinigt die Übereinstimmung mit den genannten Harmonisierungsvorschriften, beinhaltet jedoch keine Zusicherung von Eigenschaften. This document declares the accordance with the named harmonized regulations, but does NOT assure specific properties. BRAND GMBH + CO KG · info@brand.de · www.brand.de...
-
Page 5: Table Of Contents
7 Ordering Information 7.1 Liquid Handling Station and Accessories ..... 29 7.2 Spare parts ........32... -
Page 7: User Instructions
Read this operating manual carefully before using the Liquid Handling Station and keep it in a location easily accessible to all users for later reference. Use the Liquid Handling Station only for the intended use described in this manual. In case of doubt, contact the manufacturer of this product. -
Page 8: Symbols
Terms that you can see on the current screen of the software are shown in italics. Tips and recommendations Highlights useful tips and recommendations as well as information for efficient ope- ration. Help Symbol for the context-sensitive help function in the Liquid Handling Station ope- rating software. -
Page 9: Glossary
Labware Collective term for microplates, PCR plates, deep-well plates, inserts, tube racks, tubes, tips and the waste box that can all be used with the Liquid Handling Station. Liquid End Single- or 8-channel pipetting module that is connected to the motor control unit to carry out liquid transfers with the Liquid Handling Station. - Page 10 Individual recess on the Work Table onto which the labware can be positioned. The Work Table of the Liquid Handling Station has eight positions. Seven of them can be equipped freely, but one position is predefined for the waste box.
- Page 11 Work Table Workspace of the Liquid Handling Station, whose eight positions can be virtually equip- ped using the software. After definition of the commands, the physical loading of the Work Table then takes place. Z-tracking Downward movement during liquid aspiration and upward movement while dispensing.
-
Page 12: Liability
1.5 Liability All specifications and instructions in this manual were compiled in consideration of the app- licable standards and regulations, the state of the art, and the many years of experience of the manufacturer. The manufacturer of this product cannot accept any liability for damages resulting from: Failure to follow this operating manual Use of the instrument for anything but its intended use Use by untrained personnel... -
Page 13: Safety
2 Safety 2.1 Intended use The BRAND Liquid Handling Station is an automated pipetting system for use in routine laboratories with small to medium sample throughput in research, development, or production particularly in such application fields as PCR, qPCR, ELISA, enzyme assays, etc. -
Page 14: Safety Instructions
2.2 Safety instructions 1. Danger due to electrical current DANGER! Danger to life from electrical voltage Life-threatening electrical voltages exist within the instrument. Contact with live components may result in a danger to life by electrocution. Commissioning may only take place if the instrument has been properly installed or repaired. - Page 15 3. Danger due to failure to observe the intended use, or improper handling WARNING! Follow the limitations on use Do not use the instrument for anything but its intended use. The instrument must only be used for its intended purpose. Explosive and flammable substances must not be used The manufacturer cannot assume any liability for any consequential damage , including personal injury, loss of productivity of samples, and/or property damage that results from...
- Page 16 When handling infectious, aqueous fluids, national regulations and biosafety level of labo- ratories should be observed. The Liquid Handling Station is suitable for dealing with germs and biological material of risk class I. The most current requirements stated in the ”Laboratory Biosafety Manual”(World Health Organization) apply when dealing with germs of higher risk groups.
- Page 17 7. Danger of crushing Caution! Crushing danger - Watch your fingers and hands! Only reach into the work area when the machinery is at a standstill! If the front panel is opened while a program is in progress, the running process will be interrupted after the current work step has finished.
-
Page 18: Transport And Storage
2.3 Transport and storage WARNING! Risk of injury or property damage during transport Always have at least two people to lift and carry the instrument. When carrying the instrument, only grip it under the sides. Only transport the instrument in a vertical orientation and do not tip it. Before transport, remove all loose parts (adapters, containers, labware, etc.). -
Page 19: Liquid Handling Station
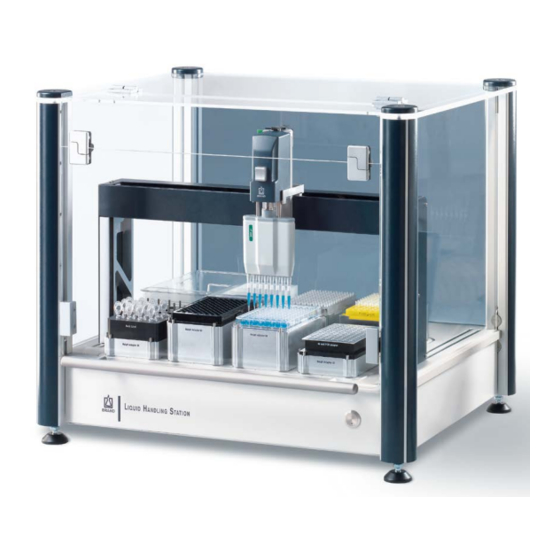
3 Liquid Handling Station 3.1 Overview Front side Back side... -
Page 20: Included In Delivery
3.2 Included in delivery Delivery includes the following: BRAND Liquid Handling Station Motor control unit Operating software Operating manual Power cable USB cable Documentation and on-site training 3.3 Technical data Specifications Liquid Ends Single-channel Liquid Ends (SC), 8-channel Liquid Ends... - Page 21 Accuracy tolerances for the Liquid Ends Liquid End Volume range µl Volume step µl CV % Single- 1 - 50 channel 10 - 200 40 - 1000 1000 8-channel 1 - 50 20 - 300 * Final test values related to the nominal capacity (maximum volume) indicated on the Liquid End and the indicated volume steps, obtained when Liquid End and destil- led water are equilibrated at ambient temperature (20 °C / 68 °F) and with smooth operation.
-
Page 22: Start-Up
Condensation can cause malfunctions or defects in the Liquid Handling Station or the computer connected to it. Before beginning initial operations, the Liquid Handling Station and the computer must first adjust the surrounding temperature. This may take several hours in some circumstances. -
Page 23: Connection
4.2 Connection DANGER! Danger to life due to electrical current Contact with live components may result in a danger to life by electrocution. Always be sure that the housing and covers are intact and closed. Only connect the instrument to properly grounded power outlets. Before connecting, check that the supply voltage matches the permitted ope- rating voltage. -
Page 24: Operation
3. Create a method or load an existing method. This procedure is described in detail in the operating manual for the Liquid Handling Station operating software. 4. Open the front hood and fill the Work Table with the labware needed for the method and selected in the software. -
Page 25: Replacing The Liquid End
5 Replacing the Liquid End 1. Grasp the Liquid End and press the decoupling button. The Liquid End is automatically released from the motor control unit. If the Liquid End is replaced while the Liquid Handling Station is turned off, it must be pulled downwards with the decoupling button pressed. -
Page 26: Maintenance/Cleaning
Decontamination Caution! Turn off the Liquid Handling Station and isolate it from the mains before cleaning, decontaminating or carrying out any maintenance work! Wipe off the instrument and working surface with a lint-free cloth. We recommend using 70 % (v/v) ethanol, 3 % - 4 % sodium hypochloride or an alcohol-based surface disinfectant, e.g. - Page 27 Hereto complete the ”Declaration on Absence of Health Hazards” and send the instrument to the manufacturer. Ask your manufacturer for the form or download it on www.brand.de. Before sending, request the special packaging from the manufacturer and pack the Liquid Handling Station properly in order to prevent damage during transport.
-
Page 28: Single-Channel Liquid Ends
To do this, the Liquid End must be dismantled (see below). Replace the piston if necessary. 4. Test the Liquid Ends for leaks. For testing, we recommend the BRAND PLT unit. If the Liquid End is leaking, please contact the ma- nufacturer’s support department! Dismantling and cleaning 1. -
Page 29: 8-Channel Liquid Ends
1. Detach Liquid End. 2. Check nose cones, pistons and seals for damage and contamination. 3. Test the Liquid Ends for leaks. For testing, we recommend the BRAND PLT unit. Use only original spare parts! Dismantling and cleaning Cleaning instructions 1. - Page 30 6. Connect the Liquid End 6.1 Reassemble the Liquid End, attach the lower ejector part, and check for leaks. For testing, we recommend the BRAND PLT unit. 6.2 After checking for leaks, connect the Liquid End back to the motor control unit.
-
Page 31: Ordering Information
7 Ordering Information 7.1 Liquid Handling Station and Accessories BRAND Liquid Handling Station including motor control unit, operating software, user manual, power cable, USB cable, docu- mentation and on-site training. Cat. No.7094 00 Single-channel Liquid End Volume Description Cat. No. - Page 32 7014 56 50 mL flat bottom, low profile 7014 58 Additional accessories for the BRAND Liquid Handling Station Description Cat. No. Silicone oil, for pistons in single-channel Liquid Ends 7055 02 Silicone grease, for pistons in 8-channel Liquid Ends...
- Page 33 Liquid Handling Station robotic tips and robotic filter tips Use the following compatibility table to find the right tip for your Liquid Ends: Liquid Ends Robotic tips Robotic filter tips Cat. Ref. in Liquid End software 7094 10 1-channel 1-50 µl SC-50 µl...
-
Page 34: Spare Parts
7.2 Spare parts Spare parts for the single-channel Liquid End Parts will differ slightly depending on nominal volume of Liquid End (Fig. shows spare parts for 50 µl Liquid End). Pack of 1. Volume 1 - 50 µl 7096 02 7096 08 7096 12 7096 24... - Page 39 You will find the printed operating instructions section, „Device and components“, as well as de- tailed information regarding the operation of the Liquid Handling Station software on your software data carrier under Manual.pdf, or by clicking on Start Display User Manual.
- Page 40 9974 96 · Printed in Germany · 1016...
Need help?
Do you have a question about the Liquid Handling Station and is the answer not in the manual?
Questions and answers