Advertisement
®
Instruction Manual
Thank you for purchasing the Hakko 472D desoldering tool
with digital temperature display.
Please read this manual before operating the Hakko 472D.
Keep this manual readily accessible for reference.
REMOVE the pump securing screw (M4 × 25, red) from the
bottom of the 472D station before using it. Leaving the screw
in place will cause serious problems. Be sure to SAVE THIS
SCREW!
REPLACE the pump securing screw (M4 × 25, red) into the
bottom of the 472D station before transporting it. Leaving the
screw out will cause serious problems.
PACKING LIST / SPECIFICATIONS .............................................. 1
WARNINGS, CAUTIONS, NOTES AND EXAMPLES ................... 2
PART NAMES ............................................................................... 3
OPERATION .................................................................................. 4
PARAMETER SETTING ................................................................ 8
MAINTENANCE ............................................................................ 9
REPLACEMENT PARTS ............................................................. 12
ERROR MESSAGES ................................................................... 14
BEFORE SERVICING ...... .......................................................... 14
REPLACEMENT/OPTIONAL PARTS .......................................... 15
PARTS LIST (IRON) .................................................................... 16
PARTS LIST (STATION) .............................................................. 17
WIRING DIAGRAM ...................................................................... 19
Desoldering Tool
G
G
CAUTION
Before Plugging In!
TABLE OF CONTENTS
Advertisement

Related Manuals for Hakko Electronics 807


Summary of Contents for Hakko Electronics 807
-
Page 1: Table Of Contents
® Desoldering Tool Instruction Manual Thank you for purchasing the Hakko 472D desoldering tool with digital temperature display. Please read this manual before operating the Hakko 472D. Keep this manual readily accessible for reference. CAUTION Before Plugging In! REMOVE the pump securing screw (M4 × 25, red) from the bottom of the 472D station before using it. - Page 2 Hakko 472D package. Station ............. 1 Cleaning pin for ø1.0 mm (0.04 in.) nozzle ..1 Desoldering iron (Hakko 807) ......1 Cleaning pin for heating element ....1 Filter pipe [w/filter holder, spring filter &...
-
Page 3: Warnings, Cautions, Notes And Examples
WARNINGS, CAUTIONS, NOTES AND EXAMPLES Warnings, cautions and notes are placed at critical points in this manual to direct the operator’s attention to significant items. They are defined as follows: WARNING: Misuse may potentially cause death of, or serious injury to the user. CAUTION: Misuse may potentially cause injury to the user or physical damage to the objects involved. -
Page 4: Part Names
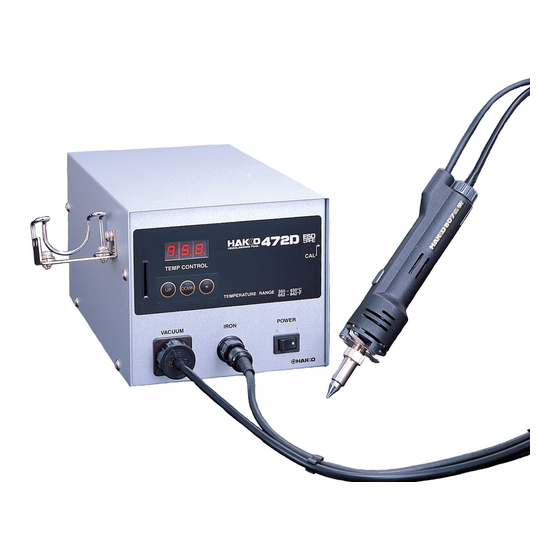
PART NAMES G Station Temperature display Heater lamp Control card slot CAL POT Membrane sheet DOWN Iron holder VACUUM Power switch IRON POWER Vacuum outlet cap Receptacle Fuse holder Control card Power cord G Desoldering iron Cord assembly Button Hose Nozzle Filter pipe (Inside housing) -
Page 5: Operation
Push and turn the back holder clockwise. (Figure 2) 2. Connect the cord assembly of the Hakko (Figure 2 ) 807 to the receptacle. (Figure 3) 3. Connect the hose to the vacuum outlet Insert the cord cap. (Figure 4) - Page 6 OPERATION 2. Clean the tip of the nozzle. Keep the tinned section of the nozzle clean and shiny by coating it with a small amount of solder. If the tip of the nozzle is coated with oxide, the nozzle’s heat conductivity will be lowered.
- Page 7 G Factory setting The Hakko 472D comes from the factory with the following values preset: °F Temperature scale Low temperature alarm setting Set temperature G Control card Each Hakko 472D comes with a small card, which inserts in the control slot in the front of the unit. This card is used when entering data for the process control functions.
- Page 8 OPERATION 3. Enter the TENS digit • Press the button to select the desired value for the TENS digit. Any value from 0 to 9 can be selected. When the desired value is displayed, press the DOWN Press the button. button.
-
Page 9: Parameter Setting
PARAMETER SETTING The HAKKO 472D has the following parameters. Parameter settings can be adjusted. 1. °C or °F temperature display selection. 2. Low temperature tolerance. 3. Display of room temperature compensation value (test mode) Once parameter input mode has been entered, set the parameters in the order shown below. After all the parameters have been set, normal operation will be resumed. -
Page 10: Maintenance
MAINTENANCE Efficient desoldering depends upon the temperature, the quality and quantity of the solder and flux. Perform the following service procedures as dictated by the conditions of the iron usage. During maintenance, please wear gloves and work carefully. WARNING: Since the desoldering iron can reach a very high temperature, please work carefully. Except when cleaning the nozzle and heating element, always turn the power switch off and disconnect the power plug before performing any maintenance procedure. - Page 11 2. Disassemble the heating Element cover Heating element element part. Nozzle CAUTION: Remove the nut with The heating element is very hot during operation. the spanner. Scrape away all oxidation from the hole in the heating element until the cleaning pin passes cleanly through the 3.
- Page 12 MAINTENANCE Cleaning the pump 1. Disassemble the pump heads. • Unplug the power cord. • Remove the cover screws. (right/left) • Remove the cover. • Remove the pump head from each side of the pump. 2. Clean the pump head. Clean the pump head •...
- Page 13 54Ω between pins 2 and 4 (sensor) at 73°F (23°C) If the measured values are outside this range, replace the heating element. Nozzle (No. A1174 24V-60W heating element for Hakko 807) Element cover Fig. 2 Replacing the heating element 1. Unplug the cord.
- Page 14 REPLACEMENT PARTS 8. Desolder the heating element leads (marked H) and sensor leads (marked S). 9. Remove the old heating element and Fig. 5 replace it with a new one. 10. Bend the lead wire as shown in Fig. 6, and pass two red leads and two white Wires leads through the holes as shown in Fig.
- Page 15 ERROR MESSAGES Various error messages will be displayed when there is a problem with the Hakko 472D unit. If the following message is displayed, refer to “Trouble Shooting Guide”. System Error After the power has been turned on, the system checks the memory and the programs.
- Page 16 Cleaning drill for ø1.3 mm (0.05 in.) nozzle B1305 Cleaning drill for ø1.6 mm (0.06 in.) nozzle Part No. Part name/Description Spanner, cleaning brush, B2100 Spanner (for desoldering iron) silicone grease, iron holder B1670 Cleaning brush A1028 Silicone grease C1316 Iron holder for Hakko 807...
- Page 17 PARTS LIST (Iron) NOTE: Spare or repair parts do not include mounting screws, if they are not listed on the description. Screws must be ordered separately. Pan head screw M2.6 × 7 (1) Pan head screw M2.6 × 7 (7) Item No.
- Page 18 PARTS LIST (Station) NOTE: Spare or repair parts do not include mounting screws, if they are not listed on the description. Screws must be ordered separately . Pan head screw with washer M4 × 30 Pan head screw with washer M4 ×...
- Page 19 WIRING DIAGRAM Motor Switch Iron P.W.B. for control Power cord Fuse holder P.W.B. for display Transfomer HEAD OFFICE 4-5, SHIOKUSA 2-CHOME, NANIWA-KU, OSAKA, 556-0024 JAPAN TEL:+81-6-6561-3225 FAX:+81-6-6561-8466 http://www.hakko.com/ AMERICAN HAKKO PRODUCTS, INC. 28920 N. AVENUE WILLIAMS VALENCIA CA 91355, U.S.A. TEL: (661) 294-0090 FAX: (661) 294-0096 Toll Free (800)88-HAKKO www.hakkousa.com 4 2 5 5 6...
Need help?
Do you have a question about the 807 and is the answer not in the manual?
Questions and answers