Vertiv LIEBERT RPC2 Quick Installation Manual
Communications module
Hide thumbs
Also See for LIEBERT RPC2:
- Installer/user manual (59 pages) ,
- Command reference manual (52 pages)
Table of Contents
Advertisement
Quick Links
LIEBERT® RPC2™
COMMUNICATIONS MODULE
Quick Installation Guide
The RPC2™ Communications
Module provides network and
environmental sensor connectivity
for the Liebert™ rack PDU family of
products. It provides Ethernet and
serial communication interfaces as
well as the ability to connect up to
four rack PDUs in an array, sharing
one IP address. Devices powered
by a rack PDU can be remotely
controlled and monitored through
the RPC2's various interfaces. The
RPC2 also supports the connection
of an optional external LCD display.
Please see the RPC2
Communications Module Installer/
User Guide for further information.
The following are instructions to
install and configure the
communications module in the
rack PDU.
Setting up the RPC2
Communications Module
The RPC2 can be accessed either
via DHCP (factory default) or static
IP boot mode through the network
(LAN) port. To find the DHCP IP
address, see the MPH2™ Rack PDU
Installer/User Guide. To configure
the static IP boot mode, the
network settings must be changed
via the link port as follows.
1. Locating the
communication card bay
Find the communication card
bay on the rack PDU. It may
have a removable cover.
2. Inserting the RPC2
communications module
Insert the RPC2
communications module into
the card bay and secure it by
tightening the captive
thumbscrews.
NOTE: The RPC2 factory
default boot mode is DHCP for
the LAN port, so no changes
are necessary.
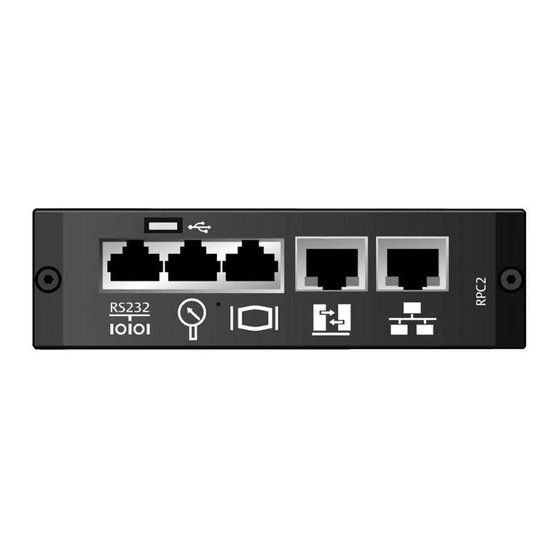
RPC2™ Communications Module Installation
USB Micro-AB
Serial
Sensor
3. Connecting a laptop
Connect a CAT5 Ethernet cable
(not included) from a laptop to
the RPC2's link port.
NOTE: Do not connect the link
port to your network. The
RPC2's link port should only be
used for local configuration or
linking together a Rack PDU
Array™.
4. Configuring the RPC2
through the link port
To establish communication
through the link port, first
configure the laptop's Ethernet
adaptor with the following
settings:
IP Address: 192.168.1.9
Subnet mask: 255.255.255.252
Default gateway: 192.168.1.1
Link
Display
Network
5. Entering the link port IP
address
Open a web browser and enter
192.168.1.10. When prompted,
enter admin for both the login
and the password and click the
Login icon or press Enter.
6. Configuring the network
Click the System tab and click
Settings - Network in the
navigation tree. Click the Edit
icon in the right pane. Select
Static for the IPV4 Boot Mode
and enter the IP address,
subnet mask and default
gateway in the proper fields.
See your network administrator
for these settings.
1
SL20842_Rev3/590-1771-501A
Advertisement
Table of Contents

Subscribe to Our Youtube Channel
Related Manuals for Vertiv LIEBERT RPC2


Summary of Contents for Vertiv LIEBERT RPC2
- Page 1 LIEBERT® RPC2™ COMMUNICATIONS MODULE Quick Installation Guide The RPC2™ Communications RPC2™ Communications Module Installation Module provides network and environmental sensor connectivity for the Liebert™ rack PDU family of products. It provides Ethernet and serial communication interfaces as well as the ability to connect up to four rack PDUs in an array, sharing one IP address.
- Page 2 To contact Vertiv Technical Support: visit www.VertivCo.com © 2017 Vertiv Co. All rights reserved. Vertiv and the Vertiv logo are trademarks or registered trademarks of Vertiv Co. All other names and logos referred to are trade names, trademarks or registered trademarks of their respective owners. While every precaution has been taken to ensure accuracy and completeness herein, Vertiv Co. assumes no responsibility, and disclaims all liability, for damages resulting from use of this information or for any errors or omissions.
Need help?
Do you have a question about the LIEBERT RPC2 and is the answer not in the manual?
Questions and answers