Table of Contents
Advertisement
Advertisement
Table of Contents

Subscribe to Our Youtube Channel
Related Manuals for Vertiv Liebert IntelliSlot RDU101


Summary of Contents for Vertiv Liebert IntelliSlot RDU101
- Page 1 Liebert® IntelliSlot™ RDU101™ Communications Card Installer/User Guide...
- Page 2 The products covered by this instruction manual are manufactured and/or sold by Vertiv. This document is the property of Vertiv and contains confidential and proprietary information owned by Vertiv. Any copying, use or disclosure of it without the written permission of Vertiv is strictly prohibited.
-
Page 3: Table Of Contents
5.4.2 Local Users Folder 5.4.3 Remote Authentication Folder 5.4.4 Network Folder 5.4.5 Web Server Folder 5.4.6 LIFE™ Folder 5.4.7 Remote Services Folder 5.4.8 Velocity Protocol Folder 5.4.9 Messaging Folder 5.5 Protocols Folder 5.5.1 SNMP Folder Vertiv | IntelliSlot™ RDU101 Installer/User Guide |... - Page 4 5.6 Status Folder 5.7 Support Folder 5.7.1 Active Networking Folder 5.7.2 Firmware Update Folder 5.7.3 Configuration Export/Import Folder 5.7.4 Manually Restarting the Card 5.7.5 Manually Resetting to Factory Defaults Vertiv | IntelliSlot™ RDU101 Installer/User Guide |...
-
Page 5: Introduction
1 INTRODUCTION This Liebert® RDU101 card delivers enhanced communication and control of AC Power, Power Distribution and Thermal Management products. The platform communicates with Vertiv™ software tools and services, including Trellis™, Trellis Power Insight, LIFE™ Services, Liebert® SiteScan Web™ and Liebert®... - Page 6 This page intentionally left blank Vertiv™ | IntelliSlot™ RDU101 Installer/User Guide...
-
Page 7: Installation
NOTICE Risk of improper installation. Can cause equipment damage. Only a qualified service professional should install these products. We recommend that a Vertiv™ technician perform the installation in large UPS system. Contact Vertiv™ at https://www.vertivco.com/en- us/support/. -
Page 8: Installing The Card
Press the Windows key+R, and enter cmd, and click OK. • Type ipconfig /all and press Enter, then verify the following, see Figure 2.1 on the facing page: Autoconfiguration Enabled = Yes Autoconfiguration IPv4 Address = 169.254.x.x Subnet Mask = 255.255.0.0 Vertiv™ | IntelliSlot™ RDU101 Installer/User Guide... -
Page 9: Determining The Dhcp Ip Address
2. On the computer, open a web browser session and enter 169.254.24.7 to connect to the card's web server. The RDU101 user interface opens. Figure 2.1 Autoconfiguration Lines in the Command Prompt ITEM DESCRIPTION Autoconfiguration Enabled Autoconfiguration IPv4 Address Subnet Mask 2.1.2 Determining the DHCP IP Address The card is factory-configured for DHCP. -
Page 10: Assigning A Static Ip Address
IPv4, but this can be changed to IPv6 for greater security. Contact your network administrator to determine if it is compatible with your network. On the Communications tab menu, select Configuration > Network. Vertiv™ | IntelliSlot™ RDU101 Installer/User Guide... -
Page 11: Installing Multiple Cards In A System
2. Enable the protocol, IPv4 or IPv6, that will be used to communicate with the card and with the equipment: a. Click IPv4 or IPv6. b. Click Edit. c. When prompted, enter the Administrative user name and password. The default name and password are both "Liebert" (case-sensitive). d. - Page 12 Enable/disable SNMP - disable unused Communication Protocols Enable Communication Protocols on page 11 protocols. Enable/disable the desired SNMP version(s); SNMP Version Settings Consider using SNMPv3 with user Configure SNMP Settings on page 12 authentication and encryption. Vertiv™ | IntelliSlot™ RDU101 Installer/User Guide...
- Page 13 Enable/disable the Velocity Protocol which is Velocity Protocol Settings used by Vertiv™ management applications to Velocity Protocol Folder on page 40 access device data. For added security, the local network firewall and gateway may be restricted to allow only the necessary traffic on the required network ports.
- Page 14 This page intentionally left blank Vertiv™ | IntelliSlot™ RDU101 Installer/User Guide...
-
Page 15: Enable Communication Protocols
The RDU101 card enables SNMP management of Liebert® equipment. To integrate the card into a SNMP implementation, import or compile the Liebert® Global Products MIB on the network management station (NMS). The Liebert® Global Products MIB is available at https://www.vertiv.com/en-us/support/software- download/monitoring/management-information-bases-mibs-for-liebert-products/. It supports both Windows® (LGPMIB-WIN) and Unix (LGPMIB-UNIX) file formats. 3 Enable Communication Protocols... - Page 16 The new engine ID is not displayed until after rebooting the card in Step 4. The text-generated engine ID is a hexadecimal representation of ASCII characters similar to that shown in Figure 3.1 on the facing page. Vertiv™ | IntelliSlot™ RDU101 Installer/User Guide...
- Page 17 Figure 3.1 SNMP Engine ID generated using text-format scheme NOTE: If the format type or text for the Engine ID are incomplete or invalid, the Engine ID is generated based on the MAC Address. 4. Restart the card to activate the changes: a.
-
Page 18: Download Protocol Mappings
Click the Managed Device tab, then Summary > Downloads. The Data Mapping Files heading shows mapping files: • SNMP_Events.txt, SNMP_Parameters.txt, SNMP_upsMibEvents.txt, and SNMP_upsParams.txt for SNMP v1/v2c/v3 The SNMP MIB files are available for download from the www.vertivco.com. Vertiv™ | IntelliSlot™ RDU101 Installer/User Guide... -
Page 19: Unity Web-Page Layout
4 UNITY WEB-PAGE LAYOUT Default settings of the card let you use it immediately after installation to monitor the equipment in which the card is installed. The Web interface customizes the information to ease equipment monitoring and troubleshooting problems. You can name the equipment, enter a location, set up email and text alerts and change equipment settings. -
Page 20: Help Text
Status, Events, or Settings row. The Web UI may display any of the following 6 icons. Table 4.1 Help text and icons ICON DESCRIPTION Event Normal Event Information Event Alarm Event Warning Event Critical Tool Tip Vertiv™ | IntelliSlot™ RDU101 Installer/User Guide... -
Page 21: Managed-Device Tab Menu
4.3 Managed-device Tab Menu Menus on the Managed Device tab list only data that is relevant to the monitored equipment. For example, menus shown by a card installed in a UPS differ from menus shown by a card installed in Thermal Management equipment. -
Page 22: Sensor Tab Menu
Icons indicate sensor status readings for example: cable fault or door open/closed depending on sensor function. Sensor details—data for sensor selected in the summary list. Sensor settings—editable data/configuration for sensor selected in the summary list. Vertiv™ | IntelliSlot™ RDU101 Installer/User Guide... -
Page 23: Sensor-Tab Summary Page
The Sensor menu contains folders showing an overview of the installed sensors, the event status of the sensors, download links for log files and sensor-configuration settings described in the following table. Table 4.2 Sensor-tab menu folders FOLDER DESCRIPTION Displays a list of currently discovered sensors, with their status and values. Also displays a Summary detail section about the sensor that is currently selected Active Events... -
Page 24: Changing Sensor Order
2. Click Edit, and enter the user name and password. 3. Select the radio button for the sensor to move. 4. Use the arrows at the right of the list to move the sensor up or down. 5. Click Save. Vertiv™ | IntelliSlot™ RDU101 Installer/User Guide... -
Page 25: Editing The Card Configuration
5 EDITING THE CARD CONFIGURATION The Web UI can be used to configure the settings for the card and for the monitored equipment. The following steps apply to making changes to all configuration settings. To edit the configuration: Open a Web browser and enter the card’s IP address. 2. -
Page 26: Configuration Folder
NTP Time Sync Rate The rate at which time will be synchronized with the Network Time Protocol server, if NTP is the external time source. Time Zone Time zone where the device is located. Vertiv™ | IntelliSlot™ RDU101 Installer/User Guide... -
Page 27: Local Users Folder
Enable Auto-Sync to Managed Device Enable automatic writing time to the managed device. Managed Device Auto-Sync Rate Rate at which time will be written to the managed device, if an external time source has been selected. 5.4.2 Local Users Folder The Local Users subfolder offers up to 10 users and 3 access levels described in Table 5.1 below. - Page 28 The attributes are in a config file or a GUI interface depend on the authentication server implementation. • The unity_group=unityuser; can be used in the same manner as unity_group=unityadmin; . • The unity_group=unityadmin; and unity_group=unityuser; string must be terminated with a semicolon. Vertiv™ | IntelliSlot™ RDU101 Installer/User Guide...
- Page 29 LDAP Authentication Authentication and authorization is provided by the remote LDAP server. NOTE: If you are using an out-of-the-box Linux OpenLDAP installation, you must add the "Info" attribute to specify the RDU101-group authorization, or the LDAP authorization will not work. Adding "Info" Attribute to LDAP Schema for Linux OpenLDAP on the next page.
- Page 30 $ Info ) MAY ( userPassword $ loginShell $ gecos $ description ) ) To add the "Info" attribute on an existing OpenLDAP installation: Use “ldapmodify” or other LDAP administrator tool to add the “Info” attribute to the user accounts. Vertiv™ | IntelliSlot™ RDU101 Installer/User Guide...
- Page 31 TACACS+ Authentication Authentication and authorization is provided by the remote TACACS+ server. TACACS+ Settings [Enable/Disable selection] Enables TACACS+ authentication in the card. Primary Authentication Server IP address of the primary TACACS+ server. Secondary Authentication Server IP address of the secondary TACACS+ server. Secret The shared secret that serves as a password between the client and the server.
- Page 32 The attributes are in a config file or a GUI interface depend on the authentication server implementation. • The unity_group=unityuser; can be used in the same manner as unity_group=unityadmin; . • The unity_group=unityadmin; and unity_group=unityuser; string must be terminated with a semicolon. Vertiv™ | IntelliSlot™ RDU101 Installer/User Guide...
-
Page 33: Network Folder
Kerberos Authentication Kerberos Settings [Enable/Disable selection] Enables Kerberos authentication in the card. Server (Realm) IP address of the Kerberos server. Realm Domain Name Name of the realm of systems that share the Kerberos database. Domain Name Domain where Kerberos database resides in the master system.. 5.4.4 Network Folder The top level of the Network subfolder displays the following: Speed Duplex... - Page 34 Mode the card boots into to be a network ready device (Static, Auto). Default = Auto. Static IP Address Network address for the interface. Prefix Length Prefix length for the address that divides a network into manageable segments. Vertiv™ | IntelliSlot™ RDU101 Installer/User Guide...
- Page 35 Default Gateway IP address of the gateway for network traffic destined for other networks or subnets. Default = 64. DNS Server Address Source Source of DNS server identification (None, Automatic, Configured). Default = Automatic. Primary DNS Server Primary DNS Server Secondary DNS Server Secondary DNS Server Domain Name Server (DNS) Test Folder The Domain Name Server Test checks key points of a Domain Name Server (DNS) setup for a given domain.
-
Page 36: Web Server Folder
When enabled, a log-in session is required before any device information is displayed to the user. User level credentials will allow only viewing of device information. Administrator level credentials are required to make any changes. Vertiv™ | IntelliSlot™ RDU101 Installer/User Guide... - Page 37 Remote Write Access When enabled, all web browsers have write access to data on all card web pages when the user is logged-in with Administrator credentials. When disabled, write access is restricted to web browsers connected via IPv4 Auto-configuration address at 169.254.24.7. For additional information, see Connecting Directly to Computer for Configuration on page 4.
- Page 38 State or province of the organization identified as the owner of the generated certificate. Country Code Country-code (2-letter abbreviation) of the organization identified as the owner of the generated certificate. Email Address Email-address of the contact within the organization identified as owner of the generated certificate. Vertiv™ | IntelliSlot™ RDU101 Installer/User Guide...
- Page 39 Uploading SSL Certificate PEM Files On the Communications tab, select Configuration > Web Server > Certificate. 2. In Commands, click Enable, then click Upload next to Upload SSL Certificate PEM Files. The upload dialog opens. See the following figure. 3. Follow the instructions in the dialog to select and upload the appropriate files. Figure 5.2 Upload SSL Key &...
-
Page 40: Life™ Folder
The LIFE subfolder contains settings that affect use of the Vertiv™ LIFE Technology, a remote monitoring and diagnostic service for Vertiv™ units. The LIFE settings are for use by trained Vertiv™ personnel only and require no user changes. The following tables provide reference information about the LIFE settings. -
Page 41: Remote Services Folder
5.4.7 Remote Services Folder The top level of the Remote Services subfolder offers options for remote-service connections. Settings in this folder are managed by Vertiv™. A service contract is required. For support, contact Vertiv™ LIFE Services at 1-800-435-7250, option 3. - Page 42 URL address of the remote-service platform. Do not enter the "http://" or "https://" prefix. Connection retry time Length of time to attempt reconnection in the event of a communication failure. Range: 30 to 600 seconds. Proxy Enable Enables use of remote-service-platform URL to connect with a proxy server. Vertiv™ | IntelliSlot™ RDU101 Installer/User Guide...
- Page 43 Proxy Authentication Enables authentication of the proxy server. Proxy Address IP or URL address of the proxy server. Proxy IP Port Number Port number of the proxy server. Range: 1 to 65535. Proxy User Name User name of the proxy server. Proxy User Password Password of the proxy server.
-
Page 44: Velocity Protocol Folder
NOTE: With the exception of changing the node ID when multiple cards are used or when disabling Velocity-Protocol IP access, the settings in the Velocity Protocol sub-folders should not be modified unless directed by a Vertiv™ representative. NOTE: Liebert® Nform™ requires that IP access to Velocity be enabled. - Page 45 SMTP Server Address Fully-qualified domain name or IP address of the server used for relaying email messages. NOTE: If using a server name, a DNS server may need to be configured under Network Settings. SMTP Server Port SMTP server port. Default = 25. SMTP Connection SMTP server connection type.
- Page 46 SMTP server connection type. Determines the capabilities of the SMTP server. Options are: • Clear = Do not use encryption • SSL/TLS = Encryption using SSL/TLS connection • STARTTLS = SSL/TLS encryption initiated using STARTTLS. Vertiv™ | IntelliSlot™ RDU101 Installer/User Guide...
- Page 47 SMTP Authentication Enable or disable SMS SMTP authentication. An SMS account must be provided for the SMTP service provider to authenticate. NOTE: Some messaging servers may require account-configuration changes to allow communication with the RDU101 card. For example, Gmail only recognizes Google applications as being secure. However, they provide an account setting that allows authentication with what they consider “less- secure apps.”...
-
Page 48: Protocols Folder
5.5 Protocols Folder The Protocols folder displays the types of protocols available for the card to communicate with management systems such as BMS, NOC, and so on. NOTE: To enable and configure the Vertiv™ Velocity protocol, see Velocity Protocol Folder on page 40. - Page 49 LGP MIB Traps Enable or Disable support for Liebert® Global Products MIB traps. The LGP MIB must be enabled for LGP traps to operate. LGP MIB System Notify Trap Enable or Disable support for the LGP System Notification trap. This is a single trap sent each time an alarm or warning is added or removed from the conditions table.
- Page 50 SNMPv1 Trap Settings SNMP Trap Target Addresses Configure network hosts that will receive alert notifications (i.e., SNMP Traps). The host can be identified as either an IP address or the host’s network name. Vertiv™ | IntelliSlot™ RDU101 Installer/User Guide...
-
Page 51: Status Folder
SNMP Trap Port Port used by the target host for receiving notifications; default is 162. SNMP Trap Community String String identifying a 'secret' known only by those hosts that want to be notified of device status changes. Default: public (case-sensitive). SNMPv1/v2c Access Folder This page contains settings for network hosts that access data using SNMPv1/v2c. - Page 52 Restart card and implement configuration changes Reset Card to Factory Defaults Reset the card’s configuration to its factory defaults Generate and download diagnostic file Generate a file containing diagnostic information and download it with a Web browser. Vertiv™ | IntelliSlot™ RDU101 Installer/User Guide...
-
Page 53: Active Networking Folder
5.7.1 Active Networking Folder Status of the currently active IP network settings for the RDU101 card along with some previous values for troubleshooting IP communication issues. Active Networking Parameters Ethernet MAC Address Ethernet MAC Address for the Liebert® IntelliSlot card IPv4 Address Presently used IPv4 network address IPv4 Default Gateway... -
Page 54: Firmware Update Folder
Alternate Firmware Date The build date of the alternate (previous) firmware Firmware Commands Run Alternate Firmware Return the card's firmware to the alternate (previous) version. Firmware Update Update the card’s firmware to a new/different version. Vertiv™ | IntelliSlot™ RDU101 Installer/User Guide... - Page 55 Updating the Card Firmware For description of the field and folders used when updating, see Firmware Update Folder on the previous page. To update the firmware on the RDU101 card: On a computer, download the latest RDU101-card firmware from https://www.vertivco.com/en- us/support/software-download/monitoring/liebert-intellislot-communications-interface-cards/.
-
Page 56: Configuration Export/Import Folder
User password and other secrets are hidden in the export file, and the line is commented to prevent inadvertent import. To import a new password or other secret, un-comment the line and enter the new password. Because this is a text string, it must be enclosed in double quotes ("). Vertiv™ | IntelliSlot™ RDU101 Installer/User Guide... - Page 57 Figure 5.4 File-format Examples (example lines are bold) Exporting and Modifying a Configuration File The exported file is text format (.txt) saved to the default folder created by the web browser, which is typically the "Downloads" folder on MicroSoft Windows devices. The file is named with the prefix "config_" followed by MAC address, Year, Month, Day, and Time.
-
Page 58: Manually Restarting The Card
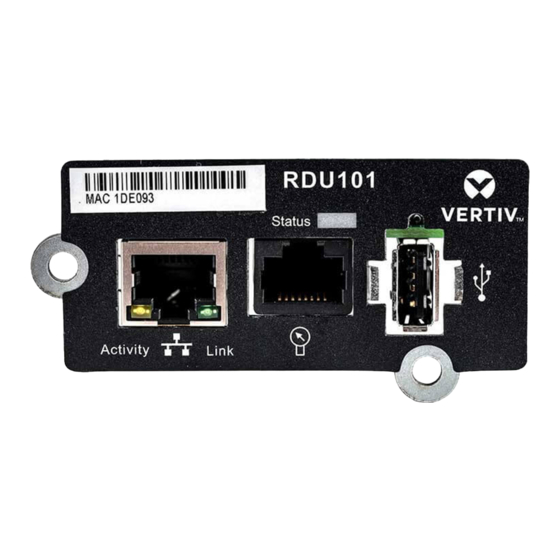
5.7.5 Manually Resetting to Factory Defaults Locate the reset button above the USB port on the front of the card, see Figure 1.1 on page 1. 2. Press-and-hold for at least 30 seconds. The card is reset to factory-default configuration. Vertiv™ | IntelliSlot™ RDU101 Installer/User Guide... - Page 59 Vertiv™ | IntelliSlot™ RDU101 Installer/User Guide...
- Page 60 VertivCo.com | Vertiv Headquarters, 1050 Dearborn Drive, Columbus, OH, 43085, USA © 2018 Vertiv Co. All rights reserved. Vertiv and the Vertiv logo are trademarks or registered trademarks of Vertiv Co. All other names and logos referred to are trade names, trademarks or registered trademarks of their respective owners. While every precaution has been taken to ensure accuracy and completeness herein, Vertiv Co.
Need help?
Do you have a question about the Liebert IntelliSlot RDU101 and is the answer not in the manual?
Questions and answers