
Related Manuals for Seastar Solutions HC5370-3


Summary of Contents for Seastar Solutions HC5370-3
- Page 1 INSTALLATION INSTRUCTIONS AND OWNER'S MANUAL w w w . s e a s t a r s o l u t i o n s . c o m FORTY SEVEN ISO 9001 Side Mount & Splashwell Mount Steering Cylinders...
- Page 2 SeaStar Solutions throughout this publication. These safety alerts alone cannot eliminate all of the hazards that may be present while on the water. SeaStar Solutions recommends that all users of the steering system take an accredited 'boating safety course', follow safe boating practices and are made aware of the environment that they will be in.
-
Page 3: Safety Information
(including helm pumps, hoses and fitting kits). 2. DO NOT modify or substitute any component in any way without written consent from SeaStar Solutions. 3. Comply with all system ratings/regulations (boat/engine, U.S.C.G.). - Cylinder MUST be compatible with engine(s) installed. - Page 4 Safety Information Continued Prior to every use 1. Check Fluid level in highest helm pump (see page 12 for proper fluid level setting). 2. Verify immediate steering response when turning steering wheel(s). (Ensure drive(s)/rudder(s) turns when steering wheel is turned.) 3.
-
Page 5: Table Of Contents
Before proceeding with the installation oil is disposed of properly. of these cylinders, read these instructions thoroughly. SeaStar Solutions cannot accept responsibility for installation where instructions have not been followed, where substitute parts have been used or where modifications have been made to our products. -
Page 6: Side Mount Cylinders
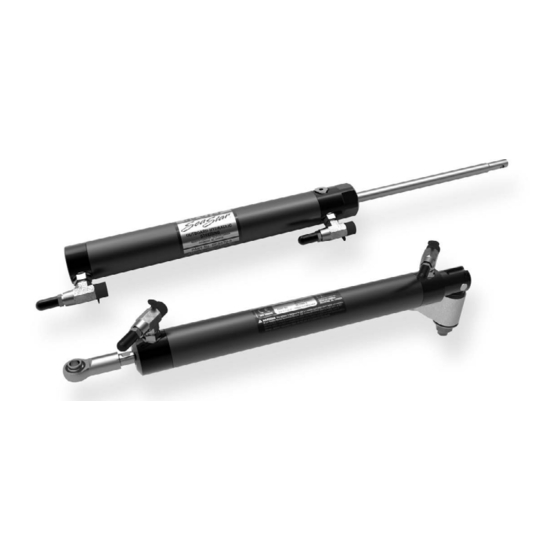
SIDE MOUNT CYLINDERS HC5370-3 & HC4670-3 NOTICE The side mount cylinder is installed in the same fashion as a steering cable. 1. Slide well greased extension rod into thoroughly cleaned and rust free engine steering/tilt tube. (item 1, figure 1). - Page 7 (WITH 11" TILT TUBE) TILT TUBE LINK ARM SUPPLIED BY ENGINE MANUFACTURER BLEED NIPPLE 1.94" (50 mm) 1.5" (38 mm) ACROSS WRENCH FLATS TORQUE TO 50-75 FT.LB. Figure 1. HC5370-3 SeaStar Side Mount Cylinder shown, BayStar similar. Side Mount & Splashwell Mount Cylinders...
-
Page 8: Splashwell Mount Cylinders
SPLASHWELL MOUNT CYLINDER HC5380-3 NOTICE BEFORE attempting installation of this Splashwell Mount Cylinder, consult the mounting configuration below for proper position of the mounting foot to the transom. As the Splashwell cylinder requires through bolting on the transom it will be necessary to contact the boat manufacturer for proper preparation of the transom holes. -
Page 9: Plumbing Diagram
Use of a hose/tube other than that recommended by SeaStar Solutions may drastically change performance and the safe operation of your system. SeaStar Solutions cannot be responsible for ANY consequences resulting from the use of a substitute tube or hose. - Page 10 HYDRAULIC STEERING HOSE AND TUBING loss of steering control. Loss of steering control may lead to a collision with an obstacle and/or ejection from boat resulting in property damage, personal injury and/or death. c) Hose/Tube must be routed so that it will not interfere with any other functional equipment;...
- Page 11 HYDRAULIC STEERING HOSE AND TUBING WARNING SeaStar Solutions recommends that the hose and hose fittings are checked on a regular basis to ensure the safe operation of the steering system. SECURE WITH SECURE WITH WRENCH HERE WRENCH HERE WHILE TIGHTENING...
- Page 12 HYDRAULIC STEERING HOSE AND TUBING b) BayStar Nylon Tubing. CAUTION • Slide tube not over tubing. Ensure that the tubing is pushed • Push tubing into bottom of component fittings. ALL the way in. • Hand tighten tube nut, ensuring that the tube is bottomed out against the fitting while tightening.
-
Page 13: Filling & Purging The System
Do NOT allow the oil level to disappear into the helm pump, as this may introduce air into the system and increase your filling time. SeaStar Solutions recommends the use of SeaStar Steering Fluid ONLY. Hydraulic Fluid SeaStar Steering Systems have been engineered and validated using our proprietary SeaStar Hydraulic Fluid. - Page 14 HYDRAULIC STEERING FILLING AND PURGING Single Station One Cylinder Figure 8. OIL BOTTLE Step 1 FILL TUBE • Screw the threaded end of the • Fill the helm pump full of oil (refer STEERING WHEEL HELM filler tube into the helm filler hole. to figure 4).
- Page 15 HYDRAULIC STEERING FILLING AND PURGING Twin Station Single Cylinder STATION NO.2 • Perform steps 1 through 5 at Refer to NOTICE station no. 1. Oil Level and System Check on page 12. • Then repeat steps 1 - 5 at STATION NO.1 station no.
-
Page 16: Oil Level And System Proof Check
OIL LEVEL AND SYSTEM PROOF CHECK STEP 1 Oil Level Setting The oil level MUST be checked and maintained BEFORE each use WARNING to ensure the safe operation of your steering system. Failure to adhere to this warning may lead to loss of steering control. Loss of steering control may result in unpredictable boat behavior, collision with an obstacle and/or ejection from vessel, leading to property damage personal injury and/or death. -
Page 17: Routine Maintenance
ROUTINE MAINTENANCE WARNING Following the routine maintenance schedules as outlined below, in the time frame noted will ensure years of service from your SeaStar Steering System, as well as keep you and your passengers safe from the dangers that are present on and off the water. 1. -
Page 18: Troubleshooting Guide
TROUBLESHOOTING GUIDE FAULT CAUSE SOLUTION 1. Helm locks up completely. • PRO helm used with an • Replace helm with a non-Pro unbalanced cylinder. helm pump. • Collapsed hose/tube. • Replace section with new length. 2. Oil keeps pouring out of •... -
Page 19: Statement Of Limited Warranty
In such a case SeaStar Solutions products found to be defective and covered by this warranty, will be replaced at SeaStar Solutions’ option, and returned to the customer. - Page 20 SEASTAR SOLUTIONS 3831 NO.6 ROAD RICHMOND, B.C. CANADA V6V 1P6 FAX 604-270-7172 www.seastarsolutions.com © 2009 MARINE CANADA ACQUISITION INC. DBA SEASTAR SOLUTIONS PRINTED IN CANADA 04/18 ISO 10592 Please scan FORM NO. 343322 REV. E this QR code and watch our latest Boating Safety video.
Need help?
Do you have a question about the HC5370-3 and is the answer not in the manual?
Questions and answers