Table of Contents
Advertisement
Quick Links
Download this manual
See also:
Installation Manual
NORTH AMERICA
3130 East Miraloma Avenue
Anaheim, CA 92806 USA
USA and Canada –
Phone: 800-368-9700
Fax: 800-832-4888
Other Locations – Phone: (001)-714-632-7100; Fax: (001)-714-632-1044
©Premier Mounts 2010
9531-008-001-0A
CREATING POSITIVE CUSTOMER EXPERIENCES
INSTALLATION INSTRUCTIONS
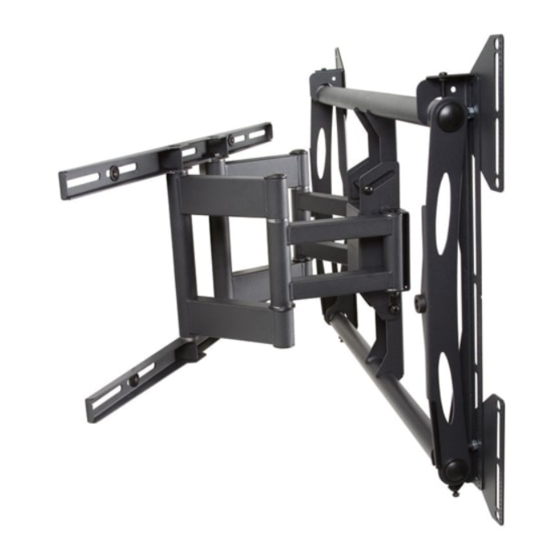
Universal Low Profile Swingout Arm for 37" to 63" Flat Panels
AM175
Shilton, Coventry, England CV79JY
Phone: +44 (0) 2476 614700
EUROPE
Swallow House,
Shilton Industrial Estate,
Fax: +44 (0) 2476 614710
Advertisement
Table of Contents

Related Manuals for Premier Mounts AM175


Summary of Contents for Premier Mounts AM175
- Page 1 Anaheim, CA 92806 USA Shilton Industrial Estate, USA and Canada – Shilton, Coventry, England CV79JY Phone: 800-368-9700 Phone: +44 (0) 2476 614700 Fax: 800-832-4888 Fax: +44 (0) 2476 614710 Other Locations – Phone: (001)-714-632-7100; Fax: (001)-714-632-1044 ©Premier Mounts 2010 9531-008-001-0A...
-
Page 2: Table Of Contents
PROPERTY DAMAGE. KEEP THESE INSTALLATION INSTRUCTIONS IN AN EASILY ACCESSIBLE LOCATION FOR FUTURE REFERENCE. PREMIER MOUNTS DOES NOT WARRANT AGAINST DAMAGE CAUSED BY THE USE OF ANY PREMIER MOUNTS PRODUCT FOR PURPOSES OTHER THAN THOSE FOR WHICH IT WAS DESIGNED OR DAMAGE CAUSED BY UNAUTHORIZED... -
Page 3: Parts List
AM175 Parts List Make sure your Premier Mounts product has the following hardware and components before begin- ning installation. If there are parts missing and/or damaged, stop the installation and call Premier Mounts at (800) 368-9700 Extension Adapter Hardware Pack... - Page 4 M8 x 30mm (Qty 6) M6 x 16mm (Qty 6) M8 x 25mm (Qty 6) M8 x 16mm (Qty 6) If your unit requires alternative mounting hardware, use commercially available hardware or contact Premier Mounts (800) 368-9700. Page 4 Installation Instructions...
-
Page 5: Wood Stud Installation
AM175 Wood Stud Installation THE FOLLOWING STEPS MUST BE PERFORMED BY TWO PEOPLE. Wall Stud E l e c t r o n i c Stud Finder Step 2. Once the studs have been located, use a pencil Step 1. Determine the desired viewing location. Use a to mark the center of each stud. - Page 6 AM175 Step 10. Re-level the AM175. Mounting Slot Step 11. Using a 1/2” socket wrench, completely tighten the two (2) upper lag bolts. Flat Washer Do NOT over-tighten lag bolts when Upper Mounting Channel attaching the mount to the wall. Improper 5/16”...
-
Page 7: Concrete Surface Installation
AM175 Concrete Surface Installation THE FOLLOWING STEPS MUST BE PERFORMED BY TWO PEOPLE. If concrete wedge anchors are not used (as described in these installation instructions) and you decide on other mounting hardware, please follow the installation instructions as provided with that hardware. -
Page 8: Determining The Mounting Hardware
AM175 Step 7. Once all of the anchors are in place, move the wall bracket into position. Level Step 8. Attach the nut onto the threaded shaft that is protruding from the wall. Step 9. Re-level the wall plate and tighten all concrete wedge anchor nuts at this time. -
Page 9: Universal Spacer Installation
AM175 Universal Spacers Installation (optional) If your flat panel has uneven mounting points, or recessed mounting points, please use the provided universal spacers. The universal spacer may be stacked six (6) high, for a total stacking height of 1-1/2”. The universal spacers must be stacked in the direction shown above. -
Page 10: Griplate ™ Installation
AM175 Mounting Bracket Installation This kit provides a variety of screws with different lengths and diameters to accommodate most flat panels. The number and location of mounting points will vary between manufacturers. Do NOT over-tighten the screws. Mounting Hardware Mounting Bracket ™... -
Page 11: Adapter Plate Installation (Optional)
Socket Wrench level and aligned with each other. If they are not aligned and level, the flat panel will not sit properly when mounted to the AM175. Step 7. Once the universal mounting brackets are level, Nylon Nut use a 1/2” socket and socket wrench to tighten Flat Washer the M8 nylon nuts. -
Page 12: Attaching The Flat Panel To The Wall
Flat Panel Step 1. Place the universal brackets and the flat panel over and onto the upper and lower mounting bars of the AM175 and lower it down. Do not release the flat panel until the flat panel is resting securely on the upper and lower mounting bars. -
Page 13: Adjusting The Flat Panel Tilt
AM175 Adjusting the Flat Panel Tilt TO ADJUST THE TILT TENSION OF THE AM175, LOOSEN THE TENSION BOLTS LOCATED ON THE BOTTOM RIGHT AND LEFT SIDE OF THE MAIN ARM ASSEMBLY. RE-TIGHTEN THESE BOLTS TO ACHIEVE YOUR DESIRED TENSION. Tension... -
Page 14: Technical Specifications
AM175 Technical Specification All measurements are in inches(mm). 34.31 33.21 3.21 16.00 25.71 26.43 14.02 Page 14 Installation Instructions... -
Page 15: Warranty
What Premier Mounts Will Do At the sole option of Premier Mounts, Premier Mounts will repair or replace any product or product part that is defective. If Premier Mounts chooses to replace a defective product or part, a replacement product or part will be shipped to you at no charge, but you must pay any labor costs.
Need help?
Do you have a question about the AM175 and is the answer not in the manual?
Questions and answers