Table of Contents
Troubleshooting

Related Manuals for Dräger Medical Resuscitaire WBR82


Summary of Contents for Dräger Medical Resuscitaire WBR82
- Page 1 Resuscitaire® Radiant Warmer Products Models WBR82, RW82, and WARNING: For a full understanding of the performance characteri- WMRW82 stics of this equipment, the user should carefully read this manual before operating. Technical Service Manual...
- Page 3 Proprietary and Confidential Draft 8 Sep 05 Resuscitaire® Radiant Warmer Products Service Manual Revisions Revision Letter Pages Affected Date Original Issue December, 2004 Revision 2 August, 2005 82 990 45 (MU16506) Resuscitaire® Radiant Warmer Products Service Manual (82 990 45) Page i...
- Page 4 Proprietary and Confidential Draft 8 Sep 05 Revisions © 2005 by Draeger Infant Medical Care, Inc. ALL RIGHTS RESERVED. No part of this text shall be reproduced or transmitted in any form or by any means, electronic or mechanical, including photocopying, recording, or by any information or retrieval system without written permission from Draeger Infant Medical Care, Inc.
- Page 5 Proprietary and Confidential Draft 8 Sep 05 Revisions The information contained in this manual is subject to change without notice. Dräger Medical makes no commitment to update or keep current, the information contained in this manual. The only product warranty intended by Dräger Medical is the express, written warranty accompanying the bill of sale to the original purchaser.
- Page 6 Proprietary and Confidential Draft 8 Sep 05 Revisions NOTES: Page iv Resuscitaire® Radiant Warmer Products Service Manual (82 990 45)
-
Page 7: Table Of Contents
Proprietary and Confidential Draft 8 Sep 05 Table of Contents Chapter 1: Introduction Purpose ............1 - 1 Audience . - Page 8 Proprietary and Confidential Draft 8 Sep 05 Table of Contents Suction ........... 1 - 20 Gas Supply Module (Optional).
- Page 9 Proprietary and Confidential Draft 8 Sep 05 Table of Contents Mechanical ........... . 2 - 8 Resuscitation Equipment (Optional).
- Page 10 Proprietary and Confidential Draft 8 Sep 05 Table of Contents Suction Does Not Obtain Desired Pressure ......2 - 80 Blender Module Oxygen Concentration Reading Does Not Match Blender Module Setting .
- Page 11 Proprietary and Confidential Draft 8 Sep 05 Table of Contents Pneumatic System..........3 - 13 Chapter 4: Removal and Replacement Tool and Supply Requirements.
- Page 12 Proprietary and Confidential Draft 8 Sep 05 Table of Contents Replacement ..........4 - 36 Controller Module Front Panel .
- Page 13 Proprietary and Confidential Draft 8 Sep 05 Table of Contents Resuscitation Variable Height Adjustable Cart Assembly, 120V/240V for the Resuscitaire® Radiant Warmer (Models with Variable Tilt Bassinet) ..5 - 68 Variable Height Adjustable Cart Assembly, 120V/240V with Variable Tilt Bassinet for the Resuscitaire®...
- Page 14 Proprietary and Confidential Draft 8 Sep 05 Table of Contents Calibrating the Auxiliary Flow ........6 - 2 Adjusting the Pressure Regulator .
- Page 15 Proprietary and Confidential Draft 8 Sep 05 Table of Contents Disinfecting........... 6 - 22 Cleaning Painted Surfaces .
- Page 16 Proprietary and Confidential Draft 8 Sep 05 Table of Contents Preventive Maintenance Schedule ....... . . 6 - 41 Preventive Maintenance Checklist .
-
Page 17: Chapter 1: Introduction
Proprietary and Confidential Draft 8 Sep 05 Chapter 1 Introduction Purpose This manual provides requirements for the normal operation and maintenance of the Resuscitaire® Birthing Room Warmer (WBR82), the Resuscitaire® Radiant Warmer (RW82), and the Resuscitaire® Wall Mounted Radiant Warmer (WMRW82). It also includes parts lists (in chapter 5) for ordering replacement components. -
Page 18: Chapter 4: Removal And Replacement Procedures
Proprietary and Confidential Draft 8 Sep 05 Organization Chapter 1: Introduction Chapter 4: Removal and Replacement Procedures Chapter 4 contains the detailed maintenance procedures determined necessary in chapter 2. Chapter 5: Parts List This chapter contains the part-ordering procedure and illustrated parts lists. Chapter 6: Calibration and Maintenance Procedures Calibration, cleaning, preventive maintenance, and other general procedures are described in this chapter. -
Page 19: Document Symbol Definition
Proprietary and Confidential Draft 8 Sep 05 Document Symbol Definition Chapter 1: Introduction Document Symbol Definition This manual contains different typefaces and icons designed to improve readability and increase understanding of its content. Note the following examples: • Standard text—used for regular information. •... -
Page 20: Introduction
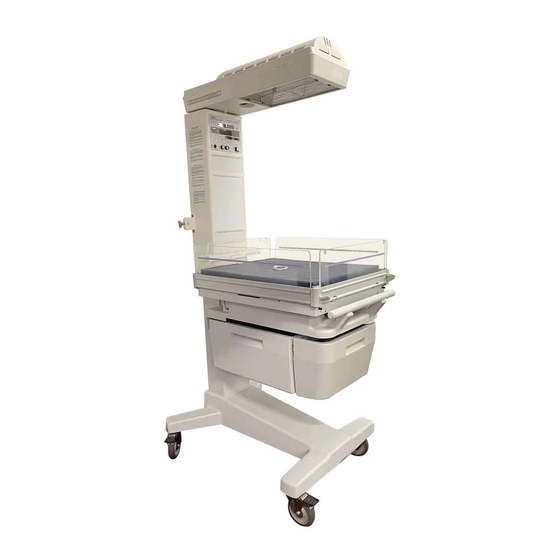
Proprietary and Confidential Draft 8 Sep 05 Introduction Chapter 1: Introduction Introduction Overview The Resuscitaire® Birthing Room Warmer (WBR82) is designed especially for labor and delivery use (see figure 1-4 on page 1-5). It consists of a detachable cart and bassinet and a freestanding warmer that provides heat control and monitors skin temperature and includes an Apgar timer. - Page 21 Proprietary and Confidential Draft 8 Sep 05 Introduction Chapter 1: Introduction Figure 1-4. Resuscitaire® Radiant Warmer (RW82) Controller Warmer Module Module Blended Gas Supply Module Examination Resuscitation Light Module Gas Supply Bassinet Module X-ray Tray Handle Cassette Pass-through Drawer Resuscitation Equipment Storage Compartment...
- Page 22 Proprietary and Confidential Draft 8 Sep 05 Introduction Chapter 1: Introduction Figure 1-5. Resuscitaire® Birthing Room Warmer (WBR82) Warmer Module Controller Blended Gas Supply Module Bassinet Tilt Resuscitation Mechanism Module Supply Module Drawer Suction Lock Bottle Pass-through Drawer Caster Lock Page 1 - 6 Resuscitaire®...
-
Page 23: Abbreviations
Proprietary and Confidential Draft 8 Sep 05 Introduction Chapter 1: Introduction Figure 1-6. Resuscitaire® Wall Mounted Radiant Warmer (WMRW82) Abbreviations • Liters Per Minute (LPM) • Standard Cubic Feet per Hour (scfh) • Neonatal Intensive Care Unit (NICU) • Positive End Expiratory Pressure (PEEP) •... -
Page 24: Cart/Bassinet (Resuscitaire® Birthing Room Warmer (Wbr82) And Cart Only)
Proprietary and Confidential Draft 8 Sep 05 Introduction Chapter 1: Introduction permits the warmer to pivot 90° to either side for X-ray procedures. In addition, when the warmer is pivoted, it can be powered to provide heat. The warmer head contains the quartz heating element and an examination light. -
Page 25: Controller Module
Proprietary and Confidential Draft 8 Sep 05 Introduction Chapter 1: Introduction Controller Module At power-up, the microprocessor within the Controller Module performs a series of power-up diagnostic tests to confirm the proper operation of the system. During this time, all displays and indicators light (except the Power Fail light) and a tone sounds. -
Page 26: Blender Module (Factory-Installed Option)
Proprietary and Confidential Draft 8 Sep 05 Introduction Chapter 1: Introduction Blender Module (Factory-Installed Option) The Blender Module provides blended oxygen from 21% to 100% to the patient outlet on the Resuscitation Module. Resuscitation Module (Factory-Installed Option) The Resuscitation Modules contain the pneumatic outlets necessary for infant resuscitation (see figure 1-7 on page 1-11). - Page 27 Proprietary and Confidential Draft 8 Sep 05 Introduction Chapter 1: Introduction RM2001™ Gas Delivery Module (Front Panel) Figure 1-7. NOTE: The outlet 1/4" hose barb fittings of the RM2001™ Gas Delivery Module attach to commercially-available oxygen supply tubing or a self-inflating resuscitation bag (PN 67 350 50).
- Page 28 Proprietary and Confidential Draft 8 Sep 05 Introduction Chapter 1: Introduction NOTE: The airway pressure gauge is not connected to the auxiliary outlet. NOTE: The Auxiliary Outlet oxygen percentage is not adjustable. It always supplies 100% oxygen. WARNING: The internal adjustable airway pressure relief is not functional with a self-inflating bag because the patient supply is connected to the fresh gas reservoir on the self-inflating bag, rather than directly to the patient airway.
-
Page 29: Resuscitation Module Without Autobreath™ Infant Resuscitator
Proprietary and Confidential Draft 8 Sep 05 Introduction Chapter 1: Introduction Figure 1-8. Patient Breathing Circuit for Manual Ventilation or Bagging Used with RM2001™ Gas Delivery Module Resuscitation Module without AutoBreath™ Infant Resuscitator • Patient Outlet (Resuscitation Module Only)—Use the Patient Outlet to provide continuous gas flow to the patient. - Page 30 Proprietary and Confidential Draft 8 Sep 05 Introduction Chapter 1: Introduction Figure 1-9. Resuscitation Module without AutoBreath™ Infant Resuscitator (Front Panel) • Airway Pressure—The airway pressure gauge monitors the airway pressure when externally connected to patient circuits. • Blender Module—The optional Blender Module provides blended oxygen from 21% to 100% to the Patient Outlet on the Resuscitation Module.
- Page 31 Proprietary and Confidential Draft 8 Sep 05 Introduction Chapter 1: Introduction WARNING: The internal adjustable airway pressure relief is not functional with a self-inflating bag because the patient supply is connected to the fresh gas reservoir on the self-inflating bag, rather than directly to the patient airway.
- Page 32 Proprietary and Confidential Draft 8 Sep 05 Introduction Chapter 1: Introduction Figure 1-10. Patient Breathing Circuit for Manual Ventilation or Bagging Used with Resuscitation Module without AutoBreath™ Infant Resuscitator Exhaust valve cap Exhaust port Exhalation valve housing Exhalation valve diaphragm Patient port Corrugated tubing Connect to...
-
Page 33: Resuscitation Module With Autobreath™ Infant Resuscitator
Proprietary and Confidential Draft 8 Sep 05 Introduction Chapter 1: Introduction Resuscitation Module with AutoBreath™ Infant Resuscitator (not available in the U.S.) WARNING: Always use an airway pressure monitor if the AutoBreath™ Infant Resuscitator is to be used unattended. Failure to do so could result in patient injury. - Page 34 Proprietary and Confidential Draft 8 Sep 05 Introduction Chapter 1: Introduction • Patient Gas Supply - The Patient Gas Supply circuit may be used with the AutoBreath™ Infant Resuscitator turned on or off to provide continuous gas flow to the patient. Controls are provided for Airway Pressure Relief (maximum pressure) and Flow Rate (LPM) (circuit flow delivering 100% oxygen or blended gas).
- Page 35 Proprietary and Confidential Draft 8 Sep 05 Introduction Chapter 1: Introduction WARNING: The internal adjustable airway pressure relief is not functional with a self-inflating bag because the patient supply is connected to the fresh gas reservoir on the self-inflating bag, rather than directly to the patient airway.
-
Page 36: Suction
Proprietary and Confidential Draft 8 Sep 05 Introduction Chapter 1: Introduction Figure 1-12. Patient Breathing Circuit for Manual Ventilation or Bagging Used with Resuscitation Module with AutoBreath™ Infant Resuscitator Self-inflating For manual bagging Flow-inflating to AutoBreath™ Infant Resuscitator For AutoBreath™ Infant Resuscitator 15 mm fitting Accessory T-piece allows connection to pressure gauge (not available in the U. - Page 37 Proprietary and Confidential Draft 8 Sep 05 Introduction Chapter 1: Introduction (Front Panel) Figure 1-13. Suction Controls Suction Suction Suction -19.99 kPa (-2.90 PSI) mm Hg Low Suction / Low Flow Rate Resuscitaire® Radiant Warmer Products Service Manual (82 990 45) Page 1 - 21...
- Page 38 Proprietary and Confidential Draft 8 Sep 05 Introduction Chapter 1: Introduction Figure 1-14. Suction Functional Block Diagram Box of 20 disposable suction bottle (PN 81 001 49) with built-in filter. One reusable glass suction bottle conversion kit (PN 81 001 50) with the associated filter and tubing.
-
Page 39: Gas Supply Module (Optional)
Proprietary and Confidential Draft 8 Sep 05 Introduction Chapter 1: Introduction Suction Line Filter The Suction Line Filter is a hydrophobic bacterial filter that is connected in line with the supply connection to the suction bottle. An extension tubing connects to the suction bottle outlet port. Gas Supply Module (Optional) The Gas Supply Module includes an On/Off switch that controls the pipeline and cylinder gas supply to the Resuscitation Module. -
Page 40: Apgar Timer
Proprietary and Confidential Draft 8 Sep 05 Introduction Chapter 1: Introduction Gas Delivery System When the Blender Module is included in the system, the Gas Delivery Module provides 0 to 15 LPM of oxygen/air mixture, as selected by the user (see figure 1-16 on page 1-24). -
Page 41: Alarms
Proprietary and Confidential Draft 8 Sep 05 Introduction Chapter 1: Introduction seconds. Refer to the W30R Weigh Scale User Manual (PN 03 990 50) that accompanies the scale for additional information. Alarms High Temperature When the baby skin temperature probe is attached to the infant and the skin temperature exceeds 39°C (102°F), the heater automatically turns off, the High Temp indicator flashes, and the alarm sounds continuously. -
Page 42: Baby Skin Temperature
Proprietary and Confidential Draft 8 Sep 05 Introduction Chapter 1: Introduction Baby Skin Temperature When the temperature sensed by the baby skin temperature probe is 1.0°C (1.3°F) above or below the displayed Set Temperature setting in Baby Mode, the Baby Temperature indicator flashes and an alarm sounds, first at a low level, then at a medium level, and finally at a high level. -
Page 43: Specifications
Proprietary and Confidential Draft 8 Sep 05 Specifications Chapter 1: Introduction Specifications Physical Specifications For Resuscitaire® Radiant Warmer Products specifications, see table 1-1 on page 1-27. Table 1-1. Specifications Feature Dimension Skin temperature display range 18°C to 43°C (64.4°F to 109.4°F) Skin temperature display accuracy ±... - Page 44 Proprietary and Confidential Draft 8 Sep 05 Specifications Chapter 1: Introduction For Resuscitaire® Radiant Warmer physical specifications, see table 1-2 on page 1-28. Table 1-2. Resuscitaire® Radiant Warmer (RW82) Physical Specifications Feature Dimension Mattress height 100 cm (39.4") Mattress height with VHA 89.2 cm to 110.2 cm (35.1"...
-
Page 45: Electrical Specification
Proprietary and Confidential Draft 8 Sep 05 Specifications Chapter 1: Introduction For Resuscitaire® Wall Mounted Warmer physical specifications, see table 1-4 on page 1-29. Table 1-4. Resuscitaire® Wall Mounted Warmer (WMRW82) Physical Specifications Feature Dimension Weight with bracket 18.1 kg (40 lb) Weight without bracket 15.8 kg (35 lb) Length... -
Page 46: Alarm Specifications
Proprietary and Confidential Draft 8 Sep 05 Specifications Chapter 1: Introduction Feature Dimension 220/240V models 220V/240V, 50/60 Hz, 750 W (non-VHA), 1300 W (VHA) Overload protection (100V and Dual circuit breakers: 6A (non-VHA), 10A 120V models only) (VHA) Overload protection (220/240V Dual circuit breakers: 3A (non-VHA), 5A model only) (VHA) -
Page 47: Resuscitation Modules Specifications (Resuscitaire® Birthing Room Warmer (Wbr82) And Resuscitaire® Radiant Warmer (Rw82) Only)
Proprietary and Confidential Draft 8 Sep 05 Specifications Chapter 1: Introduction Alarm Cause System fail Activates when there is a system failure. Baby (skin) temperature Activates if the baby skin temperature fluctuates 1°C above or below the setpoint. Electrical Module, audio Tone frequency: 1.2 KHz maximum three- ramping alarms (80 dBA stage sound level: 15 seconds low, 15... - Page 48 Proprietary and Confidential Draft 8 Sep 05 Specifications Chapter 1: Introduction Feature Dimension RESUSCITATION (w/o AutoBreath™ Infant Resuscitator feature, PN 8140072 and 8140073) Wall supply pressure 40 psi to 75 psi (276 kPa to 517 kPa) Cylinder pressure 3000 psi (20684 kPa) maximum Cylinder length (with VHA) 70 cm (27.5") Cylinder length (with VHA and spacer) ♦...
-
Page 49: Autobreath™ Infant Resuscitator Specifications
Proprietary and Confidential Draft 8 Sep 05 Specifications Chapter 1: Introduction Feature Dimension Patient gas supply airway pressure limit, 0 to 50 cm H O (0 to 4.9 kPa) operator adjustable ± 10% Patient gas supply fixed pressure relief, 50 cm H O ±... -
Page 50: Suction Specifications
Proprietary and Confidential Draft 8 Sep 05 Specifications Chapter 1: Introduction Feature Dimension Adjustable airway pressure relief (range of 0 to 50 cm H O ± 5 cm H working pressure) (0 to 4.9 kPa ± 0.5 kPa) Fixed maximum pressure 50 cm H O (5.0 kPa) ±... -
Page 51: Regulations, Standards, And Codes
Proprietary and Confidential Draft 8 Sep 05 Specifications Chapter 1: Introduction Regulations, Standards, and Codes The Resuscitaire® Radiant Warmer Products meet the following regulations, standards, and codes: EN 60601-1: 1990, Medical Electrical Equipment, Part 1: General Requirements for Safety, including Amendments 1 and 2 EN 60601-1-2: 2001, Collateral Standard: Electromagnetic Compatibility, Requirements and Tests EN 60601-2-21: 1994, Particular Requirements for the Safety of Infant... -
Page 52: Device Classification
Proprietary and Confidential Draft 8 Sep 05 Model Identification Chapter 1: Introduction Device Classification (EN 60601 Medical Electrical Equipment Part I: General Requirements for Safety) • Class I • Type BF • IPX 0 ordinary equipment • Not AP • Continuous operation Model Identification For Resuscitaire®... - Page 53 Proprietary and Confidential Draft 8 Sep 05 Model Identification Chapter 1: Introduction Table 1-13. Model Identification of the Available Modules Model Number Description RM811-1 and RM812-1 Resuscitation Module Series 00 RM811-1 and RM812-1 Resuscitation Module with airway pressure gauge Series 01 port (P/N 8140072, 8140072, and 8140081) RM811-1 and RM812-1 Resuscitation Module without AutoBreath™...
-
Page 54: Safety Tips
Proprietary and Confidential Draft 8 Sep 05 Safety Tips Chapter 1: Introduction Safety Tips WARNING: Prior to reuse, confirm that the patient breathing circuit contains all necessary parts. Failure to do so could result in patient injury. WARNING: Ensure the patient breathing circuit connections are secure and free of obstructions. -
Page 55: Warning And Caution Labels
Proprietary and Confidential Draft 8 Sep 05 Warning and Caution Labels Chapter 1: Introduction Warning and Caution Labels Figure 1-17. Warning and Caution Labels Resuscitaire® Radiant Warmer Products Service Manual (82 990 45) Page 1 - 39... - Page 56 Proprietary and Confidential Draft 8 Sep 05 Warning and Caution Labels Chapter 1: Introduction Figure 1-18. Warning Labels Units without actuator spacer Units with actuator spacer Page 1 - 40 Resuscitaire® Radiant Warmer Products Service Manual (82 990 45)
-
Page 57: Chapter 2: Troubleshooting Procedures
Proprietary and Confidential Draft 8 Sep 05 Chapter 2 Troubleshooting Procedures Getting Started WARNING: Only facility-authorized personnel should troubleshoot the Resuscitaire® Radiant Warmer Products. Troubleshooting by unauthorized personnel may result in personal injury or equipment damage. Begin each procedure in this chapter with step 1. Follow the sequence outlined (each step assumes the previous step has been completed). -
Page 58: Initial Actions
Proprietary and Confidential Draft 8 Sep 05 Initial Actions Chapter 2: Troubleshooting Procedures Initial Actions To gather information from operators concerning problems with the Resuscitaire® Radiant Warmer Products, use Initial Actions. Note symptoms or other information concerning the problem that the operator describes. This information helps identify the probable cause. -
Page 59: Controller Module
Proprietary and Confidential Draft 8 Sep 05 Function Checks Chapter 2: Troubleshooting Procedures Controller Module SHOCK HAZARD: Plug the power cord only into a properly grounded wall receptacle that is approved for hospital-use and is of the correct voltage. Do not use extension cords or an AC receptacle box for this device. - Page 60 Proprietary and Confidential Draft 8 Sep 05 Function Checks Chapter 2: Troubleshooting Procedures 5. Press the Mode Select key, and select Manual Mode. The Manual indicator lights. ↓ → Go to RAP 2.5. 6. Perform the following: a. Press the up arrow key until all the Heater Power display segments light.
- Page 61 Proprietary and Confidential Draft 8 Sep 05 Function Checks Chapter 2: Troubleshooting Procedures 13. The Chk Patient indicator lights and the alarm sounds. ↓ → Go to RAP 2.5. 14. The Heater Power indicators come back on. ↓ → Go to RAP 2.22. 15.
- Page 62 Proprietary and Confidential Draft 8 Sep 05 Function Checks Chapter 2: Troubleshooting Procedures 21. Lower the baby skin temperature probe reading until it is below the set temperature by at least 1°C. The Baby Temperature indicator flashes, and the alarm sounds. ↓...
- Page 63 Proprietary and Confidential Draft 8 Sep 05 Function Checks Chapter 2: Troubleshooting Procedures 28. Press the Start/Stop key. The Apgar timer count stops. ↓ → Go to RAP 2.5. 29. Press the Reset key. The Apgar timer display goes off. ↓...
-
Page 64: Mechanical
Proprietary and Confidential Draft 8 Sep 05 Function Checks Chapter 2: Troubleshooting Procedures Mechanical 1. Depending upon the model of the tilt mechanism, perform one of the following test Methods: a. Support the rear lower edge of the bassinet assembly (A) with the palm of your hand (see figure 2-1 on page 2-9). - Page 65 Proprietary and Confidential Draft 8 Sep 05 Function Checks Chapter 2: Troubleshooting Procedures Figure 2-1. Cart Assembly Resuscitaire® Radiant Warmer Products Service Manual (82 990 45) Page 2 - 9...
- Page 66 Proprietary and Confidential Draft 8 Sep 05 Function Checks Chapter 2: Troubleshooting Procedures 2. Perform the following: a. Raise each side panel (C), and pivot them to hang straight down. b. Return each side panel (C) to its upright position, and make sure that they are positively engaged to confine the infant.
- Page 67 Proprietary and Confidential Draft 8 Sep 05 Function Checks Chapter 2: Troubleshooting Procedures Figure 2-2. Warmer Head Assembly 5. For units with an x-ray cassette tray accessory, perform the following: a. Grasp the middle of a side panel (C), and pull the x-ray cassette tray out from under the bassinet assembly (A) (see figure 2-1 on page 2-9).
- Page 68 Proprietary and Confidential Draft 8 Sep 05 Function Checks Chapter 2: Troubleshooting Procedures 7. For units with an instrument tray accessory, swing the instrument tray out from under the bassinet assembly (A). The instrument tray functions properly. ↓ → Replace the instrument tray. 8.
- Page 69 Proprietary and Confidential Draft 8 Sep 05 Function Checks Chapter 2: Troubleshooting Procedures Figure 2-3. Resuscitaire Birthing Room Warmer Resuscitaire® Radiant Warmer Products Service Manual (82 990 45) Page 2 - 13...
-
Page 70: Resuscitation Equipment (Optional)
Proprietary and Confidential Draft 8 Sep 05 Function Checks Chapter 2: Troubleshooting Procedures WARNING: For optimum stability, always lower the variable height adjustment on the Resuscitaire® Radiant Warmer to its lowest position prior to transport. If installed, ensure that items placed on the shelves are properly secured. -
Page 71: Blended Gas Supply (Optional)
Proprietary and Confidential Draft 8 Sep 05 Function Checks Chapter 2: Troubleshooting Procedures a. Ensure that each cylinder is properly secured on the rear of the warmer and that the cylinder valve located on the top of the cylinder is open. b. -
Page 72: Suction
Proprietary and Confidential Draft 8 Sep 05 Function Checks Chapter 2: Troubleshooting Procedures The Blender Module alarm sounds. ↓ → Go to RAP 2.25. 2. Return the oxygen or air supply, and set the Blender Module to the desired percentage of oxygen concentration. The desired percentage of oxygen concentration is within the specified range of 20.8% to 100%. - Page 73 Proprietary and Confidential Draft 8 Sep 05 Function Checks Chapter 2: Troubleshooting Procedures NOTE: The hydrophobic filter and suction tubing resistance does not affect the desired maximum pressure value. The pressure value of the suction gauge matches the actual pressure value at the end of the catheter. e.
- Page 74 Proprietary and Confidential Draft 8 Sep 05 Function Checks Chapter 2: Troubleshooting Procedures Figure 2-4. Cart Assembly Page 2 - 18 Resuscitaire® Radiant Warmer Products Service Manual (82 990 45)
- Page 75 Proprietary and Confidential Draft 8 Sep 05 Function Checks Chapter 2: Troubleshooting Procedures f. Using the Suction Min/Max control, adjust the suction magnitude while viewing the suction level on the suction gauge until the desired maximum suction pressure value is achieved. The desired maximum suction pressure value is achieved.
- Page 76 Proprietary and Confidential Draft 8 Sep 05 Function Checks Chapter 2: Troubleshooting Procedures 5. For units with a Resuscitation Module having an AutoBreath™ Infant Resuscitator, perform the following using the automatic patient circuit 10 mm tubing that is 10 mm with an exhalation valve and exhalation valve control line tubing): a.
-
Page 77: Final Actions
Proprietary and Confidential Draft 8 Sep 05 Final Actions Chapter 2: Troubleshooting Procedures i. To check the desired breaths-per-minute (BPM) rate, count the number of breath cycles per minute. The BPM rate is within the specified 10 BPM to 60 BPM. ↓... -
Page 78: Troubleshooting
Proprietary and Confidential Draft 8 Sep 05 Troubleshooting Chapter 2: Troubleshooting Procedures Troubleshooting WARNING: Only facility-authorized personnel should troubleshoot the Resuscitaire® Radiant Warmer products. Troubleshooting by unauthorized personnel could result in personal injury or equipment damage. For troubleshooting of the equipment, refer to the table 2-1 on page 2-22. If you cannot localize the fault, remove the unit from use, and refer it to factory- trained or other qualified service personnel. - Page 79 Proprietary and Confidential Draft 8 Sep 05 Troubleshooting Chapter 2: Troubleshooting Procedures Symptom Possible Cause Corrective Action The Blender Module alarm Oxygen and/or air is Connect the oxygen and/or activates disconnected. air. Either the oxygen and/or air Check cylinder gauge. tank may not be opened.
- Page 80 Proprietary and Confidential Draft 8 Sep 05 Troubleshooting Chapter 2: Troubleshooting Procedures Symptom Possible Cause Corrective Action The heater is ON, but the There is an internal Replace the Display P.C. indicators are OFF. malfunction. Board (PCB1) (refer to procedure 4.10). Cannot obtain the desired Suction jar rim gasket is Go to RAP 2.23.
- Page 81 Proprietary and Confidential Draft 8 Sep 05 Troubleshooting Chapter 2: Troubleshooting Procedures Symptom Possible Cause Corrective Action The Inspiratory/Expiratory Resuscitation Module has Go to RAP 2.29. (I/E) Ratio is Greater Than failed. 1:2.4 and Less Than 1.6:1, Resuscitaire® Radiant Warmer Products Service Manual (82 990 45) Page 2 - 25...
- Page 82 Proprietary and Confidential Draft 8 Sep 05 Chapter 2: Troubleshooting Procedures NOTES: Page 2 - 26 Resuscitaire® Radiant Warmer Products Service Manual (82 990 45)
-
Page 83: Off-Line Diagnostic Tests
Proprietary and Confidential Draft 8 Sep 05 2.1 Off-Line Diagnostic Tests Chapter 2: Troubleshooting Procedures Off-Line Diagnostic Tests NOTE: The Resuscitaire® Radiant Warmer front panels are shown throughout the Diagnostic Tests. All of the front panels will operate in the same manner. The off-line diagnostic tests are embedded in the software. - Page 84 Proprietary and Confidential Draft 8 Sep 05 2.1 Off-Line Diagnostic Tests Chapter 2: Troubleshooting Procedures Figure 2-5. Diagnostic Mode Start-Up Display Page 2 - 28 Resuscitaire® Radiant Warmer Products Service Manual (82 990 45)
-
Page 85: Diagnostic Test #1-Software Level Display
Proprietary and Confidential Draft 8 Sep 05 2.2 Diagnostic Test #1—Software Level Display Chapter 2: Troubleshooting Procedures Diagnostic Test #1—Software Level Display NOTE: The Resuscitaire® Radiant Warmer front panels are shown throughout the Diagnostic Tests. All of the front panels will operate in the same manner. This test displays the version and revision level of the software. - Page 86 Proprietary and Confidential Draft 8 Sep 05 2.2 Diagnostic Test #1—Software Level Display Chapter 2: Troubleshooting Procedures NOTES: Page 2 - 30 Resuscitaire® Radiant Warmer Products Service Manual (82 990 45)
-
Page 87: Diagnostic Test #2-Rom Device Checksum Display
Proprietary and Confidential Draft 8 Sep 05 2.3 Diagnostic Test #2—ROM Device Checksum Display Chapter 2: Troubleshooting Procedures Diagnostic Test #2—ROM Device Checksum Display NOTE: The Resuscitaire® Radiant Warmer front panels are shown throughout the Diagnostic Tests. All of the front panels will operate in the same manner. This test displays the Read Only Memory (ROM) device checksum. - Page 88 Proprietary and Confidential Draft 8 Sep 05 2.3 Diagnostic Test #2—ROM Device Checksum Display Chapter 2: Troubleshooting Procedures 2. Perform one of the following: • To access additional diagnostic tests, press the Up or Down arrow keys. • To exit Diagnostic Mode, turn the unit off and then on, and go to “Final Actions”...
-
Page 89: Diagnostic Test #3-Power Fail Test
Proprietary and Confidential Draft 8 Sep 05 2.4 Diagnostic Test #3—Power Fail Test Chapter 2: Troubleshooting Procedures Diagnostic Test #3—Power Fail Test NOTE: The Resuscitaire® Radiant Warmer front panels are shown throughout the Diagnostic Tests. All of the front panels will operate in the same manner. This test verifies the operation of the Power Fail circuit. - Page 90 Proprietary and Confidential Draft 8 Sep 05 2.4 Diagnostic Test #3—Power Fail Test Chapter 2: Troubleshooting Procedures ↓ → Replace the Power and Control P.C. Board (PCB2) (refer to procedure 4.10). If this solves the problem, go to step 4. Otherwise, call Technical Support for assistance.
-
Page 91: Diagnostic Test #4-Key Check
Proprietary and Confidential Draft 8 Sep 05 2.5 Diagnostic Test #4—Key Check Chapter 2: Troubleshooting Procedures Diagnostic Test #4—Key Check NOTE: The Resuscitaire® Radiant Warmer front panels are shown throughout the Diagnostic Tests. All of the front panels will operate in the same manner. This test checks for keypad failures. - Page 92 Proprietary and Confidential Draft 8 Sep 05 2.5 Diagnostic Test #4—Key Check Chapter 2: Troubleshooting Procedures ↓ → Replace the Display P.C. Board (PCB1) (refer to procedure 4.10). If this solves the problem, go to step 3. Otherwise, call Technical Support for assistance. 3.
- Page 93 Proprietary and Confidential Draft 8 Sep 05 2.5 Diagnostic Test #4—Key Check Chapter 2: Troubleshooting Procedures 5. Press the °C/°F key. The corresponding segments of the display toggle between 0 and 1. ↓ → Replace the Display P.C. Board (PCB1) (refer to procedure 4.10).
-
Page 94: Diagnostic Test #5-Heater Duty Cycle Test
Proprietary and Confidential Draft 8 Sep 05 2.6 Diagnostic Test #5—Heater Duty Cycle Test Chapter 2: Troubleshooting Procedures Diagnostic Test #5—Heater Duty Cycle Test NOTE: The Resuscitaire® Radiant Warmer front panels are shown throughout the Diagnostic Tests. All of the front panels will operate in the same manner. This test displays the current AC heater duty cycle percentage applied to achieve 600 Watts of power in the following power ranges (see table 2-2 on page 2-38). - Page 95 Proprietary and Confidential Draft 8 Sep 05 2.6 Diagnostic Test #5—Heater Duty Cycle Test Chapter 2: Troubleshooting Procedures Figure 2-10. Heater Duty Cycle Test Display Table 2-3. AC Line Voltage Correction Percentages 100 V Model 120 V Model 240 V Model 220 V Model Correction AC Line...
- Page 96 Proprietary and Confidential Draft 8 Sep 05 2.6 Diagnostic Test #5—Heater Duty Cycle Test Chapter 2: Troubleshooting Procedures 100 V Model 120 V Model 240 V Model 220 V Model Correction AC Line Correction AC Line Correction AC Line Correction AC Line Percentage Voltage...
-
Page 97: Diagnostic Test #6-Heater/Relays Ac Line Voltage Display
Proprietary and Confidential Draft 8 Sep 05 2.7 Diagnostic Test #6—Heater/Relays AC Line Voltage Display Chapter 2: Troubleshooting Procedures Diagnostic Test #6—Heater/Relays AC Line Voltage Display NOTE: The Resuscitaire® Radiant Warmer front panels are shown throughout the Diagnostic Tests. All of the front panels will operate in the same manner. This test displays the calculated AC line voltage by measuring the current through the Solid State Relay #1 (K4) and Solid State Relay #2 (K3). - Page 98 Proprietary and Confidential Draft 8 Sep 05 2.7 Diagnostic Test #6—Heater/Relays AC Line Voltage Display Chapter 2: Troubleshooting Procedures Figure 2-11. Safety Relay AC Line Voltage Display 3. Test the Solid State Relay #1 by pressing the Mode key. The calculated AC line voltage appears on the Baby Temperature display and the quartz heater turns on for approximately 40 seconds, then Solid State Relay #1 automatically switches off (see figure 2-12 on page 2-43).
- Page 99 Proprietary and Confidential Draft 8 Sep 05 2.7 Diagnostic Test #6—Heater/Relays AC Line Voltage Display Chapter 2: Troubleshooting Procedures Figure 2-12. Solid State Relay #1 AC Line Voltage Display 4. Test the Solid State Relay #2 (K3) by pressing the >37°C key. The calculated AC line voltage appears on the Baby Temperature display and the quartz heater turns on for approximately 40 seconds, then Solid State Relay #2 switching off, (see figure 2-13 on page 2-44).
- Page 100 Proprietary and Confidential Draft 8 Sep 05 2.7 Diagnostic Test #6—Heater/Relays AC Line Voltage Display Chapter 2: Troubleshooting Procedures Both of the displayed voltages are within 2 volts of each other. ↓ → Replace the Power and Control P.C. Board (PCB2) (refer to procedure 4.10).
- Page 101 Proprietary and Confidential Draft 8 Sep 05 2.7 Diagnostic Test #6—Heater/Relays AC Line Voltage Display Chapter 2: Troubleshooting Procedures ↓ → Make sure that the power source is in compliance with the electrical specification of the system by performing the calibration procedure (refer to procedure ).
-
Page 102: Diagnostic Test #7-Eeprom Status Test
Proprietary and Confidential Draft 8 Sep 05 2.8 Diagnostic Test #7—EEPROM Status Test Chapter 2: Troubleshooting Procedures Diagnostic Test #7—EEPROM Status Test NOTE: The Resuscitaire® Radiant Warmer front panels are shown throughout the Diagnostic Tests. All of the front panels will operate in the same manner. This test displays a four-bit hexadecimal number that indicates the status of the EEPROM. - Page 103 Proprietary and Confidential Draft 8 Sep 05 2.8 Diagnostic Test #7—EEPROM Status Test Chapter 2: Troubleshooting Procedures Figure 2-14. EEPROM Status Test Display Resuscitaire® Radiant Warmer Products Service Manual (82 990 45) Page 2 - 47...
-
Page 104: Diagnostic Test #8-Unit Configuration Display
Proprietary and Confidential Draft 8 Sep 05 2.9 Diagnostic Test #8—Unit Configuration Display Chapter 2: Troubleshooting Procedures Diagnostic Test #8—Unit Configuration Display NOTE: The Resuscitaire® Radiant Warmer front panels are shown throughout the Diagnostic Tests. All of the front panels will operate in the same manner. This test displays the unit configuration as read from the jumpers JP5 and JP6 on the Power and Control P.C. - Page 105 Proprietary and Confidential Draft 8 Sep 05 2.9 Diagnostic Test #8—Unit Configuration Display Chapter 2: Troubleshooting Procedures Figure 2-15. Unit Configuration Display Resuscitaire® Radiant Warmer Products Service Manual (82 990 45) Page 2 - 49...
-
Page 106: 2.10 Diagnostic Test #9-Adc Offset/Gain Display
Proprietary and Confidential Draft 8 Sep 05 2.10 Diagnostic Test #9—ADC Offset/Gain Display Chapter 2: Troubleshooting Procedures 2.10 Diagnostic Test #9—ADC Offset/Gain Display NOTE: The Resuscitaire® Radiant Warmer front panels are shown throughout the Diagnostic Tests. All of the front panels will operate in the same manner. This test displays the ADC gain and offset on the Apgar Timer and Baby Temperature display, respectively. - Page 107 Proprietary and Confidential Draft 8 Sep 05 2.10 Diagnostic Test #9—ADC Offset/Gain Display Chapter 2: Troubleshooting Procedures Figure 2-16. ADC Offset/Gain Display Resuscitaire® Radiant Warmer Products Service Manual (82 990 45) Page 2 - 51...
-
Page 108: 2.11 Diagnostic Test #10-Ambient Temperature Probe Display
Proprietary and Confidential Draft 8 Sep 05 2.11 Diagnostic Test #10—Ambient Temperature Probe Display Chapter 2: Troubleshooting Procedures 2.11 Diagnostic Test #10—Ambient Temperature Probe Display NOTE: The Resuscitaire® Radiant Warmer front panels are shown throughout the Diagnostic Tests. All of the front panels will operate in the same manner. This test displays the ambient probe temperatures. - Page 109 Proprietary and Confidential Draft 8 Sep 05 2.11 Diagnostic Test #10—Ambient Temperature Probe Display Chapter 2: Troubleshooting Procedures 5. Perform one of the following: • To access additional diagnostic tests, press the Up or Down arrow keys. • To exit Diagnostic Mode, turn the unit off and then on, and go to “Final Actions”...
-
Page 110: 2.12 Diagnostic Test #11-Skin Probe Temperature Display
Proprietary and Confidential Draft 8 Sep 05 2.12 Diagnostic Test #11—Skin Probe Temperature Display Chapter 2: Troubleshooting Procedures 2.12 Diagnostic Test #11—Skin Probe Temperature Display NOTE: The Resuscitaire® Radiant Warmer front panels are shown throughout the Diagnostic Tests. All of the front panels will operate in the same manner. This test displays the temperature of Skin Probe 1 on the Baby Temperature display and the temperature of Skin Probe 2 on the Apgar Timer display. - Page 111 Proprietary and Confidential Draft 8 Sep 05 2.12 Diagnostic Test #11—Skin Probe Temperature Display Chapter 2: Troubleshooting Procedures Figure 2-18. Skin Probe Temperature Display 5. Perform one of the following: • To access additional diagnostic tests, press the Up or Down arrow keys. •...
-
Page 112: Diagnostic Test #12-Skin Probe Display Temperature Accuracy
Proprietary and Confidential Draft 8 Sep 05 2.13 Diagnostic Test #12—Skin Probe Display Temperature Accuracy Chapter 2: Troubleshooting Procedures 2.13 Diagnostic Test #12—Skin Probe Display Temperature Accuracy NOTE: The Resuscitaire® Radiant Warmer front panels are shown throughout the Diagnostic Tests. All of the front panels will operate in the same manner. This test displays the accuracy temperature of Skin Probe 1 on the Baby Temperature display, and the accuracy temperature of Skin Probe 2 on the Apgar Timer display. - Page 113 Proprietary and Confidential Draft 8 Sep 05 2.13 Diagnostic Test #12—Skin Probe Display Temperature Accuracy Chapter 2: Troubleshooting Procedures Figure 2-19. Skin Probe Display Temperature Accuracy Resuscitaire® Radiant Warmer Products Service Manual (82 990 45) Page 2 - 57...
-
Page 114: 2.14 Diagnostic Test #13-Logic Voltage Display
Proprietary and Confidential Draft 8 Sep 05 2.14 Diagnostic Test #13—Logic Voltage Display Chapter 2: Troubleshooting Procedures 2.14 Diagnostic Test #13—Logic Voltage Display NOTE: The Resuscitaire® Radiant Warmer front panels are shown throughout the Diagnostic Tests. All of the front panels will operate in the same manner. This test displays the CPU voltage on the Baby Temperature display. - Page 115 Proprietary and Confidential Draft 8 Sep 05 2.14 Diagnostic Test #13—Logic Voltage Display Chapter 2: Troubleshooting Procedures Figure 2-20. Logic Voltage Display Resuscitaire® Radiant Warmer Products Service Manual (82 990 45) Page 2 - 59...
-
Page 116: 2.15 Diagnostic Test #14-Supercap Voltage Display
Proprietary and Confidential Draft 8 Sep 05 2.15 Diagnostic Test #14—Supercap Voltage Display Chapter 2: Troubleshooting Procedures 2.15 Diagnostic Test #14—Supercap Voltage Display NOTE: The Resuscitaire® Radiant Warmer front panels are shown throughout the Diagnostic Tests. All of the front panels will operate in the same manner. This test displays the supercap voltage of the Power Fail detection circuit on the Baby Temperature display. - Page 117 Proprietary and Confidential Draft 8 Sep 05 2.15 Diagnostic Test #14—Supercap Voltage Display Chapter 2: Troubleshooting Procedures Figure 2-21. Supercap Voltage Display Resuscitaire® Radiant Warmer Products Service Manual (82 990 45) Page 2 - 61...
-
Page 118: 2.16 Diagnostic Test #15-Watchdog Timer Test
Proprietary and Confidential Draft 8 Sep 05 2.16 Diagnostic Test #15—Watchdog Timer Test Chapter 2: Troubleshooting Procedures 2.16 Diagnostic Test #15—Watchdog Timer Test NOTE: The Resuscitaire® Radiant Warmer front panels are shown throughout the Diagnostic Tests. All of the front panels will operate in the same manner. This test initiates a watchdog timer time-out. - Page 119 Proprietary and Confidential Draft 8 Sep 05 2.16 Diagnostic Test #15—Watchdog Timer Test Chapter 2: Troubleshooting Procedures Figure 2-22. Watchdog Timer Test Display Resuscitaire® Radiant Warmer Products Service Manual (82 990 45) Page 2 - 63...
-
Page 120: 2.17 Diagnostic Test #16-Speaker Test
Proprietary and Confidential Draft 8 Sep 05 2.17 Diagnostic Test #16—Speaker Test Chapter 2: Troubleshooting Procedures 2.17 Diagnostic Test #16—Speaker Test NOTE: The Resuscitaire® Radiant Warmer front panels are shown throughout the Diagnostic Tests. All of the front panels will operate in the same manner. This test activates the speaker test. - Page 121 Proprietary and Confidential Draft 8 Sep 05 2.17 Diagnostic Test #16—Speaker Test Chapter 2: Troubleshooting Procedures Figure 2-24. Speaker Test On Display ↓ → Replace the Power and Control P.C. Board (PCB2) (refer to procedure 4.10). If this solves the problem, go to step 3. Otherwise, call Technical Support for assistance.
- Page 122 Proprietary and Confidential Draft 8 Sep 05 2.17 Diagnostic Test #16—Speaker Test Chapter 2: Troubleshooting Procedures ↓ → Replace the Power and Control P.C. Board (PCB2) (refer to procedure 4.10). If this solves the problem, go to step 6. Otherwise, call Technical Support for assistance. 6.
- Page 123 Proprietary and Confidential Draft 8 Sep 05 2.17 Diagnostic Test #16—Speaker Test Chapter 2: Troubleshooting Procedures NOTES: Resuscitaire® Radiant Warmer Products Service Manual (82 990 45) Page 2 - 67...
-
Page 124: 2.18 Diagnostic Test #17-Back-Up Audio Annunciation Test
Proprietary and Confidential Draft 8 Sep 05 2.18 Diagnostic Test #17—Back-Up Audio Annunciation Test Chapter 2: Troubleshooting Procedures 2.18 Diagnostic Test #17—Back-Up Audio Annunciation Test NOTE: The Resuscitaire® Radiant Warmer front panels are shown throughout the Diagnostic Tests. All of the front panels will operate in the same manner. This test activates the piezo back-up audio annunciator. - Page 125 Proprietary and Confidential Draft 8 Sep 05 2.18 Diagnostic Test #17—Back-Up Audio Annunciation Test Chapter 2: Troubleshooting Procedures Figure 2-26. Back-Up Audio Annunciation Test Deactivation Display ↓ → Replace the Power and Control P.C. Board (PCB2) (refer to procedure 4.10). If this solves the problem, go to step 3. Otherwise, call Technical Support for assistance.
-
Page 126: Diagnostic Test #18-Error Log Display And Clear
Proprietary and Confidential Draft 8 Sep 05 2.19 Diagnostic Test #18—Error Log Display and Clear (Units with Firmware Version 1.05 and Higher Only) Chapter 2: Troubleshooting Procedures 2.19 Diagnostic Test #18—Error Log Display and Clear (Units with Firmware Version 1.05 and Higher Only) NOTE: The Resuscitaire®... -
Page 127: System Error Codes
Proprietary and Confidential Draft 8 Sep 05 2.19 Diagnostic Test #18—Error Log Display and Clear (Units with Firmware Version 1.05 and Higher Only) Chapter 2: Troubleshooting Procedures NOTE: If no errors have occurred, the error reference numbers, 0:01 through 0:04, appear on the Apgar Timer display after you press the °C/°F key. - Page 128 Proprietary and Confidential Draft 8 Sep 05 2.19 Diagnostic Test #18—Error Log Display and Clear (Units with Firmware Version 1.05 and Higher Only) Chapter 2: Troubleshooting Procedures Error Number Explanation Corrective Action AC heater current is high Inspect the quartz tube heating element. If necessary, replace it (refer to procedure 4.7).
- Page 129 Proprietary and Confidential Draft 8 Sep 05 2.19 Diagnostic Test #18—Error Log Display and Clear (Units with Firmware Version 1.05 and Higher Only) Chapter 2: Troubleshooting Procedures Error Number Explanation Corrective Action Difference between ambient Check for damaged ambient temperature temperature probe 1 and 2.
- Page 130 Proprietary and Confidential Draft 8 Sep 05 2.19 Diagnostic Test #18—Error Log Display and Clear (Units with Firmware Version 1.05 and Higher Only) Chapter 2: Troubleshooting Procedures Figure 2-28. Error Log Reset Display ↓ → Replace the Power and Control P.C. Board (PCB2) (refer to procedure 4.10).
- Page 131 Proprietary and Confidential Draft 8 Sep 05 2.19 Diagnostic Test #18—Error Log Display and Clear (Units with Firmware Version 1.05 and Higher Only) Chapter 2: Troubleshooting Procedures NOTES: Resuscitaire® Radiant Warmer Products Service Manual (82 990 45) Page 2 - 75...
-
Page 132: 2.20 Heater Does Not Turn On
Proprietary and Confidential Draft 8 Sep 05 2.20 Heater Does Not Turn On Chapter 2: Troubleshooting Procedures 2.20 Heater Does Not Turn On 1. Remove and inspect the quartz heating element (A) (refer to procedure 4.7) (see figure 2-29 on page 2-76). The quartz heating element (A) is good. Figure 2-29. - Page 133 Proprietary and Confidential Draft 8 Sep 05 2.20 Heater Does Not Turn On Chapter 2: Troubleshooting Procedures 3. Inspect the connection at J4 (B) on the Power and Control P.C. Board (PCB2) (C) (see figure 2-30 on page 2-77). The connection at J4 (B) on the Power and Control P.C.
-
Page 134: 2.21 Pre-Warm Mode Is Not Activated Upon A Reset Of The System
Proprietary and Confidential Draft 8 Sep 05 2.21 Pre-Warm Mode Is Not Activated Upon a Reset of the System Chapter 2: Troubleshooting Procedures 2.21 Pre-Warm Mode Is Not Activated Upon a Reset of the System 1. The system is out of Diagnostic Mode. ↓... -
Page 135: 2.22 Heater Is On, But Indicators Are Off
Proprietary and Confidential Draft 8 Sep 05 2.22 Heater Is On, but Indicators Are Off Chapter 2: Troubleshooting Procedures 2.22 Heater Is On, but Indicators Are Off CAUTION: To prevent component damage, ensure that your hands are clean, and only handle the P.C. board by its edges. CAUTION: When handling electronic components, wear an antistatic strap. -
Page 136: 2.23 Suction Does Not Obtain Desired Pressure
Proprietary and Confidential Draft 8 Sep 05 2.23 Suction Does Not Obtain Desired Pressure Chapter 2: Troubleshooting Procedures 2.23 Suction Does Not Obtain Desired Pressure 1. The suction jar (A) and rim gasket show no signs of wear or damage (see figure 2-31 on page 2-80) and (see figure 2-32 on page 2-81). - Page 137 Proprietary and Confidential Draft 8 Sep 05 2.23 Suction Does Not Obtain Desired Pressure Chapter 2: Troubleshooting Procedures Figure 2-32. Suction Jar on the Resuscitaire® Radiant Warmer (RW82) ↓ → Replace the suction jar (A). If this solves the problem, go to “Final Actions”...
-
Page 138: Blender Module Oxygen Concentration Reading Does Not Match Blender
Proprietary and Confidential Draft 8 Sep 05 2.24 Blender Module Oxygen Concentration Reading Does Not Match Blender Module Setting Chapter 2: Troubleshooting Procedures 2.24 Blender Module Oxygen Concentration Reading Does Not Match Blender Module Setting 1. The Blender Module knob (A) is secure (see figure 2-33 on page 2-82). Figure 2-33. -
Page 139: 2.25 Blender Module Sets Off Alarms
Proprietary and Confidential Draft 8 Sep 05 Troubleshooting Chapter 2: Troubleshooting Procedures 2.25 Blender Module Sets Off Alarms WARNING: Cylinder heights may vary. When replacing a gas cylinder, make sure that the tank does not exceed the maximum tank height specification. Also, prior to placing the cylinder, confirm that there is sufficient clearance between the bottom of the tank and the floor when the Resuscitaire®... - Page 140 Proprietary and Confidential Draft 8 Sep 05 Troubleshooting Chapter 2: Troubleshooting Procedures 2. Go to “Final Actions” on page 2-21. Page 2 - 84 Resuscitaire® Radiant Warmer Products Service Manual (82 990 45)
-
Page 141: 2.28 Patient Gas Supply Pressure Relief Gauge Exceeds 60 Cm H
Proprietary and Confidential Draft 8 Sep 05 Troubleshooting Chapter 2: Troubleshooting Procedures 2.28 Patient Gas Supply Pressure Relief Gauge Exceeds 60 cm H ± 20 cm H 1. Replace the pressure relief valve. This solves the problem. ↓ → For assistance, call Technical Support. 2. - Page 142 Proprietary and Confidential Draft 8 Sep 05 Troubleshooting Chapter 2: Troubleshooting Procedures Page 2 - 86 Resuscitaire® Radiant Warmer Products Service Manual (82 990 45)
-
Page 143: Chapter 3: Theory Of Operation
Proprietary and Confidential Draft 8 Sep 05 Chapter 3 Theory of Operation Introduction Electrical System Display P.C. Board (PCB1) The Display P.C. Board (PCB1) contains all of the front panel switches, display driver, and displays (see figure 3-1 on page 3-1). In addition, it contains the dual-analog probe circuitry and an analog/digital (A/D) converter. -
Page 144: Power And Control P.c. Board (Pcb2)
Proprietary and Confidential Draft 8 Sep 05 Introduction Chapter 3: Theory of Operation The following potentiometers on PCB1 require adjusting: • The 5V, precision, reference potentiometer, R15 • The dual-analog probe, amplifier, calibrations potentiometers, R13 (Channel 1) and R28 (Channel 2). The probe amplifier circuits are calibrated at 97°F (36°C). -
Page 145: Power Supply Circuit
Proprietary and Confidential Draft 8 Sep 05 Introduction Chapter 3: Theory of Operation PCB2 supports the following three operating modes: • Pre-Warm Mode • Manual Mode • Baby Mode In addition, PCB2 contains the circuitry required to control the remote isolated serial port. -
Page 146: Control Circuitry
Proprietary and Confidential Draft 8 Sep 05 Introduction Chapter 3: Theory of Operation The 12V DC voltage is supplied through the DC power supply located on the Electrical Module. It is brought into PCB2 through connector J2, and into PCB1 through connector J1. The -12V DC voltage is supplied through the DC power supply located on the Electrical Module. -
Page 147: System Interfaces
Proprietary and Confidential Draft 8 Sep 05 Introduction Chapter 3: Theory of Operation System Interfaces Baby (Skin) Temperature Probe The baby skin temperature probe signals are brought to PCB2 through connector J3. The signals SK1 and SK2 are brought to PCB1 through connector J1 and converted to a digital signal through the A/D converter, U4. -
Page 148: Probe Fail
Proprietary and Confidential Draft 8 Sep 05 Introduction Chapter 3: Theory of Operation If the AC power fails, the alarm is powered by capacitor, C29. The Power Fail alarm is self-resetting with the resumption of power. Probe Fail A skin temperature dual thermistor probe differential of > ± 0.4°C exists. Pneumatic System The pneumatic system consists of the following (see figure 3-3 on page 3-7): •... -
Page 149: Gas Supply Module
Proprietary and Confidential Draft 8 Sep 05 Introduction Chapter 3: Theory of Operation Figure 3-3. Resuscitaire® Radiant Warmer Controller Electronics Warmer Module Module Blended Gas Supply Module Examination Resuscitation Light Module Gas Supply Bassinet Module X-ray Tray Handle Cassette Pass-through Drawer Resuscitation Equipment... - Page 150 Proprietary and Confidential Draft 8 Sep 05 Introduction Chapter 3: Theory of Operation The Gas Supply Module connects the pipeline-supplied or cylinder-supplied gas to the pneumatic system. The Resuscitation Module contains the suction, oxygen delivery, and optional ventilation circuitry. An optional precision Blender Module mixes the oxygen and air supplies.
- Page 151 Proprietary and Confidential Draft 8 Sep 05 Introduction Chapter 3: Theory of Operation Figure 3-4. Oxygen Pipeline and Oxygen/Air Pipeline with Cylinder Supply Gas Supply Module O Only Filter/ DISS, NIST Water trap or crimped Wall Supply (40-75 PSI) Main Supply Main Supply ON/OFF ON/OFF...
- Page 152 Proprietary and Confidential Draft 8 Sep 05 Introduction Chapter 3: Theory of Operation Resuscitation Module The Resuscitation Module is an integrated package that contains several pneumatic circuits for infant resuscitation. The module uses flow control valves to control the following parameters: •...
- Page 153 Proprietary and Confidential Draft 8 Sep 05 Introduction Chapter 3: Theory of Operation pressure divider. This controls the pressure applied to a diaphragm, which closes a seat in the pressure relief valve assembly. Varying this pressure adjusts the airway pressure relief threshold. Auxiliary Supply WARNING: During infant resuscitation, monitor the airway pressure, and provide...
-
Page 154: Blender Module (Optional)
Proprietary and Confidential Draft 8 Sep 05 Introduction Chapter 3: Theory of Operation AutoBreath™ Infant Resuscitator (Optional) The AutoBreath™ Infant Resuscitator is a basic gas-powered, time-cycled, continuous-flow, pressure-limited resuscitator. The AutoBreath™ Infant Resuscitator, used in combination with the patient breathing circuit, provides automatic continuous flow ventilation. -
Page 155: Heating Element
Proprietary and Confidential Draft 8 Sep 05 Electrical System Chapter 3: Theory of Operation Heating Element The radiant heater consists of a 741 W (600W compensated) quartz tube heater. Examination Light The examination light is mounted underneath the warmer head. It is located on the centerline of the warmer head directly behind the radiant heating element. - Page 156 Proprietary and Confidential Draft 8 Sep 05 Pneumatic System Chapter 3: Theory of Operation Refer to fold-out FO 3-5 at the rear of this manual. Page 3 - 14 Resuscitaire® Radiant Warmer Products Service Manual (82 990 45)
- Page 157 Proprietary and Confidential Draft 8 Sep 05 Pneumatic System Chapter 3: Theory of Operation NOTES: Resuscitaire® Radiant Warmer Products Service Manual (82 990 45) Page 3 - 15...
- Page 158 Proprietary and Confidential Draft 8 Sep 05 Pneumatic System Chapter 3: Theory of Operation Page 3 - 16 Resuscitaire® Radiant Warmer Products Service Manual (82 990 45)
-
Page 159: Chapter 4: Removal And Replacement
Proprietary and Confidential Draft 8 Sep 05 Chapter 4 Removal and Replacement Tool and Supply Requirements To service the Resuscitaire® Radiant Warmer Products, the following tools and supplies are required: • Phillips head screwdriver • Small screwdriver • Pressure gauge assembly •... - Page 160 Proprietary and Confidential Draft 8 Sep 05 Tool and Supply Requirements Chapter 4: Removal and Replacement • Tubing, green polyvinyl chloride (PVC), ¼" inner diameter, 15" long (3) (P/N 67 359 01-R) • Elbow, 90°, 3/8"-¼", brass (P/N 67 355 44) •...
- Page 161 Proprietary and Confidential Draft 8 Sep 05 Tool and Supply Requirements Chapter 4: Removal and Replacement NOTES: Resuscitaire® Radiant Warmer Products Service Manual (82 990 45) Page 4 - 3...
-
Page 162: Upper Post Covers
Proprietary and Confidential Draft 8 Sep 05 4.1 Upper Post Covers Chapter 4: Removal and Replacement Upper Post Covers Tools required: Cylinder wrench (unit with cylinder gas supplies only) Phillips head screwdriver Removal SHOCK HAZARD: Unplug the unit from its power source during removal and replacement procedures. -
Page 163: Replacement
Proprietary and Confidential Draft 8 Sep 05 4.1 Upper Post Covers Chapter 4: Removal and Replacement 4. For pipeline gas supplies on Diameter Index Safety System (DISS) or Non- Interchangeable Screw Thread (NIST) units, disconnect the pipeline supply hoses. 5. For cylinder gas supply units, use the cylinder wrench to close the cylinder valves (F), and remove the reserve gas cylinders. -
Page 164: Controller Module
Proprietary and Confidential Draft 8 Sep 05 4.2 Controller Module Chapter 4: Removal and Replacement Controller Module Tools required: Phillips head screwdriver Removal 1. Remove the upper post cover(s) (A) (refer to procedure 4.1) (see figure 4-2 on page 4-6). Figure 4-2. -
Page 165: Replacement
Proprietary and Confidential Draft 8 Sep 05 4.2 Controller Module Chapter 4: Removal and Replacement Figure 4-3. Controller Module 5. Remove the Controller Module (C) from the upper post (E) (see figure 4-2 on page 4-6). Replacement 1. Align the wires with the center groove in the Controller Module (C), and position the Controller Module (C) into the upper post (E). -
Page 166: Blender Module
Proprietary and Confidential Draft 8 Sep 05 4.3 Blender Module Chapter 4: Removal and Replacement Blender Module Tools required: Phillips head screwdriver Mylar shim Small piece of cellophane tape Adjustable wrench Black marker Soapy water (optional) Removal 1. Remove the upper post cover(s) (A) (refer to procedure 4.1) (see figure 4-4 on page 4-8). - Page 167 Proprietary and Confidential Draft 8 Sep 05 4.3 Blender Module Chapter 4: Removal and Replacement Figure 4-5. Blender Module 4. Simultaneously push in on the red collar of the fitting and pull the tube (E) straight out from its mating connector. 5.
-
Page 168: Replacement
Proprietary and Confidential Draft 8 Sep 05 4.3 Blender Module Chapter 4: Removal and Replacement Replacement 1. Turn the control knob (I) on the low-flow, no-bleed microblender (G) fully clockwise. 2. Wrap the mylar shim around the control knob (I), and use a small piece of cellophane tape to secure the mylar shim in place. - Page 169 Proprietary and Confidential Draft 8 Sep 05 4.3 Blender Module Chapter 4: Removal and Replacement NOTES: Resuscitaire® Radiant Warmer Products Service Manual (82 990 45) Page 4 - 11...
-
Page 170: Resuscitation Module
Proprietary and Confidential Draft 8 Sep 05 4.4 Resuscitation Module Chapter 4: Removal and Replacement Resuscitation Module Tools required: Phillips head screwdriver Black marker Removal 1. Remove the upper post cover(s) (A) (refer to procedure 4.1) (see figure 4-6 on page 4-12). Figure 4-6. - Page 171 Proprietary and Confidential Draft 8 Sep 05 4.4 Resuscitation Module Chapter 4: Removal and Replacement Figure 4-7. Resuscitation Module Fittings 4. Mark the tubing with an “F.” 5. For units with a Blender Module, do the following: a. Disengage the tubing by pushing in on the red collar of the fitting (G) and (H) while pulling the tubing straight out (see figure 4-7 on page 4-13).
-
Page 172: Replacement
Proprietary and Confidential Draft 8 Sep 05 4.4 Resuscitation Module Chapter 4: Removal and Replacement Figure 4-8. Blender Module Fitting d. Mark the tubing with an “I.” 6. Remove the Resuscitation Module (C) through the opening in the front of the upper post (E) (see figure 4-6 on page 4-12). - Page 173 Proprietary and Confidential Draft 8 Sep 05 4.4 Resuscitation Module Chapter 4: Removal and Replacement 5. Firmly push the tubing labeled “G,” “H,” and “I” into the corresponding fittings (G), (H), and (I). then pull on the tubing (see figure 4-7 on page 4-13) and (see figure 4-8 on page 4-14).
-
Page 174: Gas Supply Module
Proprietary and Confidential Draft 8 Sep 05 4.5 Gas Supply Module Chapter 4: Removal and Replacement Gas Supply Module Tools required: Adjustable wrench Phillips head screwdriver Removal WARNING: Disconnect the gas supplies from the unit when performing removal and replacement procedures. Failure to do so could result in personal injury or equipment damage. - Page 175 Proprietary and Confidential Draft 8 Sep 05 4.5 Gas Supply Module Chapter 4: Removal and Replacement 4. Remove the upper post cover(s) (D) (refer to procedure 4.1) (see figure 4- 10 on page 4-17). Figure 4-10. Upper Post 5. Remove the two screws (E) securing the gas supply chassis (G) to the resuscitation/gas supply support plate (F).
-
Page 176: Replacement
Proprietary and Confidential Draft 8 Sep 05 4.5 Gas Supply Module Chapter 4: Removal and Replacement Replacement WARNING: Cylinder heights may vary. When replacing a gas cylinder, make sure that the tank does not exceed the maximum tank height specification. Also, prior to placing the cylinder, confirm that there is sufficient clearance between the bottom of the tank and the floor when the Resuscitaire®... - Page 177 Proprietary and Confidential Draft 8 Sep 05 4.5 Gas Supply Module Chapter 4: Removal and Replacement 10. Turn the On/Off switch of the Gas Supply Module (B) to the Off position (see figure 4-9 on page 4-16). 11. See whether any gas flows in the system. 12.
-
Page 178: Oxygen Or Air Yoke
Proprietary and Confidential Draft 8 Sep 05 4.6 Oxygen or Air Yoke Chapter 4: Removal and Replacement Oxygen or Air Yoke Tools required: Phillips head screwdriver Pliers 1 1/4" open end wrench 7/8" open end wrench 1/8" open end wrench Two adjustable wrenches Cylinder wrench Parts required:... - Page 179 Proprietary and Confidential Draft 8 Sep 05 4.6 Oxygen or Air Yoke Chapter 4: Removal and Replacement 4. Remove the upper post cover(s) (C) (refer to procedure 4.1). 5. Remove the Gas Supply Module (D) (refer to procedure 4.5). Figure 4-11. Upper Post 6.
- Page 180 Proprietary and Confidential Draft 8 Sep 05 4.6 Oxygen or Air Yoke Chapter 4: Removal and Replacement Figure 4-12. Unit Having One Oxygen and One Air Yokes 10. On a unit equipped with two oxygen yoke assemblies (B) only, disconnect the tubing (F) from its fitting (G) (see figure 4-13 on page 4-23).
- Page 181 Proprietary and Confidential Draft 8 Sep 05 4.6 Oxygen or Air Yoke Chapter 4: Removal and Replacement Figure 4-13. Unit Having Two Oxygen Yokes 11. Remove the Gas Supply Module (D) from the unit (see figure 4-12 on page 4-22) and (see figure 4-13 on page 4-23). 12.
-
Page 182: Unit Equipped With Oxygen And Air Yokes
Proprietary and Confidential Draft 8 Sep 05 4.6 Oxygen or Air Yoke Chapter 4: Removal and Replacement Unit Equipped with Oxygen and Air Yokes 1. Using two adjustable wrenches, simultaneously hold the brass connector (G) and loosen the jam nut (H) (see figure 4-12 on page 4-22). 2. -
Page 183: Replacement
Proprietary and Confidential Draft 8 Sep 05 4.6 Oxygen or Air Yoke Chapter 4: Removal and Replacement 6. Remove the elbow and tee connectors (G) from the oxygen yoke assemblies (B). 7. Remove the two oxygen yoke assemblies (B) and the two male-to-female yoke adapters (I) from the Gas Supply Module (D). -
Page 184: Quartz Heater Assembly
Proprietary and Confidential Draft 8 Sep 05 4.7 Quartz Heater Assembly Chapter 4: Removal and Replacement Quartz Heater Assembly Tools required: Clean cloth gloves Rubbing alcohol Clean cloth or towel Small screwdriver or trim potentiometer adjustment tool Digital voltmeter (DVM) Wire tie Removal SHOCK HAZARD:... - Page 185 Proprietary and Confidential Draft 8 Sep 05 4.7 Quartz Heater Assembly Chapter 4: Removal and Replacement Figure 4-14. Quartz Heater Element Resuscitaire® Radiant Warmer Products Service Manual (82 990 45) Page 4 - 27...
-
Page 186: Replacement
Proprietary and Confidential Draft 8 Sep 05 4.7 Quartz Heater Assembly Chapter 4: Removal and Replacement 6. Remove the two screws (E) securing the heat shield (F) to the two end plates (G). 7. Remove the heat shield (F) from the two end plates (G). 8. - Page 187 Proprietary and Confidential Draft 8 Sep 05 4.7 Quartz Heater Assembly Chapter 4: Removal and Replacement 4. Make sure to route the leads (A) of the quartz heater element (B) in the same manner as the original quartz heater element (B). 5.
- Page 188 Proprietary and Confidential Draft 8 Sep 05 4.7 Quartz Heater Assembly Chapter 4: Removal and Replacement 14. Lift the other end of the secondary reflector (J) above the hole in the lower T-portion of the second mounting bracket (K), and hold it in place. 15.
-
Page 189: Heater Grill
Proprietary and Confidential Draft 8 Sep 05 4.8 Heater Grill Chapter 4: Removal and Replacement Heater Grill Tools required: Screwdriver Removal SHOCK HAZARD: Unplug the unit from its power source during removal and replacement procedures. Failure to do so may result in personal injury or equipment damage. - Page 190 Proprietary and Confidential Draft 8 Sep 05 4.8 Heater Grill Chapter 4: Removal and Replacement Figure 4-15. Heater Grill Page 4 - 32 Resuscitaire® Radiant Warmer Products Service Manual (82 990 45)
-
Page 191: Replacement
Proprietary and Confidential Draft 8 Sep 05 4.8 Heater Grill Chapter 4: Removal and Replacement Replacement 1. Perform the removal procedure in reverse order. 2. To make sure the warmer operates properly, perform the “Function Checks” on page 2-2. Resuscitaire® Radiant Warmer Products Service Manual (82 990 45) Page 4 - 33... - Page 192 Proprietary and Confidential Draft 8 Sep 05 4.8 Heater Grill Chapter 4: Removal and Replacement NOTES: Page 4 - 34 Resuscitaire® Radiant Warmer Products Service Manual (82 990 45)
-
Page 193: Warmer Head Top Cover
Proprietary and Confidential Draft 8 Sep 05 4.9 Warmer Head Top Cover Chapter 4: Removal and Replacement Warmer Head Top Cover Tools required: Phillips head screwdriver Removal SHOCK HAZARD: Unplug the unit from its power source during removal and replacement procedures. -
Page 194: Replacement
Proprietary and Confidential Draft 8 Sep 05 4.9 Warmer Head Top Cover Chapter 4: Removal and Replacement Figure 4-16. Warmer Head Top Cover 4. Lift the warmer head top cover (B) away from the warmer head (C). Replacement 1. Perform the removal procedure in reverse order. 2. -
Page 195: 4.10 Controller Module Front Panel
Proprietary and Confidential Draft 8 Sep 05 4.10 Controller Module Front Panel Chapter 4: Removal and Replacement 4.10 Controller Module Front Panel Tools required: Phillips head screwdriver AMP® unlocking tool (AMP® P/N 91084-1) Removal 1. Remove the Controller Module (refer to procedure 4.2). 2. - Page 196 Proprietary and Confidential Draft 8 Sep 05 4.10 Controller Module Front Panel Chapter 4: Removal and Replacement 5. Disconnect all the connectors from the Display P.C. Board (PCB1) (E) and the Power and Control P.C. Board (PCB 2) (F). 6. Locate the three metal anchors on the Electrical Module front panel (D) securing the Display P.C.
-
Page 197: Replacement
Proprietary and Confidential Draft 8 Sep 05 4.10 Controller Module Front Panel Chapter 4: Removal and Replacement Replacement CAUTION: Do not use the two hex standoffs as a torque to tighten the two standoffs to the Electrical Module front panel. Equipment damage or breakage of the Loctite®... - Page 198 Proprietary and Confidential Draft 8 Sep 05 4.10 Controller Module Front Panel Chapter 4: Removal and Replacement 7. Connect all of the connectors to the display with the Display P.C. Board (PCB 1) (E) and Power and Control P.C. Board (PCB 2) (F). 8.
-
Page 199: Chapter 5: Parts List
Proprietary and Confidential Draft 8 Sep 05 Chapter 5 Parts List Service Parts Ordering Using the parts lists in this manual, identify the part number(s) you require. Find the product number and serial number on the product identification label (A) (see figure 5-1 on page 5-1), (see figure 5-2 on page 5-2), and (see figure 5-3 on page 5-3). - Page 200 Proprietary and Confidential Draft 8 Sep 05 Service Parts Ordering Chapter 5: Parts List Figure 5-2. Product Identification Label Location on the Resuscitaire® Birthing Room Warmer (WBR82) Page 5 - 2 Resuscitaire® Radiant Warmer Products Service Manual (82 990 45)
- Page 201 Proprietary and Confidential Draft 8 Sep 05 Service Parts Ordering Chapter 5: Parts List Figure 5-3. Product Identification Label Location on the Resuscitaire® Wall Mounted Warmer (WMRW82) Call Technical Support with the following information: • Customer account number • Purchase order number •...
-
Page 202: Recommended Spare Parts
Proprietary and Confidential Draft 8 Sep 05 Recommended Spare Parts Chapter 5: Parts List Recommended Spare Parts For a recommended spare parts list to service five or more units, see table 5-1 on page 5-4. Table 5-1. Recommended Spare Parts Part Number Description 17 683 11... - Page 203 Proprietary and Confidential Draft 8 Sep 05 Recommended Spare Parts Chapter 5: Parts List Part Number Description 81 000 06 MU10841 Breathing circuit, disposable, box of 25 68 209 46 MU06942 Critter Covers® Probe Cover, box of 68 209 45 MU06941 Critter Covers®...
-
Page 204: Resuscitaire® Radiant Warmer Without Resuscitation
Proprietary and Confidential Draft 8 Sep 05 Resuscitaire® Radiant Warmer without Resuscitation Chapter 5: Parts List Resuscitaire® Radiant Warmer without Resuscitation Figure 5-4. Resuscitaire® Radiant Warmer without Resuscitation Page 5 - 6 Resuscitaire® Radiant Warmer Products Service Manual (82 990 45) - Page 205 Proprietary and Confidential Draft 8 Sep 05 Resuscitaire® Radiant Warmer without Resuscitation Chapter 5: Parts List Table 5-2. Resuscitaire® Radiant Warmer without Resuscitation Item Part Number Description 81 020 73-R MU11084 Cart assembly, Resuscitaire® Radiant Warmer (fixed height model only) 81 200 71 MU11214 Warmer head assembly, 120V (120V...
- Page 206 Proprietary and Confidential Draft 8 Sep 05 Resuscitaire® Radiant Warmer without Resuscitation Chapter 5: Parts List Item Part Number Description 17 AZ 104* MU02496 Cable assembly, AC power/link, domestic, 10' (120V model only) 17 AZ 203* MU02500 Cable assembly, AC power/link, European, 10' (220V and 240V models only) Page 5 - 8...
- Page 207 Proprietary and Confidential Draft 8 Sep 05 Resuscitaire® Radiant Warmer without Resuscitation Chapter 5: Parts List NOTES: Resuscitaire® Radiant Warmer Products Service Manual (82 990 45) Page 5 - 9...
-
Page 208: Upper Post Assembly For The Resuscitaire® Radiant Warmer
Proprietary and Confidential Draft 8 Sep 05 Upper Post Assembly for the Resuscitaire® Radiant Warmer (Models without Resuscitation Only) Chapter 5: Parts List Upper Post Assembly for the Resuscitaire® Radiant Warmer (Models without Resuscitation Only) Figure 5-5. Upper Post Assembly for the Resuscitaire® Radiant Warmer (Models without Resuscitation Only) Page 5 - 10 Resuscitaire®... - Page 209 Proprietary and Confidential Draft 8 Sep 05 Upper Post Assembly for the Resuscitaire® Radiant Warmer (Models without Resuscitation Only) Chapter 5: Parts List Table 5-3. Upper Post Assembly for the Resuscitaire® Radiant Warmer (Models without Resuscitation Only) Part Item Description Number 81 020 02 MU11043...
-
Page 210: Resuscitaire® Radiant Warmer With Resuscitation
Proprietary and Confidential Draft 8 Sep 05 Resuscitaire® Radiant Warmer with Resuscitation Chapter 5: Parts List Resuscitaire® Radiant Warmer with Resuscitation Figure 5-6. Resuscitaire® Radiant Warmer with Resuscitation Page 5 - 12 Resuscitaire® Radiant Warmer Products Service Manual (82 990 45) - Page 211 Proprietary and Confidential Draft 8 Sep 05 Resuscitaire® Radiant Warmer with Resuscitation Chapter 5: Parts List Table 5-4. Resuscitaire® Radiant Warmer with Resuscitation Item Part Number Description 81 020 71 MU11081 Cart assembly, Resuscitaire® Radiant Warmer (fixed height model only) 82 010 70 MU12010 Cart assembly, Resuscitaire®...
- Page 212 Proprietary and Confidential Draft 8 Sep 05 Resuscitaire® Radiant Warmer with Resuscitation Chapter 5: Parts List Item Part Number Description 81 400 31 MU11338 Overlay, without AutoBreath™ Infant Resuscitator front panel, Radiant Warmer, Italian 81 400 40 MU11342 Overlay, front panel, resuscitation module, blank 81 400 20 MU11329...
- Page 213 Proprietary and Confidential Draft 8 Sep 05 Resuscitaire® Radiant Warmer with Resuscitation Chapter 5: Parts List Item Part Number Description 78 162 59 MU09415 Label, warning, side/end panel, German 78 162 63 MU09419 Label, warning, side/end panel, Italian 81 000 40 MU10858 Label, caution, heating hazard, English 81 000 41...
- Page 214 Proprietary and Confidential Draft 8 Sep 05 Resuscitaire® Radiant Warmer with Resuscitation Chapter 5: Parts List Item Part Number Description 81 990 92 MU11715 Replacement kit, electrical front panel, RW, Greek 81 600 34 MU11571 Overlay, front panel, blender, blank 17 AZ 104 MU02496 Cable assembly, AC power/link, domestic, 10'...
- Page 215 Proprietary and Confidential Draft 8 Sep 05 Resuscitaire® Radiant Warmer with Resuscitation Chapter 5: Parts List NOTES: Resuscitaire® Radiant Warmer Products Service Manual (82 990 45) Page 5 - 17...
-
Page 216: Upper Post Assembly (Units With Resuscitation Only) For The Resuscitaire
Proprietary and Confidential Draft 8 Sep 05 Upper Post Assembly (Units with Resuscitation Only) for the Resuscitaire® Radiant Warmer Chapter 5: Parts List Upper Post Assembly (Units with Resuscitation Only) for the Resuscitaire® Radiant Warmer Figure 5-7. Upper Post Assembly (Units with Resuscitation Only) for the Resuscitaire® Radiant Warmer Page 5 - 18 Resuscitaire®... - Page 217 Proprietary and Confidential Draft 8 Sep 05 Upper Post Assembly (Units with Resuscitation Only) for the Resuscitaire® Radiant Warmer Chapter 5: Parts List Table 5-5. Upper Post Assembly (Units with Resuscitation Only) for the Resuscitaire® Radiant Warmer Item Part Number Description 81 020 02 MU11043...
- Page 218 Proprietary and Confidential Draft 8 Sep 05 Upper Post Assembly (Units with Resuscitation Only) for the Resuscitaire® Radiant Warmer Chapter 5: Parts List Item Part Number Description 99 032 94 MU15203 Screw, #8-32 x ¾", pan, phillips, stainless steel, sems internal (fixed height model only) 08 136 07-R MU01917...
- Page 219 Proprietary and Confidential Draft 8 Sep 05 Upper Post Assembly (Units with Resuscitation Only) for the Resuscitaire® Radiant Warmer Chapter 5: Parts List Item Part Number Description 81 301 32 MU11274 Label, rear panel, 120V, English (120V model only) 81 301 33 MU11275 Label, rear panel, 120V, Spanish (120V model only)
-
Page 220: Resuscitaire® Birthing Room Warmer-82 3E2 70
Proprietary and Confidential Draft 8 Sep 05 Resuscitaire® Birthing Room Warmer—82 3E2 70 Chapter 5: Parts List Resuscitaire® Birthing Room Warmer—82 3E2 70 Figure 5-8. Resuscitaire® Birthing Room Warmer—82 3E2 70 Page 5 - 22 Resuscitaire® Radiant Warmer Products Service Manual (82 990 45) - Page 221 Proprietary and Confidential Draft 8 Sep 05 Resuscitaire® Birthing Room Warmer—82 3E2 70 Chapter 5: Parts List Table 5-6. Resuscitaire® Birthing Room Warmer—82 3E2 70 Item Part Number Description 81 020 02 MU11043 Bracket, heater head (pivot) 81 005 74 MU11018 Cover, upper post 81 005 67...
- Page 222 Proprietary and Confidential Draft 8 Sep 05 Resuscitaire® Birthing Room Warmer—82 3E2 70 Chapter 5: Parts List Item Part Number Description 99 110 04 MU15451 Nut, hex, 5/16"-18, keps, steel, zinc-plated 99 124 16 MU15569 Washer, lock, #10, split, steel, cadmium- plated 99 901 40 MU15773...
- Page 223 Proprietary and Confidential Draft 8 Sep 05 Resuscitaire® Birthing Room Warmer—82 3E2 70 Chapter 5: Parts List NOTES: Resuscitaire® Radiant Warmer Products Service Manual (82 990 45) Page 5 - 25...
-
Page 224: Resuscitaire® Birthing Room Warmer-82 1A1 70 And 82 1B1 70
Proprietary and Confidential Draft 8 Sep 05 Resuscitaire® Birthing Room Warmer—82 1A1 70 and 82 1B1 70 Chapter 5: Parts List Resuscitaire® Birthing Room Warmer—82 1A1 70 and 82 1B1 70 Figure 5-9. Resuscitaire® Birthing Room Warmer—82 1A1 70 and 82 1B1 70 Page 5 - 26 Resuscitaire®... - Page 225 Proprietary and Confidential Draft 8 Sep 05 Resuscitaire® Birthing Room Warmer—82 1A1 70 and 82 1B1 70 Chapter 5: Parts List Table 5-7. Resuscitaire® Birthing Room Warmer—82 1A1 70 and 82 1B1 Item Part Number Description 81 020 02 MU11043 Bracket, heater head (pivot) 81 005 74 MU11018...
- Page 226 Proprietary and Confidential Draft 8 Sep 05 Resuscitaire® Birthing Room Warmer—82 1A1 70 and 82 1B1 70 Chapter 5: Parts List Item Part Number Description 99 901 77 MU15779 Loctite® adhesive #242 99 041 36 MU15229 Screw, #10-32 x 3/8" truss, phillips, Nylok®...
- Page 227 Proprietary and Confidential Draft 8 Sep 05 Resuscitaire® Birthing Room Warmer—82 1A1 70 and 82 1B1 70 Chapter 5: Parts List Item Part Number Description 81 000 30 MU10851 Label, caution—shock hazard/high pressure, English 81 400 10 MU11321 Label, air cylinder inlet, English 81 400 17 MU11326 1 or 2 Label, oxygen cylinder inlet, English...
-
Page 228: Wall Mounted Resuscitaire® Radiant Warmer Assembly-82 000 70/80
Proprietary and Confidential Draft 8 Sep 05 Wall Mounted Resuscitaire® Radiant Warmer Assembly—82 000 70/80 Chapter 5: Parts List Wall Mounted Resuscitaire® Radiant Warmer Assembly—82 000 70/80 Figure 5-10. Wall Mounted Resuscitaire® Radiant Warmer Assembly—82 000 70/80 Page 5 - 30 Resuscitaire®... - Page 229 Proprietary and Confidential Draft 8 Sep 05 Wall Mounted Resuscitaire® Radiant Warmer Assembly—82 000 70/80 Chapter 5: Parts List Table 5-8. Wall-Mounted Resuscitaire® Radiant Warmer Assembly—82 000 70/80 Item Part Number Description 81 000 90 MU10866 Label, caution: no block vents, English 82 000 16 MU11788 Label, mattress height, wall-mounted...
- Page 230 Proprietary and Confidential Draft 8 Sep 05 Wall Mounted Resuscitaire® Radiant Warmer Assembly—82 000 70/80 Chapter 5: Parts List Item Part Number Description 81 000 30 MU10851 Label, caution—shock hazard/high pressure, English 78 265 41CC MU09761 Label, explosion hazard, English a.
- Page 231 Proprietary and Confidential Draft 8 Sep 05 Wall Mounted Resuscitaire® Radiant Warmer Assembly—82 000 70/80 Chapter 5: Parts List NOTES: Resuscitaire® Radiant Warmer Products Service Manual (82 990 45) Page 5 - 33...
-
Page 232: Cart Assembly (Bassinet) For The Resuscitaire® Radiant Warmer
Proprietary and Confidential Draft 8 Sep 05 Cart Assembly (Bassinet) for the Resuscitaire® Radiant Warmer Chapter 5: Parts List Cart Assembly (Bassinet) for the Resuscitaire® Radiant Warmer Figure 5-11. Cart Assembly (Bassinet) for the Resuscitaire® Radiant Warmer Page 5 - 34 Resuscitaire®... - Page 233 Proprietary and Confidential Draft 8 Sep 05 Cart Assembly (Bassinet) for the Resuscitaire® Radiant Warmer Chapter 5: Parts List Table 5-9. Cart Assembly (Bassinet) for the Resuscitaire® Radiant Warmer Item Part Number Description 78 170 20 MU09577 Mattress assembly, 20½" x 25¾" 81 900 42 MU11613 Replacement front panel, Italian (old style)
- Page 234 Proprietary and Confidential Draft 8 Sep 05 Cart Assembly (Bassinet) for the Resuscitaire® Radiant Warmer Chapter 5: Parts List Item Part Number Description 81 100 81-R MU11128 Bassinet assembly 81 101 23 MU11139 Label, suction flow (model with suction only) 99 010 67 MU15073 Screw, #4-40 x ¼", truss, phillips, stainless...
- Page 235 Proprietary and Confidential Draft 8 Sep 05 Cart Assembly (Bassinet) for the Resuscitaire® Radiant Warmer Chapter 5: Parts List Item Part Number Description 81 900 11 MU11595 Replacement rear panel, Spanish 81 900 21 MU11604 Replacement rear panel, French 81 900 31 MU11608 Replacement rear panel, German 81 900 41...
-
Page 236: Cart Assembly For The Resuscitaire® Birthing Room Warmer-82 005
Proprietary and Confidential Draft 8 Sep 05 Cart Assembly for the Resuscitaire® Birthing Room Warmer—82 005 50, 82 005 50NOK, and 82 005 50TLC Chapter 5: Parts List Cart Assembly for the Resuscitaire® Birthing Room Warmer—82 005 50, 82 005 50NOK, and 82 005 50TLC Figure 5-12. - Page 237 Proprietary and Confidential Draft 8 Sep 05 Cart Assembly for the Resuscitaire® Birthing Room Warmer—82 005 50, 82 005 50NOK, and 82 005 50TLC Chapter 5: Parts List Table 5-10. Cart Assembly for the Resuscitaire® Birthing Room Warmer— 82 005 50, 82 005 50NOK, and 82 005 50TLC Item Part Number Description...
-
Page 238: Cart Base Assembly For The Resuscitaire® Birthing Room
Proprietary and Confidential Draft 8 Sep 05 Cart Base Assembly for the Resuscitaire® Birthing Room Warmer—81 005 75 Chapter 5: Parts List Cart Base Assembly for the Resuscitaire® Birthing Room Warmer—81 005 75 Figure 5-13. Cart Base Assembly for the Resuscitaire® Birthing Room Warmer—81 005 75 Page 5 - 40 Resuscitaire®... - Page 239 Proprietary and Confidential Draft 8 Sep 05 Cart Base Assembly for the Resuscitaire® Birthing Room Warmer—81 005 75 Chapter 5: Parts List Table 5-11. Cart Base Assembly for the Resuscitaire® Birthing Room Warmer—81 005 75 Item Part Number Description Reference only Screw, #10 x 2", pan, phillips, zinc-plated 81 005 75G MU11021...
-
Page 240: Bassinet Assembly For The Resuscitaire® Birthing Room Warmer
Proprietary and Confidential Draft 8 Sep 05 Bassinet Assembly for the Resuscitaire® Birthing Room Warmer Chapter 5: Parts List Bassinet Assembly for the Resuscitaire® Birthing Room Warmer Figure 5-14. Bassinet Assembly for the Resuscitaire® Birthing Room Warmer Page 5 - 42 Resuscitaire®... - Page 241 Proprietary and Confidential Draft 8 Sep 05 Bassinet Assembly for the Resuscitaire® Birthing Room Warmer Chapter 5: Parts List Table 5-12. Bassinet Assembly for the Resuscitaire® Birthing Room Warmer Item Part Number Description 81 020 31 MU11070 Bassinet support 81 900 01 MU11586 Replacement rear panel, English 81 900 00...
- Page 242 Proprietary and Confidential Draft 8 Sep 05 Bassinet Assembly for the Resuscitaire® Birthing Room Warmer Chapter 5: Parts List Item Part Number Description 99 023 64 MU15131 Screw, #6-32 x 7/16", truss, phillips, stainless steel, Nylok® a. Nylok® is a registered trademark of Nylock Fastener Corporation. Page 5 - 44 Resuscitaire®...
- Page 243 Proprietary and Confidential Draft 8 Sep 05 Bassinet Assembly for the Resuscitaire® Birthing Room Warmer Chapter 5: Parts List NOTES: Resuscitaire® Radiant Warmer Products Service Manual (82 990 45) Page 5 - 45...
-
Page 244: Front, Side, And Rear Panel Assemblies For The Resuscitaire® Birthing Room Warmer Bassinet Assembly
Proprietary and Confidential Draft 8 Sep 05 Front, Side, and Rear Panel Assemblies for the Resuscitaire® Birthing Room Warmer Bassinet Assembly Chapter 5: Parts List Front, Side, and Rear Panel Assemblies for the Resuscitaire® Birthing Room Warmer Bassinet Assembly Figure 5-15. Front, Side, and Rear Panel Assemblies for the Resuscitaire® Birthing Room Warmer Bassinet Assembly Page 5 - 46 Resuscitaire®... - Page 245 Proprietary and Confidential Draft 8 Sep 05 Front, Side, and Rear Panel Assemblies for the Resuscitaire® Birthing Room Warmer Bassinet Assembly Chapter 5: Parts List Table 5-13. Front, Side, and Rear Panel Assemblies for the Resuscitaire® Birthing Room Warmer Bassinet Assembly Item Part Number Description...
-
Page 246: Variable Height Adjustable Cart Base And Column Assembly For The Resuscitaire® Radiant Warmer
Proprietary and Confidential Draft 8 Sep 05 Variable Height Adjustable Cart Base and Column Assembly for the Resuscitaire® Radiant Warmer Chapter 5: Parts List Variable Height Adjustable Cart Base and Column Assembly for the Resuscitaire® Radiant Warmer Figure 5-16. Variable Height Adjustable Cart Base and Column Assembly for the Resuscitaire Radiant Warmer Page 5 - 48 Resuscitaire®... - Page 247 Proprietary and Confidential Draft 8 Sep 05 Variable Height Adjustable Cart Base and Column Assembly for the Resuscitaire® Radiant Warmer Chapter 5: Parts List Table 5-14. Variable Height Adjustable Cart Base and Column Assembly for the Resuscitaire Radiant Warmer Item Part Number Description 82 010 03...
- Page 248 Proprietary and Confidential Draft 8 Sep 05 Variable Height Adjustable Cart Base and Column Assembly for the Resuscitaire® Radiant Warmer Chapter 5: Parts List Item Part Number Description 82 010 07 MU11991 Gasket, separator plate 82 010 05 MU11989 Wire harness, Radiant Warmer, VHA 17 734 12 MU03546 Cord lock adapter...
- Page 249 Proprietary and Confidential Draft 8 Sep 05 Variable Height Adjustable Cart Base and Column Assembly for the Resuscitaire® Radiant Warmer Chapter 5: Parts List NOTES: Resuscitaire® Radiant Warmer Products Service Manual (82 990 45) Page 5 - 51...
-
Page 250: Resuscitation Variable Height Adjustable Cart, 240V Base And Column Assembly For The Resuscitaire® Radiant Warmer (For The U.k.)
Proprietary and Confidential Draft 8 Sep 05 Resuscitation Variable Height Adjustable Cart, 240V Base and Column Assembly for the Resuscitaire® Radiant Warmer (for the U.K.) Chapter 5: Parts List Resuscitation Variable Height Adjustable Cart, 240V Base and Column Assembly for the Resuscitaire® Radiant Warmer (for the U.K.) Figure 5-17. - Page 251 Proprietary and Confidential Draft 8 Sep 05 Resuscitation Variable Height Adjustable Cart, 240V Base and Column Assembly for the Resuscitaire® Radiant Warmer (for the U.K.) Chapter 5: Parts List Table 5-15. Resuscitation Variable Height Adjustable Cart, 240V Base and Column Assembly for the Resuscitaire® Radiant Warmer (U.K. Model) Item Part Number...
- Page 252 Proprietary and Confidential Draft 8 Sep 05 Resuscitation Variable Height Adjustable Cart, 240V Base and Column Assembly for the Resuscitaire® Radiant Warmer (for the U.K.) Chapter 5: Parts List Item Part Number Description 17 734 12 MU03546 Cord lock adapter 68 212 00 MU06964 Label, ground symbol, protective...
- Page 253 Proprietary and Confidential Draft 8 Sep 05 Resuscitation Variable Height Adjustable Cart, 240V Base and Column Assembly for the Resuscitaire® Radiant Warmer (for the U.K.) Chapter 5: Parts List NOTES: Resuscitaire® Radiant Warmer Products Service Manual (82 990 45) Page 5 - 55...
-
Page 254: Variable Height Adjustable Cart Assembly, Without Resuscitation, For The Resuscitaire® Radiant Warmer
Proprietary and Confidential Draft 8 Sep 05 Variable Height Adjustable Cart Assembly, without Resuscitation, for the Resuscitaire® Radiant Warmer Chapter 5: Parts List Variable Height Adjustable Cart Assembly, without Resuscitation, for the Resuscitaire® Radiant Warmer Figure 5-18. Variable Height Adjustable Cart Assembly, without Resuscitation, for the Resuscitaire®... - Page 255 Proprietary and Confidential Draft 8 Sep 05 Variable Height Adjustable Cart Assembly, without Resuscitation, for the Resuscitaire® Radiant Warmer Chapter 5: Parts List Table 5-16. Variable Height Adjustable Cart Assembly, without Resuscitation, for the Resuscitaire® Radiant Warmer Item Part Number Description 81 020 14 MU11055...
- Page 256 Proprietary and Confidential Draft 8 Sep 05 Variable Height Adjustable Cart Assembly, without Resuscitation, for the Resuscitaire® Radiant Warmer Chapter 5: Parts List Item Part Number Description 99 901 77 MU15779 Loctite® (adhesive) #242 78 161 20 MU09367 Plug button, nylon, 0.88" hole 99 106 32 MU15433 Nut, hex, #8-32, keps, steel, zinc-plated...
- Page 257 Proprietary and Confidential Draft 8 Sep 05 Variable Height Adjustable Cart Assembly, without Resuscitation, for the Resuscitaire® Radiant Warmer Chapter 5: Parts List NOTES: Resuscitaire® Radiant Warmer Products Service Manual (82 990 45) Page 5 - 59...
- Page 258 Proprietary and Confidential Draft 8 Sep 05 Resuscitation Variable Height Adjustable Cart Assembly, 120V/220V/240V for the Resuscitaire® Radiant Warmer Chapter 5: Parts List Resuscitation Variable Height Adjustable Cart Assembly, 120V/220V/240V for the Resuscitaire® Radiant Warmer Figure 5-19. Resuscitation Variable Height Adjustable Cart Assembly, 120V/220V/240V for the Resuscitaire®...
- Page 259 Proprietary and Confidential Draft 8 Sep 05 Resuscitation Variable Height Adjustable Cart Assembly, 120V/220V/240V for the Resuscitaire® Radiant Warmer Chapter 5: Parts List Table 5-17. Resuscitation Variable Height Adjustable Cart Assembly, 120V/220V/240V for the Resuscitaire® Radiant Warmer Item Part Number Description 81 020 14 MU11055...
- Page 260 Proprietary and Confidential Draft 8 Sep 05 Resuscitation Variable Height Adjustable Cart Assembly, 120V/220V/240V for the Resuscitaire® Radiant Warmer Chapter 5: Parts List Item Part Number Description 99 056 66 MU15304 Screw, ¼"-20 x 5/8", cap, socket, button, stainless steel 99 195 22 MU15734 Screw, shoulder, 0.38"...
- Page 261 Proprietary and Confidential Draft 8 Sep 05 Resuscitation Variable Height Adjustable Cart Assembly, 120V/220V/240V for the Resuscitaire® Radiant Warmer Chapter 5: Parts List NOTES: Resuscitaire® Radiant Warmer Products Service Manual (82 990 45) Page 5 - 63...
-
Page 262: The Resuscitaire® Radiant Warmer
Proprietary and Confidential Draft 8 Sep 05 Variable Height Adjustable Cart, 120V/240V Base and Column Assembly (Models with Variable Tilt Bassinet) for the Resuscitaire® Radiant Warmer Chapter 5: Parts List Variable Height Adjustable Cart, 120V/240V Base and Column Assembly (Models with Variable Tilt Bassinet) for the Resuscitaire® Radiant Warmer Figure 5-20. - Page 263 Proprietary and Confidential Draft 8 Sep 05 Variable Height Adjustable Cart, 120V/240V Base and Column Assembly (Models with Variable Tilt Bassinet) for the Resuscitaire® Radiant Warmer Chapter 5: Parts List Table 5-18. Variable Height Adjustable Cart, 120V/240V Base and Column Assembly (Models with Variable Tilt Bassinet) for the Resuscitaire®...
- Page 264 Proprietary and Confidential Draft 8 Sep 05 Variable Height Adjustable Cart, 120V/240V Base and Column Assembly (Models with Variable Tilt Bassinet) for the Resuscitaire® Radiant Warmer Chapter 5: Parts List Item Part Number Description 17 653 09 MU03265 Relay, double-pole double-throw (DPDT), 10A/250V AC, UL/CSA®...
- Page 265 Proprietary and Confidential Draft 8 Sep 05 Variable Height Adjustable Cart, 120V/240V Base and Column Assembly (Models with Variable Tilt Bassinet) for the Resuscitaire® Radiant Warmer Chapter 5: Parts List NOTES: Resuscitaire® Radiant Warmer Products Service Manual (82 990 45) Page 5 - 67...
-
Page 266: Resuscitation Variable Height Adjustable Cart Assembly, 120V/240V For The Resuscitaire® Radiant Warmer (Models With Variable Tilt Bassinet)
Proprietary and Confidential Draft 8 Sep 05 Resuscitation Variable Height Adjustable Cart Assembly, 120V/240V for the Resuscitaire® Radiant Warmer (Models with Variable Tilt Bassinet) Chapter 5: Parts List Resuscitation Variable Height Adjustable Cart Assembly, 120V/240V for the Resuscitaire® Radiant Warmer (Models with Variable Tilt Bassinet) Figure 5-21. - Page 267 Proprietary and Confidential Draft 8 Sep 05 Resuscitation Variable Height Adjustable Cart Assembly, 120V/240V for the Resuscitaire® Radiant Warmer (Models with Variable Tilt Bassinet) Chapter 5: Parts List Table 5-19. Resuscitation Variable Height Adjustable Cart Assembly, 120V/240Vfor the Resuscitaire® Radiant Warmer (Models with Variable Tilt Bassinet) Item Part Number...
- Page 268 Proprietary and Confidential Draft 8 Sep 05 Resuscitation Variable Height Adjustable Cart Assembly, 120V/240V for the Resuscitaire® Radiant Warmer (Models with Variable Tilt Bassinet) Chapter 5: Parts List Item Part Number Description 99 045 24 MU15269 Screw, #10-32 x 2.00", cap, hex, stainless steel 81 020 22 MU11062...
- Page 269 Proprietary and Confidential Draft 8 Sep 05 Resuscitation Variable Height Adjustable Cart Assembly, 120V/240V for the Resuscitaire® Radiant Warmer (Models with Variable Tilt Bassinet) Chapter 5: Parts List NOTES: Resuscitaire® Radiant Warmer Products Service Manual (82 990 45) Page 5 - 71...
-
Page 270: Variable Height Adjustable Cart Assembly, 120V/240V With Variable Tilt Bassinet For The Resuscitaire® Radiant Warmer
Proprietary and Confidential Draft 8 Sep 05 Variable Height Adjustable Cart Assembly, 120V/240V with Variable Tilt Bassinet for the Resuscitaire® Radiant Warmer Chapter 5: Parts List Variable Height Adjustable Cart Assembly, 120V/240V with Variable Tilt Bassinet for the Resuscitaire® Radiant Warmer Figure 5-22. - Page 271 Proprietary and Confidential Draft 8 Sep 05 Variable Height Adjustable Cart Assembly, 120V/240V with Variable Tilt Bassinet for the Resuscitaire® Radiant Warmer Chapter 5: Parts List Table 5-20. Variable Height Adjustable Cart Assembly, 120V/240V with Variable Tilt Bassinet for the Resuscitaire® Radiant Warmer Item Part Number Description...
- Page 272 Proprietary and Confidential Draft 8 Sep 05 Variable Height Adjustable Cart Assembly, 120V/240V with Variable Tilt Bassinet for the Resuscitaire® Radiant Warmer Chapter 5: Parts List Item Part Number Description 99 042 02 MU15236 Screw, #10-32 x ½", flat, phillips, stainless steel 82 011 20 MU12036...
- Page 273 Proprietary and Confidential Draft 8 Sep 05 Variable Height Adjustable Cart Assembly, 120V/240V with Variable Tilt Bassinet for the Resuscitaire® Radiant Warmer Chapter 5: Parts List NOTES: Resuscitaire® Radiant Warmer Products Service Manual (82 990 45) Page 5 - 75...
-
Page 274: Bassinet Subassembly For The Resuscitaire® Radiant Warmer
Proprietary and Confidential Draft 8 Sep 05 Bassinet Subassembly for the Resuscitaire® Radiant Warmer Chapter 5: Parts List Bassinet Subassembly for the Resuscitaire® Radiant Warmer Figure 5-23. Bassinet Subassembly for the Resuscitaire® Radiant Warmer NOTE Bottom view shown. Page 5 - 76 Resuscitaire®... - Page 275 Proprietary and Confidential Draft 8 Sep 05 Bassinet Subassembly for the Resuscitaire® Radiant Warmer Chapter 5: Parts List Table 5-21. Bassinet Subassembly for the Resuscitaire® Radiant Warmer Item Part Number Description 81 020 31 MU11070 Bassinet support 81 020 07 MU11047 Support, mattress 82 000 10...
-
Page 276: Warmer Head Assembly
Proprietary and Confidential Draft 8 Sep 05 Warmer Head Assembly Chapter 5: Parts List Warmer Head Assembly Figure 5-24. Warmer Head Assembly Page 5 - 78 Resuscitaire® Radiant Warmer Products Service Manual (82 990 45) - Page 277 Proprietary and Confidential Draft 8 Sep 05 Warmer Head Assembly Chapter 5: Parts List Table 5-22. Warmer Head Assembly Item Part Number Description 81 020 41 MU11077 Wire, ground, #6 ring, 4.00" long Reference only Label, data tag, 1.63" x 3.00" 99 901 77 MU15779 Loctite®...
- Page 278 Proprietary and Confidential Draft 8 Sep 05 Warmer Head Assembly Chapter 5: Parts List Item Part Number Description 68 212 00 MU06964 Label, ground symbol, protective 81 020 26 MU11065 Cover, top 99 023 51 MU15127 Screw, #6-32 x 3/8", truss, phillips, stainless steel, Nylok®...
- Page 279 Proprietary and Confidential Draft 8 Sep 05 Warmer Head Assembly Chapter 5: Parts List Item Part Number Description 17 063 22 MU02923 Clamp, cable, loop, tefzel, 0.12 inside diameter a. Loctite® is a registered trademark of Loctite Corporation. b. Nylok® is a registered trademark of Nylok Fastener Corporation. A/R As required Resuscitaire®...
-
Page 280: Heater Subassembly
Proprietary and Confidential Draft 8 Sep 05 Heater Subassembly Chapter 5: Parts List Heater Subassembly Figure 5-25. Heater Subassembly Page 5 - 82 Resuscitaire® Radiant Warmer Products Service Manual (82 990 45) - Page 281 Proprietary and Confidential Draft 8 Sep 05 Heater Subassembly Chapter 5: Parts List Table 5-23. Heater Subassembly Item Part Number Description 81 200 43 MU11195 Spring, retaining 81 020 27 MU11066 End plate, main reflector 81 200 08 MU11173 Reflector, main Reference only Bracket, parabola (for use with units equipped with P/N 81 990 65 (Retrofit kit,...
-
Page 282: Controller Assembly
Proprietary and Confidential Draft 8 Sep 05 Controller Assembly Chapter 5: Parts List Controller Assembly Figure 5-26. Controller Assembly Page 5 - 84 Resuscitaire® Radiant Warmer Products Service Manual (82 990 45) - Page 283 Proprietary and Confidential Draft 8 Sep 05 Controller Assembly Chapter 5: Parts List Table 5-24. Controller Assembly Item Part Number Description 12 995 00 MU01975 Wire tie (4½" long) 17 585 58 MU03067 Suppressor, ferrite, 120 ohms 99 182 06 MU15714 Ring, retaining, Nat 6100-37-ST-ZD 81 990 80...
- Page 284 Proprietary and Confidential Draft 8 Sep 05 Controller Assembly Chapter 5: Parts List Item Part Number Description 17 683 01 MU03306 Actuator, switch, push button, light, rectangular, mount 17 683 08 MU03307 Actuator, switch, push button, light, round, momentary 17 683 09 MU03308 Actuator, switch, push button, light, round, mount...
- Page 285 Proprietary and Confidential Draft 8 Sep 05 Controller Assembly Chapter 5: Parts List Item Part Number Description 99 010 56 MU15067 Screw, #4-40 x ¼", truss, phillips, stainless steel 99 011 35 MU15086 Screw, #4-40 x 7/16", truss, phillips, stainless steel 99 022 72 MU15101 Screw, #6-32 x ¼", truss, phillips, stainless...
-
Page 286: Blender-81 600 80 And Blender Blank-81 600 70
Proprietary and Confidential Draft 8 Sep 05 Blender—81 600 80 and Blender Blank—81 600 70 Chapter 5: Parts List Blender—81 600 80 and Blender Blank—81 600 70 Figure 5-27. Blender—81 600 80 and Blender Blank—81 600 70 Page 5 - 88 Resuscitaire®... - Page 287 Proprietary and Confidential Draft 8 Sep 05 Blender—81 600 80 and Blender Blank—81 600 70 Chapter 5: Parts List Table 5-25. Blender—81 600 80 and Blender Blank—81 600 70 Item Part Number Description 81 501 36 MU11498 Tubing, polyethylene, 0.187" inside diameter, 0.312"...
-
Page 288: Rm2001™ Gas Delivery Module Assembly
Proprietary and Confidential Draft 8 Sep 05 RM2001™ Gas Delivery Module Assembly Chapter 5: Parts List RM2001™ Gas Delivery Module Assembly Figure 5-28. RM2001™ Gas Delivery Module Assembly Table 5-26. RM2001™ Gas Delivery Module Assembly Item Part Number Description 81 400 74T MU11371 Tested RM2001™... - Page 289 Proprietary and Confidential Draft 8 Sep 05 Resuscitation Module Assembly (Models without AutoBreath™ Infant Resuscitator) Chapter 5: Parts List Resuscitation Module Assembly (Models without AutoBreath™ Infant Resuscitator) Figure 5-29. Resuscitation Module Assembly (Models without AutoBreath™ Infant Resuscitator) Table 5-27. Resuscitation Module Assembly (Models without AutoBreath™...
-
Page 290: Resuscitation Module Assembly
Proprietary and Confidential Draft 8 Sep 05 Resuscitation Module Assembly (Models with AutoBreath™ Infant Resuscitator) Chapter 5: Parts List Resuscitation Module Assembly (Models with AutoBreath™ Infant Resuscitator) Figure 5-30. Resuscitation Module Assembly (Models with AutoBreath™ Infant Resuscitator) Table 5-28. Resuscitation Module Assembly (Models with AutoBreath™... - Page 291 Proprietary and Confidential Draft 8 Sep 05 Resuscitation Module Assembly (Models with AutoBreath™ Infant Resuscitator) Chapter 5: Parts List NOTES: Resuscitaire® Radiant Warmer Products Service Manual (82 990 45) Page 5 - 93...
-
Page 292: Nist), And Low-Pressure
Proprietary and Confidential Draft 8 Sep 05 Oxygen Pipeline with Oxygen Cylinder (Pin-Index) Gas Supply Module—Diameter Index Safety System (DISS), Non-Interchangeable Screw Thread (NIST), and Low-Pressure Chapter 5: Parts List Oxygen Pipeline with Oxygen Cylinder (Pin-Index) Gas Supply Module—Diameter Index Safety System (DISS), Non- Interchangeable Screw Thread (NIST), and Low-Pressure Figure 5-31. - Page 293 Proprietary and Confidential Draft 8 Sep 05 Oxygen Pipeline with Oxygen Cylinder (Pin-Index) Gas Supply Module—Diameter Index Safety System (DISS), Non-Interchangeable Screw Thread (NIST), and Low-Pressure Chapter 5: Parts List Table 5-29. Oxygen Pipeline with Oxygen Cylinder (Pin-Index) Gas Supply Module—Diameter Index Safety System (DISS), Non- Interchangeable Screw Thread (NIST), and Low-Pressure Item Part Number...
- Page 294 Proprietary and Confidential Draft 8 Sep 05 Oxygen Pipeline with Oxygen Cylinder (Pin-Index) Gas Supply Module—Diameter Index Safety System (DISS), Non-Interchangeable Screw Thread (NIST), and Low-Pressure Chapter 5: Parts List Item Part Number Description 81 500 23 MU11404 Elbow, ¼" outside diameter tubing—¼" National Pipe Thread (NPT), male 81 500 27 MU11408...
- Page 295 Proprietary and Confidential Draft 8 Sep 05 Oxygen Pipeline with Oxygen Cylinder (Pin-Index) Gas Supply Module—Diameter Index Safety System (DISS), Non-Interchangeable Screw Thread (NIST), and Low-Pressure Chapter 5: Parts List Item Part Number Description 81 501 77 MU11526 Regulator, 45 psi/pressure relief, high pressure oxygen (HpO2) (81 501 94-R only) a.
-
Page 296: Gas Supply Module With Oxygen Reserve, Deutsche Industrie Norm (Din) Cylinder Fittings-White Hose Or Green Hose
Proprietary and Confidential Draft 8 Sep 05 Gas Supply Module with Oxygen Reserve, Deutsche Industrie Norm (DIN) Cylinder Fittings—White Hose or Green Hose Chapter 5: Parts List Gas Supply Module with Oxygen Reserve, Deutsche Industrie Norm (DIN) Cylinder Fittings—White Hose or Green Hose Figure 5-32. - Page 297 Proprietary and Confidential Draft 8 Sep 05 Gas Supply Module with Oxygen Reserve, Deutsche Industrie Norm (DIN) Cylinder Fittings—White Hose or Green Hose Chapter 5: Parts List Table 5-30. Gas Supply Module with Oxygen Reserve, DIN Cylinder Fittings—White Hose or Green Hose Item Part Number Description...
- Page 298 Proprietary and Confidential Draft 8 Sep 05 Gas Supply Module with Oxygen Reserve, Deutsche Industrie Norm (DIN) Cylinder Fittings—White Hose or Green Hose Chapter 5: Parts List Item Part Number Description 81 500 24 MU11405 Elbow, 0.312" outside diameter tubing— 1/8"...
- Page 299 Proprietary and Confidential Draft 8 Sep 05 Gas Supply Module with Oxygen Reserve, Deutsche Industrie Norm (DIN) Cylinder Fittings—White Hose or Green Hose Chapter 5: Parts List c. Teflon® is a registered trademark of E. I. du Pont and de Nemours and Company. d.
-
Page 300: Nist), And Low-Pressure
Proprietary and Confidential Draft 8 Sep 05 Oxygen/Air Pipeline with Pin-Indexed Oxygen/Air Cylinder Gas Supply Module—Diameter Index Safety System (DISS), Non-Interchangeable Screw thread (NIST), and Low-Pressure Chapter 5: Parts List Oxygen/Air Pipeline with Pin-Indexed Oxygen/Air Cylinder Gas Supply Module—Diameter Index Safety System (DISS), Non- Interchangeable Screw thread (NIST), and Low-Pressure Figure 5-33. - Page 301 Proprietary and Confidential Draft 8 Sep 05 Oxygen/Air Pipeline with Pin-Indexed Oxygen/Air Cylinder Gas Supply Module—Diameter Index Safety System (DISS), Non-Interchangeable Screw thread (NIST), and Low-Pressure Chapter 5: Parts List Table 5-31. Oxygen/Air Pipeline with Pin-Indexed Oxygen/Air Cylinder Gas Supply Module—Diameter Index Safety System (DISS), Non- Interchangeable Screw Thread (NIST), and Low-Pressure Item Part Number...
- Page 302 Proprietary and Confidential Draft 8 Sep 05 Oxygen/Air Pipeline with Pin-Indexed Oxygen/Air Cylinder Gas Supply Module—Diameter Index Safety System (DISS), Non-Interchangeable Screw thread (NIST), and Low-Pressure Chapter 5: Parts List Item Part Number Description 81 900 74 MU11641 Replacement kit, air yoke 78 440 15 MU10216 Adapter, yoke, male to female, high...
- Page 303 Proprietary and Confidential Draft 8 Sep 05 Oxygen/Air Pipeline with Pin-Indexed Oxygen/Air Cylinder Gas Supply Module—Diameter Index Safety System (DISS), Non-Interchangeable Screw thread (NIST), and Low-Pressure Chapter 5: Parts List Item Part Number Description 99 181 48 MU15708 Ring, retaining, push-on, stainless steel, 0.01"...
- Page 304 Proprietary and Confidential Draft 8 Sep 05 Gas Supply Module with Oxygen/Air Reserves and Deutsche Industrie Norm (DIN) Cylinder Fittings—Blue/Green and Yellow Hoses or Blue/White and Black Hoses Chapter 5: Parts List Gas Supply Module with Oxygen/Air Reserves and Deutsche Industrie Norm (DIN) Cylinder Fittings—Blue/Green and Yellow Hoses or Blue/White and Black Hoses Figure 5-34.
-
Page 305: Black Hoses
Proprietary and Confidential Draft 8 Sep 05 Gas Supply Module with Oxygen/Air Reserves and Deutsche Industrie Norm (DIN) Cylinder Fittings—Blue/Green and Yellow Hoses or Blue/White and Black Hoses Chapter 5: Parts List Table 5-32. Gas Supply Module with Oxygen/Air Reserves and DIN Cylinder Fittings—Blue/Green and Yellow Hoses or Blue/White and Black Hoses Item... - Page 306 Proprietary and Confidential Draft 8 Sep 05 Gas Supply Module with Oxygen/Air Reserves and Deutsche Industrie Norm (DIN) Cylinder Fittings—Blue/Green and Yellow Hoses or Blue/White and Black Hoses Chapter 5: Parts List Item Part Number Description 81 501 22 MU11484 Connector, Deutsche Industrie Norm (DIN), oxygen cylinder, HpO2 81 501 23...
- Page 307 Proprietary and Confidential Draft 8 Sep 05 Gas Supply Module with Oxygen/Air Reserves and Deutsche Industrie Norm (DIN) Cylinder Fittings—Blue/Green and Yellow Hoses or Blue/White and Black Hoses Chapter 5: Parts List Item Part Number Description 99 129 85 MU15644 Washer, lock, internal, 7/8", steel, cadmium-plated 99 114 50...
-
Page 308: Gas Supply Module With Ente Nationale Italiano Di Unificazione (Uni) Cylinder Fittings, Oxygen Reserve, And White Hoses
Proprietary and Confidential Draft 8 Sep 05 Gas Supply Module with Ente Nationale Italiano di Unificazione (UNI) Cylinder Fittings, Oxygen Reserve, and White Hoses Chapter 5: Parts List Gas Supply Module with Ente Nationale Italiano di Unificazione (UNI) Cylinder Fittings, Oxygen Reserve, and White Hoses Figure 5-35. - Page 309 Proprietary and Confidential Draft 8 Sep 05 Gas Supply Module with Ente Nationale Italiano di Unificazione (UNI) Cylinder Fittings, Oxygen Reserve, and White Hoses Chapter 5: Parts List Table 5-33. Gas Supply Module with Ente Nationale Italiano di Unificazione (UNI) Cylinder Fittings, Oxygen Reserve, and White Hoses Part Item Description...
- Page 310 Proprietary and Confidential Draft 8 Sep 05 Gas Supply Module with Ente Nationale Italiano di Unificazione (UNI) Cylinder Fittings, Oxygen Reserve, and White Hoses Chapter 5: Parts List Part Item Description Number 81 501 05 MU11469 Tubing, formed, 3/16" outside diameter, HpO2 81 501 33 MU11495 Tubing, copper, 0.12"...
- Page 311 Proprietary and Confidential Draft 8 Sep 05 Gas Supply Module with Ente Nationale Italiano di Unificazione (UNI) Cylinder Fittings, Oxygen Reserve, and White Hoses Chapter 5: Parts List NOTES: Resuscitaire® Radiant Warmer Products Service Manual (82 990 45) Page 5 - 113...
-
Page 312: Gas Supply Module With Oxygen/Air Reserve, Ente Nationale Italiano Di Unificazione (Uni) Cylinder Fittings, And White/Black Hoses
Proprietary and Confidential Draft 8 Sep 05 Gas Supply Module with Oxygen/Air Reserve, Ente Nationale Italiano di Unificazione (UNI) Cylinder Fittings, and White/Black Hoses Chapter 5: Parts List Gas Supply Module with Oxygen/Air Reserve, Ente Nationale Italiano di Unificazione (UNI) Cylinder Fittings, and White/Black Hoses Figure 5-36. - Page 313 Proprietary and Confidential Draft 8 Sep 05 Gas Supply Module with Oxygen/Air Reserve, Ente Nationale Italiano di Unificazione (UNI) Cylinder Fittings, and White/Black Hoses Chapter 5: Parts List Table 5-34. Gas Supply Module with Oxygen/Air Reserve, Ente Nationale Italiano di Unificazione (UNI) Cylinder Fittings, and White/Black Hoses Item Part Number Description...
- Page 314 Proprietary and Confidential Draft 8 Sep 05 Gas Supply Module with Oxygen/Air Reserve, Ente Nationale Italiano di Unificazione (UNI) Cylinder Fittings, and White/Black Hoses Chapter 5: Parts List Item Part Number Description 81 500 37 MU11415 Elbow, street, 90°, ¼" National Pipe Thread (NPT), brass 81 500 23 MU11404...
- Page 315 Proprietary and Confidential Draft 8 Sep 05 Gas Supply Module with Oxygen/Air Reserve, Ente Nationale Italiano di Unificazione (UNI) Cylinder Fittings, and White/Black Hoses Chapter 5: Parts List Item Part Number Description Reference only Label, data tag, 1.81" square 81 500 30 MU11410 Elbow, 0.19"...
-
Page 316: Display P.c. Board (Pcb 1) Assembly
Proprietary and Confidential Draft 8 Sep 05 Display P.C. Board (PCB 1) Assembly Chapter 5: Parts List Display P.C. Board (PCB 1) Assembly Figure 5-37. Display P.C. Board (PCB 1) Assembly Table 5-35. Display P.C. Board (PCB 1) Assembly Item Part Number Description 81 307 75... -
Page 317: Power And Control P.c. Board (Pcb 2) Assembly
Proprietary and Confidential Draft 8 Sep 05 Power and Control P.C. Board (PCB 2) Assembly Chapter 5: Parts List Power and Control P.C. Board (PCB 2) Assembly Figure 5-38. Power and Control P.C. Board (PCB 2) Assembly Table 5-36. Power and Control P.C. Board (PCB 2) Assembly Item Part Number Description... - Page 318 Proprietary and Confidential Draft 8 Sep 05 Power and Control P.C. Board (PCB 2) Assembly Chapter 5: Parts List NOTES: Page 5 - 120 Resuscitaire® Radiant Warmer Products Service Manual (82 990 45)
-
Page 319: Chapter 6: Calibration And Maintenance Procedures
Proprietary and Confidential Draft 8 Sep 05 Chapter 6 Calibration and Maintenance Procedures Calibrating the Resuscitation Module Tools required: Phillips head screwdriver Pressure gauge assembly Clamping device (hemostat) (3) Digital counter Pressure transducer RT200 tester or equivalent test device Hex key wrench set Extension tubing Digital voltmeter (DVM) (Fluke®... -
Page 320: Calibrating The Oxygen And Air Regulators
Proprietary and Confidential Draft 8 Sep 05 Calibrating the Resuscitation Module Chapter 6: Calibration and Maintenance Procedures Calibrating the Oxygen and Air Regulators 1. Remove the white hoses from the output of the Oxygen Tank Regulator. 2. Attach the RT200 Tester (or equivalent) to the white hose. 3. -
Page 321: Adjusting The Auxiliary Flow And Flow Valve To Zero
Proprietary and Confidential Draft 8 Sep 05 Calibrating the Resuscitation Module Chapter 6: Calibration and Maintenance Procedures Adjusting the Auxiliary Flow and Flow Valve to Zero 1. Connect the Auxiliary Outlet to the connector corresponding to a high flow measurement on the RT200 tester or equivalent test device. 2. -
Page 322: Adjusting The Auxiliary Flow Relief Valve
Proprietary and Confidential Draft 8 Sep 05 Calibrating the Resuscitation Module Chapter 6: Calibration and Maintenance Procedures Adjusting the Auxiliary Flow Relief Valve 1. Connect the Auxiliary Outlet to the connector corresponding to a low pressure measurement on the RT200 tester or equivalent test device. 2. -
Page 323: Adjusting The Maximum Suction Relief Gauge For Accuracy And To Zero
Proprietary and Confidential Draft 8 Sep 05 Calibrating the Resuscitation Module Chapter 6: Calibration and Maintenance Procedures 3. At the RT200 tester or equivalent test device, select the test: a. For the new Resuscitation Module without AutoBreath™ Infant Resuscitator (PN 81 400 81) or the old Resuscitation Module with AutoBreath™... -
Page 324: Calibrating The Patient Gas Supply
Proprietary and Confidential Draft 8 Sep 05 Calibrating the Resuscitation Module Chapter 6: Calibration and Maintenance Procedures a. While turning the Suction control knob, compare the accuracy of the readings on the Suction gauge to the readings on the RT200 tester or equivalent test device. -
Page 325: Airway Pressure
Proprietary and Confidential Draft 8 Sep 05 Calibrating the Resuscitation Module Chapter 6: Calibration and Maintenance Procedures b. Adjust the knob until the pressure on the gauge reads 20 psi (138 kPa). c. Press down on the red ring, and secure the wire tie just above the red ring. -
Page 326: Adjusting The Airway Pressure Valve To Zero
Proprietary and Confidential Draft 8 Sep 05 Calibrating the Resuscitation Module Chapter 6: Calibration and Maintenance Procedures 11. If the reading on the RT200 tester or equivalent test device is not 50 cm H O (5 kPa), adjust the airway pressure resistor until the reading on the RT200 tester or equivalent device is 50 cm H O (5 kPa): a. -
Page 327: Checking Zero On The Airway Pressure Gauge
Proprietary and Confidential Draft 8 Sep 05 Calibrating the Resuscitation Module Chapter 6: Calibration and Maintenance Procedures 4. Place a clamping device between the test port tee and the airway pressure resistor on the purple tee. 5. Place a clamping device on the yellow bleed resistor. 6. - Page 328 Proprietary and Confidential Draft 8 Sep 05 Calibrating the Resuscitation Module Chapter 6: Calibration and Maintenance Procedures 6. If the position on the Flow Rate control knob does not correspond to the reading on the RT200 tester or equivalent test device, perform the following: a.
-
Page 329: Adjusting The Patient Airway Relief Valve
Proprietary and Confidential Draft 8 Sep 05 Calibrating the Resuscitation Module Chapter 6: Calibration and Maintenance Procedures 15. Remove the hose connections. Adjusting the Patient Airway Relief Valve 1. Remove the auxiliary relief valve, and install the airway pressure relief valve in its place. -
Page 330: Calibrating The Autobreath™ Infant Resuscitator
Proprietary and Confidential Draft 8 Sep 05 Calibrating the Resuscitation Module Chapter 6: Calibration and Maintenance Procedures Calibrating the AutoBreath™ Infant Resuscitator Adjusting the Pressure of the Regulator 1. At the front panel, remove the orange plug (TP11A) from the elbow on the back of the AutoBreath™... -
Page 331: Adjusting The Pilot Pressure
Proprietary and Confidential Draft 8 Sep 05 Calibrating the Resuscitation Module Chapter 6: Calibration and Maintenance Procedures NOTE: The low point is fixed and cannot be adjusted. d. If the highest pressure point does not correspond to a 22 psi (152 kPa) switch point, adjust the timing variable resistor. -
Page 332: Adjusting The Positive End Expiratory Pressure (Peep) Valve To Zero
Proprietary and Confidential Draft 8 Sep 05 Calibrating the Resuscitation Module Chapter 6: Calibration and Maintenance Procedures 11. Remove the relief valve cap from the manifold. 12. Install the auxiliary relief valve. 13. Remove the clamping device from the blue capacitor line. 14. -
Page 333: Adjusting The Peep Pressure
Proprietary and Confidential Draft 8 Sep 05 Calibrating the Resuscitation Module Chapter 6: Calibration and Maintenance Procedures Adjusting the PEEP Pressure 1. Connect a patient circuit between the patient outlet connector and the exhalation valve port. 2. Turn the Flow Rate control knob, Airway Pressure Relief control knob, and PEEP control knob to their maximum settings. - Page 334 Proprietary and Confidential Draft 8 Sep 05 Calibrating the Resuscitation Module Chapter 6: Calibration and Maintenance Procedures 7. At the front panel, adjust the Breath Rate control knob for an expiratory time of 2.222 seconds as indicated by the digital counter. 8.
- Page 335 Proprietary and Confidential Draft 8 Sep 05 Calibrating the Resuscitation Module Chapter 6: Calibration and Maintenance Procedures 16. To adjust for short inspiratory times, use the timing resistor. 17. Work with the Breath Rate knob positions until all rates and inspiratory/expiratory (I/E) ratios are within specification.
-
Page 336: Calibrating The Controller Assembly
Proprietary and Confidential Draft 8 Sep 05 Calibrating the Controller Assembly Chapter 6: Calibration and Maintenance Procedures Calibrating the Controller Assembly Tools required: Digital voltmeter (DVM) Small screwdriver or trim potentiometer adjustment tool Adjusting the Precision 5V Reference 1. At the Display P.C. Board (PCB1) (A), perform the following (see figure 6- 1 on page 6-18): Figure 6-1. -
Page 337: Adjusting The Skin Probe 1 Temperature Sensor
Proprietary and Confidential Draft 8 Sep 05 Calibrating the Controller Assembly Chapter 6: Calibration and Maintenance Procedures Adjusting the Skin Probe 1 Temperature Sensor 1. Perform “Diagnostic Test #12—Skin Probe Display Temperature Accuracy” on page 2-56. 2. At the Display P.C. Board (PCB1) (A), use a small screwdriver or trim potentiometer adjustment tool to adjust the channel 1 temperature sensor circuit resistor (R13) until the value on the Baby Temperature display reads 96.8°F (36°C) ±... - Page 338 Proprietary and Confidential Draft 8 Sep 05 Calibrating the Controller Assembly Chapter 6: Calibration and Maintenance Procedures Figure 6-2. Power and Control P.C. Board (PCB 2) a. Measure the input AC line voltage between pins 1 and 6 of the connector J6 (C).
-
Page 339: Cleaning
Proprietary and Confidential Draft 8 Sep 05 Cleaning Chapter 6: Calibration and Maintenance Procedures Cleaning WARNING: Follow the product manufacturer’s instructions. Failure to do so may result in personal injury or equipment damage. WARNING: When performing cleaning and maintenance procedures and oxygen is in use, make sure that the oxygen supply to the equipment is turned off, and that it is disconnected from the oxygen supply. -
Page 340: Steam Cleaning
Proprietary and Confidential Draft 8 Sep 05 Cleaning Chapter 6: Calibration and Maintenance Procedures When an infant is discharged, or at least once a week, thoroughly clean and disinfect the equipment. Before cleaning, disassemble, and then group the parts and assemblies in categories according to the method of cleaning required. If there is no visible soilage with possible body fluids, we recommend that you clean the unit with a mild detergent and warm water. -
Page 341: Cleaning Metal Surfaces
Proprietary and Confidential Draft 8 Sep 05 Cleaning Chapter 6: Calibration and Maintenance Procedures Cleaning Metal Surfaces WARNING: The heater element may be hot enough to cause burns. Before cleaning the warmer head, allow 30 minutes for the unit to sufficiently cool. -
Page 342: Cleaning Method
Proprietary and Confidential Draft 8 Sep 05 Cleaning Method Chapter 6: Calibration and Maintenance Procedures Cleaning Method Tools required: None Disassembling the Warmer 1. Remove both bassinet side panels (A) from the bassinet (B) by pulling them straight up (see figure 6-3 on page 6-24). Figure 6-3. -
Page 343: Assembling The Warmer
Proprietary and Confidential Draft 8 Sep 05 Cleaning Method Chapter 6: Calibration and Maintenance Procedures 5. Remove the x-ray cassette tray. 6. Remove the suction bottle (H) and suction filter (I) from the side of the post (J) (or the front of the bassinet) (see figure 6-4 on page 6-25). Figure 6-4. - Page 344 Proprietary and Confidential Draft 8 Sep 05 Cleaning Method Chapter 6: Calibration and Maintenance Procedures 6. If a reusable suction bottle (H) is in use, install a new suction filter (I) (see figure 6-4 on page 6-25). 7. If a disposable suction bottle (H) is in use, replace the suction bottle (H). 8.
-
Page 345: Cleaning The Reusable Breathing Circuit
Proprietary and Confidential Draft 8 Sep 05 Cleaning the Reusable Breathing Circuit Chapter 6: Calibration and Maintenance Procedures Cleaning the Reusable Breathing Circuit Tools required: Cold sterilization solution (2% Glutaraldehyde or equivalent) Parts required: 81 000 15 Breathing circuit, reusable 81 000 07 Diaphragm, box, 25 Reference only... - Page 346 Proprietary and Confidential Draft 8 Sep 05 Cleaning the Reusable Breathing Circuit Chapter 6: Calibration and Maintenance Procedures Figure 6-5. Reusable Breathing Circuit Components CAUTION: Do not pull or twist tubing. Attach and detach tubing from equipment using the silicone cuffs. Failure to do so could result in equipment damage.
- Page 347 Proprietary and Confidential Draft 8 Sep 05 Cleaning the Reusable Breathing Circuit Chapter 6: Calibration and Maintenance Procedures Figure 6-6. Cleaning the Reusable Breathing Circuit CAUTION: Do not use the following solutions to sterilize the breathing circuit: Hypochlorite, Phenol (>5%), Formaldehyde, Chlorinated Hydrocarbons, Aromatic Hydrocarbons, and inorganic acids.
- Page 348 Proprietary and Confidential Draft 8 Sep 05 Cleaning the Reusable Breathing Circuit Chapter 6: Calibration and Maintenance Procedures CAUTION: Ensure that the blue exhalation valve diaphragm is inserted with the stem facing the cap prior to connecting the exhalation valve cap to the exhalation valve housing.
-
Page 349: General Maintenance
Proprietary and Confidential Draft 8 Sep 05 General Maintenance Chapter 6: Calibration and Maintenance Procedures General Maintenance WARNING: Only facility-authorized personnel should perform maintenance on the Resuscitaire® Radiant Warmer Products. Maintenance performed by unauthorized personnel may result in personal injury or equipment damage. -
Page 350: Verifying The Dc Power Requirements
Proprietary and Confidential Draft 8 Sep 05 Verifying the DC Power Requirements Chapter 6: Calibration and Maintenance Procedures Observe the following P.C. board handling rules: • Make sure that hands are clean and free of moisture, oily liquids, etc. • Only handle the P.C. board by its outer edges. •... -
Page 351: Testing The Leakage Current
Proprietary and Confidential Draft 8 Sep 05 Testing the Leakage Current Chapter 6: Calibration and Maintenance Procedures Testing the Leakage Current Tools required: Leakage current detector Setup 1. Plug the connector into an appropriate power source through an ungrounded adapter plug so that the unit is ungrounded. 2. -
Page 352: Verifying The Heater Head Electrical Requirements
Proprietary and Confidential Draft 8 Sep 05 Verifying the Heater Head Electrical Requirements Chapter 6: Calibration and Maintenance Procedures Verifying the Heater Head Electrical Requirements Tools required: Digital voltmeter (DVM) (Fluke® 8080A or equivalent) 1. Measure the resistance of the heater element (see table 6-3 on page 6-34). Table 6-3. -
Page 353: Checking The Pneumatic System
Proprietary and Confidential Draft 8 Sep 05 Checking the Pneumatic System Chapter 6: Calibration and Maintenance Procedures Checking the Pneumatic System Tools required: Oxygen analyzer (Bio-Tek® #74233 or equivalent) Filter/regulator, gas manual (P/N 67 352 36) Nipple, DISS oxygen—1/8" (P/N 67 355 10) Tee, oxygen sensor, 22 mm male-female (P/N 67 356 02) Tubing, green polyvinyl chloride (PVC) ¼"... -
Page 354: Checking For Pneumatic Leaks
Proprietary and Confidential Draft 8 Sep 05 Checking the Pneumatic System Chapter 6: Calibration and Maintenance Procedures Checking for Pneumatic Leaks WARNING: Disconnect the gas supplies from the unit. Failure to do so could result in personal injury or equipment damage. Checking the Gas Supply Module and Tank Yokes (Models Equipped with Reserve Gas Supply Only) 1. - Page 355 Proprietary and Confidential Draft 8 Sep 05 Checking the Pneumatic System Chapter 6: Calibration and Maintenance Procedures 4. Slowly reduce the oxygen regulator to the 50 psi (345 kPa) supply until the Blender Module pressure differential alarm sounds. Verify that the alarm sounds when the oxygen supply pressure is 30 psi ±...
-
Page 356: Checking The Performance Of The Resuscitation Module
Proprietary and Confidential Draft 8 Sep 05 Checking the Performance of the Resuscitation Module Chapter 6: Calibration and Maintenance Procedures Checking the Performance of the Resuscitation Module Tools required: Oxygen analyzer (Bio-Tek® #74233 or equivalent) Parts required: 67 352 11 Adapter, 15 mm male—¼"... -
Page 357: Checking The Airway Pressure Gauge
Proprietary and Confidential Draft 8 Sep 05 Checking the Performance of the Resuscitation Module Chapter 6: Calibration and Maintenance Procedures Checking the Airway Pressure Gauge (Models without AutoBreath™ Infant Resuscitator Only) 1. Using the 33 cm (13") corrugated hose and the 15 mm male adapter, connect the patient outlet to the airway pressure gauge input. -
Page 358: Preventive Maintenance
Proprietary and Confidential Draft 8 Sep 05 Preventive Maintenance Chapter 6: Calibration and Maintenance Procedures Preventive Maintenance WARNING: Only facility-authorized personnel should perform preventive maintenance on the Resuscitaire® Radiant Warmer Products. Preventive maintenance performed by unauthorized personnel may result in personal injury or equipment damage. The Resuscitaire®... -
Page 359: Preventive Maintenance Schedule
Proprietary and Confidential Draft 8 Sep 05 Preventive Maintenance Chapter 6: Calibration and Maintenance Procedures Preventive Maintenance Schedule Table 6-4. Preventive Maintenance Schedule Function Procedure Overall Visually inspect for signs of damage or deterioration to all outer surfaces, appearance Controller Module, warmer head, Resuscitation Module, casters, mattress, crib sides and all other features where applicable. -
Page 360: Preventive Maintenance Checklist
Proprietary and Confidential Draft 8 Sep 05 Preventive Maintenance Chapter 6: Calibration and Maintenance Procedures Preventive Maintenance Checklist Table 6-5. Preventive Maintenance Checklist Date Function Overall appearance Internal visual inspection Control knobs Gauges Tubes Hoses Modules AC power cord P.C. boards Skin probe System calibration Blender Module... -
Page 361: Disposal
Proprietary and Confidential Draft 8 Sep 05 Disposal Chapter 6: Calibration and Maintenance Procedures Disposal This device is subject to EU Directive 2002/96/EC (WEEE). It is not registered for use in private households, and may not be disposed of at municipal collection points for waste electrical and electronic equipment. - Page 362 Proprietary and Confidential Draft 8 Sep 05 Disposal Chapter 6: Calibration and Maintenance Procedures NOTES: Page 6 - 44 Resuscitaire® Radiant Warmer Products Service Manual (82 990 45)
-
Page 363: Resuscitaire® Radiant Warmer Products Accessories
Proprietary and Confidential Draft 8 Sep 05 Chapter 7 Accessories Resuscitaire® Radiant Warmer Products Accessories For Resuscitaire® Radiant Warmer Products accessories, see table 7-1 on page 7-1. Table 7-1. Accessories List Part Number Description 81 900 00 MU11585 Replacement side panel, English 81 900 01 MU11586 Replacement rear panel, English... - Page 364 Proprietary and Confidential Draft 8 Sep 05 Resuscitaire® Radiant Warmer Products Accessories Chapter 7: Accessories Part Number Description 68 209 47 MU06943 Cover, probe, Care-For-Me™, large, 100 68 209 48 MU06944 Cover, probe, Care-For-Me™, standard, 100 81 001 29 MU10902 Connector, with side port, bag of 25 81 001 27 MU10900...
- Page 371 Manufactured by: EC Representative: Draeger Medical Infant Care, Inc. Dräger Medical AG & Co. KGaA 330 Jacksonville Road Germany Hatboro, PA 19040 USA Moislinger Allee 53 - 55 USA and Canada Customer Support: D-23542 Lübeck (800) 437-2437 Tel: ++49 (451) 882 - 0 http://www.draegermedical.com Fax: ++49 (451) 882-2080 Technical Support: (800) 437-2437...
Need help?
Do you have a question about the Resuscitaire WBR82 and is the answer not in the manual?
Questions and answers