Table of Contents
Advertisement
Advertisement
Table of Contents

Subscribe to Our Youtube Channel
Related Manuals for HIKVISION DS-K1A801MF


Summary of Contents for HIKVISION DS-K1A801MF
- Page 1 Fingerprint Fingerprint Time Attendance Terminal User Manual V1.0 UD02461B...
- Page 2 Trademarks and other Hikvision marks are the property of Hikvision and are registered trademarks or the subject of applications for the same by Hikvision and/or its affiliates. Other trademarks mentioned in this manual are the properties of their respective owners. No right of license is given to use such trademarks without express permission.
- Page 3 Fingerprint Time Attendance Terminal IN THE EVENT OF ANY CONFLICTS BETWEEN THIS MANUAL AND THE APPLICABLE LAW, THE LATER PREVAILS. Support Should you have any questions, please do not hesitate to contact your local dealer.
- Page 4 Fingerprint Time Attendance Terminal Regulatory Information FCC Information Please take attention that changes or modification not expressly approved by the party responsible for compliance could void the user’s authority to operate the equipment. FCC compliance: This equipment has been tested and found to comply with the limits for a Class B digital device, pursuant to part 15 of the FCC Rules.
- Page 5 Fingerprint Time Attendance Terminal This device complies with Industry Canada licence-exempt RSS standard(s). Operation is subject to the following two conditions: (1) this device may not cause interference, and (2) this device must accept any interference, including interference that may cause undesired operation of the device.
- Page 6 Fingerprint Time Attendance Terminal Safety Instruction These instructions are intended to ensure that user can use the product correctly to avoid danger or property loss. The precaution measure is divided into Warnings and Cautions: Warnings: Neglecting any of the warnings may cause serious injury or death. Cautions: Neglecting any of the cautions may cause injury or equipment damage.
- Page 7 Fingerprint Time Attendance Terminal Please use the provided glove when open up the device cover, avoid direct contact with the device cover, because the acidic sweat of the fingers may erode the surface coating of the device cover. Please use a soft and dry cloth when clean inside and outside surfaces of the device cover, do not use alkaline detergents.
-
Page 8: Table Of Contents
Fingerprint Time Attendance Terminal Contents Chapter 1 Overview ................... 3 1.1 Introduction ....................... 3 1.2 Main Features ....................3 1.3 Appearance ......................4 1.4 Keypad Description .................... 5 Chapter 2 Installation ..................6 2.1 Wall Mounting....................6 2.2 Wall Mounting with Mounting Plate ..............7 Chapter 3 Basic Operation ................. - Page 9 Fingerprint Time Attendance Terminal 4.2.1 Controller Management................45 4.2.2 Access Control Point Management ............60 4.3 Permission Management ................. 62 4.3.1 Person Management .................. 62 4.3.2 Card Management ..................65 4.3.3 Schedule Template ..................68 4.3.4 Door Status Management ................72 4.3.5 Interact Configuration ................
-
Page 10: Chapter 1 Overview
Hint for full report memory Authenticate via ID No. + password, card or fingerprint for the admin Different authentication types according to different device models: 1. Fingerprint (DS-K1A801F) 2. EM card reading and fingerprint (DS-K1A801EF) 3. Mifare card reading and fingerprint (DS-K1A801MF) -
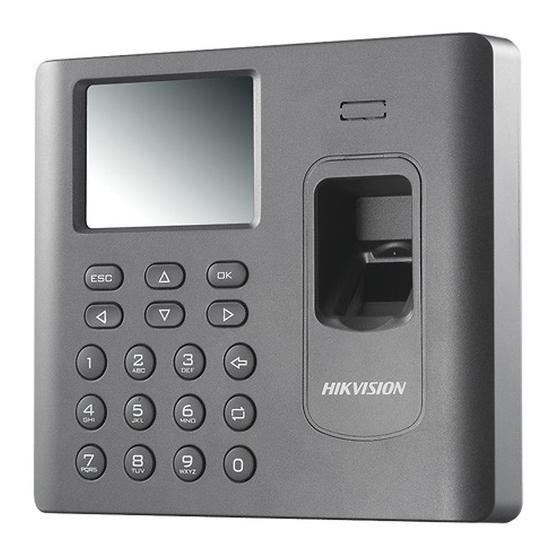
Page 11: Appearance
Fingerprint Time Attendance Terminal 1.3 Appearance Table 1. 1 Description of DS-K1A801 Series Model Description 2.8-inch LCD Display Screen Loudspeaker Front Cover Indicator Keypad Fingerprint Reading Module 12V Power Interface Ethernet Port USB Interface... -
Page 12: Keypad Description
Fingerprint Time Attendance Terminal 1.4 Keypad Description Table 1. 2 Keypad Description Description Exiting Key: Press the button to exit the menu. , , , Direction Keys: Use to move the cursor in the menu. Numeric Keys/Letter Keys: Press to input numbers or letters. Confirming Key: Press to confirm operations. -
Page 13: Chapter 2 Installation
Fingerprint Time Attendance Terminal Chapter 2 Installation 2.1 Wall Mounting Steps: 1. Drill holes on the wall or other places according to the mounting template (supplied). Note: The minimum bearing weight of the wall or other places should be three times heavier than the device weight. -
Page 14: Wall Mounting With Mounting Plate
Fingerprint Time Attendance Terminal 2.2 Wall Mounting with Mounting Plate Steps: 1. Remove the two screws at the bottom of the front cover and remove the back cover. 2. Align the back cover on the level on the wall or other places. 3. -
Page 15: Chapter 3 Basic Operation
Fingerprint Time Attendance Terminal Chapter 3 Basic Operation The suggested working flow is as follows: Device Activation: Activate the device before first using. Login: Hold the OK key for 3s to login the device main interface. Parameters Configuration: Configure the communication, the system, and the time. User Management: Add, edit and delete the users. -
Page 16: Activating Via Sadp Software
1. Get the SADP software from the supplied disk or the official website. Install and run the software. Note: Go to http://www.hikvision.com/en/tools_82.html to download the SADP software. 2. Check the inactive device from the device list. 3. Create a password in the right side of the interface and confirm the password. -
Page 17: Activating Via Client Software
Fingerprint Time Attendance Terminal 4. Click Activate. The device will be active. Or click Fresh to fresh the device status. 5. Check the device and manually edit the device IP address, Port No., Subnet Mask, Gateway, etc. Or check DHCP to enable DHCP. 6. - Page 18 1. Get the client software from the supplied disk or the official website. Install and run the client software. Note: Go to http://www.hikvision.com/en/Tools_84.html to download the client software. 2. Click Switch System -> Access Control System at the upper left corner of the interface to enter the Access Control System interface.
- Page 19 Fingerprint Time Attendance Terminal 4. Select an inactive device from the device list. 5. Click Activate to pop up the Activation interface. 6. Create a password and confirm the new password. STRONG PASSWORD RECOMMENDED– We highly recommend you create a strong password of your own choosing (using a minimum of 8 characters, including upper case letters, lower case letters, numbers, and special characters) in order to increase the security of your product.
-
Page 20: Login
Fingerprint Time Attendance Terminal 3.2 Login Steps: 1. For the first time login, long-press the OK key for 3s to enter the main interface. You can manage the user, the department, the shift, the holiday, the shift schedule, the report, the communication, the system, the time, etc. If you have configured the admin in the User interface, then 1) Long-press OK key to enter the Admin Login interface. - Page 21 Fingerprint Time Attendance Terminal Setting Network You can set the device network parameters, including the IP address, the subnet mask and the gateway address. Steps: 1. Move the cursor to the Network and press the OK key to enter the Network interface.
-
Page 22: System Settings
Fingerprint Time Attendance Terminal 1. Move the cursor to the Wi-Fi, and press the OK key to enter the Wi-Fi interface. 2. Move the cursor to the icon and press the OK key to enable the WLAN. 3. Select a network and press the OK key to enter the Wi-Fi Setting interface. 4. - Page 23 Fingerprint Time Attendance Terminal Setting System Parameters Purpose: Set the system parameters, including the device time format, the keypad sound, the voice prompt, the volume, the sleeping, the attendance repeating time interval, the attendance record prompt and the authentication mode. Steps: 1.
- Page 24 Fingerprint Time Attendance Terminal Time Format: MM/DD/YYYY, MM.DD.YYYY, DD-MM-YYYY, DD/MM/YYYY, DD.MM.YYYY, YYYYMMDD, YYYY-MM-DD, YYYY/MM/DD, YYYY.MM.DD and MM-DD-YYYY are available. Keypad Sound: Move the cursor to and press the OK key to enable or disable the keypad sound. Voice Prompt: Move the cursor to and press the OK key to enable or disable the prompt audio.
- Page 25 Fingerprint Time Attendance Terminal You are able to delete the storage data of the device, including the event, the attendance data, the user, and the permission. Steps: 1. Move the cursor to Data and press the OK key to enter the Data interface. 2.
- Page 26 Fingerprint Time Attendance Terminal Restoring Settings Purpose: You can restore Factory Defaults or Default Settings. Steps: 1. Move the cursor to Reset and press the OK key to enter the Reset interface. 2. Select Factory Defaults or Default Settings. Factory Defaults: All parameters of the device will restore to the factory condition.
-
Page 27: Setting Time
Fingerprint Time Attendance Terminal Notes: The upgrading file should be put in the root directory. The upgrading file name in the USB disk should be digicap.dav. 3.3.3 Setting Time Purpose: You are able to set the device time and the DST. Steps: 1. -
Page 28: Adding User
Fingerprint Time Attendance Terminal 3.4.1 Adding User You can add users by editing the ID No., the user name, the card No. You can also scan the user fingerprint, set the password, the department, the role and the authentication mode. Steps: 1. - Page 29 The card No. can be used for once. The device of DS-K1A801F model supports manually entering the card No. The device of DS-K1A801MF and DS-K1A801EF model supports manually entering card No. and swiping card to get the card No.
- Page 30 Fingerprint Time Attendance Terminal 5. Move the cursor to Set and press the OK key to edit the user password. 1) Enter the password and confirm the password in the Set Password interface. 2) Press the ESC key and select Yes to save the password. Note: Up to 8 digits can be entered.
-
Page 31: Managing The User
Fingerprint Time Attendance Terminal Card/Password (The password here refers to the card ID No. and the user password), and Controller. 9. Press the ESC key and select Yes to save the settings and exit the interface. 3.4.2 Managing the User Searching the User Purpose: Enter the user ID No. -
Page 32: Department Management
Fingerprint Time Attendance Terminal 3. Select Delete User and press the OK key to delete the target user. The linked user information will be deleted. Or press Delete Password and press the OK key to delete the target user password. Or press Clear Fingerprint and press the OK key to clear the target user fingerprint. -
Page 33: Searching The Department
Fingerprint Time Attendance Terminal 2. Press the OK key to enter the configuration interface. 3. Select Edit and press the OK key. 4. Edit the department name, the shift type and the shift name. 5. Press the ESC key and select Yes to save the settings and exit the interface. Notes: ... -
Page 34: Resetting The Department
Fingerprint Time Attendance Terminal Search the target department by entering the department name. Steps: 1. Enter the target department name in the searching bar of the department list interface. 2. Press the OK key to search. 3.5.3 Resetting the Department Purpose: Reset all parameters of the target department to the default ones. -
Page 35: Normal Shift
Fingerprint Time Attendance Terminal Note: Support up to 32 normal shifts and 32 man-hour shifts. 3.6.1 Normal Shift Setting the Attendance Rule Steps: 1. In the Normal (Normal Shift) interface, select Rule. 2. Configure the attendance rule. On-work Advanced Time: The allowable early duration to go to work. Latest On-Work Check Time: The allowable late duration to go to work. -
Page 36: Man-Hour Shift
Fingerprint Time Attendance Terminal Notes: Unit: minute. The available time range is from 0 to 1440 minutes. Setting Normal Shift Attendance Steps: 1. Select an attendance type in the Normal (Normal Shift) interface. Notes: By default, the normal shift type includes 2/Day (2 times per day), 4/Day (4 times per day), and 30 custom types. - Page 37 Fingerprint Time Attendance Terminal 2. Select a man-hour shift type in the list. Notes: By default, the man-hour shift type includes 6H/Day (6 hours per day), 4H/Day (4 hours per day), and 30 custom types. The following steps will take Custom 1 as an example. 3.
-
Page 38: Holiday Management
Fingerprint Time Attendance Terminal 5. Press the ESC key and select Yes to save the settings and exit the interface. 3.7 Holiday Management Purpose: You are able to configure the attendance holiday. The attendance will not be recorded during the holiday. 3.7.1 Adding the Holiday Steps: 1. -
Page 39: Shift Schedule Management
Fingerprint Time Attendance Terminal 2. Select Edit and follow the steps in Section 3.7.1 Adding the Holiday to edit the holiday information. Or select Delete and press the OK key to delete the holiday. 3. Press the ESC key and select Yes to save the settings and exit the interface. 3.8 Shift Schedule Management Purpose: Configure the shift schedule by department or by individual. - Page 40 Fingerprint Time Attendance Terminal 2. Press the OK key to enter the Schedule Shift by Dept. interface. 3. Move the cursor to Set Shift and press the OK key to enter the Set Shift interface. 1) Select the shift type and the shift times. Notes: ...
-
Page 41: Scheduling Shift By Individual
Fingerprint Time Attendance Terminal 1) Select a target holiday. 2) Press the ESC key and select Yes to save the settings and exit the interface. Notes: The attendance will not be recorded during the holiday. 6. Press the ESC key and select Yes to save the settings and exit the interface. Note: The department name cannot be edited. - Page 42 Fingerprint Time Attendance Terminal 3. Select an individual in the list and press the OK key to enter the Individual Shift Settings interface. 4. Move the cursor to Set Shift and press the OK key to enter the Set Shift interface. 1) Select the shift types and the shift times.
-
Page 43: Other Management
Fingerprint Time Attendance Terminal 1) Select a target holiday. 2) Press the ESC key and select Yes to save the settings and exit the interface. Note: The attendance will not be recorded during the holiday. 7. Press the ESC key and press the OK key to save the settings and exit the interface. Editing and Deleting Individual Shift Steps: 1. - Page 44 Fingerprint Time Attendance Terminal Steps: 1. Insert a USB disk to the USB interface. Note: The device will automatically check the USB disk memory. If there is no enough space for exporting, a prompt will be displayed. 1. Select Attendance Record/Attendance Report/Abnormal Attendance Record in the Report interface.
-
Page 45: Data Transfer
Fingerprint Time Attendance Terminal Support the USB disk of FAT32 format. The USB disk memory should be from 1G to 32G. Make sure the free space of the USB disk is more than 512M. For details about the exported tables descriptions, see Section 5.4 Attendance Report Table. -
Page 46: Searching The Log
Fingerprint Time Attendance Terminal Importing Attendance Parameters Steps: 1. Insert the USB disk to the USB interface. 2. Press the key to enter the Import interface and select Import Attendance Para (Import Attendance Parameters). 3. Press the OK key to import. Notes: ... -
Page 47: Testing
Fingerprint Time Attendance Terminal 3. Enter the target log start time and the end time. 4. Press the OK key to search. The interface will display the log search result. 3.9.4 Testing Purpose: You are able to perform the voice test, the keypad test and the RTC test. Voice Test Steps: 1. - Page 48 Fingerprint Time Attendance Terminal 2. Press the OK key. If the device voice is working properly, you are able to hear “Voice Test Success”. Keypad Test Steps: 1. Select Keypad Test in the Test interface. 2. Press the OK button to start testing. If the keypad test succeeds, the screen will display the corresponding numbers or functions of the pressed key.
-
Page 49: System Information
Fingerprint Time Attendance Terminal 2. Press the OK key to enter the RTC Test interface. If the test succeeds, the screen will display the synchronization time. 3.9.5 System Information You are able to check the device capacity and the device information. Checking the Capacity Check the user capacity and the fingerprint capacity in the device. - Page 50 Fingerprint Time Attendance Terminal Checking the Device Information In the Device interface, you are able to check the device name, the device serial No., the MAC address, the firmware, the hardware and the production data.
-
Page 51: Chapter 4 Client Operation
Fingerprint Time Attendance Terminal Chapter 4 Client Operation 4.1 Overview of Access Control System Click Switch System-> Access Control System on the menu bar to enter the Access Control System. 4.1.1 Description The Access Control System is a client of configuring permission of door access. It provides multiple functionalities, including access controller management, person/card management, permission configuration, door status management, attendance management, event search, etc. -
Page 52: Device Management
Fingerprint Time Attendance Terminal 4.2 Device Management 4.2.1 Controller Management Click the icon to enter the controller management interface. - Page 53 Fingerprint Time Attendance Terminal The interface is divided into 2 parts: device management and online device detection. Device Management: Manage the access control devices, including adding, editing, deleting, and batch time synchronizing functions. Online Device Detection: Automatically detect online devices in the same subnet with the access control server, and the detected devices can be added to the server in an easy way.
- Page 54 Fingerprint Time Attendance Terminal After adding the device, some advanced parameters can be configured in the editing device interface, e.g. downloading hardware parameters, reading hardware parameters, time synchronizing, configuring access point, etc. Steps: 1. In the device list, click Edit button to edit the information of the selected added device.
- Page 55 Fingerprint Time Attendance Terminal Steps: 1. In the editing interface, click the Door_1 button to edit the information of the selected door. 1) Door Magnetic: The Door Magnetic is in the status of Remain Closed (excluding special conditions). 2) Exit Button Type: The Exit Button Type is in the status of Remain Open (excluding special conditions).
- Page 56 Fingerprint Time Attendance Terminal Steps: 1. In the device list, select a card reader name to enter into the card reader information editing interface. 2. Click the Basic Information button to edit the basic information about the card reader. 3. Click the Expansion Information button to edit the expansion information about the card reader.
- Page 57 Fingerprint Time Attendance Terminal 5. Click the Hardware Parameters Downloading button to download the updated parameters to the local memory of the device. Deleting Device Steps: 1. In the device list, select a device by clicking it, or select multiple devices by pressing Ctrl button on your keyboard and clicking them one by one.
- Page 58 Fingerprint Time Attendance Terminal Attendance Configuration Purpose: You are able to remotely configure the device shift, holiday and shift schedule. Shift Management You are able to add, delete and edit the shift. 1) Editing Normal Shift Steps: 1. Click the Shift Group tab to enter the following page.
- Page 59 Fingerprint Time Attendance Terminal 2. Click Attendance Rule in the Shift Management List, and click the attendance rule on the right of the interface. Note: There is one default attendance rule. 3. Click button to pop up the Attendance Rule window. 4.
- Page 60 Fingerprint Time Attendance Terminal 6. Click to enter the Attendance Shift editing window. 7. Configure the parameters in the window and click to confirm editing. 8. Click to apply the parameters to the device. 2) Editing Man-Hour Shift Steps: 1. Click “Man-Hour Shift” in the Shift Management List and click a shift on the right of the interface.
- Page 61 Fingerprint Time Attendance Terminal 2. Click 3. Configure the man-hour shift parameters in the pop-up window. 4. Click to confirm editing. Holiday Management Steps: 1. Click Holiday Management to enter the Holiday Management tab. 2. Click to enter the Holiday management window. 3.
- Page 62 Fingerprint Time Attendance Terminal 4. Click to add the holiday. 5. Click to apply the parameters to the device. Or select a holiday in the holiday list and click to edit the holiday. Or select a holiday and click to delete the holiday. ...
- Page 63 Fingerprint Time Attendance Terminal 2. Select a department in the department list and click the default shift on the right of the interface. 3. Click and configure the shift schedule parameters in the pop-up window. 4. Click to confirm editing.
- Page 64 Fingerprint Time Attendance Terminal 5. Click , and apply permissions in the permission management to apply configurations to the device. For details, see Section 4.3 Permission Management. Schedule by Person Before you start: Add persons in the Person Management before you scheduling by person. Steps: 1.
- Page 65 Fingerprint Time Attendance Terminal You can also select the person in the person list and click to delete the person. 3. Select the person in the person list and select the default schedule on the right of the interface. 4. Click and configure the parameters in the pop-up window.
- Page 66 Fingerprint Time Attendance Terminal 5. Click to confirm editing. 6. Click , and apply permissions in the permission management to apply configurations to the device. For details, see Section 4.3 Permission Management. Setting Wiegand Purpose: You can set the Wiegand channel and the communication mode. Steps: 1.
-
Page 67: Access Control Point Management
Fingerprint Time Attendance Terminal 4.2.2 Access Control Point Management Click the icon on the control panel to enter the door management interface. Group Management The doors can be added to different groups to realize the centralized management. Door Management... - Page 68 Fingerprint Time Attendance Terminal Manage the specific door under the door group, including importing, editing and deleting door. Group Management Adding Group Steps: 1. Click the button to pop up the Add Group dialog. 2. Input the group name in the text field and click the button to finish adding.
-
Page 69: Permission Management
Fingerprint Time Attendance Terminal Steps: 1. Click to select a access control point in the list and click the button to edit the access control point. 2. Edit the Door Name and Position. 3. Click button to finish editing. Note: you can also enter the Edit interface by double clicking the door from the list. - Page 70 Fingerprint Time Attendance Terminal Department Management Steps: 1. In the department list, click button to pop up the adding department interface. Notes: Multi-level department system can be created. Click a department as the upper-level deparment and click button, and then the added department will be the sub-department of it.
- Page 71 Fingerprint Time Attendance Terminal infoarmation list to pop up the adding person interface. 2. Input the Person Name (required), Gender, ID Card, etc., upload the photo of the person and click the icon to finish adding. Note: The format of the photo should be .jpg, or .jpeg. 3.
-
Page 72: Card Management
Fingerprint Time Attendance Terminal 4.3.2 Card Management Click on the control panel of the software to enter the card management interface. The cards are divided into 3 types: Blank Card, Normal Card, and Lost Card. Blank Card: A card has not been issued with a person. Normal Card: A card is issued with a person and is under normal using. - Page 73 Fingerprint Time Attendance Terminal Choose the Bulking Adding as the adding mode by clicking the and input the activation date, expiry date, start card No. and last card No. in the corresponding text fields. Note: The start card No. and the last card No. should be the with same length. E.g., the last card No.
- Page 74 Fingerprint Time Attendance Terminal Click to select a card and click the Card Change button to change the associated card for card holder. Select another card in the popup window to replace the current card. Click to select an issued card and click the Return Card button to cancel the assotiation of the card, then the card will disappear from the Normal Card list, which you can find it in the Blank Card list.
-
Page 75: Schedule Template
Fingerprint Time Attendance Terminal Click the Cancel Card Loss button to resume the card to the normal card. Click the Card Replacement button to issue a new card to the card holder replacing for the lost card. Select another card in the popup window as the new card and the predefined permissions of the lost card will be copied to the new one automatically. - Page 76 Fingerprint Time Attendance Terminal 2. Input the name of week plan and click the OK button to add the week plan. 3. Select a week plan in the plan list on the left-side of the window to edit. 4. Click and drag your mouse on a day to draw a blue bar on the schedule, which means in that period of time, the cofigured permission is activated.
- Page 77 Fingerprint Time Attendance Terminal 1) Click and drag your mouse on a day to draw a blue bar on the schedule, which means in that duration, the cofigured permission is activated. 2) Click to select a configured duration and click to delete it.
- Page 78 Fingerprint Time Attendance Terminal 4. Select holiday groups you want to apply to the schedule. Note:At most 4 holiday groups can be added. Click to select a holiday group in the left-side list and click add it. Click to select an added holiday group in the right-side list and click to delete the it.
-
Page 79: Door Status Management
Fingerprint Time Attendance Terminal 4.3.4 Door Status Management Purpose: The function of Door Status Management allows you to schedule weekly time periods for a door to remain open or closed. Click the icon on the control panel to enter the interface. Steps: 1. - Page 80 Fingerprint Time Attendance Terminal Notes The min. segment of the schedule is 30min. You can copy the configured time periods of a day to the whole week. Steps: 1. Select a day which has already been configured. 2. Click on to copy the time periods to the whole week.
-
Page 81: Interact Configuration
Fingerprint Time Attendance Terminal 7. Click to enter the Download Door State page. 8. Select a control point and click OK to download the settings to the system. Note: The attendance device does not support the function. 4.3.5 Interact Configuration Click on the control panel of the software to enter the interact configuration interface. - Page 82 Fingerprint Time Attendance Terminal In this interface, you can set alarm linkage modes of the access host, including case trigger, event card interact, and client interact. Case Trigger Purpose: The case (refer to the triggers of the controller) can be linked to some actions (e.g., alarm output, host buzzer) when it is triggered.
- Page 83 Fingerprint Time Attendance Terminal 2. Select the host to be set from the host list. 3. Click the button to start setting the event linkage. 4. Click the radio button of the event linkage, and select the event type from the dropdown list.
-
Page 84: Access Permission Configuration
Fingerprint Time Attendance Terminal 4. Click the radio button of card linkage, and input the card number. 5. Select the event source, and check the checkbox of the card reader’s serial number. 6. Set the linkage target, and set the property as Trigger to enable this function. Controller Buzzer: The audible warning of controller will be triggered. - Page 85 Fingerprint Time Attendance Terminal Access Permission Settings Purpose: You can allocate permission for people/department to enter/exist the control points (doors) in this section. Steps: 1. Enter the Permission page. 2. Click on icon on the upper-left side of the page to enter the Add Permission page.
- Page 86 Fingerprint Time Attendance Terminal By Department: You can select departments from the list to enter/exit the door. Once the permission is allocated, all the people in this department will have the permission to access the door. By Access Control Point: You can select doors from the door list for people to enter/exit.
- Page 87 Fingerprint Time Attendance Terminal Note: The lower-level of department will also be selected if the highest-level of department is selected, 7. Click the Done button to complete the permission adding. 8. Click to enter the Download Permission page. 9. Select a control point and click the OK button, to enter the download result interface, to download the permission to the device.
- Page 88 Fingerprint Time Attendance Terminal Access Permission Searching Purpose: After the permission settings being completed, you can search and view permission assigning condition on the searching interface. Steps: Enter the Permission page. Enter the search criteria (main type/minor type/Keyword). Click Search to get the search results. Note: You can click Reset on the search criteria panel to clear all the displayed search results.
-
Page 89: Advanced Functions
Fingerprint Time Attendance Terminal needs to be deleted. 2. Select the permission from the results list. Note: you can press the Ctrl or Shift key on the keyboard to select multiple items. 3. Click the Delete Permission button to delete the permission. 4. - Page 90 Fingerprint Time Attendance Terminal Access Control Type Purpose: The added cards can be assigned with different card type for the corresponding usage. Steps: 1. Click Access Control Type tab and select a card type. Normal Card: By default, the card is set as normal card. Card for Disabled Person: The door will remain open for the configured time period for the cardholder.
- Page 91 Fingerprint Time Attendance Terminal You can only open the door by both swiping card and entering the password during the set time periods. Notes: For this authentication mode, the card swiping operation cannot be replaced by entering the card No.. ...
- Page 92 Fingerprint Time Attendance Terminal You can click the Delete button to delete the selected time period or click the Clear button to delete all the configured time periods. 5. (Optional) Click the Copy to button to copy the settings to other card readers. 6.
-
Page 93: Attendance Management
Fingerprint Time Attendance Terminal Steps: 1. Click Anti-passing Back and select an access control point. 2. You can set the name for the controller and select the card reader as the beginning of the path. 3. In the list, click the text filed of Card Reader Afterward and select the linked card readers. - Page 94 Fingerprint Time Attendance Terminal Steps: 1. Click the Shift Group tab to enter the following page. 2. Click button to pop up the adding shift group window. 3. Enter the shift group name, and add button on the person list area to pop up the person adding window.
-
Page 95: Shift Management
Fingerprint Time Attendance Terminal 4. Check the checkbox to select the person and click and return to the shift group settings interface. To delete the added person, check the person from the person list, and click button. 5. Click button to complete the operation. 6. - Page 96 Fingerprint Time Attendance Terminal 3. Set a rule name. 4. Set detailed parameters for the attendance rule according to actual needs. 5. Click to save the rule. 6. (Optional) You can edit or delete the rule by clicking Notes: After deleting the rule, the normal attendance shift which has enabled the rule will be deleted as well.
- Page 97 Fingerprint Time Attendance Terminal 3. Set a shift name. 4. Set on-work duration for the shift, and select the attendance rule from the dropdown list. 5. Click to complete the operation. 6. (Optional) You can edit or delete the shift by clicking Note: After deleting the shift, its shift schedule will be deleted as well.
-
Page 98: Holiday Management
Fingerprint Time Attendance Terminal 3. Set a shift name, and daily work duration. 4. (Optional) Check the checkbox of latest on-work time, and set the latest on-work time. 5. (Optional) Set the durations excluded from man-hour duration. 6. Click to complete the operation. 7. -
Page 99: Shift Schedule Management
Fingerprint Time Attendance Terminal 3. Click button to pop-up holiday adding window. 4. Set the start date and end date, select the date of week, and click 5. Click to save the settings. 4.4.4 Shift Schedule Management Purpose: After setting the shift group and the corresponding shift and shift rule, you can set the shift schedule for the shifts. -
Page 100: Attendance Check Point Management
Fingerprint Time Attendance Terminal 2. Select the shift group from the list on the left. 3. Click to pop up the shift schedule settings window. 4. Select the shift name from the drop-down list and set the start data and end data. -
Page 101: Adjustment Management
Fingerprint Time Attendance Terminal follows. Check the select the card reader of the access control point and set the start date and the end date. Select the check point type. Click to save the adding. The added check points will be displayed in the attendance check point list. 3. - Page 102 Fingerprint Time Attendance Terminal 2. Click to pop up the adjustment reason adding dialog box. 3. Enter the adjustment reason, and click to save the adding. Notes: The default adjustment reasons include leave for personal affairs, sick leave, marriage leave, funeral leave, home leave, annual leave, maternity leave, and paternity leave.
- Page 103 Fingerprint Time Attendance Terminal 3. Enter the adjustment reason, and click Notes: The default adjustment reasons for leave in lieu include overtime, and business trip. You can check the checkbox of a reason and click to edit the reason, and click to delete the reason.
- Page 104 Fingerprint Time Attendance Terminal 2. Click to pop up the adjustment reason adding dialog box. 3. Enter the adjustment reason, and click Notes: The default adjustment reasons for card replacing include forget to swipe card, attendance card lost, device fault, shift adjustment, and business trip. ...
- Page 105 Fingerprint Time Attendance Terminal 3. Select the adjustment type: leave, leave in lieu, overtime, and card replacement. Leave, Leave in Lieu, and Overtime 1) Select the adjustment reason from the drop-down list. 2) Click to pop up the person adding window. 3) Select the adding type as by department or by shift group.
-
Page 106: Card Swiping Log Query
Fingerprint Time Attendance Terminal Steps: 1. In the Enabled List interface, check the checkbox of a piece of enabled list and click to disable the list. 2. Click Disabled tab and the disabled list will be listed on the disabled interface. 3. - Page 107 Fingerprint Time Attendance Terminal Press the Attendance Analysis Table tab to enter the attendance analysis interface. Notes: • You can search the attendance statistics by different shift type: Normal Shift, or Man-Hour Shift. • You can search the attendance statistics by department. •...
-
Page 108: Parameters Configuration
Fingerprint Time Attendance Terminal Notes: • You can search the attendance rate statistics by different shift type: Normal Shift, or Man-Hour Shift. • You can search the attendance rate statistics by department. • You can search the attendance rate statistics by start date and end date. 4.4.9 Parameters Configuration Steps: 1. -
Page 109: Checking Status And Event
Fingerprint Time Attendance Terminal 2. Select the date and time period for calculation and click Calculate Attendance Data to start calculating the attendance data. 3. After calculation, you can also export and import the attendance data. 4.5 Checking Status and Event Purpose: In this section, you are able to anti-control the status of the door and to check the event report of the control point. - Page 110 Fingerprint Time Attendance Terminal : Click on the button to keep the door open. : Click on the button to keep the door closed. Note: Do not support the Capture function. 4. You can also right click the icon and to select a status for the door. 5.
-
Page 111: Access Control Event
Fingerprint Time Attendance Terminal Real-Time Event You can check the Real-time information of the access event on this panel. Click More to enter the Access Event page to view more event information. 4.5.2 Access Control Event Purpose: You can view real-time access event (such as swiping to open the door, unrecognized card number, duration group error, etc.) information in this section. -
Page 112: System Maintenance
Fingerprint Time Attendance Terminal Click the icon on the control panel to enter the interface. Steps: 1. Enter the event search page. 2. Enter the search criteria (event type/ person name/ card No/ start &end time). 3. Click to get the search results. 4. - Page 113 Fingerprint Time Attendance Terminal Configuration Logs Searching Purpose: The Configuration Log files of the Access Control System can be searched by time ,including One-card Configuration, Access Control Configuration, Downloading Permission and System Configuration. Steps: 1. Open the Log Search page. 2.
- Page 114 Fingerprint Time Attendance Terminal The One-card Configuration Log files include departments, persons and cards log files. One-card Configuration of the Access Control System can be operated as adding ,modifying and deleting logs. Steps: 1. Open the Log Search page. 2. Select the radio button of Configuration Logs. 3.
-
Page 115: System Configuration
Fingerprint Time Attendance Terminal 3. Select the operation type as System Configuration Logs. 4. Click the icon to specify the start time and end time. 5. Click Search. The matched log files will display on the list. You can check the operation time, log type and other information of the logs. Note: Please narrow the search condition if there are too many log files. - Page 116 Fingerprint Time Attendance Terminal Auto Time Synchronization The Auto Time Synchronization of the Access Control System can operate auto time adjustment to all access control devices of the Access Control System according to specified period and time. Card Reader Configuration The Card Reader Configuration is for Access Control System to read the card by setting Card Reader parameters.
- Page 117 Fingerprint Time Attendance Terminal Note: You can click (Restore Default Value) to restore the defaults of all the local configurations. Card Dispenser Configuration Purpose: The Card Reader Configuration of the Access Control System can configure device type, connection mode, serial port, baud rate and other parameters of the Card Reader Configuration.
- Page 118 Fingerprint Time Attendance Terminal Fingerprint Machine Configuration Steps: 1. Click the icon on the System Configuration interface to open the Fingerprint Machine Configuration page. 2. Select the device type, serial port number, baud rate, device code, and overtime parameters of the fingerprint machine. 3.
-
Page 119: Chapter 5 Appendix
Fingerprint Time Attendance Terminal Chapter 5 Appendix 5.1 Tips for Scanning Fingerprint Recommended Finger Forefinger, middle finger or the third finger. Correct Scanning The figure displayed below is the correct way to scan your finger: You should press your finger on the scanner horizontally. The center of your scanned finger should align with the scanner center. -
Page 120: Attendance Record Delete Rule
Fingerprint Time Attendance Terminal 5.2 Attendance Record Delete Rule 5.2.1 Enabling Record Delete You are able to configure the percentage of the attendance record over threshold prompt. 1) When the record reaches the threshold, an alarm of the attendance record over limit value will be displayed on device screen. -
Page 121: Attendance Performance
Fingerprint Time Attendance Terminal 5.3 Attendance Performance Content Maximum Configurable Parameters Department Normal Shift Man-Hour Shift Holiday Holiday Group Schedule by Department Schedule by Individual... -
Page 122: Attendance Report Table
Fingerprint Time Attendance Terminal 5.4 Attendance Report Table 5.4.1 Description of Attendance Report File Name File Name Rule att_Report Type_dev_Device No._Date_Time.xls Report Type abnormal: The Abnormal Attendance Record table. abnormal2: When the row of the Abnormal Attendance Record table is more than 65000, the record will be export in two tables. -
Page 123: Attendance Report Table Description
Fingerprint Time Attendance Terminal 5.4.2 Attendance Report Table Description Shift Settings Table Special Shift:1-1 Normal Shift1 2-1 Man-Hour Shift1 0 No Shift 3Holiday Date 2016/4/10 Employee ID Name Department 1 2 3 4 5 6 7 8 Shift Settings Table: All users shift schedule information for a period will be displayed in this table. - Page 124 Fingerprint Time Attendance Terminal Abnormal Attendance Record Date:2016/04/01 ~2016/04/30 Period 1 Period 2 Employee ID Name Department Date On Work Off Work On Work Abnormal Attendance Record Table: Calculate the abnormal attendance according to the attendance records and the shift schedule configuration. 1.
- Page 125 Fingerprint Time Attendance Terminal 12:00 11:00 Attendance Report Table: Enter the start time and the end time to calculate the user attendance information via the shift information and the holiday information according to the shift schedule configuration. 1. Emplayee ID: The user's ID No. 2.
Need help?
Do you have a question about the DS-K1A801MF and is the answer not in the manual?
Questions and answers