Advertisement
Quick Links
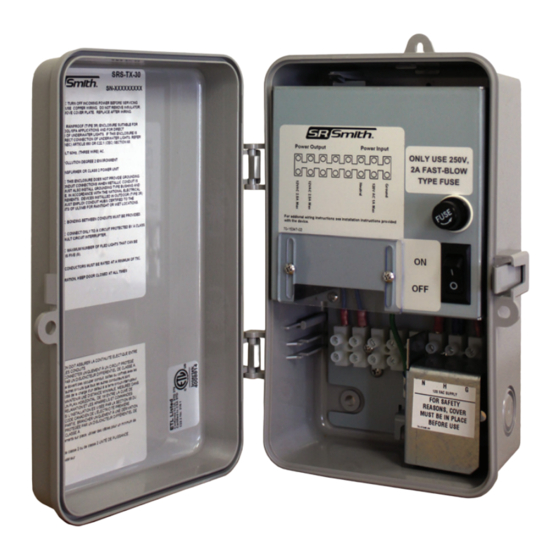
SRS-TX-30
Rated for use on 110/120VAC 60Hz applications
Installation Instructions: Read these instructions in its
entirety before performing any installation work.
FOR USE WITH POOL AND SPA PRODUCTS
79-15259-00
OFF
Conforms to UL STD 379;
Certified to CSA STD C22.2 #218.1
www.srsmith.com
ON
ISOLATION
COVER
Page 1 of 7
4008814
Advertisement

Related Manuals for S.R.Smith SRS-TX-30


Summary of Contents for S.R.Smith SRS-TX-30
- Page 1 SRS-TX-30 Rated for use on 110/120VAC 60Hz applications Installation Instructions: Read these instructions in its entirety before performing any installation work. FOR USE WITH POOL AND SPA PRODUCTS ISOLATION COVER Conforms to UL STD 379; Certified to CSA STD C22.2 #218.1...
- Page 2 The SRS-TX-30 consists of the following parts: Item # Qty. Component Part # Description 10-15078-05 Screw, 8-32, 1/4" length 02-15285-00 Relay Cover 02-15314-00 Bracket Mount, WIR-TRAN 10-15031-03 Screw, 6-32, 1/4" length 10-15089-07 M3 Screw, 14mm length 10-15089-01 M3 Screw, 4mm length...
-
Page 3: Important Safety Information
1. A qualified electrician must install the SRS-TX-30 in accordance to the National and Local Electrical Codes. 2. The SRS-TX-30 must not be less than 5 feet (3 meters in Canada) from inside edge of pool. ONLY USE COPPER CONDUCTORS. -
Page 4: Wiring Instructions
• GFCI BREAKER MUST BE USED TO CONNECT SRS-TX-30 TO INPUT POWER. • VERIFY ALL ELECTRICAL RATINGS BEFORE INSTALLATION IS COMPLETE. LOCATION The SRS-TX-30 is housed in a Type 3R rainproof enclosure and can be mounted anywhere between the pool equipment and the breaker panel. WIRING INSTRUCTIONS FOLLOW PROPER WIRING PRACTICES IN ACCORDANCE WITH ALL LOCAL REGULATORY REQUIREMENTS. - Page 5 To connect a 12VAC light to the Circuit 1 switch, pull wires from the low voltage lighting product to the SRS-TX-30 through conduits connected to the left bottom of the SRS-TX-30. Some lights may identify a 12VAC Hot and Neutral lead though this is not typical with 12VAC low voltage lighting as there is no polarity.
- Page 6 DOWN position before powering on for the first time. To turn ON the 12VAC light connected to the SRS-TX-30, flip the rocker switch UP or to the ON position. When the rocker switch is in the ON position, low voltage power is applied to the 12VAC light/s connected to the SRS-TX-30.
- Page 7 79-15259-00 www.srsmith.com Page 7 of 7...
Need help?
Do you have a question about the SRS-TX-30 and is the answer not in the manual?
Questions and answers