Table of Contents
Advertisement
Quick Links
Advertisement
Table of Contents

Related Manuals for Timeguard MTLW3000


Summary of Contents for Timeguard MTLW3000
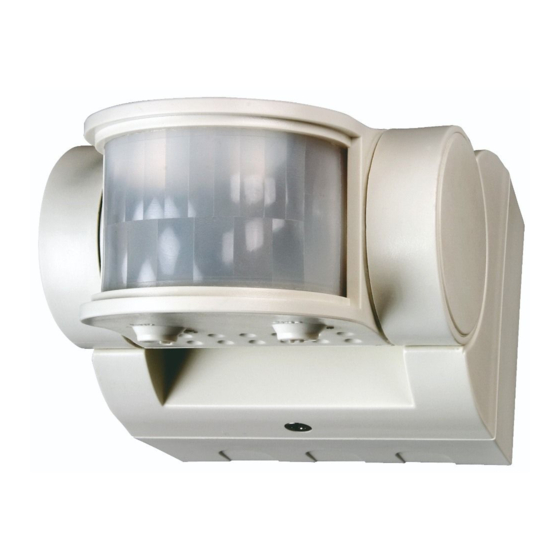
- Page 1 2300W PIR Light Controller Model: MTLW3000 – White...
-
Page 2: General Information
• IP55 Rated suitable for restricted external applications • CE Compliant • Manual Override • Multiple PIR Sensor Switching: A maximum of 8 MTLW3000 PIR sensors can be wired in parallel, to enable any detector to turn ON all the lights connected (The total load must not exceed the lamp rating of a single MTLW3000 unit). -
Page 3: Selecting A Location
4. Selecting a Location • The motion detector has number of detection zones, at various vertical and horizontal angles as shown (see diagram “A”). • The best all-round coverage is achieved with the unit mounted at the optimum height of 2.5 metres. •... -
Page 4: Installation
5. Installation • Ensure the mains supply is switched off and the circuit supply fuses are removed or the circuit breaker turned off. • This product is designed to be mounted on walls or under eaves (See diagram “C”). The sensor can be rotated through 180 degrees to direct detection where required. - Page 5 the PIR sensor to the wiring box (See diagram “G”). There will be an audible click indicating that the top clips are secure in place. • Slowly rotate the PIR sensor body downwards, and back upwards to double check that no wires are trapped. •...
-
Page 6: Connection Diagram
6. Connection Diagram • Connect cables to the terminal block as follows; Mains Supply Load Live (Brown or Red) to L Switch Live (Brown or Red) to L1 Neutral (Blue or Black) to N Neutral (Blue or Black) to N A ‘Loop Terminal’... - Page 7 Diagram H Test Mode • The unit will now operate during daytime as well as at night, illuminating the lamp for approx. 5 seconds each time movement is detected. This allows testing to be carried out to establish the best position for the PIR sensor. •...
- Page 8 • The DUSK control determines the level of darkness required for the unit to start operating. The setting is best achieved by the procedure below; 1. Set the DUSK control knob fully anti clockwise. 2. When the ambient light level reaches the level of darkness at which you wish the lamp to become operative (i.e.
-
Page 9: Troubleshooting
Manual Override Mode The light can be switched on for longer time periods by use of the Manual Override Mode. This can be activated at night by using the internal wall switch or circuit breaker. • Switch the internal wall switch/circuit breaker twice (OFF/ON, OFF/ON) within 2 seconds. - Page 10 • The PIR will not Check that the power is switched ON at the circuit operate at all. breaker/internal wall switch. Turn OFF the power to the unit and check the wiring connections as per the diagram (See section 6. Connection Diagram). Ensure no connections are loose.
-
Page 11: Year Guarantee
020 8450 0515. Note: A proof of purchase is required in all cases. For all eligible replacements (where agreed by Timeguard) the customer is responsible for all shipping/ postage charges outside of the UK. All shipping costs are to be paid in... - Page 12 If you experience problems, do not immediately return the unit to the store. Telephone the Timeguard Customer Helpline: HELPLINE 020 8450 0515 or email helpline @ timeguard.com Qualified Customer Support Coordinators will be online to assist in resolving your query.
Need help?
Do you have a question about the MTLW3000 and is the answer not in the manual?
Questions and answers