Table of Contents
Advertisement
Advertisement
Table of Contents

Related Manuals for X-Rite 301


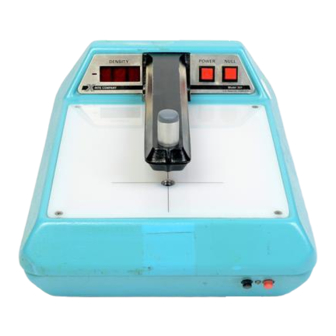
Summary of Contents for X-Rite 301
- Page 2 X-Rite 301 Operator Manual This equipment has been tested and found to comply with the limits for a Class A digital device, pursuant to Part 15 of the FCC Rules. These limits are designed to provide reasonable protection against harmful interference when the equipment is operated in a commercial environment.
- Page 3 X-Rite 301 Operator Manual Replace with only Same Type Lamp Assembly, X-Rite P/N 301-21. Ersetzen Sie die Lampenmontage nur mit einer vom gleichen Typ (X-Rite P/N 301-21). Reemplace la unidad de lampara solamente con una del mismo tipo como la pieza X-Rite 301-21.
- Page 4 X-Rite 301 Operator Manual CE DECLARATION Manufacturer's Name: X-Rite, Incorporated Manufacturer's Address: 3100 44 Street, S.W. Grandville, Michigan 49418 U.S.A. Model Name: Densitometer Model No.: Directive(s) Conformance: EMC 89/336/EEC LVD 73/23/EEC...
-
Page 5: Relamping Instructions
X-Rite 301 Operator Manual Relamping Instructions NOTE: Disconnect Power Before Relamping Fluorescent Bulbs(s) Replacement Replace the Fluorescent Bulb(s) as Follows: 1. Remove the four (4) screws on the corners of the light table and remove the light table. 2. Remove the faulty bulb(s) and replace with type F6T5/D fluorescent bulb(s). - Page 6 To fully appreciate and protect your investment, we suggest that you take several minutes to read this manual. As always, X-Rite stands behind your 301 Instrument with a full one-year limited warranty and a dedicated service organization.
- Page 7 An Instrument Registration Card is enclosed with each instrument. The purchaser should fill in the card completely and return it to X-Rite postmarked no later than 10 days form the date of receipt. This card registers your instrument with us for warranty coverage.
- Page 8 X-Rite 301 Instrument. The contents of this manual are the property of X-Rite, Incorporated and are copyrighted. Any reproduction in whole or part is strictly prohibited.
-
Page 9: Table Of Contents
X-Rite 301 Operator Manual TABLE OF CONTENTS Customer Information..............vi Relamping Instructions ............... iv Table of Contents............... viii List of Figures ................viii Introduction .................. 1 Specifications ................1 Unpacking................3 Operating Instructions ..............2 Power Application ..............2 Aperture Replacement ............. 3 Nulling (Zeroing) Procedure............ -
Page 10: Introduction
INTRODUCTION The X-Rite 301 Black and White Densitometer is a highly accurate and reliable instrument designed for ease of operation. This unit features push button nulling and will compute density comparisons and subtractions. Voltage and temperature compensation provides drift-free operation. -
Page 11: Unpacking
• 301(X) Instrument OPERATING INSTRUCTIONS Operation of the X-Rite 301 is very simple. Procedures of the various modes of operation are provided in the following paragraphs. When operating the instrument, use these recommended common sense suggestions to protect yourself and your instrument: •... -
Page 12: Aperture Replacement
Operating Instructions APERTURE REPLACEMENT Remove the installed aperture by lifting the edge upward. Install a new or different aperture by inserting the aperture into the light source cavity, making sure that the aperture is fully seated and pressed flush against the cavity. -
Page 13: Absolute Density Measurement
Operating Instructions ABSOLUTE DENSITY MEASUREMENT Measure absolute density as follows: 1. Null the instrument as previously described in Nulling (Zeroing) Procedure. 2. Center the film area directly over the bright green light spot under the reading head. 3. Lower the reading head by pressing the read button until it totally deflects and actuates the switch. -
Page 14: Calibration
CALIBRATION Calibration of this instrument should remain stable over a long period of time and over an extended range of voltage and temperature. However, a calibrated step tablet is provided (inside front cover) to verify the instrument calibration. Handle the step tablet with care to prevent accumulation of dirt and fingerprints on the surface. -
Page 15: Figure 3. Calibration
Calibration Calibration Adjustment Read Button “CAL” portion of step tablet centered on Target Window Figure 3. Calibration Calibration Point CAL Density Value Figure 4. Calibration Step Tablet... -
Page 16: Maintenance
Refer to the exploded view illustration of the 301 on page 16. WARNING: DISCONNECT POWER BEFORE PERFORMING ANY MAINTENANCE. CLEANING General cleaning of the 301 Densitometer should be done with mild a soap solution. CAUTION: Do not use alcohol based solutions to clean light table. -
Page 17: Fluorescent Bulb Replacement
Maintenance FLUORESCENT BULB REPLACEMENT Replace fluorescent bulbs as follows: 1. Remove four (4) screws securing light table to the unit chassis. 2. Remove light table. 3. Remove the faulty bulb(s) and replace with new, type F6T5/D fluorescent bulb(s). 4. Reinstall light table and secure to unit chassis with four (4) screws. Screws Lamp Figure 6. -
Page 18: Reading Lamp Replacement
Maintenance READING LAMP REPLACEMENT (P/N 301-21) Replace the reading area lamp as follows: 1. Remove the unit bottom cover by removing the four (4) screws located in the rubber feet. 2. Remove the four (4) screws securing the Lamp P.C. board to the arm assembly at bottom of chassis. -
Page 19: Fuse Replacement
Maintenance FUSE REPLACEMENT NOTE: Your 115VAC instrument may have a “twist-off” type fuse carrier not shown below. If this is the case, replace fuse with a 500ma, ¼ ” x 1-¼ ” type. A spare fuse is located in the fuse carrier if required. To replace fuse: 1. -
Page 20: Factory Repair
FACTORY REPAIR X-Rite recognizes the need to provide complete technical repair service to customers. X-Rite provides repair of any 301 submitted past warranty. The customer shall pay shipping costs and the instrument shall be submitted in its original shipping carton as a complete unaltered unit. -
Page 21: Troubleshooting
TROUBLESHOOTING The following chart is included to aid in troubleshooting your 301 instrument. Use care to avoid danger of electrical shock when troubleshooting or performing any type of maintenance. Only qualified technicians should perform repairs. WARNING: D ISCONNECT POWER BEFORE REPLACING PARTS... - Page 22 Re-seat connector Faulty bulb(s) Replace bulb(s) Faulty switch Faulty ballast(s) Open wiring Reading will not Loose connector(s) Re-set connector change or hold Faulty P.C. board Faulty switch Open wiring = Contact X-Rite Instrument Services or an authorized service center for repair.
-
Page 23: Output Connection (Model 301Rs)
3 and is normally used for modem outputs. NOTE: The output connection is preset from factory to DTE operation for X-Rite 301 units and DCE operation for Fuji 301 units. To change the Transmit Function Switch setting: 1. -
Page 24: Data Instruction Format
Troubleshooting DATA INSTRUCTION FORMAT Data is sent in the following format: <Lead Character><Units><Tenths><Hundredths><Carriage Return> Lead Character represents the ASCII code for a positive character (space) or negative character (–). Units, Tenths, & Hundredths are three ASCII digits (0-9) representing density values. Data is transmitted at the rate of 300 baud with one start bit and stop bit, and the parity bit set to logic zero. - Page 25 Parc du moulin de Massy • 35, rue du Saule Trapu • 91300 Massy • France Tel: 33-1-69.53.66.20 • FAX 33-1-69.53.00.52 X-Rite Asia Pacific Limited - Japan Office Suite 506 AIOS Gotanda • 1-7-11 Higashi-Gotanda Shinagawa-ku, Tokyo • 141-0022 Japan Tel: 81-3-5447-1607 •...
Need help?
Do you have a question about the 301 and is the answer not in the manual?
Questions and answers