Table of Contents
Advertisement
Quick Links
Advertisement
Table of Contents

Related Manuals for X-Rite X-Rite


Summary of Contents for X-Rite X-Rite
- Page 1 Instrument User Guide...
- Page 3 Cet appareil numérique de la classe A est conforme à la norme NMB-003 du Canada. Equipment Information Use of this equipment in a manner other than that specified by X-Rite, Incorporated may compromise design integrity and become unsafe. WARNING: This instrument is not for use in explosive environments.
- Page 4 X - R i t e e X a c t ™ I n s t r u m e n t If your device is equipped with a Bluetooth wireless transmitter, it contains the following module. Roving Networks RN42 Roving Networks, Inc.
- Page 5 Copyright © 2013 by X-Rite, Incorporated “ALL RIGHTS RESERVED” X-Rite, the X-Rite logo, eXact, and the eXact logo are trademarks or registered trademarks of X-Rite, Incorporated in the United States and/or other countries. All other trademarks are properties of their respective owners.
- Page 6 WARRANTIES, EXPRESSED OR IMPLIED, INCLUDING BUT NOT LIMITED TO THE IMPLIED WARRANTIES OF MERCHANTABILITY, FITNESS FOR A PARTICULAR PURPOSE OR APPLICATION, AND NON-INFRINGEMENT. NO EMPLOYEE OR AGENT OF X-RITE, OTHER THAN AN OFFICER OF X- RITE, IS AUTHORIZED TO MAKE ANY WARRANTY IN ADDITION TO THE FOREGOING.
-
Page 7: Table Of Contents
Table of Contents Introduction and Setup User Manual Information Packaging Target Base Lock Operation Measurement Conditions Selection Power Button eXact Software Applications System Requirements Installing the Software Charging the Battery Pack Connecting the Power Supply Connecting the USB Cable Bluetooth Wireless Mode... - Page 8 X - R i t e e X a c t ™ I n s t r u m e n t Measurement Functions Density Density Measurement Density Trend All Densities All Densities Tool Function CMY Balance CMY Balance Function Setting CMY Balance Measurement Tone Value (Dot Area) Function Tone Value Function Setting...
- Page 9 X - R i t e e X a c t ™ I n s t r u m e n t Metamerism Measurement Absolute Color Strength Function Color Strength Function Setting Absolute Color Strength Measurement Relative Color Strength Function Color Strength Function Settings Relative Color Strength Measurement Paper QC Function (Job tools only)
- Page 10 X - R i t e e X a c t ™ I n s t r u m e n t Other Job Options Running a Job Add Tool Creating a Tool Additional Tool Options Users Tool Creating a New User Editing a User Account Settings Change User Name...
-
Page 11: Introduction And Setup
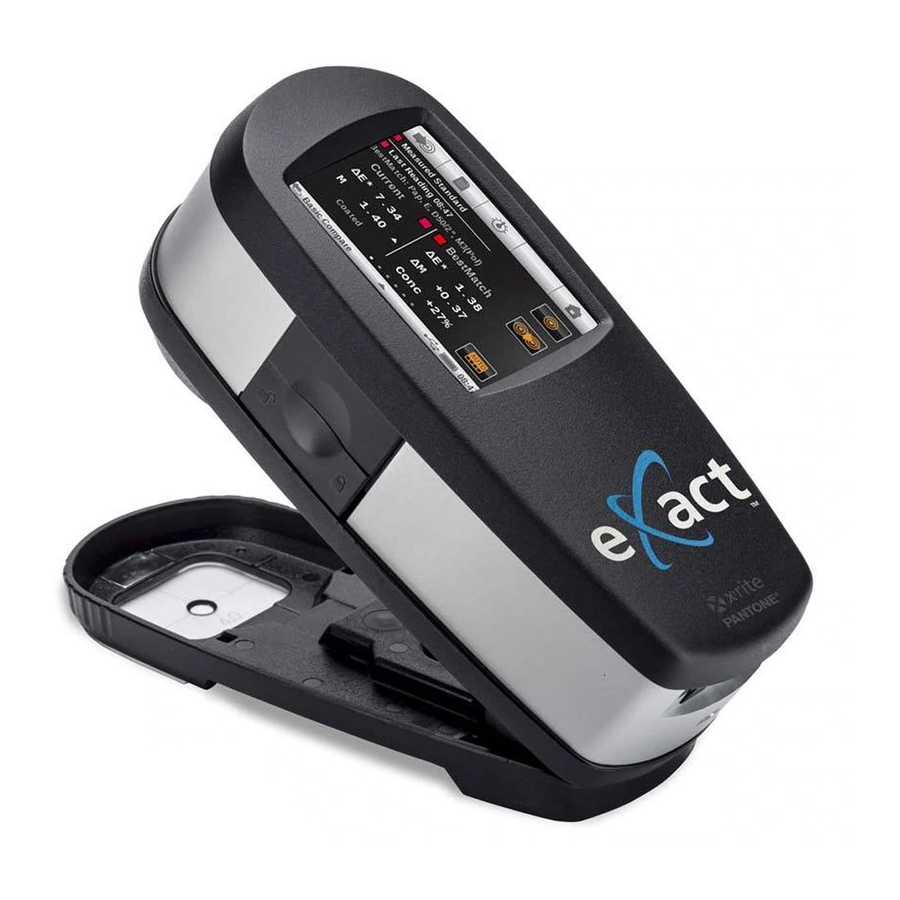
I n s t r u m e n t INTRODUCTION AND SETUP addresses the specific need of color measurement in the pressroom and ink labs The X-Rite eXact™ Key features are: Color display with touch screen operation Automated calibration with Integrated Tile... -
Page 12: User Manual Information
Specific software application information is available in the software help system. Certain functions and options described in this manual are not available on all eXact models and can be disregarded. These functions and options are noted with the following symbols: This symbol indicates that the function or option is NOT available on the X-Rite eXact Densitometer instrument. -
Page 13: Target Base Lock Operation
X - R i t e e X a c t ™ I n s t r u m e n t Target Base Lock Operation The instrument is shipped with the target base in the locked position. A toggle button on the side of the instrument is used to lock and unlock the target base. -
Page 14: Power Button
X - R i t e e X a c t ™ I n s t r u m e n t Power Button The power button is used to initiate the instrument from a power off state. Simply press the button to turn on the instrument. -
Page 15: Exact Software Applications
Review instrument condition and run diagnostics Update instrument firmware, color libraries, process tools and more NOTE: It is recommended that you regularly backup the instrument settings with the X-Rite eXact™ Manager. Refer to the application help file for the procedure. -
Page 16: Charging The Battery Pack
X - R i t e e X a c t ™ I n s t r u m e n t Charging the Battery Pack The battery pack for your new instrument comes in a low to medium charge state and should be charged a minimum of three hours before use. -
Page 17: Connecting The Power Supply
Verify the voltage indicated on the AC adapter complies with the AC line voltage in your area. Operational hazard exists if an AC adapter other than X-Rite SE30-177 is used. AC Adapter Ratings, Input: 100-240V 50-60 Hz, Output: 12VDC @ 2.5A Instrument Connection 1. -
Page 18: Connecting The Usb Cable
X - R i t e e X a c t ™ I n s t r u m e n t Connecting the USB Cable IMPORTANT: You must install the software driver before connecting the instrument to your computer. The instrument communicates with the software through the USB cable or over a wireless Bluetooth connection (if applicable). -
Page 19: User Interface
The section will cover the basic use of the touch screen, as well as icon definitions, setup wizard procedure and measurement techniques. Navigating the Screen The X-Rite eXact instrument contains a graphical touch screen display. All functionality is accessed directly through the screen. Opening Tools The instrument has three main menu screens. -
Page 20: Scrolling Through Options
X - R i t e e X a c t ™ I n s t r u m e n t Scrolling through Options A scrolling bar appears on screens when all options cannot be accessed at the main view. A scroll bar on the left indicates additional options are available. -
Page 21: Naming Screen
Tap the 123 button to access the numeric screen. After entering the new name, tap the OK button to save and exit. Icon Descriptions Note: Certain tool availability may vary, depending on the eXact model purchased. Main Menu Tools User Accounts: Setup new user accounts and edit existing user accounts. - Page 22 X - R i t e e X a c t ™ I n s t r u m e n t Status Bar Symbols USB: Appears when the instrument is connected to a computer via USB. Bluetooth: Appears when Bluetooth is activated. Also appears “blue” when the instrument is connected to a computer via Bluetooth.
- Page 23 X - R i t e e X a c t ™ I n s t r u m e n t Screen Direction: Set the hand preference (screen direction). Region: Select the region and preset the instrument with the according settings. Date: Set the date.
- Page 24 X - R i t e e X a c t ™ I n s t r u m e n t Tolerance: Access the tolerance settings for the current standard. Values can be edited from this screen. Library Sort and Search Search: Access the search a color by name.
-
Page 25: Main Measurement Screen
The main measurement screen consists of four main elements: navigation bar icons (1), data and options area (2), measurement screen icons (3), and status bar icons (4). Refer to the eXact Icons section earlier in this manual for a description of all icons. Navigation Bar Icons (1) The icons along the top of the screen are used to access screens where measurement or selections can occur. -
Page 26: Initial Wizard Setup
Time: Displays the current time. Initial Wizard Setup Upon initially startup, the eXact instrument requires you to specify some basic settings. The settings can be individually changed at a later time. 1. Tap the desired language in the list that you want the instrument to operate in. Tap OK to set and continue. -
Page 27: Measuring A Sample
X - R i t e e X a c t ™ I n s t r u m e n t 5. Swipe the month, day, and year icons in the direction needed to set the current date. Tap OK to set and time. -
Page 28: Calibration
X - R i t e e X a c t ™ I n s t r u m e n t An unsuccessful measurement will be indicated by an error message. See the Troubleshooting section for more details. Calibration IMPORTANT: The calibration plaque is dramatically affected by smudge marks and dust, and must be kept clean. -
Page 29: Measurement Tool Setup
X - R i t e e X a c t ™ I n s t r u m e n t MEASUREMENT TOOL SETUP Each measurement tool has a setup screen where various functions and settings are selected. You should review and edit each tool before measuring. The tools included are: Basic, Compare, Search, Auto Patch and Job. -
Page 30: Settings
X - R i t e e X a c t ™ I n s t r u m e n t When more than 10 functions are required for the tool, you must add a new tool for the additional functions. -
Page 31: Measurement Condition
X - R i t e e X a c t ™ I n s t r u m e n t Measurement Condition Used to select the measurement condition for colorimetric (e.g. CIE L*a*b*) and densitometric (e.g. Density, TVI, Trapping, etc.) functions. Options are: M0(No) –... -
Page 32: Pass/Fail Indication
X - R i t e e X a c t ™ I n s t r u m e n t Pass/Fail Indication Used to activate the pass/fail indication for comparison measurements. Options are: On and Off. If activated, pass/fail is indicated in the upper right corner of the screen (near the view standard icon). -
Page 33: Measurement Functions
X - R i t e e X a c t ™ I n s t r u m e n t MEASUREMENT FUNCTIONS Density This function is the measure of the ink thickness. For the process colors Cyan, Yellow, Magenta, or Black the desired Density Status (A, E, I, T, G) needs to be configured. -
Page 34: All Densities
X - R i t e e X a c t ™ I n s t r u m e n t Job Tools: All readings will be tracked and remembered for each Patch, even if it’s not the current active function on screen at the time. -
Page 35: Tone Value (Dot Area) Function
X - R i t e e X a c t ™ I n s t r u m e n t Simulated color and timestamp of reading displayed Function, response, and CMY values and graph Measurement Condition selected Tone Value (Dot Area) Function This function (also called Dot Area) provides a way to determine the absolute ink coverage (%) of a tint or halftone patch by comparing the density value of the tint patch versus known 0% (Paper/Substrate) and 100% (solid patch) density values. -
Page 36: Tone Value Increase (Dot Gain) Function
X - R i t e e X a c t ™ I n s t r u m e n t Tone Value Increase (Dot Gain) Function This function (also called Dot Gain) is the difference between the actual Tone Value % and the theoretical screen % of a tint patch. -
Page 37: Trapping Function Setting
X - R i t e e X a c t ™ I n s t r u m e n t Ritz formula Where: = Density of overprint minus paper = Density of 2 ink minus paper = Density of 1 ink minus paper Trapping Function Setting Tap the Trapping button and set the trapping formula. -
Page 38: Print Characteristics Measurement
X - R i t e e X a c t ™ I n s t r u m e n t Print Characteristics Measurement Plots a series of tone value measurements on a graph for each patch of a step wedge. The graph ranges from 0 to 100%. -
Page 39: Hue Error And Grayness Function
X - R i t e e X a c t ™ I n s t r u m e n t Hue Error and Grayness Function Hue Error indicates the variation of a printed color from a theoretical pure color. Grayness indicates the presence of gray in a color that makes it appear less saturated. -
Page 40: Cie Xyz
X - R i t e e X a c t ™ I n s t r u m e n t CIE XYZ These tristimulus values of a color are the amounts of three primary colors in a three-component additive model needed to match that test color. -
Page 41: Paper Indices Measurement
X - R i t e e X a c t ™ I n s t r u m e n t Paper Indices Measurement Paper Indices measurement displays the index value(s) for the measured surface. Up to four indices values can be displayed at one time. 1. -
Page 42: Printing Plate Function Setting
X - R i t e e X a c t ™ I n s t r u m e n t Printing Plate Function Setting Tap the Printing Plate button and set the plate type (negative or positive) and Yule-Nielson factor that is used to calculate the physical dot area coverage of your printing plate. -
Page 43: Bestmatch Function
X - R i t e e X a c t ™ I n s t r u m e n t BestMatch Function This function indicates if you can get a closer match (in Delta E) to a standard color by adjusting the ink thickness (offset printing) or concentration (flexo and gravure printing) on-press. -
Page 44: E Trend Function
X - R i t e e X a c t ™ I n s t r u m e n t 7. View measurement results. Left Screen Side (Current) The first value is the current Delta E of the sample to the current standard. The lower number indicates the density response and value of the solid ink being measured. -
Page 45: Metamerism Function
X - R i t e e X a c t ™ I n s t r u m e n t 3. Tap the Measure Standard icon or tap the Standard icon to access the screen where a standard is measured or selected from the library. 4. -
Page 46: Absolute Color Strength Function
X - R i t e e X a c t ™ I n s t r u m e n t Simulated color of standard Simulated color of sample Function, illum/obs, and Measurement Condition selected Metamerism index values Illuminant/observer combination selected Absolute Color Strength Function The absolute color strength “K/S”... -
Page 47: Color Strength Function Settings
X - R i t e e X a c t ™ I n s t r u m e n t thick layer as the standard color. Only in this way can a statement be made regarding the color concentration. -
Page 48: Bestmatch Table (Job Tools Only, Solid Functions)
X - R i t e e X a c t ™ I n s t r u m e n t BestMatch Table (Job tools only, Solid functions) This job function has a table which views the BestMatch results of all colors of a job at once. Each row in the table represents a different solid ink used in that job (table will scroll down if there are more solids than can fit on a single screen). -
Page 49: Tvi Table Function Setting (Job Only)
X - R i t e e X a c t ™ I n s t r u m e n t Spread is calculated by subtracting the largest TVI value from the smallest TVI value across the Process color Inks (CMY) at a given screen % (i.e., 50%). The smaller the spread, the better the gray balance. -
Page 50: Measurement Tool Option Icons
X - R i t e e X a c t ™ I n s t r u m e n t MEASUREMENT TOOL OPTION ICONS Each measurement tool has various option icons available in the navigation bar and measurement screen. -
Page 51: Measure Standard Icon (Compare Tool Only)
X - R i t e e X a c t ™ I n s t r u m e n t Measure Standard icon (Compare tool only) This icon is used to access a screen where a standard is measured. You can also select a standard from an existing color library by selecting the Standard icon. -
Page 52: Patch Type Icons (Job Tools Only)
X - R i t e e X a c t ™ I n s t r u m e n t Patch Type icons (Job tools only) Depending on what patch type is selected in a job tool, a paper, solid, overprint, tint, or gray balance patch can appear. -
Page 53: View Standard Or Patch Icon
X - R i t e e X a c t ™ I n s t r u m e n t Job tools In Job mode, this icon is used to manually select a new patch from the list (pops up when you tap on the patch button). -
Page 54: Change Standard Or Patch Icon
X - R i t e e X a c t ™ I n s t r u m e n t From this screen you select a standard from the library for viewing. Standards can be selected by tapping the search icon and entering the name, or by tapping the sort icon and choosing Classic view or Delta E sorting method to find a standard. -
Page 55: Basic Tool
X - R i t e e X a c t ™ I n s t r u m e n t BASIC TOOL General Information The Basic tool allows you to perform various density and color measurements without standards. Measurement screen icons for the Basic tool appear magenta in color. -
Page 56: Compare Tool
X - R i t e e X a c t ™ I n s t r u m e n t COMPARE TOOL The Compare tool is a quick method for comparing standard and sample measurements without storing the data. After entering the mode, the first step is to set the standard. Each measurement thereafter is compared to it. -
Page 57: Pass/Fail Measurement
X - R i t e e X a c t ™ I n s t r u m e n t 9. Continue with additional measurements or select a measurement screen icon to change color option or standard. Pass/Fail Measurement A pass/fail indication displays for any standard that has a tolerances set. -
Page 58: Averaging Measurement
X - R i t e e X a c t ™ I n s t r u m e n t Averaging Measurement The instrument can calculate the average of measurements for non-homogeneous samples. Averaging can be set to “Off” or up to “5” measurements. NOTE: Averaging must be set before measuring. -
Page 59: Search Tool
X - R i t e e X a c t ™ I n s t r u m e n t SEARCH TOOL The Search function is used to search for the closest color standard within a color library. The resulting color values (actual and difference) are not stored in the instrument. -
Page 60: Changing The Standard
X - R i t e e X a c t ™ I n s t r u m e n t Changing the Standard If the standard automatically selected from the library is not the one required, you can tap the Change Standard icon and manually choose the standard needed. -
Page 61: Auto Patch Tool
X - R i t e e X a c t ™ I n s t r u m e n t AUTO PATCH TOOL General Information The Auto Patch tool allows you to perform various density and color measurements without standards, by using the automatic patch recognition for CMYK jobs. -
Page 62: Job Tool
Print software. Job templates are created using the iQC Print application. Once templates are created in iQC Print, they can be exchanged with other instruments utilizing the eXact Manager application. Job Tool A Job tool defines the process used, active functions, settings and measurement conditions. -
Page 63: Reviewing/Editing Job Parameters
X - R i t e e X a c t ™ I n s t r u m e n t The following functions are preset and cannot be changed. G7 Job Paper QC: Color Space CIE L*a*b* is preset to CIE L*a*b* Gray Balance QC: Display is preset to ΔL*, ΔE*, ΔF TVI Table Setting: Spread is preset to All PSO Job... -
Page 64: Sample Storage
X - R i t e e X a c t ™ I n s t r u m e n t 5. Tap the Back button to exit the Active Functions selection. 6. Tap the Setting button to edit various settings if required. Refer to the Measurement Tool Setup section earlier in this manual for a description of all settings. - Page 65 X - R i t e e X a c t ™ I n s t r u m e n t Available patch types are as follows: Paper: a substrate and non printed patch. Solid: a single ink printed at 100%. Overprint: a patch of two inks printed at 100% one on top the other.
-
Page 66: Running A Job
X - R i t e e X a c t ™ I n s t r u m e n t Change Patch Icon This icon is used to access the change patch screen were you can move the last sample measurement to a different patch. - Page 67 X - R i t e e X a c t ™ I n s t r u m e n t 4. Tap the OK button to close the selection screen and advance to the measurement screen. 5. Measure the substrate. 6.
- Page 68 X - R i t e e X a c t ™ I n s t r u m e n t “Production Mode” for the current sheet of the job will be restored automatically if the job is exited and continued at another time. 12.
-
Page 69: Add Tool
3. Tool arrangement of the main menu is fairly limited in the instrument. However, if you use the eXact Manager software the tools can be arranged in more ways. -
Page 70: Users Tool
NOTE: User account passwords are optional. If the selected user has a password assigned, you are asked to enter the password prior to accessing the user account. If the password is forgotten, you can use the eXact Manager application to reset it, look it up or clear it out. -
Page 71: Account Settings
Off: No security is activated. Security Password: The instrument uses the same security password across all user profiles on the instrument. To change this password, use the eXact manager software or go to the Diagnostics menu to change. If security is active for the current user profile, a locked icon appears in the status bar. It is locked because security has not been temporarily disabled by entering in the security password. -
Page 72: Delete
X - R i t e e X a c t ™ I n s t r u m e n t Delete The Delete icon is used to delete the selected user from the Users menu screen. NOTE: If the last user account profile is deleted, a new profile is created in its place and settings revert back to the default settings of the current region settings. -
Page 73: My Settings Tool
This tool is used to customize several default settings for the selected user. These settings are used as the default values when a new tool is created. NOTE: Settings can also be edited using the eXact Manager application and then uploading to the eXact instrument. -
Page 74: Color Defaults
X - R i t e e X a c t ™ I n s t r u m e n t Color Defaults This option is used to set the color defaults for the selected user and are used for any new tools created. -
Page 75: Instrument
X - R i t e e X a c t ™ I n s t r u m e n t Instrument This option is used to set the instrument settings for the selected user. Beeper Volume: set the instrument beeper volume. Options include: Off, Low, and High. Power Options: set the amount of time the instrument’s screen will stay on during non use (idle) times. -
Page 76: Diagnostics Tool
X - R i t e e X a c t ™ I n s t r u m e n t DIAGNOSTICS TOOL This tool is used to view errors or view/edit the regional settings of the instrument. Tap the Diagnostics tool icon on the first main menu screen to access the diagnostics screen. -
Page 77: Instrument Summary
X - R i t e e X a c t ™ I n s t r u m e n t - Time - Time Format - Date - Date Format Instrument Summary View instrument type, serial number, firmware version and more. You can also restore factory settings from this screen. -
Page 78: Appendices
Center, if you believe that the unit does not work anymore or does not work correctly. Support We are confident you will be pleased with your new X-Rite product. At the same time, we understand your need for on-demand support and training in today’s complex and rapidly evolving workflows. -
Page 79: Cleaning The Instrument
X - R i t e e X a c t ™ I n s t r u m e n t Cleaning the Instrument Your instrument requires very little maintenance to achieve years of reliable operation. However, to protect your investment and maintain reading accuracy, a few simple-cleaning procedures should be performed from time to time. -
Page 80: Cleaning Calibration Plaque
X - R i t e e X a c t ™ I n s t r u m e n t Cleaning Calibration Plaque The calibration plaque should be cleaned periodically. Do not use solvents or cleaners of any kind. The calibration tile is embedded in the underside of the reference holder. -
Page 81: Replacing The Battery Pack
CAUTION: Risk of explosion if battery is replaced by an incorrect type. Replace only with X-Rite part number SE15-44, self protected rechargeable lithium-ion battery pack. 1. Release the target base lock and carefully turn the instrument on its side as shown. -
Page 82: Bluetooth Installation
X - R i t e e X a c t ™ I n s t r u m e n t Bluetooth Installation The following pages contain instructions for installing the Bluetooth device on both Windows XP and Windows 7. The Windows 7 procedure is shown after the Windows XP procedure. Windows XP 1. - Page 83 “default” into the open field. Click Next to continue. 7. Windows will add the instrument and display a confirmation window. This may also look different depending on your Windows operating system. Click OK or Finish. 8. Launch your eXact software and begin using the instrument.
-
Page 84: Windows 7
X - R i t e e X a c t ™ I n s t r u m e n t Windows 7 1. Insert the Bluetooth device into an available USB port. You will see a popup message like the one shown below in the lower right hand corner of your display. - Page 85 X - R i t e e X a c t ™ I n s t r u m e n t 6. Enter the pairing code “default” into the field and click Next to continue. 7. After pairing is successful, you are now ready to use the instrument in wireless mode.
-
Page 86: Troubleshooting
Prior to contacting the support department for instrument problems, try the applicable solution(s) described below. If the condition persists, contact us using one of the methods listed in the Service Information section. You can also refer to the instrument Diagnostics function within the eXact Manager application for additional troubleshooting information. Problem... - Page 87 X - R i t e e X a c t ™ I n s t r u m e n t could throw off the proper detection of other patches. Every effort is made to properly detect patches and predict other patches properly.
-
Page 88: Technical Specifications
Automatic on integrated white reference Inter instrument agreement: Average:0.25 E*ab, Max: 0.45 ΔE*ab (M3 0.55 ΔE*ab) (Measurements using X-Rite manufacturing standards at a temperature of 23°C +/- 1°C, 40-60% RH for all measurement modes on 12 BCRA color tiles and a white ceramic reference (D50, 2°)) - Page 89 I n s t r u m e n t INTERFACE, DIMENSIONS AND WEIGHT Data Interface: USB 2.0 Bluetooth (optional) - Class II Power supply: X-Rite P/N: SE30-177 100-240VAC 50/60Hz, 12VDC @ 2.5A Battery: X-Rite P/N: SE15-44 Lithium Ion, 7.4VDC, 2200mAh Physical Dimensions: 3.0”H (7.6 cm) 3.1”W (7.8 cm) 7.1”L (18 cm)
- Page 91 8105 Regensdorf Switzerland Phone (+41) 44 842 24 00 Fax (+41) 44 842 22 22 Asia Pacific Headquarters X-Rite Asia Pacific Limited Floor, No. 169 Electric Road Hong Kong, China Phone (852) 2568 6283 Fax (852) 2885 8610 Please visit www.xrite.com...
Need help?
Do you have a question about the X-Rite and is the answer not in the manual?
Questions and answers