Festo CPX-FB13 Manual
Cpx terminal.
cpx field bus node.
field bus protocol
profibus-dp
according to
en50170
Hide thumbs
Also See for CPX-FB13:
- Electronic manual (153 pages) ,
- Manual (63 pages) ,
- Brief description (62 pages)

Subscribe to Our Youtube Channel
Related Manuals for Festo CPX-FB13


Summary of Contents for Festo CPX-FB13
- Page 1 CPX terminal Manual Electronics CPX field bus node Type CPX−FB13 Field bus protocol PROFIBUS−DP according to EN 50170 Manual 526 428 en 0811c [740 270]...
- Page 3 ....... . . 526 428 © (Festo AG & Co. KG, D 73726 Esslingen, Germany, 2008) Internet: http://www.festo.com E−Mail:...
- Page 4 PROFIBUS International (P.I.) ® SIMATIC is a registered trade mark of Siemens AG ® TORX is a registered trade mark of Acument Intellectual Properties, LLC (Manufacturer: Acument Global Technologies North America, Sterling Heights, Michigan, USA) Festo P.BE−CPX−FB13−EN en 0811c...
- Page 5 ........1−25 Festo P.BE−CPX−FB13−EN en 0811c...
- Page 6 Read out diagnostic buffer with STEP 7 (up to V 5.2) ... 3−24 3.7.2 Device−related diagnosis with STEP 7 (up to V 5.3) ... . 3−26 Festo P.BE−CPX−FB13−EN en 0811c...
- Page 7 ............C−1 Festo P.BE−CPX−FB13−EN en 0811c...
- Page 8 Contents and general instructions Festo P.BE−CPX−FB13−EN en 0811c...
- Page 9 This manual is intended exclusively for technicians trained in control and automation technology who have experience in installing, commissioning, programming and diagnosing slaves on PROFIBUS−DP. Service Please consult your local Festo Service agent if you have any technical problems. Festo P.BE−CPX−FB13−EN en 0811c...
- Page 10 General basic information about the method of operation, fitting, installing and commissioning CPX terminals can be found in the CPX system manual. Information about further CPX modules can be found in the manual for the relevant module. VIII Festo P.BE−CPX−FB13−EN en 0811c...
- Page 11 This means that failure to observe this instruction may result in damage to property. The following pictogram marks passages in the text which describe activities with electrostatically sensitive compo nents. Electrostatically sensitive components may be damaged if they are not handled correctly. Festo P.BE−CPX−FB13−EN en 0811c...
- Page 12 Accessories: Information on necessary or sensible accessories for the Festo product. Environment: Information on environment−friendly use of Festo products. Text markings The bullet indicates activities which may be carried out in · any order. 1. Figures denote activities which must be carried out in the numerical order specified.
- Page 13 Number of address words assigned by the CPX terminal PLC/IPC Programmable logic controller/industrial PC SCS, SCO, SCV Short circuit/overload sensor supply, outuputs, valves Status bits Internal inputs which supply coded common diagnostic messages Tab. 0/1: CPX−specific terms and abbreviations Festo P.BE−CPX−FB13−EN en 0811c...
- Page 14 Contents and general instructions Festo P.BE−CPX−FB13−EN en 0811c...
-
Page 15: Installation
Installation Chapter 1 1−1 Festo P.BE−CPX−FB13−EN en 0811c... - Page 16 ........1−25 1−2 Festo P.BE−CPX−FB13−EN en 0811c...
-
Page 17: General Instructions On Installation
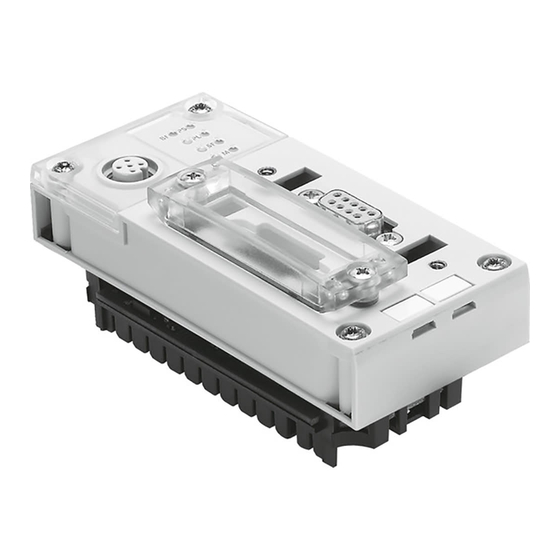
Therefore, do not touch any contacts. · Observe the handling specifications for electrostatically · sensitive components. You will then prevent the electronics from being damaged. Information about fitting the CPX terminal can be found in the CPX system manual (P.BE−CPX−SYS−...). 1−3 Festo P.BE−CPX−FB13−EN en 0811c... - Page 18 Service interface for handheld (V24) CPX−specific LEDs und USB adapter (for CPX−FMT) Field bus connection (9−pin sub−D socket) Transparent cover for the DIL switches Fig. 1/1: Connecting and display elements on the CPX field bus node 1−4 Festo P.BE−CPX−FB13−EN en 0811c...
- Page 19 2. Pull the field bus node carefully and without tilting away from the contact rails of the manifold base. Field bus node CPX−FB13 Manifold base Contact rails TORX T10 screws Fig. 1/2: Dismantling/fitting the field bus node 1−5 Festo P.BE−CPX−FB13−EN en 0811c...
- Page 20 3. Tighten the screws at first only by hand. Place the screws so that the self−cutting threads can be used. 4. Tighten the screws with a TORX screwdriver size T10 with torque 0.9 1.1 Nm. 1−6 Festo P.BE−CPX−FB13−EN en 0811c...
-
Page 21: Settings Of The Dil Switches On The Field Bus Node
1. Place the cover carefully on the node. Note Make sure that the seal is seated correctly. · 2. Tighten the two fastening screws at first by hand and then with a torque of 0.4 Nm. 1−7 Festo P.BE−CPX−FB13−EN en 0811c... -
Page 22: Settingthe Dil Switches
4. Assign an unused station number to the CPX terminal. Set the desired station number (8−position DIL switch 3, switch elements 1 5. Set the diagnostic mode (8−position DIL switch 3, switch element 8). 6. Fit the cover again (section 1.2.1). 1−8 Festo P.BE−CPX−FB13−EN en 0811c... - Page 23 An FEC integrated in the CPX terminal takes DIL 1.2: OFF control of the I/Os. This operating mode is only useful if an FEC is integrated in the CPX terminal. Tab. 1/1: Setting the operating mode with DIL switch 1 1−9 Festo P.BE−CPX−FB13−EN en 0811c...
- Page 24 (see section 3.5). Device−related diagnosis Device−related diagnosis active inactive DIL 3.8: ON DIL 3.8: OFF Tab. 1/2: Setting the diagnostic mode with DIL switch 3 1−10 Festo P.BE−CPX−FB13−EN en 0811c...
- Page 25 The following station numbers are permitted: Protocol Address designation Permitted station numbers PROFIBUS−DP PROFIBUS address 1; ...; 125 Recommendation: Assign the station numbers in ascending order. Assign the station numbers to suit the machine structure of your system. 1−11 Festo P.BE−CPX−FB13−EN en 0811c...
- Page 26 38 2 + 4 + 32 = 1 + 4 = Fig. 1/5: Examples of set station numbers (binary coded) The following pages contain a summary of the settings for the station numbers. 1−12 Festo P.BE−CPX−FB13−EN en 0811c...
- Page 27 1. Installation Station Station Reserved Tab. 1/3: Setting station numbers 1 31: Position of the DIL switch elements 1−13 Festo P.BE−CPX−FB13−EN en 0811c...
- Page 28 1. Installation Station Station Tab. 1/4: Setting station numbers 32 63: Position of the DIL switch elements 1−14 Festo P.BE−CPX−FB13−EN en 0811c...
- Page 29 1. Installation Station Station Tab. 1/5: Setting station numbers 64 95: Position of the DIL switch elements 1−15 Festo P.BE−CPX−FB13−EN en 0811c...
- Page 30 1. Installation Station Station Tab. 1/6: Setting station numbers 96 125: Position of the DIL switch elements 1−16 Festo P.BE−CPX−FB13−EN en 0811c...
-
Page 31: Connecting The Field Bus
< 110 /km core diameter: > 0.64 mm › 0.34 mm core cross−sectional area: Bus length Exact specifications on the bus length can be found in the next section and in the manuals for your control system. 1−17 Festo P.BE−CPX−FB13−EN en 0811c... -
Page 32: Field Bus Baud Rate And Field Bus Length
9.6; 19.2; 93.75 kBaud 1200 m 187.5 kBaud 1000 m 500 kBaud 400 m 1500 kBaud 200 m 3000 12000 kBaud 100 m Tab. 1/7: Maximum field bus segment lengthsfor PROFIBUS−DP depending on the baud rate 1−18 Festo P.BE−CPX−FB13−EN en 0811c... -
Page 33: Field Bus Interface
You can connect the CPX terminal with the field bus plug from Festo type FBS−SUB−9−GS−DP−B. Note Only the Festo field bus plug complies with IP65. Before connecting sub−D plugs from other manufacturers: Replace the two flat screws with bolts ·... -
Page 34: Connection Options
532216). You can disconnect the plug from the node without interrupting the bus cable (T−TAP function). Note The clamp strap in the field bus plug from Festo is connected internally only capacitively with the metallic housing of the Sub−D plug. This is to prevent equalising currents flowing through the screening of the field bus cable. - Page 35 Field bus continuing (OUT) Only connected capacitively Fig. 1/6: Field bus plug from Festo, type FBS−SUB−9−GS−DP−B DIL switches With the switch in the field bus plug you can switch the following: Switch position Bus terminal Continuing field...
- Page 36 CPX−AB−2−M12−RK−DP Bus OUT Bus IN Bus IN Bus OUT Protective cap or plug with bus termination resistor if connection is not used. Tab. 1/9: Pin assignment of the M12 adapters for the field bus interface 1−22 Festo P.BE−CPX−FB13−EN en 0811c...
- Page 37 Example of optical−fibre waveguide network components: Siemens Optical Link Module (OLM) for PROFIBUS plus Siemens Optical Link Plug (OLP) for PROFIBUS (IP20) ® Harting Han−InduNet media converter IP65 (optical data transmission in the DESINA installation concept). 1−23 Festo P.BE−CPX−FB13−EN en 0811c...
-
Page 38: Bus Connection With Terminating Resistors
Fit a bus termination to both ends of a bus segment. · Recommendation: Use the ready−to−use field bus plugs from Festo for the bus termination. A suitable resistor network is incorporated in the housing of this plug (see Fig. 1/7). -
Page 39: Pin Assignment Of Power Supply
The current consumption of a CPX terminal depends on the number and type of integrated modules and components. Read the information on power supply as well as on the earthing measures to be carried out in the CPX system manual. 1−25 Festo P.BE−CPX−FB13−E N en 0811c... - Page 40 4: Earth terminal Note the specifications on the plug : Operating voltage for electronics/sensors EL/SEN Load voltage for outputs Load voltage for valves Tab. 1/10: Pin assignment for system supply, additional supply and valve supply 1−26 Festo P.BE−CPX−FB13−E N en 0811c...
-
Page 41: Commissioning
Commissioning Chapter 2 2−1 Festo P.BE−CPX−FB13−EN en 0811c... - Page 42 ....2−54 Checklist for commissioning the CPX terminal with FB13 ....2−55 2−2 Festo P.BE−CPX−FB13−EN en 0811c...
-
Page 43: Configuration
The CP terminal now sends a constant image of all the inputs to the master. With each further FREEZE command, the input image is updated and sent again to the master. Return to normal operation: UNFREEZE command 2−3 Festo P.BE−CPX−FB13−EN en 0811c... -
Page 44: Preparing The Cpx Terminal For The Configuration
Counting from left to right. Depending on the configuration, the field bus node can occupy status information as logical inputs. Outputs Counting is module−oriented, irrespective of the position of the field bus node. Counting from left to right. 2−4 Festo P.BE−CPX−FB13−EN en 0811c... - Page 45 I/O diagnostic interface [System Table Interface, STI] Module identifier in the handheld unit or in the hardware configuration of the programming software Tab. 2/1: Module overview and address assignment part 1: field bus nodes and diagnosis mode 2−5 Festo P.BE−CPX−FB13−EN en 0811c...
- Page 46 CPX−8DE−8DA Module identifier in the handheld unit or in the hardware configuration of the programming software Identifiers can be grouped together Tab. 2/2: Module overview and address assignment part 2: Digital input and output modules 2−6 Festo P.BE−CPX−FB13−EN en 0811c...
- Page 47 Module identifier in the handheld unit or in the hardware configuration of the programming software Number of inputs which can be switched between 2 and 4 Tab. 2/3: Module overview and address assignment part 3: Digital input and output modules 2−7 Festo P.BE−CPX−FB13−EN en 0811c...
- Page 48 (FB13: CPX−8 bytes I/8 bytes O) Module identifier in the handheld unit or in the hardware configuration of the programming software Tab. 2/5: Configuration of the field bus node for the operating mode Remote Controller 2−8 Festo P.BE−CPX−FB13−EN en 0811c...
- Page 49 (see Fig. 2/1). Pneumatic modules of type MPA−P each occupy 1 byte of address space or 16 inputs. Pneumatic modules of type VPPM each occupy 1 byte of address space (inputs/outputs) or 16 inputs and 16 outputs. 2−9 Festo P.BE−CPX−FB13−EN en 0811c...
- Page 50 Module identifier in the handheld unit or in the hardware configuration of the programming software Type of MPA electronic module used Identifiers can be grouped together Tab. 2/6: Identifiers and address assignment part 1: MPA pneumatics 2−10 Festo P.BE−CPX−FB13−EN en 0811c...
- Page 51 Module identifier in the handheld unit or in the hardware configuration of the programming software Type of MPA electronic module used Identifiers can be grouped together Tab. 2/7: Identifiers and address assignment part 2: MPA pneumatic module with diagnosis function D2 2−11 Festo P.BE−CPX−FB13−EN en 0811c...
- Page 52 1 word/ VMPA−FB−PS−... 16 I VPPM proportional pressure− VPPM / 70 1 word/ 1 word/ regulating valve (type 32) 16 I 16 O VPPM−6TA−... Tab. 2/9: Identifiers and address assignment of the pneumatics part 4 2−12 Festo P.BE−CPX−FB13−EN en 0811c...
- Page 53 Between the grouped electric modules there may be any other electric module types. Further information can be found in the following configuration examples: Note Make sure that the modules are correctly grouped together. The project planning software does not make a check. 2−13 Festo P.BE−CPX−FB13−EN en 0811c...
- Page 54 Pneumatic interface for MPA pneumatics Fig. 2/2: Example terminal 1 (with MPA1 and MPA2 pneumatics) Configure the CPX terminal module−by−module from left to right. The following table shows the configuration of the above terminal example: 2−14 Festo P.BE−CPX−FB13−EN en 0811c...
- Page 55 8 bits are assigned here, but only 4 are used. Tab. 2/10: Configuration for example terminal 1 The identifier bytes of locations 5 and 6 are grouped together. The identifier with the star symbol is used in location 6. 2−15 Festo P.BE−CPX−FB13−EN en 0811c...
- Page 56 (with DIL switch set to 8 valve coils) Fig. 2/3: Example terminal 2 (with VTSA pneumatics) Configure the CPX terminal module−by−module from left to right. The following table shows the configuration of the above terminal example: 2−16 Festo P.BE−CPX−FB13−EN en 0811c...
- Page 57 ISO PlugIn DIL1 [8DO] setting. As no output module with groupable identifier is used in the subsequent locations, 8 bits are assigned here, but only 4 are used. Tab. 2/11: Configuration for example terminal 2 2−17 Festo P.BE−CPX−FB13−EN en 0811c...
- Page 58 CPX terminal with CP interface Sensor (module no. 3) CP−EL input module CP−CL output module on CP string 4 MPA−CPI valve terminal on CP string 1 Cylinder Fig. 2/4: Example terminal 3 (with CP interface) 2−18 Festo P.BE−CPX−FB13−EN en 0811c...
- Page 59 MPA1 pneumatic module completely. MPA1S: VMPA1−FB−EMS−8 [8DO] As no output module with groupable identifier is used in the subsequent locations, 8 bits are assigned here, but only 4 are used. Tab. 2/12: Configuration for example terminal 3 2−19 Festo P.BE−CPX−FB13−EN en 0811c...
-
Page 60: Device Master File (Gsd) And Icon Files
CPC terminal using configuration and programming software, e.g. Siemens STEP 7. Reference sources Current GSD files can be found on the Festo Internet pages under: www.festo.com/fieldbus GSD files You will require one of the following files for the CPX terminal: CPX_059E.GSD (German version) - Page 61 GSD to ensure support of all functions of the CPX−FB13. For some functions, the latest update of the CPX−FB13 is required. You can find information on this in the correspon ding sections of this manual. 2−21 Festo P.BE−CPX−FB13−EN en 0811c...
-
Page 62: Configuration With A Siemens Master
Before commissioning, ensure that the connected elements (e.g. actuators) do not perform any undesired or uncontrollable movements. If necessary, disconnect the load power supply and compressed air supply. See also section 2.3, checklist for commissioning 2−22 Festo P.BE−CPX−FB13−EN en 0811c... - Page 63 4. Select the controller used (PLC/Master): [Insert] [Station] ... (e.g. SIMATIC 300 Station). 5. Open the project by clicking on the plus symbol (on the left next to the project symbol and the project name). 2−23 Festo P.BE−CPX−FB13−EN en 0811c...
- Page 64 The child window symbolises the rack rail (profile rail) of your controller system. You compile the individual elements of your controller in this child window and thus form the basis for your PROFIBUS automation system. 2−24 Festo P.BE−CPX−FB13−EN en 0811c...
- Page 65 6. Add your CPU and a PROFIBUS system to the hardware configuration: Drag the corresponding catalogue element (symbol) into the Rack Rail window ( 3 or 4 in Fig. 2/5). Row 1/slot 1 is reserved and cannot be used for the configuration. 2−25 Festo P.BE−CPX−FB13−EN en 0811c...
- Page 66 With New...", create a PROFIBUS system and, if necessary, edit the Transmission rate" and Profile" entries (transmission rate/baud rate and profile) in the Network Settings" tab. Fig. 2/6: Edit the PROFIBUS properties dialogue window 2−26 Festo P.BE−CPX−FB13−EN en 0811c...
- Page 67 [Options] [Update Catalog]. All available CPX modules in the hardware catalogue are displayed under PROFIBUS−DP > Additional Field Devices > Valves > Festo CPX Terminal. You can start the selection and configuration of your modules. Station selection with STEP 7 1.
- Page 68 2. Commissioning Fig. 2/7: Station selection with STEP 7 HW Config 2−28 Festo P.BE−CPX−FB13−EN en 0811c...
- Page 69 2. 2. In the hardware catalogue, open the module Festo CPX terminal" (folder in the English version: PROFIBUS−DP > Additional Field Devices > Valves >...") 3. 3. Pull the first (left−hand) module of your CPX terminal onto line 0 in the configuration table.
- Page 70 2. Commissioning Fig. 2/8: Configuration with STEP7 Hardware catalogue This concludes the station selection and configuration. 2−30 Festo P.BE−CPX−FB13−EN en 0811c...
- Page 71 Addressing example 1: CPX valve terminal with MPA pneumatics Addresses used as from input/output word 42: Module no.: 0 Field bus node CPX−FB13 MPA2 pneumatic modules MPA1 pneumatic modules Fig. 2/9: Addressing the example terminal 1 (see also Fig. 2/2) 2−31 Festo P.BE−CPX−FB13−EN en 0811c...
- Page 72 MPA2S: VMPA2−FB−EMS−4 [4DO]x2 MPA2 pneumatic module (45) *MPA2S: VMPA2−FB−EMS−4 [4DO]x0 ) Passive module ) Occupies bits 4 7 of output byte 45 automatically Tab. 2/15: Input and output addresses for example terminal 1 (see Fig. 2/9) 2−32 Festo P.BE−CPX−FB13−EN en 0811c...
- Page 73 Addressing example 2: CPX terminal with VTSA pneumatics Addresses used as from input/output word 42: Module no.: 0 4DO 8DI Field bus node CPX−FB13 VTSA pneumatics Pneumatic interface Fig. 2/10: Addressing the example terminal 2 (see also Fig. 2/3) 2−33 Festo P.BE−CPX−FB13−EN en 0811c...
- Page 74 CPX−2AE−U/I [2AI] Analogue 2−output module CPX−2AA−U/I [2AO] VTSA pneumatic interface 16DO ISO PlugIn DIL1 [8DO] Bit 4 7 occupied, but not used Tab. 2/16: Input and output addresses for example terminal 2 (see Fig. 2/10) 2−34 Festo P.BE−CPX−FB13−EN en 0811c...
- Page 75 CP−CL output module at CP string 4 (last string used for inputs; (last string used for outputs; therefore 4 byte inputs) therefore 16 byte outputs) Fig. 2/11: Addressing the example terminal 3 (see also Fig. 2/4) 2−35 Festo P.BE−CPX−FB13−EN en 0811c...
- Page 76 Digital multi I/O module CPX−8DE−8DA [8DI/8DO] MPA pneumatic interface VMPA−FB−EPL−... MPA1 pneumatic module MPA1S: VMPA1−FB−EMS−8 [8DO] MPA1 pneumatic module MPA1S: VMPA1−FB−EMS−8 [8DO] ) Passive module Tab. 2/17: Input and output addresses for example terminal 3 (see Fig. 2/11) 2−36 Festo P.BE−CPX−FB13−EN en 0811c...
-
Page 77: Configuration In The Remote Controller Operating Mode
The field bus node is thus configured as Remote Controller. Use of Festo Software Tools Version 4 (FST 4) is required (see step 4.) to configure the CPX−FEC and CPX terminal. 4. Configure the CPX terminal with the Festo Software Tools FST 4 via the CPX−FEC. - Page 78 2. Commissioning Fig. 2/12: Remote Controller" operating mode: Configuration with STEP 7 Hardware catalogue 2−38 Festo P.BE−CPX−FB13−EN en 0811c...
-
Page 79: Identification And Maintainance
3. Activate the checks under Include" (Consider) only where you wish to load data into the field bus node. Deactivate checks where the ONLINE" filed already con tains correct data; otherwise, they will be overwritten! 4. Confirm with OK. 2−39 Festo P.BE−CPX−FB13−EN en 0811c... - Page 80 2. In the General" tab, you will find the hardware version and the software/firmware status of the field bus node (see Fig. 2/15). 3. You will find further information, such as manufacturer’s specification, in the Identification" tab (see Fig. 2/16). 2−40 Festo P.BE−CPX−FB13−EN en 0811c...
- Page 81 2. Commissioning Fig. 2/15: Look at identification data ansehen, General" tab 2−41 Festo P.BE−CPX−FB13−EN en 0811c...
- Page 82 2. Commissioning Fig. 2/16: Look at identification data, Identification" tab 2−42 Festo P.BE−CPX−FB13−EN en 0811c...
-
Page 83: Parameterisation
CPX I/O modules (P.BE−CPX−EA−...). 2.2.1 Parameterisation when switching on Master loads PROFIBUS−DP PLC/IPC parameter set Master into the node Node distributes parameter set to the modules Fig. 2/17: Sequence of the start parameterisation 2−43 Festo P.BE−CPX−FB13−EN en 0811c... - Page 84 A fault message is output (see Fig. 2/18). A list of the possible Start parameters can be found in appendix A.2. 2−44 Festo P.BE−CPX−FB13−EN en 0811c...
- Page 85 PROFIBUS master to the field bus node. An exchange of individual CPX modules is therefore possible, without the need for new manual parameterisation. 2−45 Festo P.BE−CPX−FB13−EN en 0811c...
-
Page 86: Parameterising The Cpx Terminal With Step 7
3. Click on the parameter value which you wish to modify. A list with the possible values is opened 4. 4. Modify the value by clicking it and confirm this with OK. 2−46 Festo P.BE−CPX−FB13−EN en 0811c... - Page 87 2. Commissioning Fig. 2/19: Setting system parameters with STEP 7 2−47 Festo P.BE−CPX−FB13−EN en 0811c...
- Page 88 1. Click on the value of the parameter Diag.Buffer Mode" or Diag.Buffer Error End" A list with the possible values will be opened. 2. Modify the value as follows and confirm this with OK. Fig. 2/20: Parameterising the diagnostic memory with STEP 7 2−48 Festo P.BE−CPX−FB13−EN en 0811c...
- Page 89 Record coming only": Only when a fault occurs, the fault number and the time of the event are recorded. If the fault is eliminated, the time of the event will not be recorded. 2−49 Festo P.BE−CPX−FB13−EN en 0811c...
- Page 90 1. The dialogue window Properties DP slave" is displayed. 2. Proceed further as described above under System parameters" in steps 3 and 4. Fig. 2/21: Module parameterisation with STEP 7 2−50 Festo P.BE−CPX−FB13−EN en 0811c...
-
Page 91: Parameterisation With The Handheld
The value of these parameters will not be modified when the field bus system is switched on. Values already set with the handheld or via DPV1 are retained. Information about operating the handheld can be found in the manual for the handheld P.BE−CPX−MMI−1−... 2−51 Festo P.BE−CPX−FB13−EN en 0811c... -
Page 92: Field Bus Node Cpx−Fb13
This parameter can also be set via the I/O diagnostic interface with the function number 4402 bit 7. Tab. 2/18: Device−specific parameters of the CPX−FB13 2−52 Festo P.BE−CPX−FB13−EN en 0811c... - Page 93 STEP 7, but they have no effect. Parameters Required version CPX−FB13 Filter diagnosis message V Rev 24 Analogue process value presentation Rev 23 Tab. 2/19: Required version of the CPX−FB13 for use of parameters 2−53 Festo P.BE−CPX−FB13−EN en 0811c...
-
Page 94: Application Example For Parameterisation
Signal extension time set to 50 ms: Reliable recording of the signals by the controller. The value of this parameter is set for the complete module, but must be activated/deactivated separately for each input channel. 2−54 Festo P.BE−CPX−FB13−EN en 0811c... -
Page 95: Checklist For Commissioning The Cpx Terminal With Fb13
Check the DIL switch settings and the field bus · configuration before using and replacing CPX terminals. Please also observe the switching−on instructions in the manual for your controller. 2−55 Festo P.BE−CPX−FB13−EN en 0811c... - Page 96 3 of this manual and in the CPX system manual (P.BE−CPX−SYS−...). Colour Operating status Fault treatment green lights up normal none green lights up normal none LED is off normal none Tab. 2/20: Normal operating status of the CPX terminal 2−56 Festo P.BE−CPX−FB13−EN en 0811c...
-
Page 97: Diagnosis
Diagnosis Chapter 3 3−1 Festo P.BE−CPX−FB13−EN en 0811c... - Page 98 ... 3−24 3.7.2 Device−related diagnosis with STEP 7 (up to V 5.3) ... . 3−26 3−2 Festo P.BE−CPX−FB13−EN en 0811c...
-
Page 99: Overview Of Diagnostic Possibilities
Extended access to Appendix A.3 PROFIBUS DPV1 the CPX terminal via the field diagnostic data in the PLC user program (e.g. diagnostic memory) Tab. 3/1: Overview of the diagnostic options of the CPX terminal 3−3 Festo P.BE−CPX−FB13−E N en 0811c... -
Page 100: Diagnostics Via Leds
CPX field bus node. LED BF: Bus fault/status (red) LEDs for system diagnosis: PS: Power system (green) PL: Power load (green) SF: System fault (red) M: Modify (yellow) Fig. 3/1: LEDs of the CPX node 3−4 Festo P.BE−CPX−FB13−E N en 0811c... -
Page 101: Fault Displays Of The Bus Fault/Status Led Bf
Interrupted, short−circuited or field bus connection · faulty field bus connection Faulty configuration configuration of the master · with regard to the modules of the CPX terminal Tab. 3/2: Fault diagnosis with the red LED BF" 3−5 Festo P.BE−CPX−FB13−E N en 0811c... -
Page 102: Fault Displays Of The Leds For System Diagnosis Ps, Pl, Sf, M
The load voltage supply will be · LED flashes switched on again automatically after the undervoltage has been eliminated (default) Power Off/On is necessary · Tab. 3/3: Fault diagnostics using the LEDs PS and PL 3−6 Festo P.BE−CPX−FB13−E N en 0811c... - Page 103 Error class 1 (minor error): 1 * flash, pause Error class 2 (error): 2 * flash, pause Error class 3 (serious error): 3 * flash, pause Tab. 3/4: Fault diagnostics using the SF LED 3−7 Festo P.BE−CPX−FB13−E N en 0811c...
- Page 104 4402, Tab. A/8 in the LED flashes appendix). The display of the Force function (LED flashes) has priority over the display of the setting for the system start (LED lights). Tab. 3/5: Messages of the LED M 3−8 Festo P.BE−CPX−FB13−E N en 0811c...
-
Page 105: Diagnostics Via Status Bits
FB13: DP slave system diagnosis". Further information can be found here: in the appendix A.3 Access to the CPX terminal via DPV1" in the CPX system manual P.BE−CPX−SYS−... in the chapter Diagnosis and eliminating faults". 3−9 Festo P.BE−CPX−FB13−E N en 0811c... -
Page 106: Diagnosis Via Profibus−Dp
One bit is reserved per module for displaying a diagnosis. Channel−related diagnosis (see section 3.5.5): module number channel number and type type of diagnosis (fault number). Device−related diagnosis Module−related diagnosis Channel−related diagnosis Fig. 3/2: Diagnosis possibilities 3−10 Festo P.BE−CPX−FB13−E N en 0811c... -
Page 107: Diagnosis Steps
The diagnostic information is sent to the master system only if the device−related diagnosis has been activated with the DIL switch. In order to do this, set switch element 8 of the 8−element DIL switch to ON". 3−11 Festo P.BE−CPX−FB13−E N en 0811c... -
Page 108: Overview Of The Diagnostic Bytes
CPX terminal is entered in this byte Ident_number high byte Manufacturer identifier high byte (05 Ident_number low byte Manufacturer identifier low byte (9E Tab. 3/7: Diagnostic bytes 1 6: Standard diagnostic information 3−12 Festo P.BE−CPX−FB13−E N en 0811c... - Page 109 With CPX terminal fixed 47 Module−related diagnosis module 0 Relative module has diagnostic message Module−related diagnosis module 8 Relative module has diagnostic message Reserved Tab. 3/9: Diagnostic bytes 23 29: Module−related diagnosis (details in section 3.5.4) 3−13 Festo P.BE−CPX−FB13−E N en 0811c...
- Page 110 If there are several channel−oriented faults on a module, only the diagnostic message of the channel with the lowest channel number will be entered. A maximum of 11 diagnostic messages can be processed. 3−14 Festo P.BE−CPX−FB13−E N en 0811c...
-
Page 111: Details On Standard Diagnostic Information
1 = CPX terminal does not support the function requested Diag.Invalid_Slave_Response Always 0 (set by the CPX terminal) Diag.Prm_Fault Last parameterisation telegram faulty Diag.Master_Lock Always 0 (set by the CPX terminal) bold = CPX terminal related bits Tab. 3/11: Diagnostic bits station status_1 3−15 Festo P.BE−CPX−FB13−E N en 0811c... - Page 112 Meaning Explanation Reserved Diag.Ext_Diag_Overflow 1 = The CPX terminal has more diagnostic messages than can be buffered or the master receives more diagnostic messages than it can buffer. Tab. 3/13: Diagnostic bits station status_3 3−16 Festo P.BE−CPX−FB13−E N en 0811c...
-
Page 113: Details Of The Module−Related Diagnosis
Bit 7, 6 fixed at 01 Fig. 3/4: Header byte of the module−related diagnosis Module−related diagnosis Module 0 has diagnosis Module 1 has diagnosis Module 7 has diagnosis Fig. 3/5: Module−related diagnosis 3−17 Festo P.BE−CPX−FB13−E N en 0811c... -
Page 114: Details Of The Canal−Related Diagnosis
000 = reserved 100 = 1 byte 001 = 1 bit 101 = 1 word 010 = 2 bits 110 = 2 words 011 = 4 bits 111 = reserved Fig. 3/6: Channel−related diagnostic byte 1 3−18 Festo P.BE−CPX−FB13−E N en 0811c... - Page 115 000 = reserved 100 = 1 byte 001 = 1 bit 101 = 1 word 010 = 2 bits 110 = 2 words 011 = 4 bits 111 = reserved Fig. 3/8: Channel−related diagnostic byte 1 3−19 Festo P.BE−CPX−FB13−E N en 0811c...
- Page 116 Defective CP configuration Reserved Short circuit in the CP string (CP line) Reserved Slave has no bus connection Reserved Channel failed bold = relevant for CPX−FB13 Tab. 3/14: Fault types (byte 3 of the channel−related diagnosis) 3−20 Festo P.BE−CPX−FB13−E N en 0811c...
-
Page 117: Fault Treatment (Fail Safe")
Single−solenoid valves move to the basic position. Double−solenoid valves remain in the current position. Mid−position valves move to the mid−position (depending on valve type: vented, purged or blocked). 3−21 Festo P.BE−CPX−FB13−E N en 0811c... -
Page 118: Siemens Simatic S5/S7
OM is programmed OM86 Reaction to failure of a DP slave default OM is programmed AKD: acknowledgement delay OM: organisation module PEU: periphery unclear Tab. 3/15: Fault reactions STOP and RUN with S5/S7 3−22 Festo P.BE−CPX−FB13−E N en 0811c... - Page 119 When faults occur, output fault code RECORD:=P#M110.0 BYTE 64 Pointer at start of data range for diagnosis and maximum length of the diagnostic data BUSY:=M10.0 Read procedure finished Fig. 3/9: Programming example in STL 3−23 Festo P.BE−CPX−FB13−E N en 0811c...
-
Page 120: Online Diagnosis With Step 7
4. Click on the register Diagnostic Buffer" 4. 5. Click on the event and read the details 5. Here you will find more detailed information on proceding further, depending on the S7 controller used. 3−24 Festo P.BE−CPX−FB13−E N en 0811c... - Page 121 3. Diagnosis Fig. 3/10: Online diagnosis via the diagnostic buffer (explanation see text) 3−25 Festo P.BE−CPX−FB13−E N en 0811c...
-
Page 122: Device−Related Diagnosis With Step 7 (Up To V 5.3)
The dialogue window Module Information" now appears. 3. Select the DP Slave Diagnostics" tab. 4. Read the diagnostic information 2. Fig. 3/11: Device−related diagnosis with STEP 7 (explanation see text) 3−26 Festo P.BE−CPX−FB13−E N en 0811c... - Page 123 Technical appendix Appendix A A−1 Festo P.BE−CPX−FB13−E N en 0811c...
-
Page 124: A. Technical Appendix
Examples for DPV1 access ....... . A−18 A−2 Festo P.BE−CPX−FB13−EN en 0811c... -
Page 125: A.1 Technical Specifications Of Field Bus Node Cpx−Fb13
Protocol PROFIBUS DP Transmission speed 12000 kBaud, automatic baud rate recognition Cable type depends on the cable length and on the set field bus baud rate: see the manual for your controller A−3 Festo P.BE−CPX−FB13−EN en 0811c... -
Page 126: A.2 Start Parameters
CP interface CPI: 4 bytes I/16 bytes O Digital multi−I/O module CPX−8DE−8DA [8DI/8DO] MPA1 pneumatic module MPA1S: VMPA1−FB−EMS−8 [8DO] MPA1 pneumatic module MPA1S: VMPA1−FB−EMS−8 [8DO] Total Tab. A/1: Number of start parameters for example terminal 3 (see Fig. 2/11) A−4 Festo P.BE−CPX−FB13−EN en 0811c... - Page 127 Digital 16−input modules: CPX−16DE, CPX−M−16DE−D Digital 4−way output module: CPX−4DA Digital 8−output modules: CPX−8DA, CPX−8DA−H Digital multi I/O module: CPX−8DE−8DA Tab. A/2: Number of start parameters, part 1: Field bus node, digital input and output modules A−5 Festo P.BE−CPX−FB13−EN en 0811c...
- Page 128 Rev. 20 Soft stop end−position controller CMPX without fail−safe Soft stop end−position controller CMPX with fail−safe Multi−axis interface CPX−CMXX CPX−CP interface see Tab. A/5 CPX−CP−4−FB Tab. A/4: Number of start parameters, part 3: Technology modules A−6 Festo P.BE−CPX−FB13−EN en 0811c...
- Page 129 0I/8O 0I/12O 0I/16O 4I/0O 4I/4O 4I/8O 4I/12O 4I/16O 8I/0O 8I/4O 8I/8O 8I/12O 8I/16O 12I/0O 12I/4O 12I/8O 12I/12O 12I/16O 16I/0O 16I/4O 16I/8O 16I/12O 16I/16O Tab. A/5: Number of start parameters, part 4: Technology module CPX−CP interface A−7 Festo P.BE−CPX−FB13−EN en 0811c...
- Page 130 MPAP pressure sensor module VMPA−FB−PS−... VPPM proportional pressure−regulating valve (type 32) VPPM−6TA−L−1−F... Setting with DIL switch in the pneumatic interface Type of MPA electronic module used Tab. A/6: Number of start parameters, part 5: Pneumatics A−8 Festo P.BE−CPX−FB13−EN en 0811c...
-
Page 131: A.3 Access To The Cpx Terminal Via Dpv1
DP_WRREC DPV1 compatibility S7 compatible" S7 compatible" Standard" IEC 61131−3 EN 50170 Parameterisation of the field bus node as in the following section Tab. A/7: Overview of function modules for reading and writing data records A−9 Festo P.BE−CPX−FB13−EN en 0811c... - Page 132 2. Select the Parameter Assignment" tab and modify the value of the DPV1 Services" to S7 compatible" (see following diagram). 3. Confirm with OK. Fig. A/1: Setting the compatibility for accessing the DPV1 A−10 Festo P.BE−CPX−FB13−EN en 0811c...
- Page 133 Pointer at start of data range for diagnosis and length of diagnostic data RET_VAL :=MW102 If faults occur, output fault code BUSY :=M10.1 Writing in process Fig. A/3: Example program for transmitting the diagnostic memory status A−11 Festo P.BE−CPX−FB13−EN en 0811c...
- Page 134 STATUS :=MD206 Access identifier or fault code RECORD :=P#M230.0 BYTE 10 Source range for the data record and max. data record length to be written Fig. A/5: Example program for transmitting the diagnostic memory status A−12 Festo P.BE−CPX−FB13−EN en 0811c...
- Page 135 Compliant with the standard For standard−conform access to the data records, set the DPV1 compatibility to Standard" (see above under Setting the DPV1 compatibility"). Use function module DP_RDREC for reading and DP_WRREC for writing data. A−13 Festo P.BE−CPX−FB13−EN en 0811c...
-
Page 136: A.3.2 Data Records
The following tables show the relationship between access to parameters and data via DPV1 and via the function numbers. Further information on the function numbers can be found in the Appendix to the CPX system manual P.BE−CPX−SYS−... A−14 Festo P.BE−CPX−FB13−EN en 0811c... - Page 137 Diagnosis memory 3488 3497 Entry 0 Diagnosis memory 3498 . 3507 Entry 1 Diagnosis memory Entry ... Diagnosis memory 3878 3887 Entry 39 Delete diagnosis memory Siemens S7 Tab. A/8: Slot 1: System parameters A−15 Festo P.BE−CPX−FB13−EN en 0811c...
- Page 138 Read Box and the Write Box. Slot 3: Indexed addressing of the objects Index Name Length Access Data Function no. [byte] record number Command box Read Box Write Box Siemens S7 Tab. A/10: Slot 3: Indexed addressing of the objects A−16 Festo P.BE−CPX−FB13−EN en 0811c...
- Page 139 Module fault state Module force: outputs Module force: outputs Module force: inputs Module force: inputs m = module number (counting from left to right, beginning with 0) Siemens S7 Tab. A/11: Module data and parameters A−17 Festo P.BE−CPX−FB13−EN en 0811c...
-
Page 140: A.3.3 Examples For Dpv1 Access
In the following, entry 0 of the diagnosis memory will be read out indirectly via the command box. 1. Assign the command box as follows: Byte Contents Slot no. Index no. Offset Example 2. Read out the diagnostic memory with the Read Box. A−18 Festo P.BE−CPX−FB13−EN en 0811c... - Page 141 3 of the module through forcing. See also CPX system manual Tab. B/21 Module parameter: Forcing channel x". Basics of forcing can be found in the CPX system manual in appendix C General principles for parameterisation" in the Forcing" section. A−19 Festo P.BE−CPX−FB13−EN en 0811c...
- Page 142 A. Technical appendix A−20 Festo P.BE−CPX−FB13−EN en 0811c...
- Page 143 General DP master Appendix B B−1 Festo P.BE−CPX−FB13−E N en 0811c...
-
Page 144: B. General Dp Master
......B−16 B.1.8 Transmission times on the PROFIBUS−DP ....B−16 B−2 Festo P.BE−CPX−FB13−EN en 0811c... -
Page 145: B.1 Operation With The General Dp Master
B. General DP master Operation with the general DP master The Festo CPX terminal can be controlled from any PLC, PC or industrial PC with a PROFIBUS−DP module in accordance with EN 50170. Further information Read the information on the following themes in the appropriate sections: GSD: section 2.1.3... - Page 146 PROFIBUS master to the field bus node. An exchange of individual CPX modules is therefore possible without the need for manual parameterisation. B−4 Festo P.BE−CPX−FB13−EN en 0811c...
-
Page 147: B.1.2 Send Parameterisation Data
Bit 6 Explanation Lock_Req min T + slave parameters may be overwritten CPX terminal released for other masters CPX terminal blocked for other masters CPX terminal released for other masters Tab. B/1: Octet 1: Station status B−5 Festo P.BE−CPX−FB13−EN en 0811c... - Page 148 Not supported by the CPX terminal User_Prm_Data Information on the slave−specific parameters can be found in section 2.2 and the CPX system manual P.BE−CPX−SYS−... as well as in the manual for the I/O modules P.BE−CPX−EA−... Tab. B/2: Octets 2 B−6 Festo P.BE−CPX−FB13−EN en 0811c...
-
Page 149: B.1.3 Check The Configuration Data
Analogue input and output modules: Tab. 2/3 Technology modules Tab. 2/4 CPX−FB13 as remote controller Tab. 2/5 MPA pneumatics Tab. 2/6 MPA pneumatic module with diagnosis function D2: Tab. 2/7 Pneumatic interfaces and other pneumatics: Tab. 2/8 and Tab. 2/9 B−7 Festo P.BE−CPX−FB13−EN en 0811c... - Page 150 (VI: CPX type 12: 1−16VS) correspond to the pneumatic equipment fitted Tab. B/3: Example of the configuration of a CPX terminal (see Fig. 2/3) with different modules and MPA pneumatics B−8 Festo P.BE−CPX−FB13−EN en 0811c...
- Page 151 As no output module with groupable identifier is used in the subsequent locations, 8 bits are assigned here, but only 4 are used. Tab. B/4: Example of the configuration of a CPX terminal (see Fig. 2/2) with different modules and MPA pneumatics B−9 Festo P.BE−CPX−FB13−EN en 0811c...
-
Page 152: B.1.4 Transferring Input And Output Data
Note With the function Data_Exchange, the CPX terminal expects the output information for the valves and electric outputs. The input data are sent to the master as a reply telegram. B−10 Festo P.BE−CPX−FB13−EN en 0811c... - Page 153 Bit 7: Output s.7 Only the first 4 bits in this byte are used. x, y, z, s, t = address offset of master module Tab. B/5: Cyclical data exchange for example terminal 1 (see Fig. 2/9) B−11 Festo P.BE−CPX−FB13−EN en 0811c...
- Page 154 Bit 7: Output (y+12).7 Only the first 4 bits in this byte are used. x, y, u, v = address offset of master module Tab. B/6: Cyclical data exchange for example terminal 3 (see Fig. 2/11) part 1 B−12 Festo P.BE−CPX−FB13−EN en 0811c...
- Page 155 Octet 20: O−data byte_19 (MPA1 pneumatic module, mod. no. 6, 8DO) Bit 0: Output t.0 Bit 7: Output t.7 x, y, z, ... = address offset Tab. B/7: Cyclic data exchange for example terminal 3 part 2 B−13 Festo P.BE−CPX−FB13−EN en 0811c...
-
Page 156: B.1.5 Read Diagnostic Information
With the function Set_Prm you can determine the watchdog time (WD_Fact_1, Octet 2, WD_Fact_2, Octet 3). The reaction of the CPX terminal in the event of a fault (e. g. a bus failure) depends on the parameterisation (see section 3.6.) B−14 Festo P.BE−CPX−FB13−EN en 0811c... -
Page 157: B.1.6 Implemented Functions And Service Access Points (Sap)
You can access the DPV1 services with the following functions: MSAC_C1: For masters of class 1 (e.g. PLC), fixed service access points. MSAC_C2: For masters of class 2 (e.g. PC/PG), dynamic use, service access points are specified when connections are set up. B−15 Festo P.BE−CPX−FB13−EN en 0811c... -
Page 158: B.1.7 Bus Parameters/Reaction Times
The delay time within the CPX terminal is very brief. It is con siderably less than 1 ms, irrespective of the equipment fitted on your CPX terminal. Please refer to the manual for your controller for ascertaining the total time required for transmission. B−16 Festo P.BE−CPX−FB13−EN en 0811c... - Page 159 Index Appendix C C−1 Festo P.BE−CPX−FB13−E N en 0811c...
-
Page 160: C. Index
............C−1 C−2 Festo P.BE−CPX−FB13−EN en 0811c... - Page 161 ........1−9, 2−37 Cyclic exchange of data ......B−10 C−3 Festo P.BE−CPX−FB13−EN en 0811c...
- Page 162 ......A−18 Examples of addressing ......2−31 C−4 Festo P.BE−CPX−FB13−EN en 0811c...
- Page 163 ........2−56, 3−4 C−5 Festo P.BE−CPX−FB13−EN en 0811c...
- Page 164 ....... . . B−16 Remote controller ......1−9, 2−37 C−6 Festo P.BE−CPX−FB13−EN en 0811c...
- Page 165 System supply ....... . . 1−26 C−7 Festo P.BE−CPX−FB13−EN en 0811c...
- Page 166 Work data ....... . B−11, B−12 C−8 Festo P.BE−CPX−FB13−EN en 0811c...
Need help?
Do you have a question about the CPX-FB13 and is the answer not in the manual?
Questions and answers