
Related Manuals for Clarke CSS400C


Summary of Contents for Clarke CSS400C
- Page 1 VARIABLE SPEED SCROLL SAW MODEL NO: CSS400C PART NO: 6462152 OPERATION & MAINTENANCE INSTRUCTIONS LS0911...
-
Page 2: Environmental Protection
INTRODUCTION Thank you for purchasing this CLARKE Variable Speed Scroll Saw. Before attempting to use this product, please read this manual thoroughly and follow the instructions carefully. In doing so you will ensure the safety of yourself and that of others around you, and you can look forward to your purchase giving you long and satisfactory service. -
Page 3: General Safety Instructions
GENERAL SAFETY INSTRUCTIONS 1) WORK AREA Keep the work area clean and well lit. Cluttered and dark areas invite accidents. Do not operate power tools in explosive atmospheres, such as in the presence of flammable liquids, gases or dust. Power tools create sparks which may ignite the dust or fumes. - Page 4 4) POWER TOOL USE AND CARE Do not force the power tool. Use the correct power tool for your application. The correct power tool will do the job better and safer at the rate which it was designed. Do not use the power tool if the switch does not turn it on and off. Any power tool that cannot be controlled with the switch is dangerous and must be repaired.
-
Page 5: Scroll Saw Safety Instructions
18. Be sure to use the correct blade size and type. 19. Use ONLY approved replacement saw blades. Contact your local CLARKE dealer for advice. The use of inferior blades may increase the risk of injury. -
Page 6: Electrical Connections
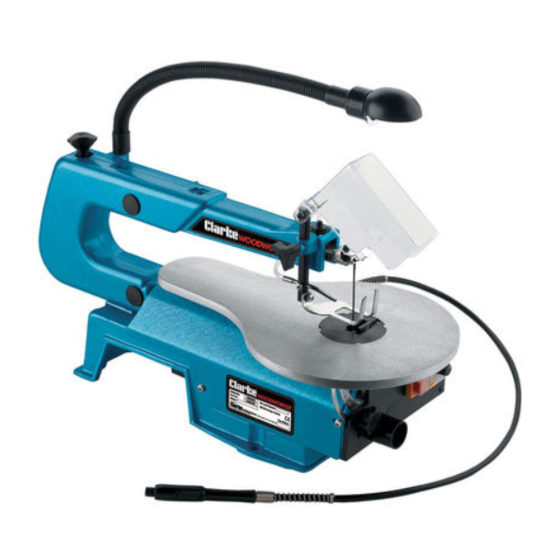
ELECTRICAL CONNECTIONS WARNING! Read these electrical safety instructions thoroughly before connecting the product to the mains supply. Before switching the product on, make sure that the voltage of your electricity supply is the same as that indicated on the rating plate. This product is designed to operate on 230VAC 50Hz. - Page 7 OVERVIEW DESCRIPTION DESCRIPTION Adjustable lamp On/Off switch Blade guard Dust extraction outlet Top blade holder Table tilt lock knob Workpiece pressure plate Angle adjustment scale Sawdust blower nozzle Flexible shaft Blade Saw table Table insert Blade tension knob Blade speed regulator Hose (sawdust blower)
-
Page 8: Mounting The Scroll Saw
13 mm (maximum) is fixed between the workbench and scroll saw to help minimise vibrations and noise. This mat is not supplied. • Suitable rubber matting of various thicknesses is available from your Clarke dealer. NOTE: Do not over-tighten the screws. Leave enough give for the rubber mat to absorb any vibration. -
Page 9: Before Use
BEFORE USE CHOOSING THE RIGHT BLADE NOTE: As a rule, select narrow blades for intricate curve cutting and wide blades for straight and large curve cutting. Scroll saw blades wear out and must be replaced frequently for optimum cutting results. Scroll saw blades generally become dull after 1/2 hour to 2 hours of cutting, depending on the type of material and speed of operation. -
Page 10: Blade Tension
3. Place the blade and adaptors into the gauge on top of the machine to set the blade to the proper length. CUTTING AT RIGHT ANGLES TO THE UPPER ARM WHEN USING PINLESS BLADES • Cutting from the side of the saw will be necessary when your workpiece exceeds 405mm in length. -
Page 11: Installing Blades
3. Turn the blade tension knob anticlockwise to remove the tension from the saw blade. 4. The following replacement blades are available from your Clarke Dealer, 15TPI (Part No: AWNCSS400C035A) 18TPI (Part No AWNCSS400C035B) 5. Press down the upper arm and hook the blade to the blade holder. -
Page 12: Removing Blades
REMOVING BLADES 1. Turn off the saw and unplug it from the power source. 2. Remove the table insert. 3. Turn the blade tension knob anticlockwise to remove the tension from the saw blade. 4. Press down on the top blade holder and remove the blade. -
Page 13: Squaring The Saw Table To The Blade
SQUARING THE SAW TABLE TO THE BLADE WARNING: TO AVOID ACCIDENTAL STARTING WHICH COULD RESULT IN SERIOUS INJURY, TURN THE SAW OFF, AND UNPLUG THE SAW FROM THE POWER SOURCE. 1. Loosen the pressure plate adjustment knob. 2. Raise the pressure plate and lock it in the raised position. -
Page 14: On/Off Switch
The arm can bend to set the light in a suitable position. CHANGING THE LIGHT BULB Remove the bulb by twisting it anticlockwise. • Replace with an identical bulb available from the Clarke Parts Department, part number AWNCSS400C026. SAWDUST BLOWER... -
Page 15: Operation
OPERATION Before starting a cut, turn the saw on and listen to the sound it makes. If you notice excessive vibration or an unusual noise, stop the saw immediately and unplug it. Do not restart the saw until you have corrected the problem. •... -
Page 16: Stack Cutting
STACK CUTTING Stack cutting may be used when several identical shapes need to be cut. Several workpieces may be stacked one on top of the other and secured to each other before cutting. Pieces of wood may be joined together by placing double sided tape between each piece or by wrapping tape around the corners or ends of the stacked wood. -
Page 17: Flexible Drive
FLEXIBLE DRIVE INSTALLING THE FLEXIBLE DRIVE SHAFT 1. Disconnect from mains supply and ensure machine is switched off. 2. Remove the cover from flexible shaft drive aperture. 3. Insert the flexible drive shaft into the aperture and tighten fully. CAUTION: ALWAYS DISCONNECT THE FLEXIBLE DRIVE SHAFT AND ANY ACCESSORY ATTACHED TO IT AFTER USE. -
Page 18: Operating The Flexible Shaft
OPERATING THE FLEXIBLE SHAFT WARNING: TO AVOID RISK OF INJURY PLEASE ENSURE THE BLADE GUARD IS ASSEMBLED AND POSITIONED OVER THE SAW BLADE WHEN USING THE FLEXIBLE SHAFT. • Always allow the tool to operate as it was designed. Never force the flexible shaft. -
Page 19: General Maintenance
MAINTENANCE WARNING: TURN OFF AND UNPLUG THE SAW BEFORE CARRYING OUT ANY MAINTENANCE WORK ON YOUR SCROLL SAW. GENERAL MAINTENANCE • Keep your scroll saw clean. • Do not allow pitch to accumulate on the saw table. Clean it with gum and pitch remover. -
Page 20: Replace Carbon Brushes
4. Make sure the brush cap is positioned correctly (straight). Tighten the carbon brush cap using a hand screwdriver only. Do not overtighten. REPLACING THE FLEXIBLE SHAFT DRIVE BELT • Replacement belts are available from your Clarke dealer Part number AWNCSS400C095 1. Remove the 3 screws securing the belt cover. -
Page 21: Specifications
Weight 12.5 kg PARTS AND SERVICING All servicing and repairs should be carried out by your nearest Clarke dealer. For Parts & Servicing, please contact your nearest dealer, or CLARKE International, on one of the following numbers. PARTS & SERVICE TEL: 020 8988 7400 PARTS &... -
Page 22: Declaration Of Conformity
DECLARATION OF CONFORMITY... - Page 23 NOTES...
Need help?
Do you have a question about the CSS400C and is the answer not in the manual?
Questions and answers