
Related Manuals for Chuango H4 PLUS


Summary of Contents for Chuango H4 PLUS
- Page 1 H4 PLUS GSM/WiFi Smart Home System User Manual Printed in China PA: H4 Plus-UM-EN-V1.0 © 2017 Chuango. All Rights Reserved.
-
Page 2: Table Of Contents
System Statuses ----------------------------------------------------------------------------------19 Quick Switch between Alarm and Cameras ------------------------------------------------------20 Thank you for choosing this alarm system. The H4 Plus is a self-monitored system History --------------------------------------------------------------------------------------------20 designed to actively involve users in their home security. We aim to provide a safe, Settings ----------------------------------------------------------------------------------------21~29 easy &... -
Page 3: Things To Note Before Getting Started
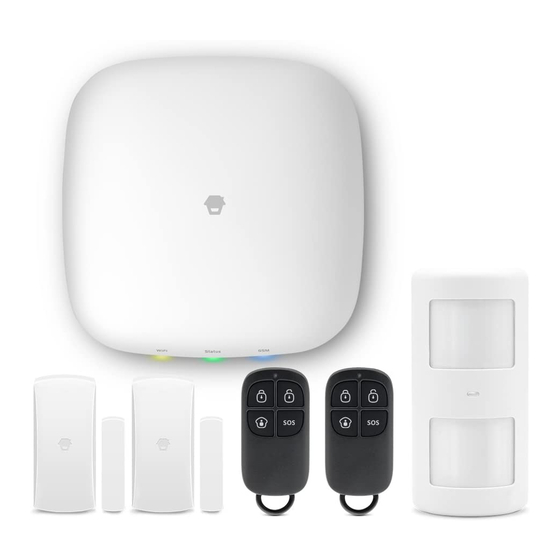
Things to Note before Getting Started In the Box WiFi Network Connection - One critical factor affecting the performance of your hub is the relative position/ distance of your home WiFi router and the hub. Place your hub in an open area (DO NOT place it directly on the floor);... -
Page 4: How The Alarm System Works
How the Alarm System Works Getting to Know Your System This is a dual network system that utilizes both WiFi and GRPS. When the WiFi is in use, the GRPS network will be in standby status (make sure the GPRS function is activated from “Settings“- ”My Hub“-”GPRS“) ,In the event of AC power loss or WiFi disconnection, the GRPS network will be implemented until power or WiFi connection The Hub receives the... -
Page 5: Hub
Description of Indicator Light Indicator Light Status Meaning Blinking Searching for WiFi network WiFi Indicator Booting up after power on or WiFi network is Light Yellow connected White Powered on Hub is in low battery condition. Please Blinking White connect with AC power. WiFi SOS Button Indicator... -
Page 6: Remote Control
Remote Control Door / Window Sensor Door/window sensors are set to ‘Normal Zone’ by default and are ideal for protecting LED Indicator entry/exit points, such as front/back doors and all windows. When the system is armed and a sensor is triggered (magnet separated from the transmitter), a push notification including the sensor name will automatically be sent to the registered users, and the Arm Button Disarm Button... -
Page 7: Pet-Immune Pir Motion Detector
Pet-immune PIR Motion Detector Pet Immune Function This sensor adopts dual detection window design to improve detection accuracy. It The motion detector is designed for use on interior walls and is set to Home Mode was only when both detection windows detect body movement will it trigger an alarm. by default. -
Page 8: Getting Started
1. WiFi Connection Note: H4 Plus does not support the 5GHz WiFi band. If you have a dual-band router (5GHz and 2.4GHz) and both the 2.4GHz and 5.0GHz networks are under the same name, you will need to Downloading App separate those two bands into different names in your router settings. - Page 9 3. Connect the hub to your smartphone How to Change WiFi? Tap “Next” and select “Home Cloud System” from the WiFi list on your smartphone. Tap on [Settings]-[Others]-[Network Configuration]-[Change WiFi], select the WiFi name and then enter the password. The WiFi indicator will stop blinking when the Note: “Home Cloud System”...
-
Page 10: Account Management
HomeCloud System Account Management For the second scenario, Select [I don’t have WiFi] when pairing the hub. The app will require you to scan the UID code at the back side of the hub. Editing Your Account Tap on [ ] on the main page to access the account management. -
Page 11: My Shares
My Shares User (Read Only) The users who receive the shared device(s) can recevice notifications and check history Sharing device(s) with family or friends. during pre-set time period; change their own personal profile; cannot change settings and re-share device(s) to others. (1) By week days Select the day(s) and each day’s routine you want the device(s) to be accessible to the account you share with. -
Page 12: System Statuses
System Statuses Quick Switch between Alarm and Cameras If you purchased an alarm system & camera kit or any extra camera that has been System Armed purchased along with it, you can connect the camera to your home WiFi by the In this mode, all of the sensors are on alert;... -
Page 13: Settings
Settings on how to set the APN correctly. Tampering Alarm My Hub The tamper switch (small black lever underneath the back cover) will trigger an alarm notification if an attempt is made to remove the Hub from its installed location. Device Name Tamper Switch This setting enables you to rename your hub, and the new name will be shown on the... -
Page 14: Accessory Settings
Notifications Accessory Settings (1) You can select an alarm tone and set up email alerts on this page. Add, delete, rename and change the zone mode of each sensor. (2) Store phone numbers for SMS texts and phone calls Pairing New Accessories The stored phone numbers (up to 5 numbers) will receive SMS and phone calls in case of triggered alarms. -
Page 15: Wireless Siren (Sold Separately)
Deleting Accessories Wireless Siren (sold separately) Pairing New Wireless Siren 1. Siren enters pairing mode (refer to its user manual) 2. Tap the arm icon on the hub’s app Arm / Disarm Beep Slide from right to left to delete an accessory. Accessory Zone Tap on the “zone mode”... -
Page 16: Auto Arm / Disarm
Auto Arm / Disarm Exit Delay Setting Set a time delay and turn on/off a reminder tone. During the delay you can exit your property without triggering an alarm. Entry Delay Setting You can install a door contact on your entrance door and change its zone mode to Delay Zone, and then set a time delay. -
Page 17: Others
Remote Phone Operation Others The hub will send SMS messages and will call any stored numbers. Users who receive a phone call have the ability to use two-way talk and operate the hub by using their phones keypad. Note: Phone numbers which have not been authorized by the hub are unable to control the system. -
Page 18: Installation
Installation Door/Window Sensor Test your sensors before installing. Step 1: Choose a suitable location The sensor can be installed on doors, windows and other objects which can be For the best signal, we recommend that you place the hub in an open, centrally opened and closed. -
Page 19: Pir Motion Detector
PIR Motion Detector Step 3: To test the detector press the test button on the back. It will enter and remain in testing mode (detect once every 10 seconds) for 3 minutes. Walk into Avoid installing the motion detector facing windows, near air conditioning, heating, the view of the detector and look for a red light. -
Page 20: Specifications
Specifications Door/ Window Sensor Power Supply DC 1.5V (1.5V AA LR6 Battery x 1pc) Static Current <35uA Alarm Current <40mA Power Supply DC 12V 500mA Transmitting Distance <80m (Open Area/No Interference) Battery 3.7V 2600mAh 18650 Rechargeable Radio Frequency 433.92MHz (EAN Code 8718868020215) Lithium Battery Housing Material ABS Plastic...
Need help?
Do you have a question about the H4 PLUS and is the answer not in the manual?
Questions and answers