Table of Contents
Advertisement
Quick Links
(C)
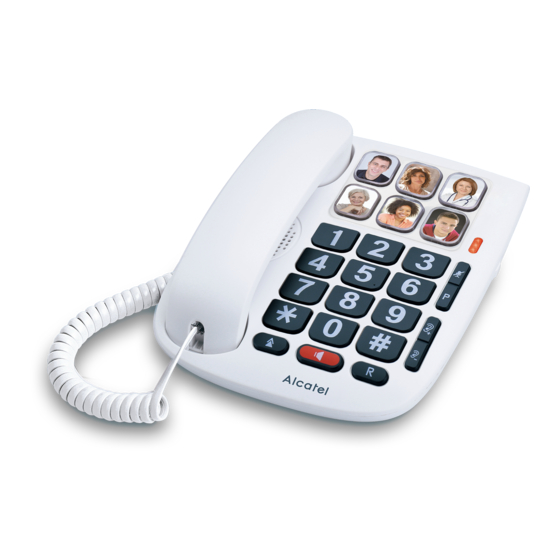
ALCATEL TMAX 10
Prise cordon spiralé
INSTALLATION MURALE
- Détachez le pied.
- Retournez la petite pièce en plastique striée située sur
la base.
- Percez deux trous de 6 mm espacés de 100 mm.
- Insérez des chevilles puis visser des vis à bois (3.5 mm
de diamètre et 30 mm de long).
- Fixez la base sur les 2 vis en la tirant vers le bas.
INSERER UNE PHOTO SUR UNE TOUCHE
RACCOURCI
USER'S GUIDE
- Levez le couvercle de la touche.
- Découpez votre photo afin qu'elle ait la bonne taille.
- Posez la photo sur la touche et refermez le couvercle.
NOTE : La taille idéale de photo est indiquée pour votre
référence à la fin de ce manuel.
TOUCHES DE LA BASE
1: 6 touches de mémoires directes
2: Voyant Secret (micro off) / Sonnerie (appel entrant)
3: Commutateur vol. sonnerie
4: Touche Secret (micro off)
5: Bouton de pause
1
6: Augmentation du volume combine ou mains libres
7: Diminution du volume combine ou mains libres
2
8: Touche Flash
3
4
9: Touche mains libres
5
10: Touche BIS
6
UTILISATION DE VOTRE TÉLÉPHONE
7
APPELER / RAPPELER UN NUMERO
10
8
- Décrochez le combiné ou appuyez sur la touche
- Entrez le numéro à l'aide du clavier ou de l'une des six
9
touches de mémoires directes (voir paragraphe
ENREGISTRER UN NUMERO pour apprendre comment
associer les touches à un numéro particulier).
A la fin de l'appel :
PREMIÈRE INSTALLATION
- Reposez le combiné sur la base ou appuyez sur la
Installation de votre téléphone:
touche
- Connecter le combiné au téléphone.
- Raccorder le téléphone à la ligne téléphonique.
RAPPELER UN DES DERNIERS NUMÉROS
COMPOSÉS
INSTALLATION DU TÉLÉPHONE:
- Décrochez le combiné ou appuyez sur la touche
Votre téléphone doit être placé sur une surface
- Appuyez sur la touche
plane pour plus de stabilité
REPONDRE A UN APPEL
- Connectez le cordon spiralé au combiné (A) et à la prise
située sur le côté gauche du téléphone (B).
- Pour répondre, décrochez le combiné ou appuyez sur la
- Connectez le cordon téléphonique à la prise droite située
touche
- Pour raccrocher, reposez le combiné sur la base ou
à l'arrière du poste et à la prise murale (C).
- Position sur table : le pied doit toujours être installé (D).
appuyez sur la touche
(A)
VOLUME DU COMBINE ET DU MAINS-LIBRES
- Appuyez sur
pour augmenter le volume.
(D)
- Appuyez sur
pour diminuer le volume.
- 4 niveaux de volume peuvent être sélectionnés.
ENREGISTRER UN NUMERO
(B)
- Décrochez le combiné.
- Choisissez l'une des touches mémoires directes (vous
pouvez changer la photo) et appuyez sur la touche
pendant au moins 5 secondes.
- Entrez le numéro à l'aide du clavier.
- Appuyez une nouvelle fois sur la même touche de
mémoire directe.
Votre numéro est enregistré.
TEMPS DE FLASH
Pour la France, le temps de flash requis est de 300ms par
default. Aucune modification n'est nécessaire dans les
83mm
paramètres pour la France. Si une modification doit être
100mm
effectuée :
Position horizontale
Position murale
-
/ *#*100 /
-
/ *#*300 /
-
/ *#*600 /
-
/ *#*1000 /
SECURITE
Ne pas utiliser votre téléphone pour signaler une fuite de
gaz ou une explosion.
Ne tentez pas d'ouvrir votre téléphone pour éviter tout
choc électrique.
Votre poste téléphonique doit être installé dans un endroit
sec, à l'abri de la chaleur, de l'humidité et des rayons
directs du soleil.
ENVIRONNEMENT
Ce symbole signifie que votre appareil électronique
hors d'usage doit être collecté séparément et non
jeté avec les déchets ménagers.
Aidez-nous à préserver l'environnement dans lequel
nous vivons !
CONFORMITE
Le logo imprimé sur l'appareil atteste que ce dernier est
.
conforme aux exigences essentielles et à toutes les
directives pertinentes. Vous pouvez consulter cette
déclaration de conformité sur notre site Web:
www.alcatel-home.com
Le logo et le nom Alcatel sont des marques enregistrées
d'Alcatel-Lucent et sont utilisées sous licence par Atlinks.
.
ENGLISH
BEFORE 1st USE
Connecting your phone:
- Connect the handset.
.
.
- Plug the telephone line into telephone socket.
INSTALLING THE PHONE:
Your phone should be placed on a level surface
.
- Plug one end of the spiral cord into the handset at (A),
and the other end into the socket on the left side of
.
the phone (B).
- Plug the telephone cord into the socket at the bottom
of the set and into the wall socket (C).
- For desktop position, always install the foot stand (D).
(A)
(C)
Spiral cord socket
(B)
WALL MOUNTING
- Remove the foot stand.
- Turn over the wall mounting peg (small grooved plastic
part) on the base.
- Drill two 6 mm holes 100 mm apart.
- Fit two wall plugs and screw in wood screws (3.5 mm
in diameter and 30 mm long).
- Mount the base on the 2 screws by pulling it downwards.
= 100ms
83mm
= 300ms
100mm
= 600ms
Horizontal position
= 1000ms
INSTALL PICTURES ON THE MEMORY BUTTONS
- Open the cap of the button.
- Cut the picture with the shape provided.
- Insert the picture and put back the button cap.
Note: The shape of the photo can be found at the end of
this user guide.
BASE STATION KEYS:
1: 6 direct memory keys (number only)
2: Indicator: Mute on (microphone off)/ Ringer
(incoming call)
3: Ringer volume switch
4: Mute key ( microphone off)
5: Pause key
6: Handsfree or Handset volume increase
7: Handsfree or handset volume decrease
8: Flash Key
9: Hands free key
10: Last number redial key
USING THE PHONE
MAKE A CALL/ REDIAL
- Pick-up the handset or press
- Dial the number or press one of the 6 number keys (with
picture).
See how to register in paragraph "Store number".
At the end of the communication:
- Replace the handset on its base or press
handsfree mode).
DIAL BACK AN OUTGOING NUMBER
- Pick-up handset or press
key.
- Press
key.
ANSWERING A CALL
- To answer: pick-up the handset or press
(handsfree mode).
- To end a call:
Replace the handset on its base or press
HANDSET AND SPEAKER VOLUME LEVEL
ADJUSTMENT
(D)
- Press
to increase the volume level.
- Press
to decrease the volume level.
- 4 levels selectable.
STORE NUMBER (6 keys with picture)
- Pick-up handset.
- Choose one key (with picture) and make a long press
on it (at least 5 seconds).
- Enter the number by using keypad.
- Press again the same key.
The number is registered.
FLASH TIME
For France, flash time value is 300ms by default (no
change needed).
If change is needed:
-
/ *#*100 /
= 100ms
-
/ *#*300 /
= 300ms
Wall mounted position
-
/ *#*600 /
= 600ms
-
/ *#*1000 /
= 1000ms
SAFETY
Do not use your telephone to notify a gas leak or other
potential explosion hazard.
Do not open your device to avoid risk of electrical shock.
Your telephone must be located in a dry place away
from hot, humid and direct sunlight condition.
ENVIRONMENT
This symbol means that your inoperative
appliance must be collected separately and not
mixed with the household waste.
Help us to protect the environment in which we live!
CONFORMITY
The logo printed on the products indicates the conformity
with all essential requirements and all applicable
directives. You can download the Declaration of Conformity
from our website www.alcatel-home.com
Alcatel Logo and Alcatel name are trademarks of Alcatel-
Lucent and used under license by Atlinks.
key (handsfree mode),
ESPAÑOL
LEA ESTAS INDICACIONES ANTES DE
USAR SU TELÉFONO
key (exit
Conexión del teléfono:
- Conecte el auricular.
- Conecte el cable de la línea telefónica en la toma
telefónica.
INSTALACIÓN DEL TELÉFONO:
Debe colocar su teléfono sobre una superficie
key
nivelada
- Conecte el cable en espiral al microteléfono (A) y al
key.
conector situado en el lado izquierdo del teléfono (B).
- Conecte el cable telefónico a la toma situada en la parte
inferior del teléfono y a la toma mural (C).
- Posición de sobremesa: el pie debe estar siempre
instalado (D).
(A)
(C)
(D)
Toma del cable en espiral
(B)
COLOCACIÓN MURAL
- Desmonte el pie.
- Invierta la lengüeta de montaje mural (pequeña pieza
de plástico estriado) ubicada en la base.
- Perfore dos orificios de 6 mm a una distancia de 100 mm.
- Coloque dos tacos y luego atornille tornillos para madera
(3.5 mm de diámetro y 30 mm de largo).
- Monte la base en los 2 tornillos deslizándola hacia abajo.
83mm
100mm
Posición de sobre mesa
Posición mural
CÓMO COLOCAR FOTOS EN LAS TECLAS DE
MARCACIÓN DIRECTA
- Retire la tapa transparente de la tecla elegida.
- Recorte una foto con la forma adecuada.
- Coloque la foto recortada en la tecla y vuelva a poner la
tapa transparente.
Nota: Al final de esta guía puede encontrar una plantilla
con la forma y tamaño adecuados para recortar sus
fotografías.
TECLAS
1: 6 teclas de marcación directa (sólo números) con
espacio para fotografías
2: Indicador luminoso: Secreto activado (micrófono
silenciado)/ Timbre (llamada entrante)
3: Selector de volumen de timbre
4: Tecla secreto (Silenciarmicrófono)
5: Tecla Pausa
6: Aumentar volumen del microteléfono o altavoz
7: Reducir el volumen del microteléfono o altavoz
8: Tecla R
9: Tecla Manos Libres
10: Tecla Rellamada
21mm
Advertisement
Table of Contents

Related Manuals for Alcatel TMAX 10


Summary of Contents for Alcatel TMAX 10
- Page 1 Lucent and used under license by Atlinks. ENREGISTRER UN NUMERO pour apprendre comment 9: Tecla Manos Libres associer les touches à un numéro particulier). Le logo et le nom Alcatel sont des marques enregistrées - Pick-up the handset or press key (handsfree mode), 10: Tecla Rellamada d'Alcatel-Lucent et sont utilisées sous licence par Atlinks.
- Page 2 7: Diminuzione volume Vivavoce o Portatile - Para responder: descuelgue o bien pulse la tecla INSTALAÇÃO: O logotipo e o nome de Alcatel são marcas registadas de Questo simbolo significa che il vostro apparecchio (sair do modo mãos-livres). 8: Tasto Flash...
Need help?
Do you have a question about the TMAX 10 and is the answer not in the manual?
Questions and answers